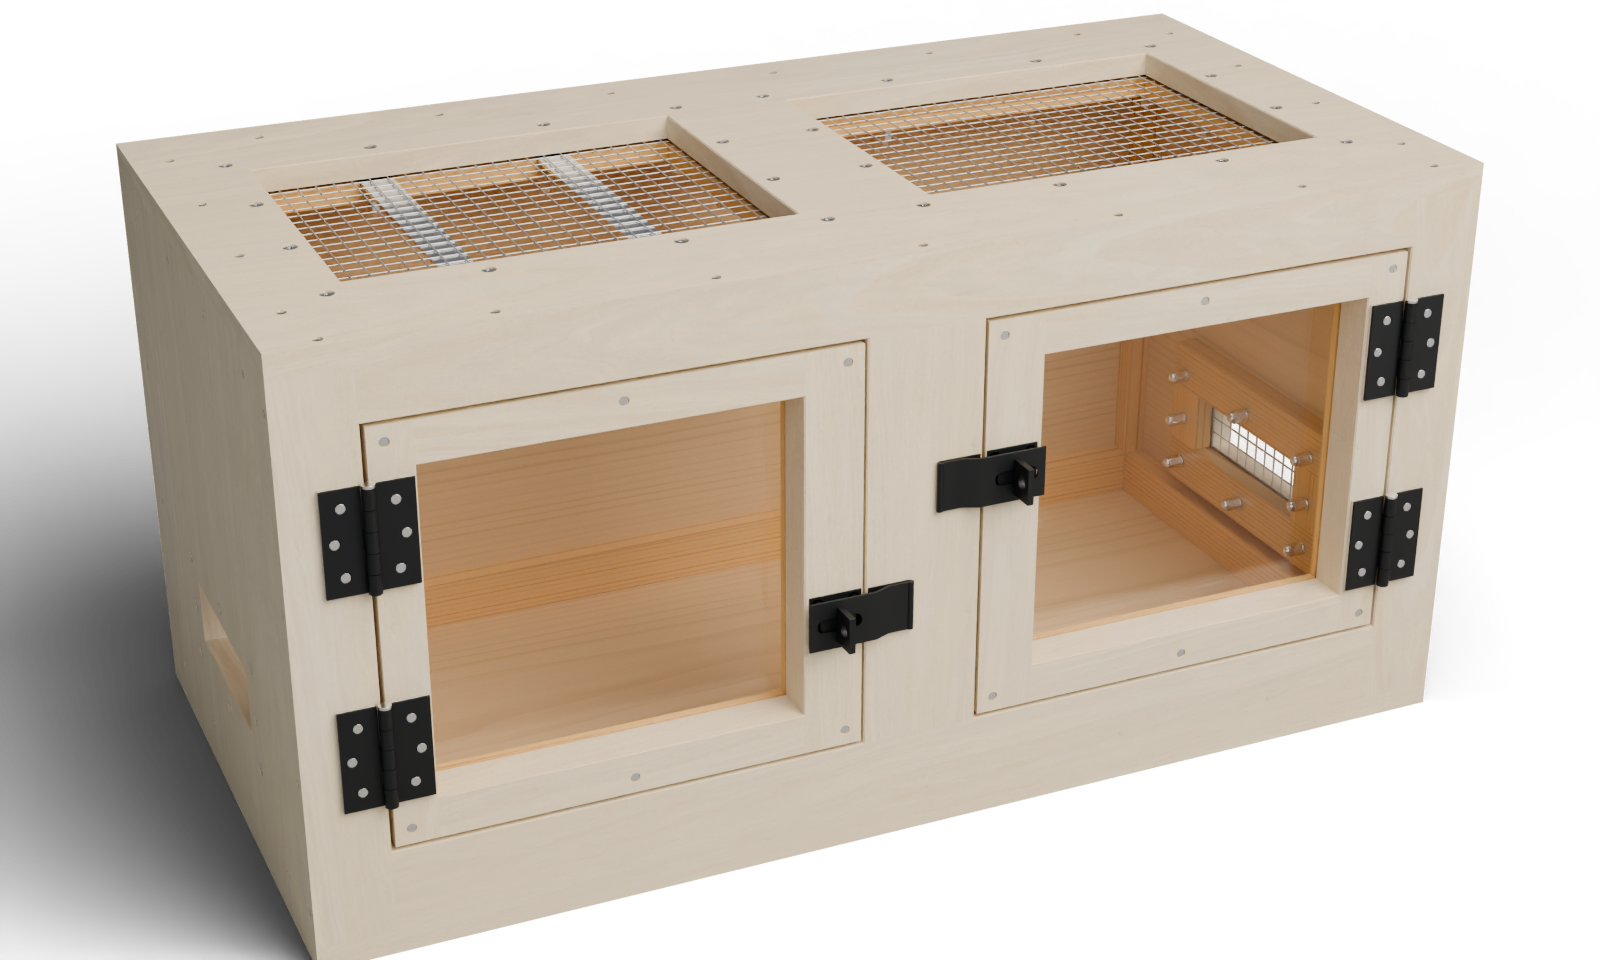
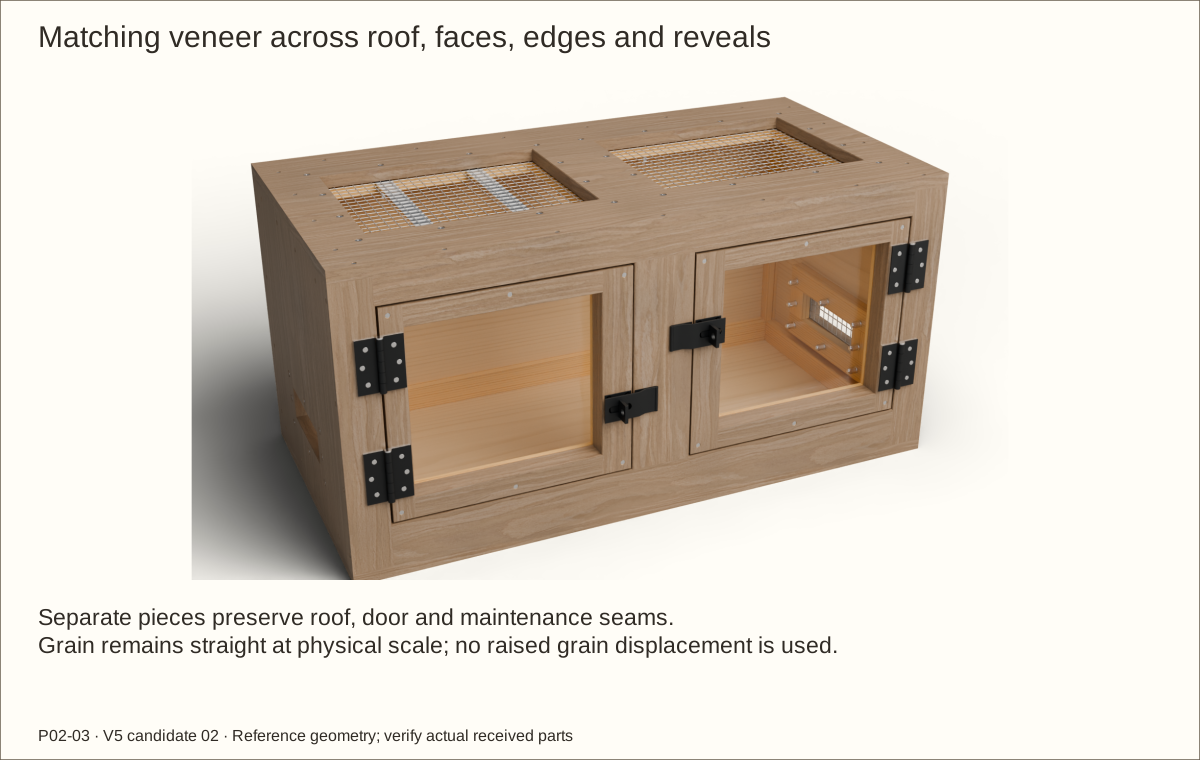
Full exterior veneer: the roof, faces, edges and reveals are included in this guide’s coordinated veneer schedule and geometry. Supplier balance, bond and actual-stack acceptance remain required. Natural grain and color vary.
About these previews
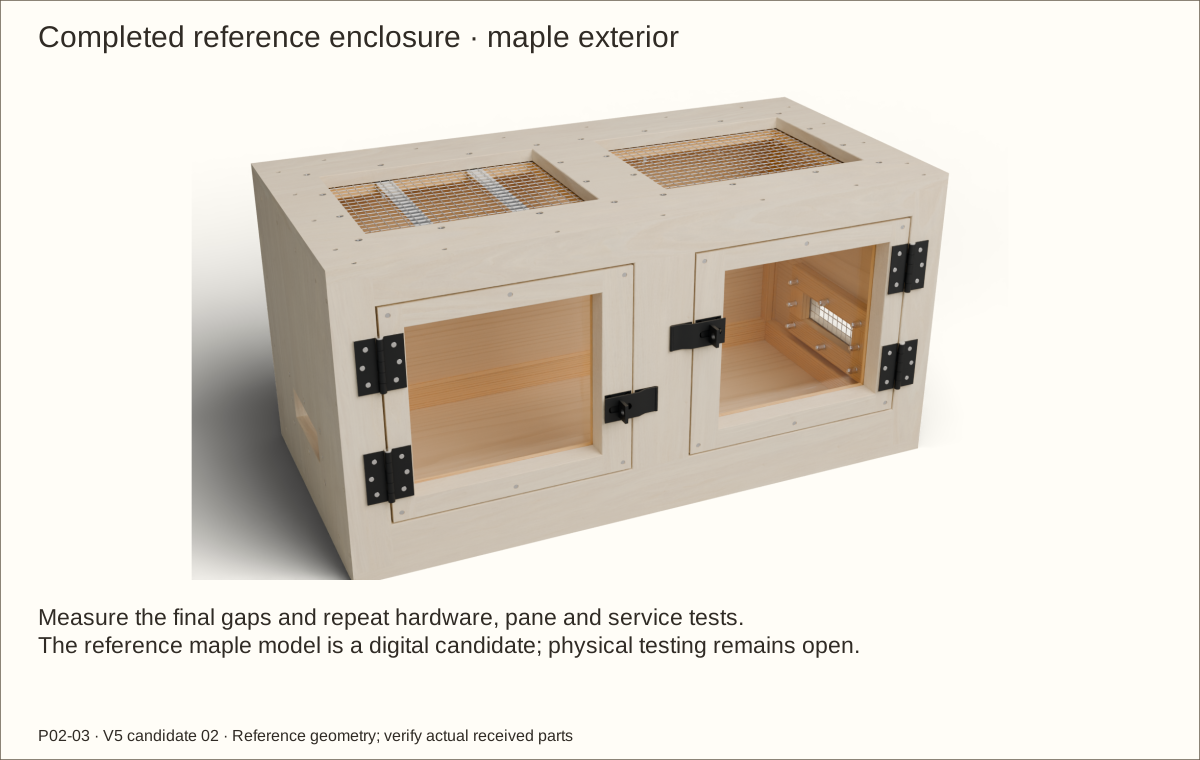
Rendered from this enclosure’s actual reference geometry. Veneer layers preserve service seams and bare hardware seats. The 3D viewer shows maple; these choices change the main picture. Texture scans by Jenelle van Heerden via Poly Haven, CC0 illustrate appearance and are not delivered veneer samples.
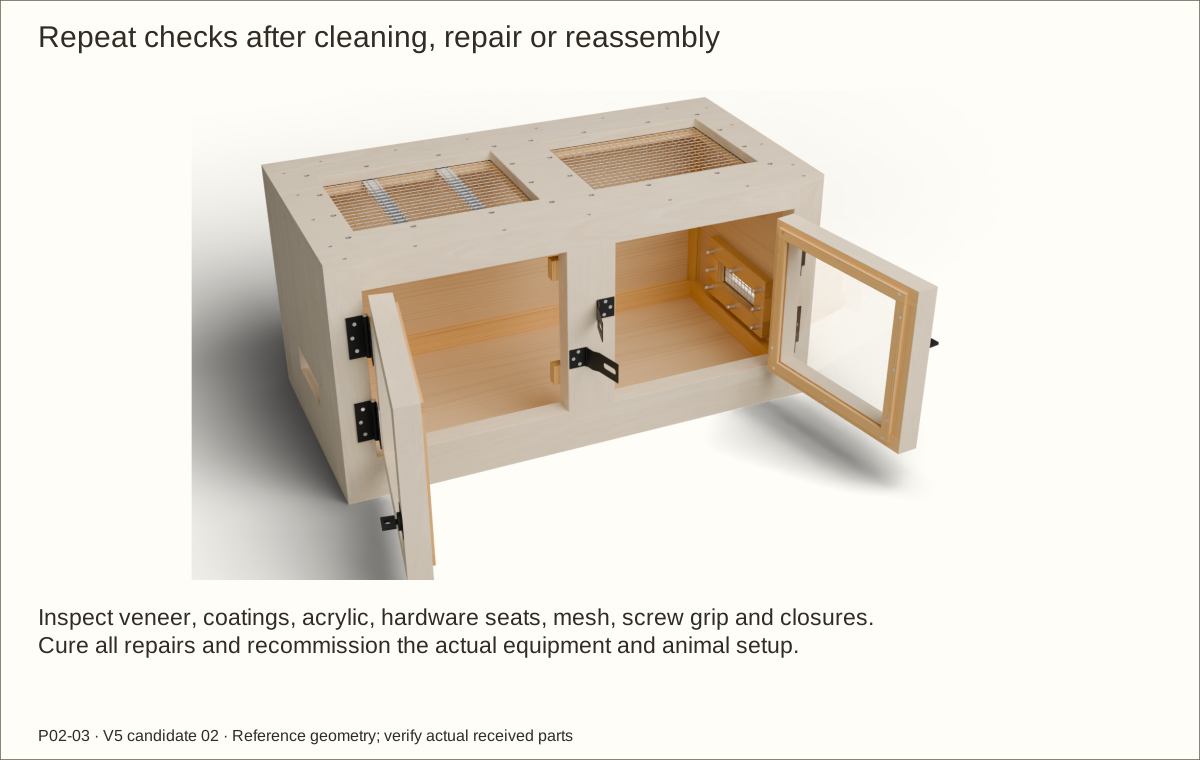
Two independently latched acrylic doors, a removable screened roof and low screened inlets. Follow 51 pictured operations with checks before continuing.
Before construction: supplier acceptance of the hinge spacers, received hardware and finish trials, prototype construction, physical testing and qualified review remain open. Publication approved; construction holds remain.
Receive and trial actual materials before dependent final cuts. This design retains P02-03’s twin-door construction and its own hardware. Changed plywood, veneer, acrylic or hardware requires the corresponding fit checks.
Measurement
Reference
Bare exterior
36 × 18 × 18 in (914.4 × 457.2 × 457.2 mm)
Reference covered wooden body
36.061 in (915.95 mm) × 18.061 in (458.75 mm) × 18.061 in (458.75 mm)
Maximum covered wooden body
36.092 in (916.74 mm) × 18.092 in (459.54 mm) × 18.092 in (459.54 mm)
Door, bare wood
13 45/64 in (348.06 mm) × 12 7/32 in (310.36 mm)
Bare door gaps
Hinge/top/bottom 3/16 in (4.76 mm); latch 5/32 in (3.97 mm)
Minimum finished operating gap
1/16 in (1.59 mm); receiving and animal-specific containment review required
2 in (50.8 mm), with at least 1 1/2 in (38.1 mm) clear below inlets
Hinge service
16 in (406.4 mm) clear in front and 4 in (101.6 mm) above upper pin
Veneer stack
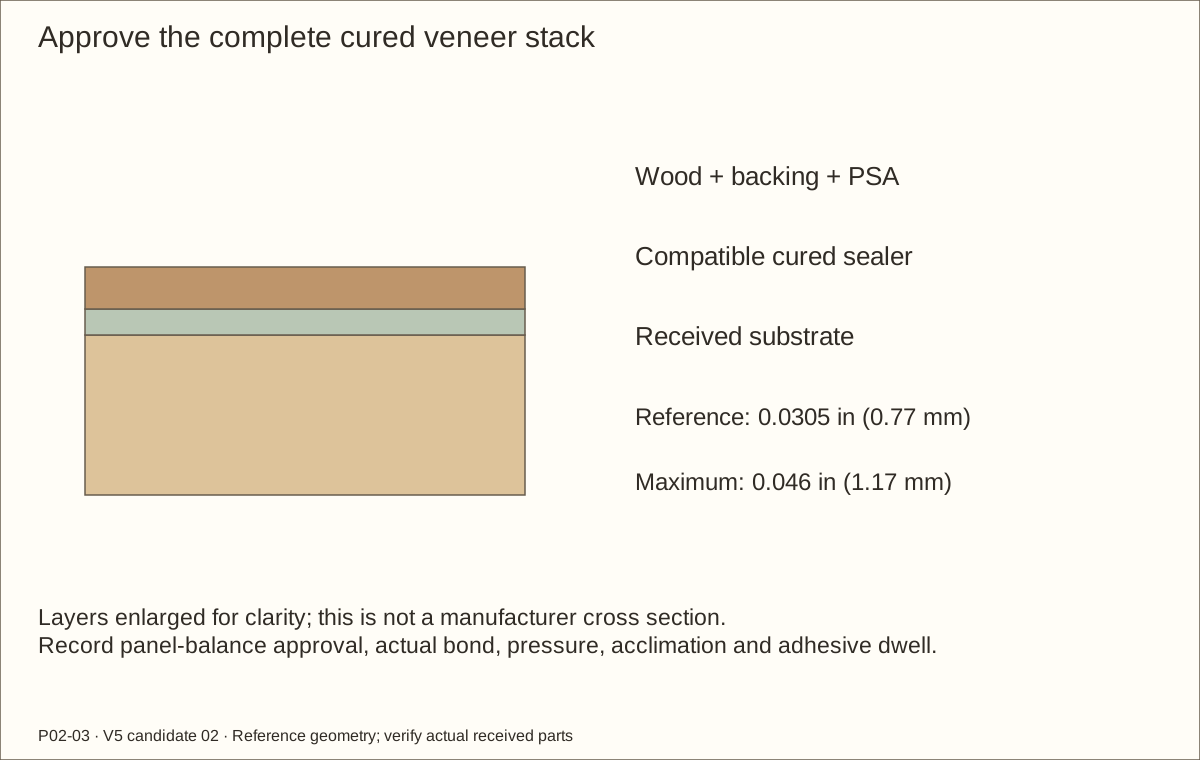
Reference 0.0305 in (0.77 mm); maximum 0.046 in (1.17 mm)
Measurement language: in means inches; mm means millimetres. Width × depth × height describes the outside body. Exact decimals are kept for mating parts. X starts at outside LEFT, Y at outside FRONT and Z at FLOOR UNDERSIDE unless a drawing names a local edge. Hinges and latches project beyond the wooden envelope; screen screw heads seat flush outside.
Tools, terms and workholding
Use a flat supporting bench, helpers, clamps, straight cauls, tape, square, caliper, marking knife, measuring strips/dividers and stopped drill setups. Cutting needs supported saw and guided router/jigsaw arrangements, a chisel, block plane and sliding bevel. Plane wide stock before ripping narrow strips.
Prepare actual-root-matched wood pilots, clearance bits and matching countersink, 82° for B10, 1/8-inch (3.18 mm) hex key and two slim 3/8-inch (9.53 mm) wrenches. Metal needs a vise, appropriate saw/bits, backing block and files. Mesh needs snips and edge protection. Acrylic needs a suitable sharp blade, full support and compatible edge finishing. Veneer needs a sharp knife, straightedge, cutting board and manufacturer-approved scraper.
Wear eye/hearing protection, control wood dust and ventilate finishes. Protect hands from cut mesh and metal; keep gloves, loose clothing and fingers away from rotating machinery. Clamp work and waste; never hold a short part under a drill.
Term
Plain meaning
Cleat / ledger
Wood strip receiving screws / strip supporting an upper panel
Stile / rail
Vertical / horizontal member of a frame
Lamination / caul
Layers glued together / straight board spreading clamp pressure
Pilot / clearance hole
Thread-guiding hole in receiver / free passage through first member
Countersink / arris
Conical flat-head seat / meeting edge of two faces
Tools / setup: Tape, square, pencil, clamps and the tools named in the operation
Before you begin: This is an unbuilt indoor shell. Appearance is not animal, load, thermal or water-holding approval.
Plan support and maintenance space
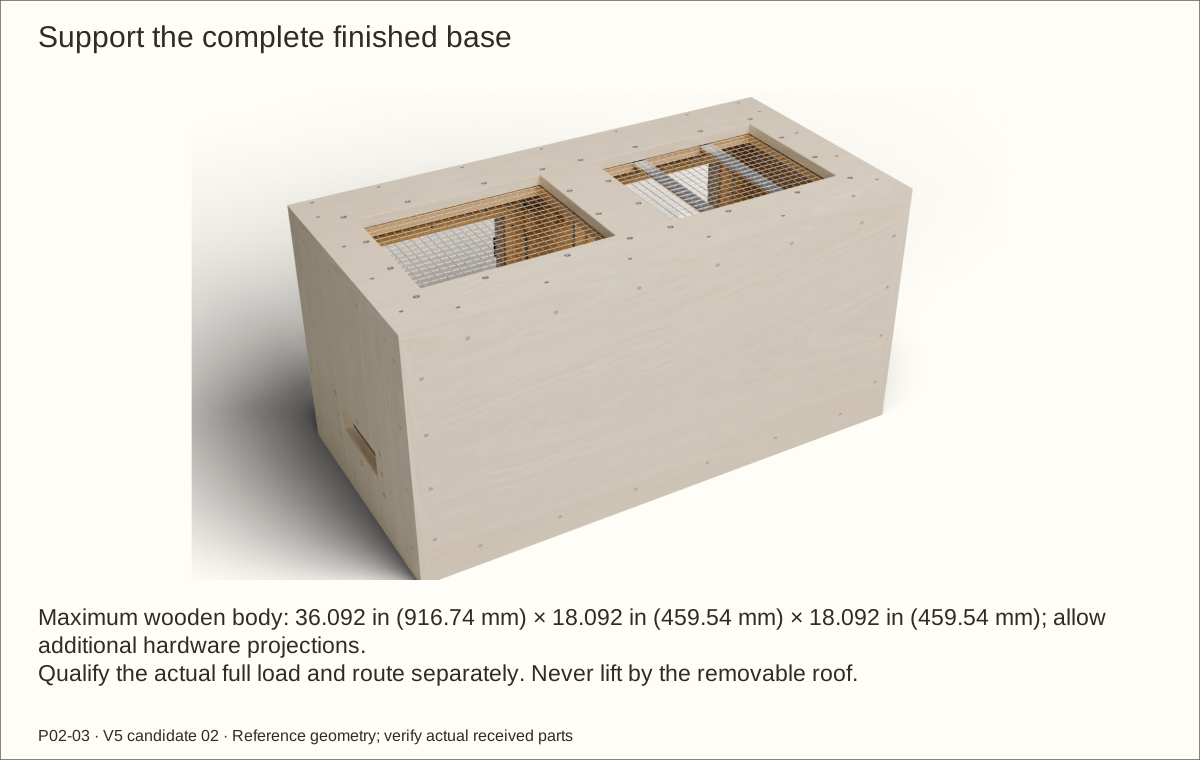
Provide a continuous, flat, level support beneath the whole finished base. The bare body is 36 in (914.4 mm) wide × 18 in (457.2 mm) deep × 18 in (457.2 mm) high. At the maximum veneer stack its wooden envelope is 36.092 in (916.74 mm) × 18.092 in (459.54 mm) × 18.092 in (459.54 mm); hinges and latches extend farther.
Measure the transport route and working position before building. Allow at least 16 in (406.4 mm) in front for supported door removal and 4 in (101.6 mm) above the upper hinge pin. Leave clear access above the entire roof and to both side bolt sets.
Record the weight of the final enclosure, substrate, furnishings and equipment. Have the support and floor checked for that actual load; no stand, stacking arrangement or load rating is provided.
Check before continuing: The empty object can be moved and serviced with helpers; the whole base has support.
Tools / setup: Tape, square, pencil, clamps and the tools named in the operation
Before you begin: Do not treat product listings or these drawings as approval of the complete assembly.
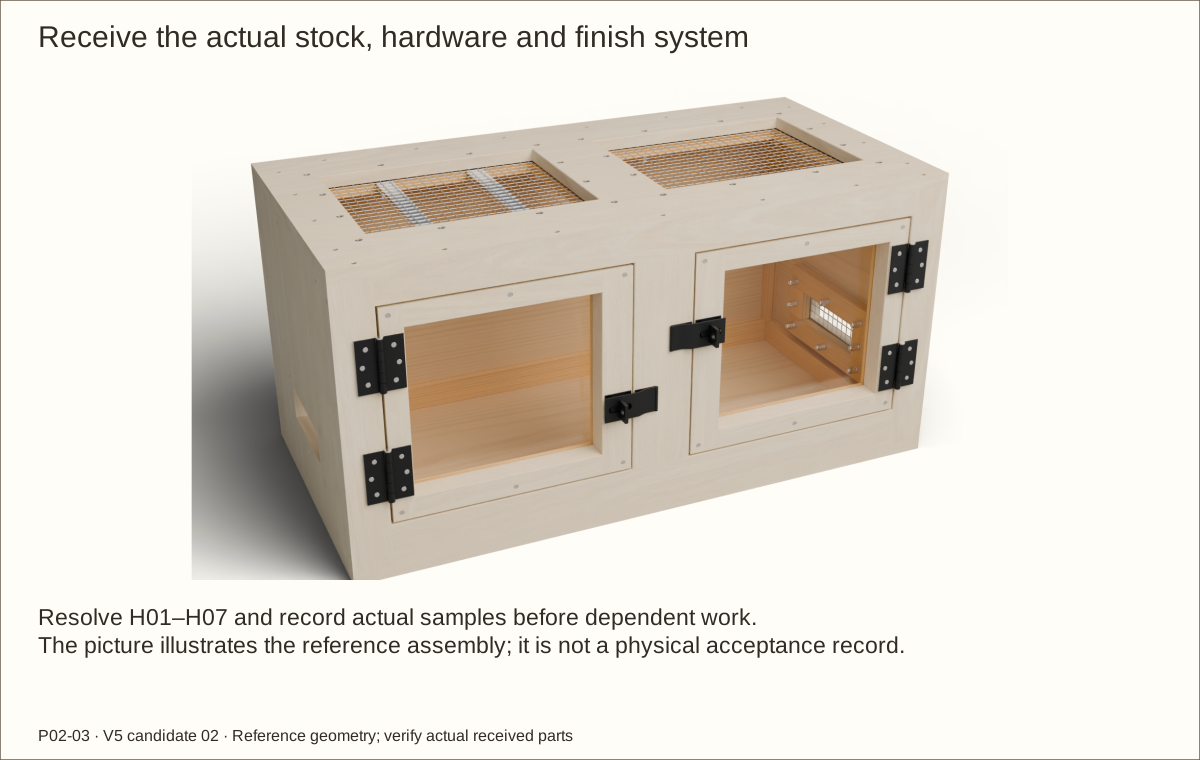
Resolve the seven receiving holds
Read the receiving record before buying dependent materials. H01 needs supplier or qualified acceptance of the proposed hinge spacers. H02 needs the actual latch footprint and screw trial. H05 needs actual countersunk-head, washer, locknut and closed-cover measurements and a complete offcut trial.
Select ONE maple, white-oak or walnut veneer system. Ask the supplier to confirm the backing, pressure-sensitive adhesive (PSA), substrate/sealer compatibility, one-sided panel balance and intended indoor conditions.
Record the supplier’s acclimation, application pressure and dwell. The complete cured veneer stack must be no more than 0.046 in (1.17 mm). A balancing layer or different hardware requires coordinated dimensional review.
Check before continuing: Written answers and trial requirements are recorded; unresolved substitutions are not used.
Parts: PLY, PINE, ACR, HINGE, HASP, fasteners, mesh, metal and veneer
Tools / setup: Tape, square, pencil, clamps and the tools named in the operation
Before you begin: Digital dimensions describe the reference stock; they do not replace received measurements.
Receive and measure the actual stock
Compare exact model numbers with the current BOM, meaning bill of materials. Keep the unknown screws supplied with hinges and hasps separate; use the scheduled screws.
Measure plywood at several edges with a caliper: reference 45/64 in (17.86 mm), receiving range 11/16 in (17.46 mm) through 23/32 in (18.26 mm). Pine is finished to 3/4 in (19.05 mm). Acrylic reference thickness is 0.22 in (5.59 mm). Reject warped, split or voided stock at a joint.
Save actual plywood and pine offcuts as thickness gauges. Field-fit dependent members between their receiving parts. If the received thickness changes, record the revised dimensions and repeat related gap and hardware checks.
Check before continuing: Thickness, straightness, model identity and quantities are recorded.
Tools / setup: Drill, actual bits and screws, countersink, depth stop, caliper, clamps and backing board
Before you begin: Clamp small parts; do not hold them by hand under a drill.
Trial clearance holes, pilots and head seats
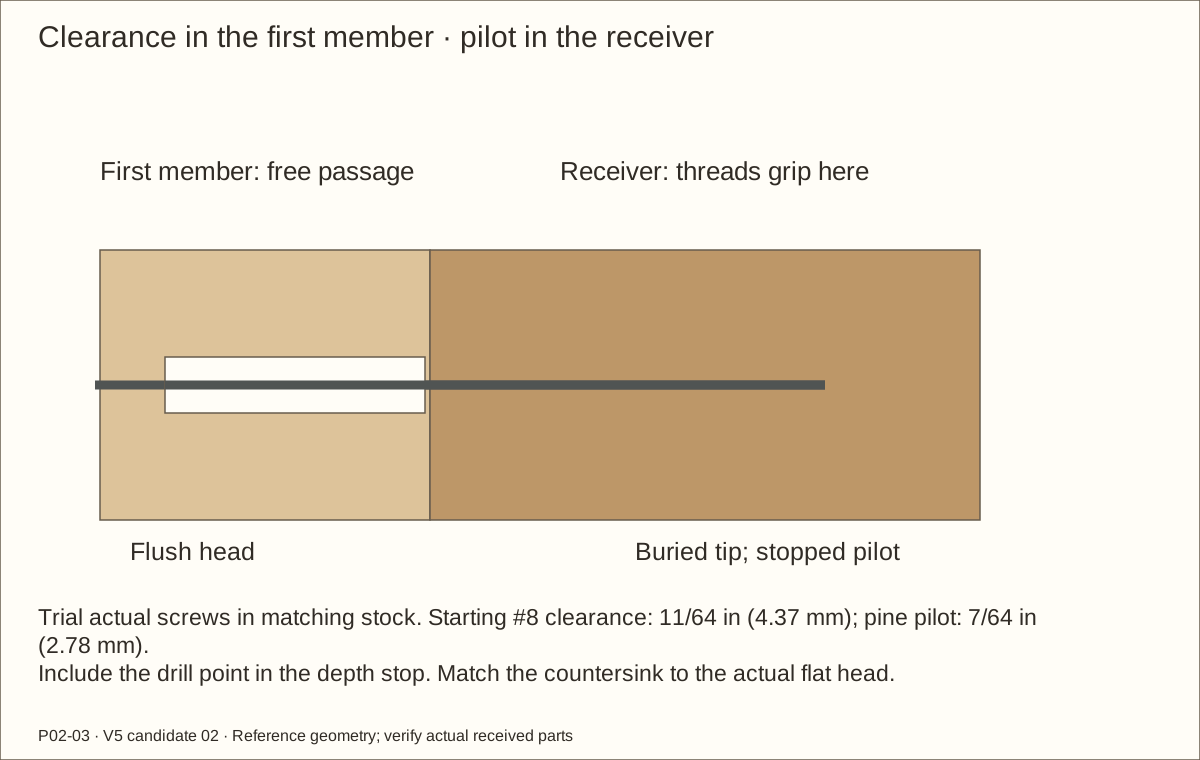
Clamp a matching offcut stack on a backing board. A clearance hole lets the screw pass through the first member; a smaller pilot guides its threads in the receiver. Never use a plywood edge as the threaded receiver.
Start the #8 pine trial with 11/64 in (4.37 mm) clearance and a 7/64 in (2.78 mm) pilot; match the actual screw root. Match the flat-head countersink angle and stop with the head flush, not crushed into wood.
Mark the intended tip location, include the drill-point length in the depth stop, and check both sides after fastening. Repeat for each screw type and hardware stack. Use the exact station and receiver table for final work.
Check before continuing: The joint closes without splitting, proud tips, stripped threads or a deeply buried head.
5. Cut the plywood panels with actual thickness gauges
Parts: P01 floor; P04 roof; P03L/P03R sides; P02 back
Tools / setup: Supported sheet saw setup, straight guide, square, clamps and actual offcut gauges
Before you begin: Support both sides of each cut. No store cutting service is assumed.
Cut the plywood panels with actual thickness gauges
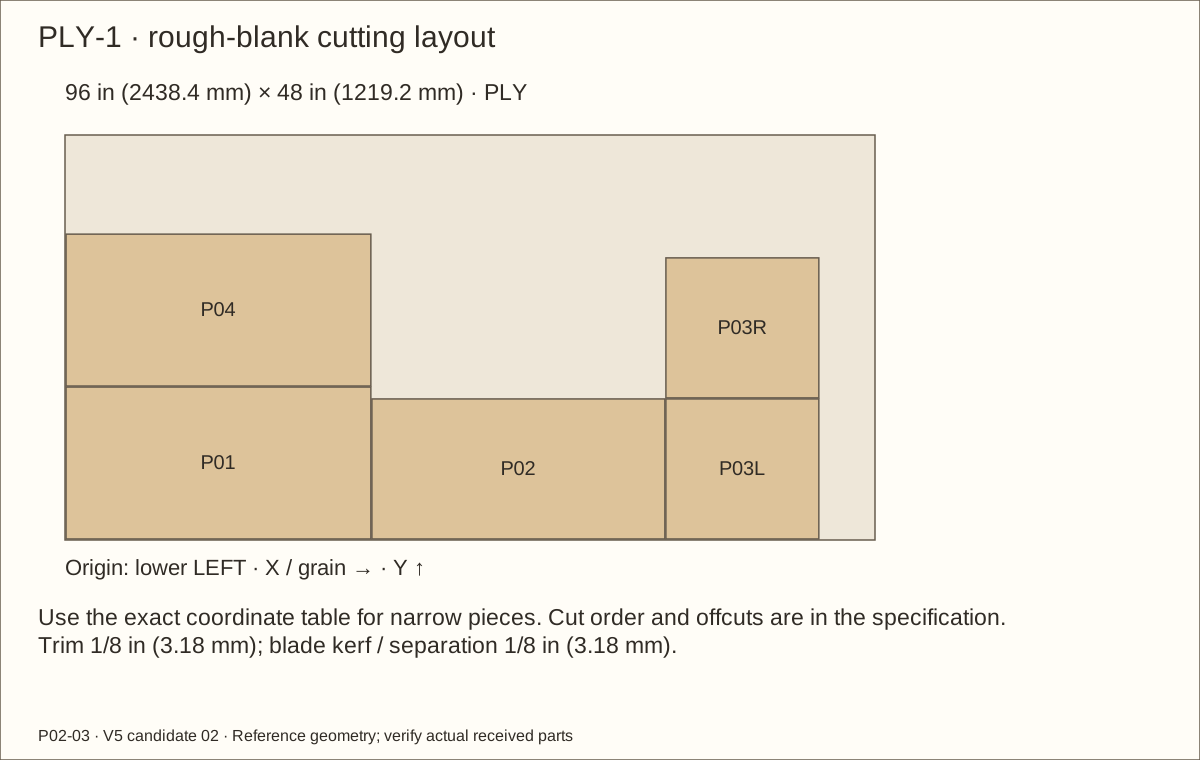
Support the whole sheet and waste on a sacrificial cutting surface. Follow PLY-1 with its trim and saw kerf. Cut P01 and P04 to 36 in (914.4 mm) × 18 in (457.2 mm) and label the outside/front/left edges.
For each side, subtract two actual plywood thicknesses from the 18 in (457.2 mm) exterior height. Reference side size is 18 in (457.2 mm) deep × 16 19/32 in (421.48 mm) high. Use offcut gauges to transfer this fit rather than stacking tape errors.
Dry-clamp the sides on the floor. Fit P02 between them: reference 34 19/32 in (878.68 mm) wide × 16 19/32 in (421.48 mm) high. Its back face is flush with the side rear edges.
Check before continuing: Matching panels agree and the dry-clamped shell reaches the intended bare dimensions.
Before you begin: Use the machine maker’s minimum feed lengths and workholding rules.
Prepare and label the solid wood members
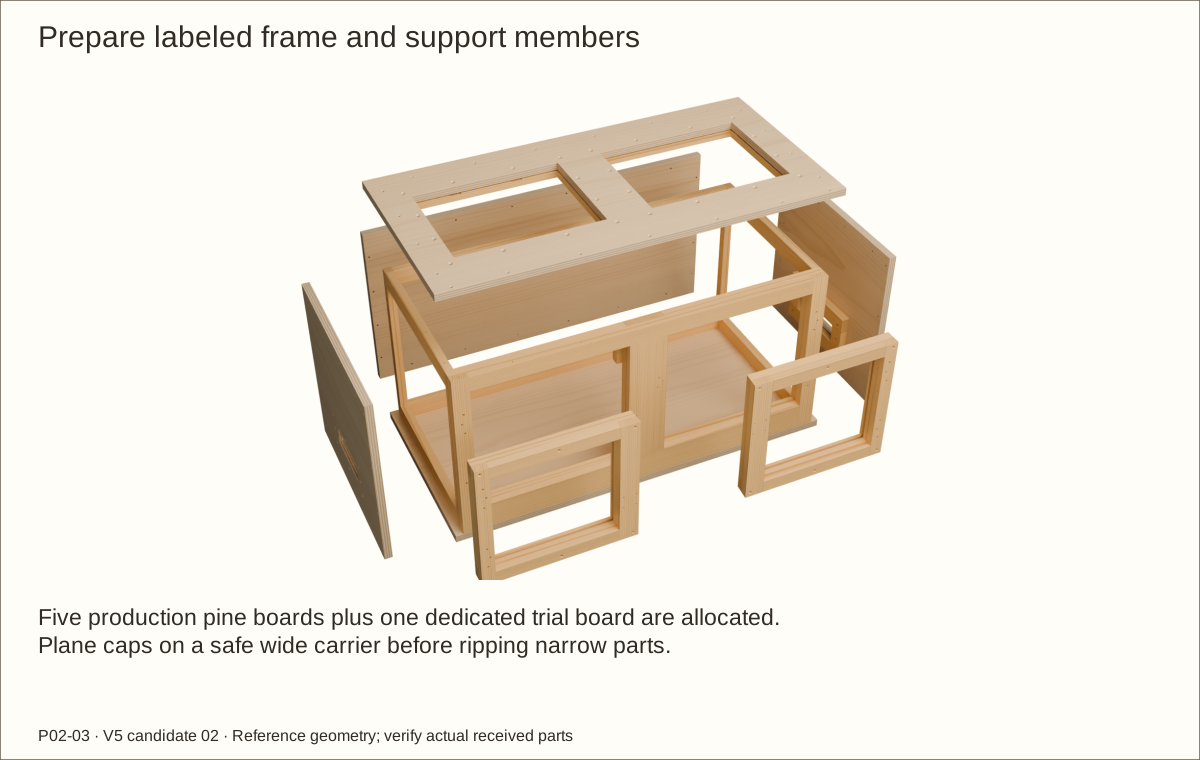
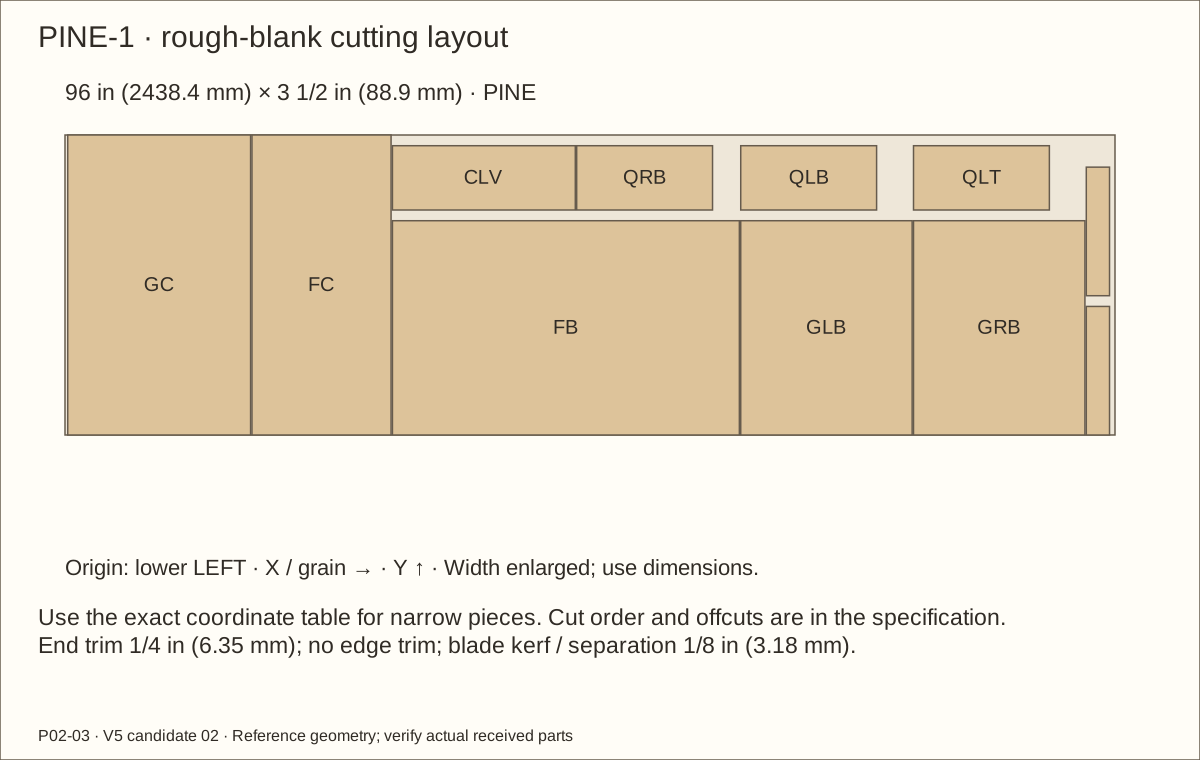
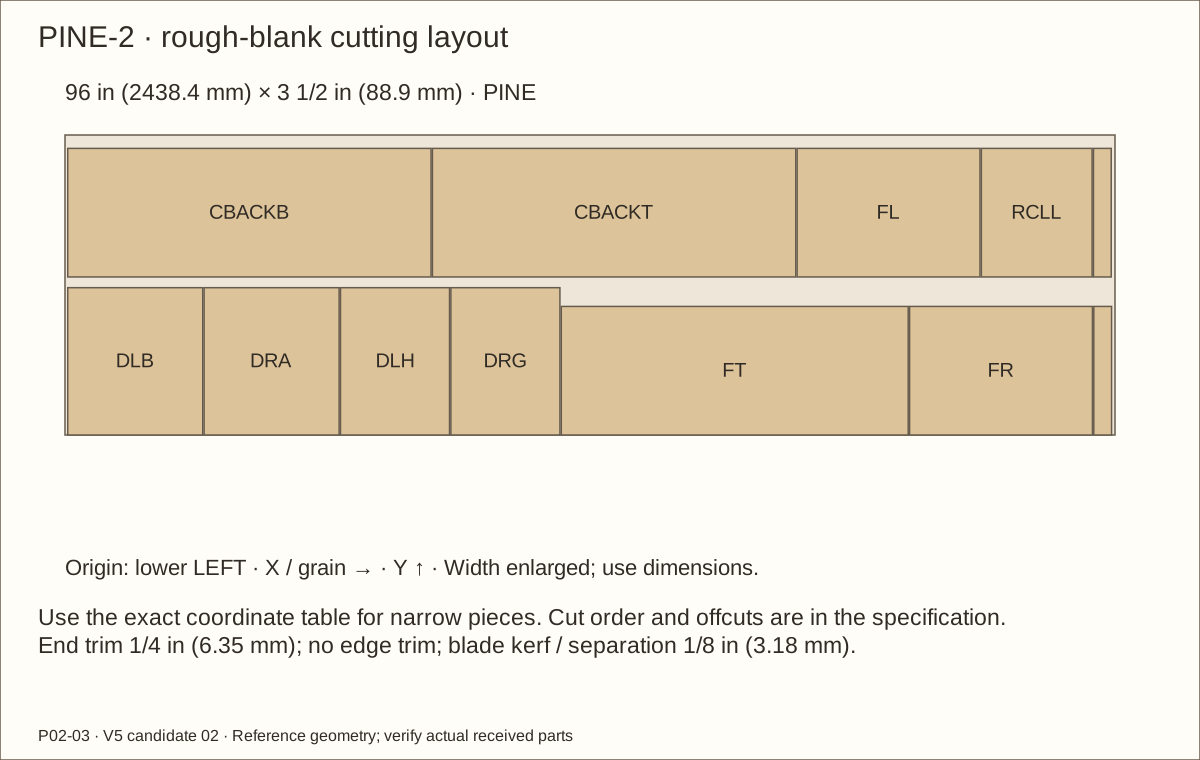
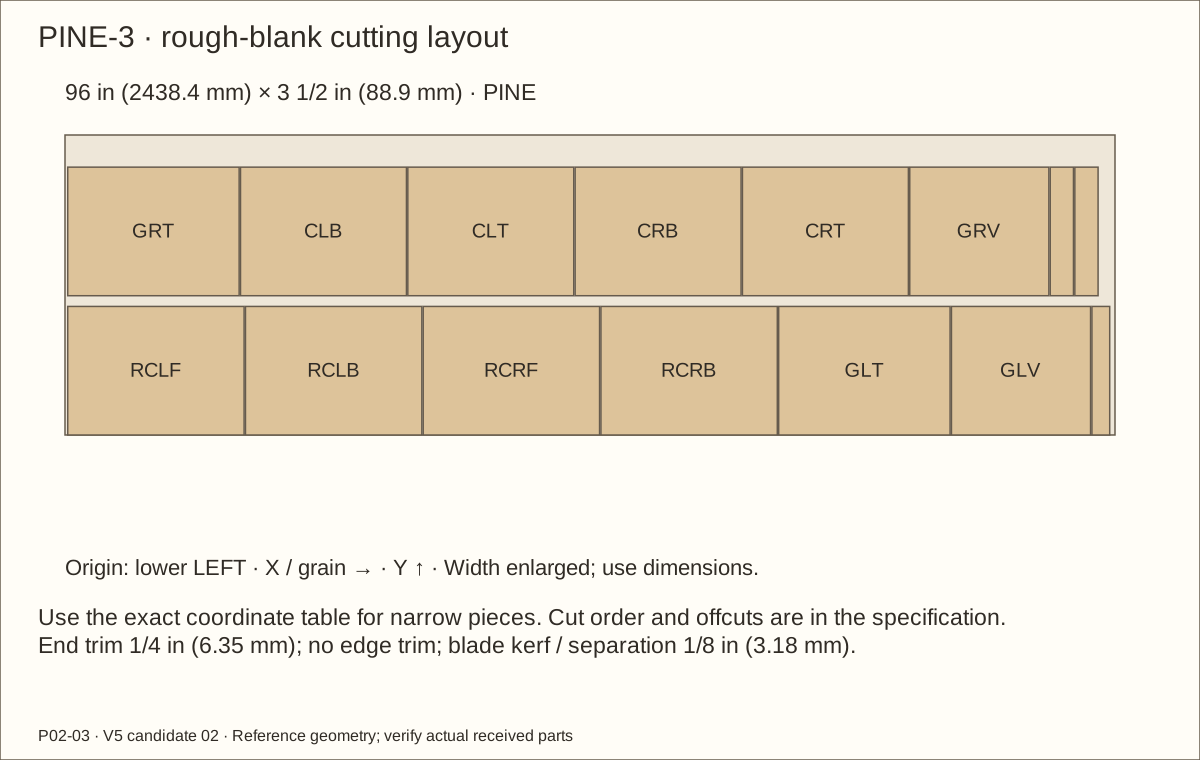
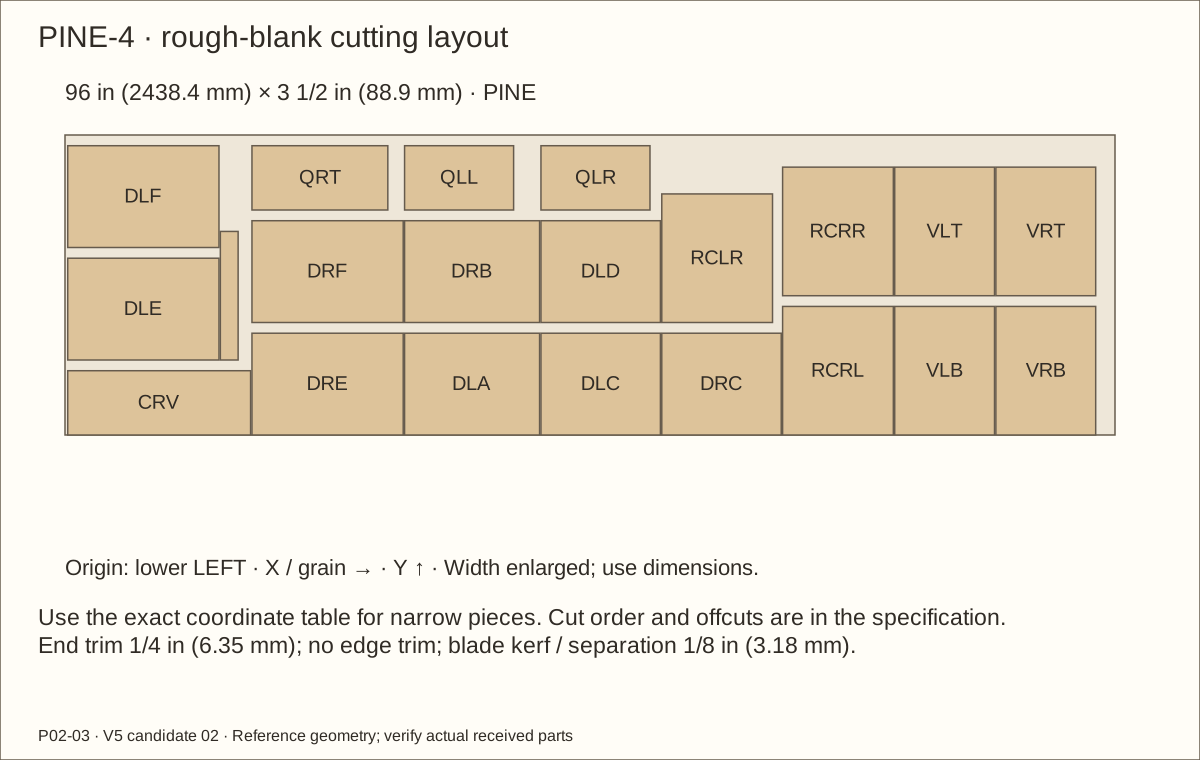
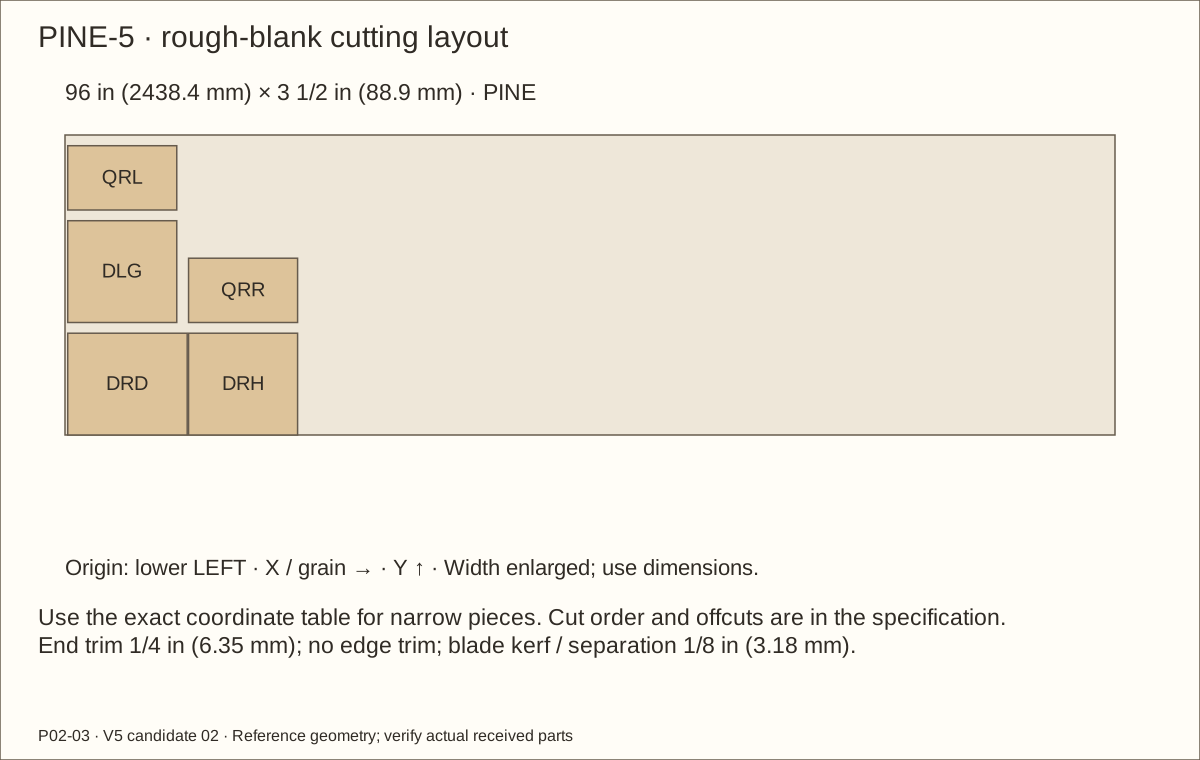
Use the five numbered pine layouts and the individual finished cut table. Preserve full 3 1/2 in (88.9 mm) stock width for FC and GC; there is no width-trimming allowance for those members.
Plane the glazing-cap stock to 1/4 in (6.35 mm) while it is safely wide and supported on an appropriate carrier. Then rip and crosscut the narrow parts using guards, a carrier and push blocks. Never feed a short loose strip through a planer.
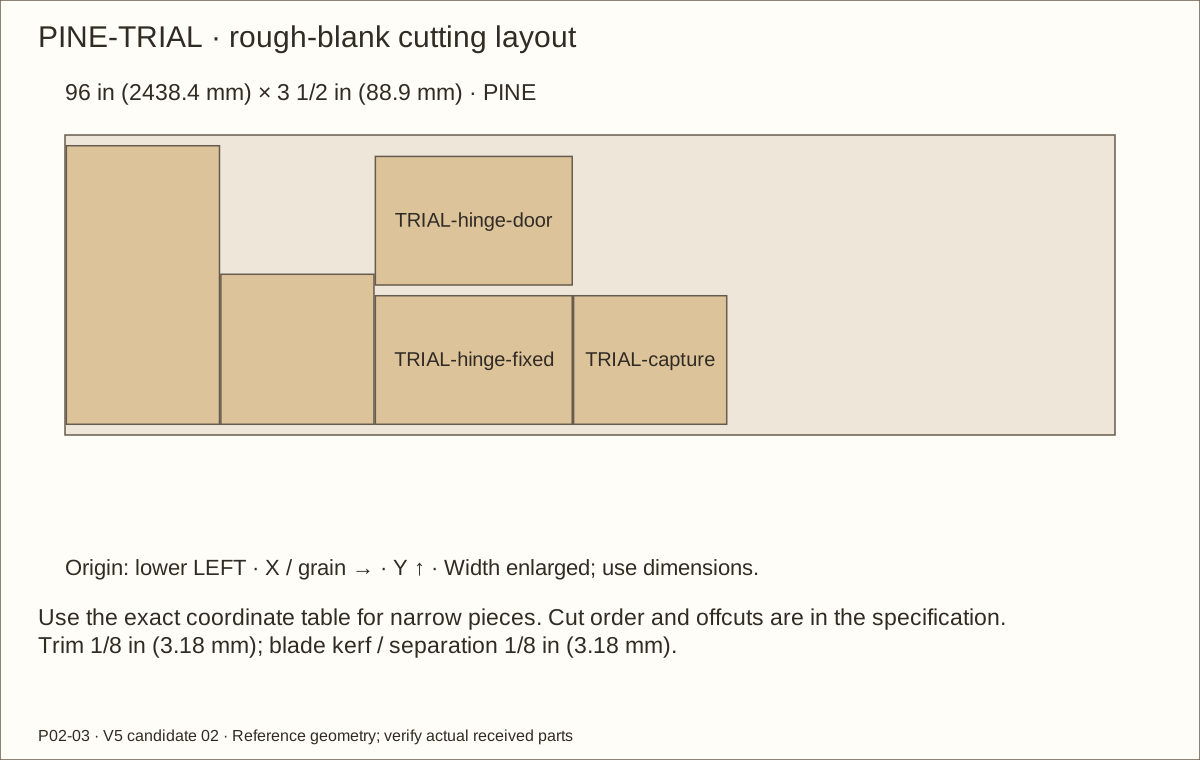
Keep dependent rails slightly long until their receiving opening is dry-fitted. Label every ID, outward face, end and grain direction; retain the dedicated trial board for glue, drilling, finish and veneer samples.
Check before continuing: Every part is labeled and matches the cut schedule; wide members retain their specified width.
Before you begin: The finished veneer raises the inlet edge slightly; use the bare datum for cutting.
Cut the two low side openings
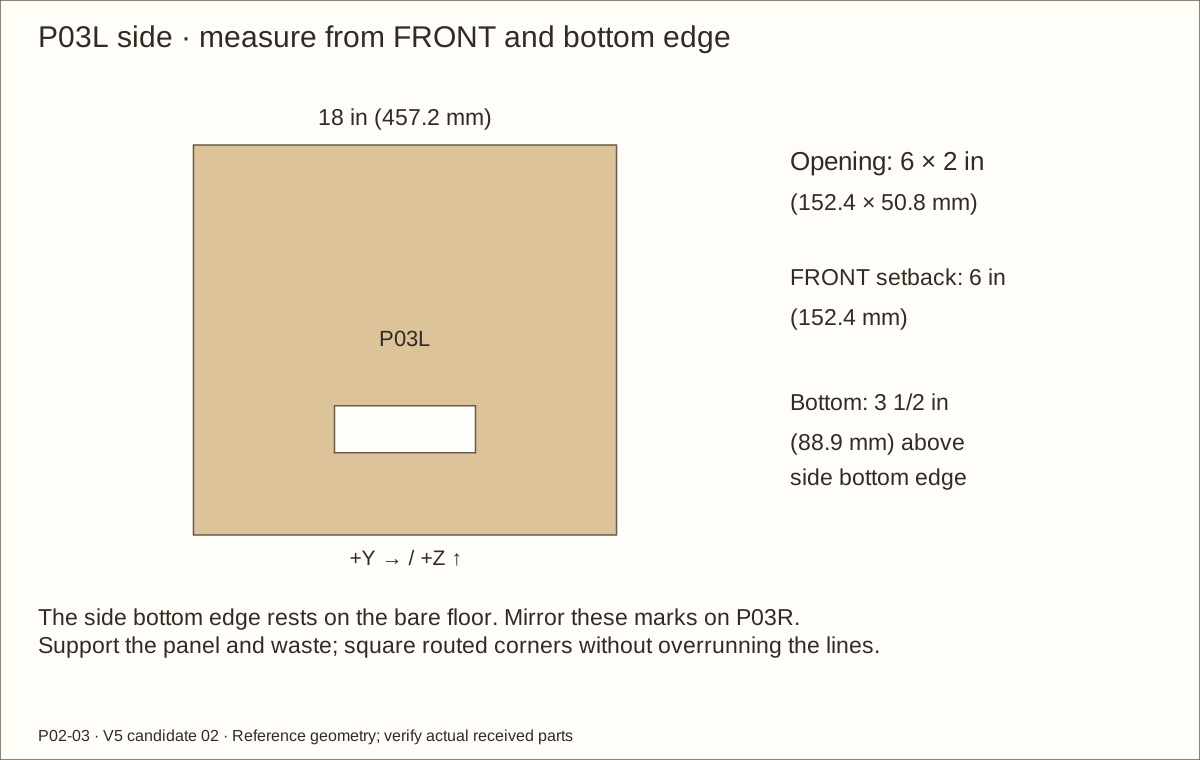
From the side FRONT edge, mark an opening 6 in (152.4 mm) along the depth and 2 in (50.8 mm) high, beginning 6 in (152.4 mm) behind the front. Its bottom is 3 1/2 in (88.9 mm) above the bare inside floor, which is also 3 1/2 in (88.9 mm) above the side bottom edge.
Clamp the panel on a supporting sacrificial board. Drill a starter hole inside the waste, use a supported jigsaw or guided router to the lines, and square the corners without cutting beyond them.
Use the first checked opening as a marking template for the opposite panel. Keep the lower support and capture locations separate; do not move an opening to hide an incorrect cleat position.
Check before continuing: Both bare openings are 6 in (152.4 mm) × 2 in (50.8 mm) at matching stations.
Tools / setup: Tape, square, drill, supported jigsaw/router and chisel
Cut the roof openings
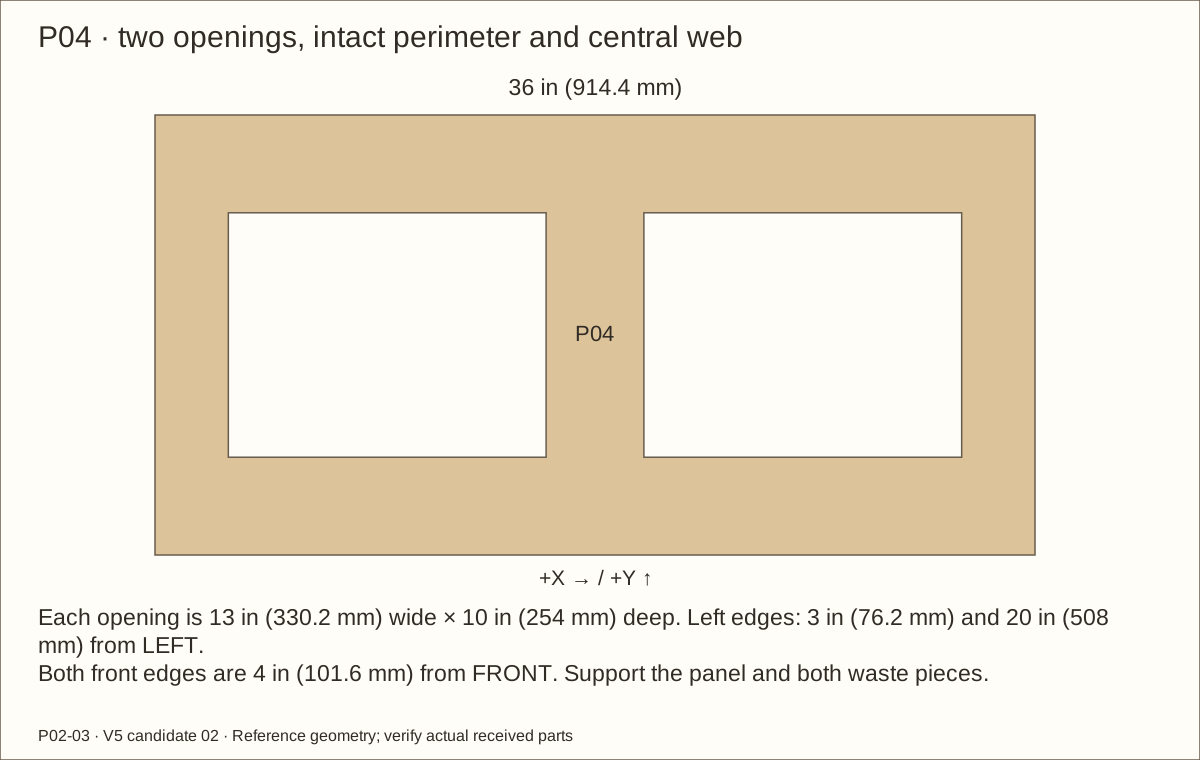
Mark two 13 in (330.2 mm) wide × 10 in (254 mm) deep openings. Their left edges are 3 in (76.2 mm) and 20 in (508 mm) from the roof LEFT edge; both front edges are 4 in (101.6 mm) from the roof FRONT.
Clamp and fully support P04 and both waste pieces. Cut within the waste and finish to the lines; square routed corners with a chisel. Preserve the central web and perimeter.
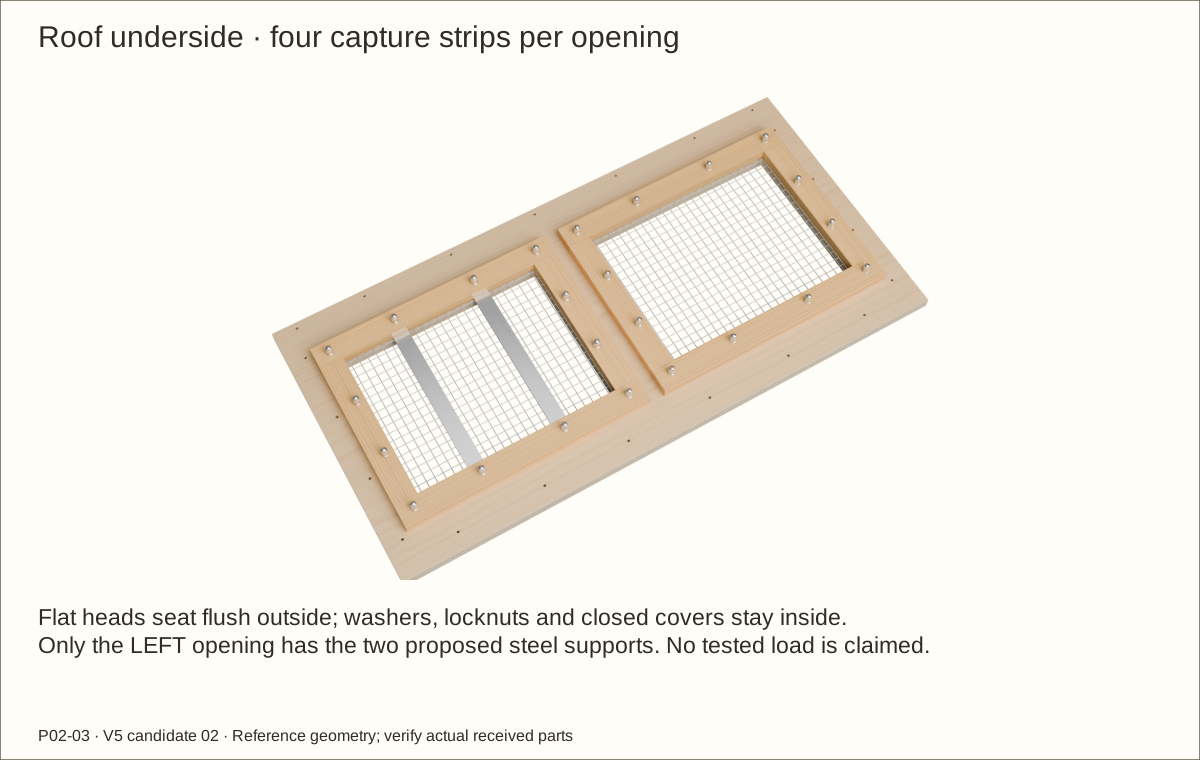
Label the LEFT opening for the two proposed steel lamp supports. Do not enlarge either opening or place equipment over the unsupported right screen.
Check before continuing: Both rectangles and their surrounding solid lands match the roof drawing.
Tools / setup: Tape, square, pencil, clamps and the tools named in the operation
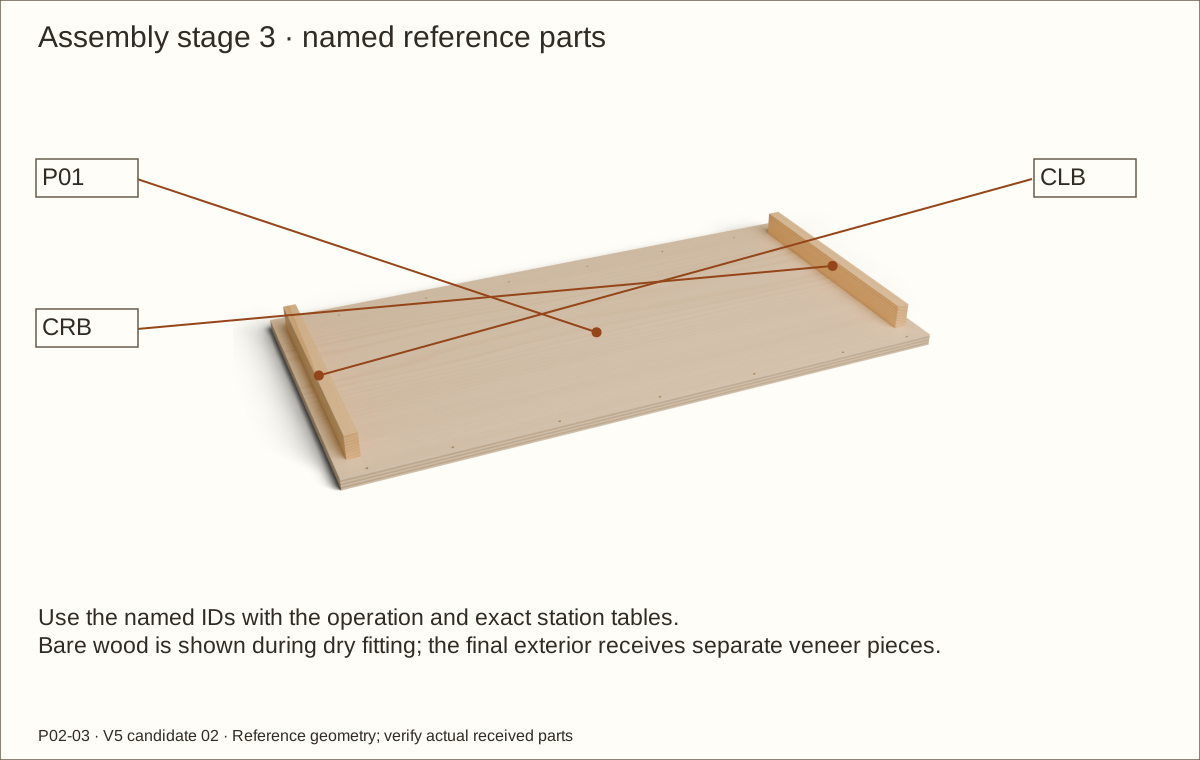
Fasten the two lower side cleats
Lay P01 flat. Clamp CLB and CRB with 3/4 in (19.05 mm) across the enclosure and 1 1/2 in (38.1 mm) vertical. Their front ends are 1 1/2 in (38.1 mm) behind the floor FRONT; use actual side-panel offcuts to set the outside faces inward.
Transfer each cleat centerline through the floor. Along each row mark 2 1/2 in (63.5 mm), 7 in (177.8 mm), 11 1/2 in (292.1 mm) and 15 3/4 in (400.05 mm) from the floor FRONT.
With a helper, support and turn the clamped assembly to reach the underside. Clearance-drill the floor, pilot the pine with a stop, and fit four S8 screws per cleat. Leave these joints unglued for finishing.
Check before continuing: Both cleats bear continuously and no screw point is exposed.
Tools / setup: Tape, square, pencil, clamps and the tools named in the operation
Before you begin: The open U-shaped shell can rack sideways.
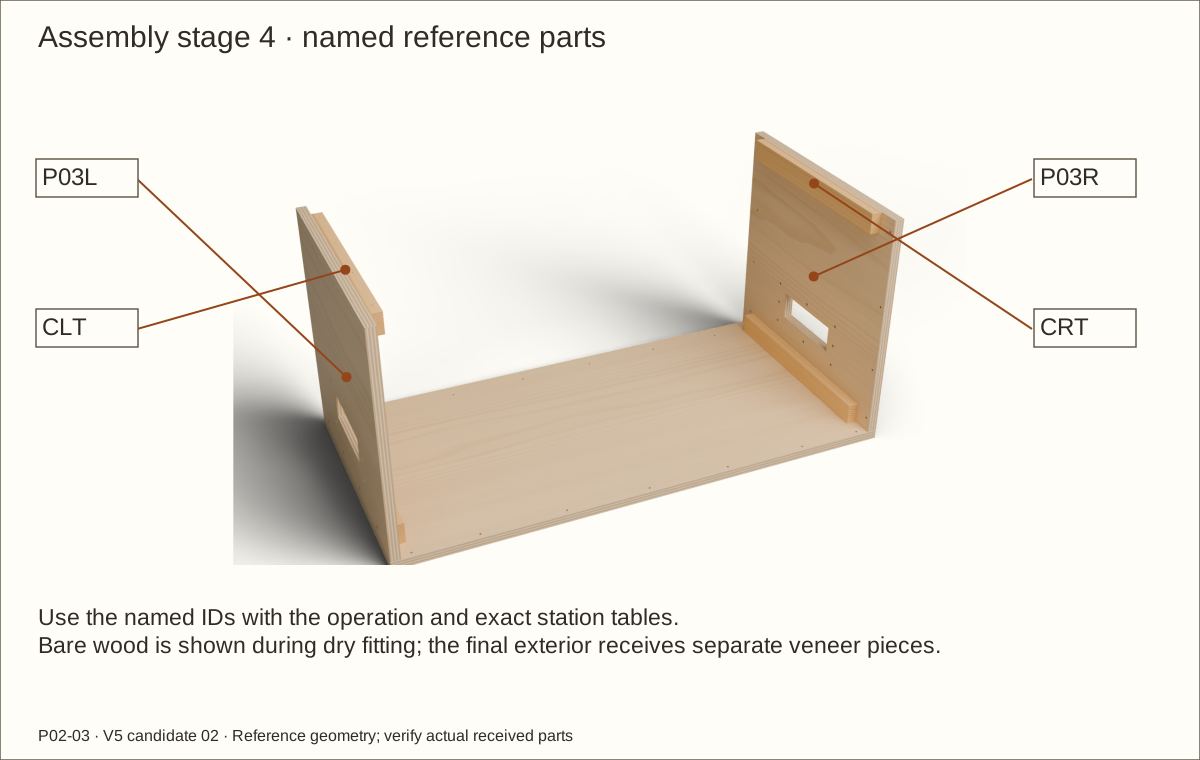
Brace the sides and set roof ledgers
Stand each side directly on P01, outside face flush with the floor edge. Clamp and temporarily brace it square before releasing your hands.
Transfer the lower-cleat centerline to the side. Mark 2 3/4 in (69.85 mm), 7 1/4 in (184.15 mm), 11 3/4 in (298.45 mm) and 16 in (406.4 mm) from the side FRONT. Drill the clearance/pilot pair and fasten.
Set CLT and CRT using a roof-thickness offcut below the side top. Transfer each ledger centerline and mark 2 1/2 in (63.5 mm), 7 in (177.8 mm), 11 1/2 in (292.1 mm) and 15 3/4 in (400.05 mm) from FRONT; drill and fasten. Keep braces until the back and front frame are secure.
Check before continuing: Sides are square, ledger tops agree and openings are unobstructed.
Tools / setup: Tape, square, pencil, clamps and the tools named in the operation
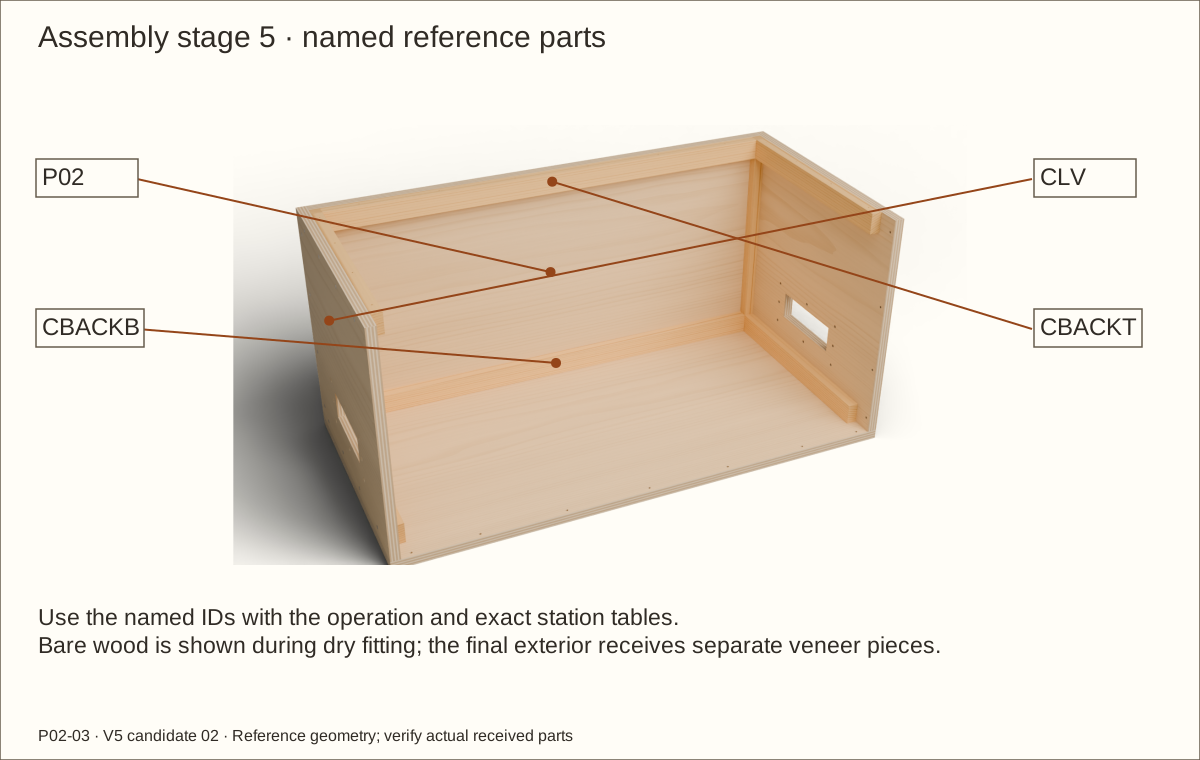
Fit the rear corner and bearing cleats
Fit CLV and CRV in the rear corners between floor and roof. Each occupies the final 3/4 in (19.05 mm) of interior depth and touches the side and back.
Clamp P02 between the sides, standing on P01. Fit CBACKB and CBACKT between the corner cleats; their 1 1/2 in (38.1 mm) faces provide bottom and top bearing.
Check both diagonals and all bearing faces before drilling. Keep full support under the floor and use clamps to hold squareness.
Check before continuing: Back and side rear edges are flush and every bearing face touches without force.
Before you begin: Use the exact station appendix if a local marking reference is unclear.
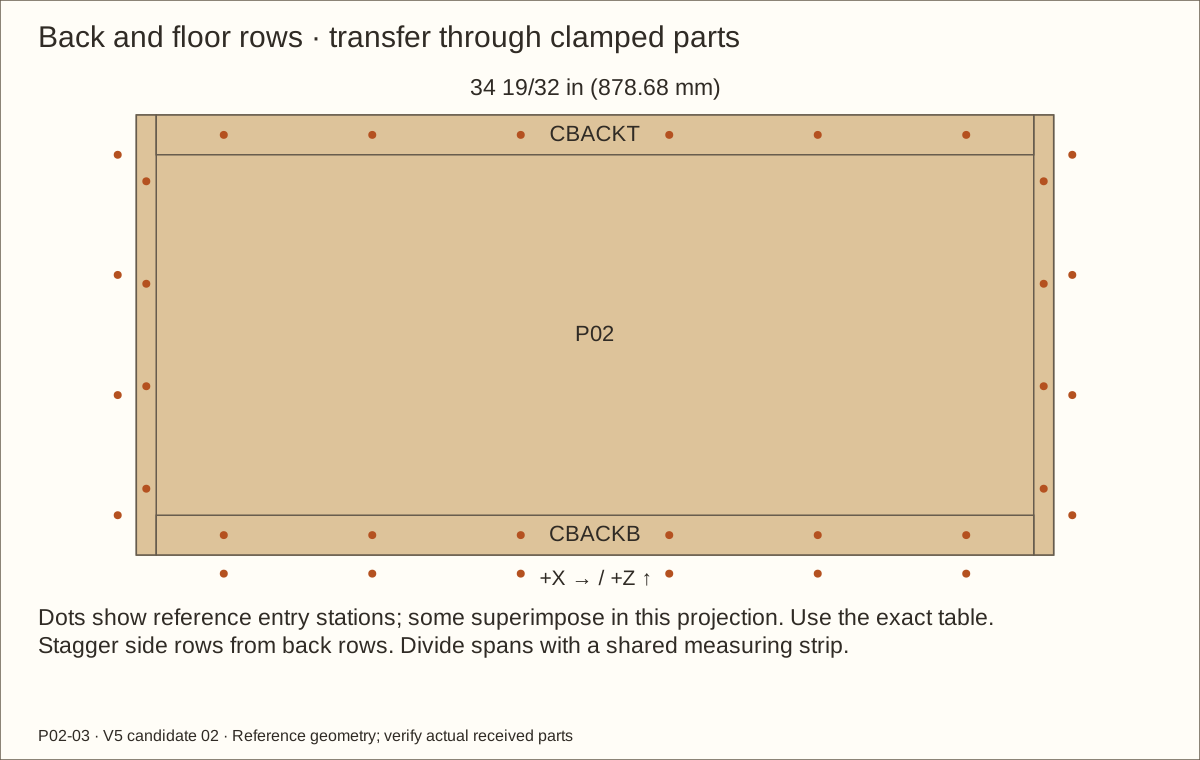
Fasten the staggered back connections
On each corner cleat, transfer its centerline to the back. Mark 2 1/2 in (63.5 mm) from both cleat ends and divide the intervening distance into three equal spaces: four back screws per corner.
For the side-to-corner rows, mark 1 1/2 in (38.1 mm) from each cleat end and divide into three equal spaces. These four screws per side are staggered from the back screws; use one marked measuring strip.
Transfer the horizontal bearing-cleat centerlines to the back. Project marks 4 in (101.6 mm) inward from each outside side face and divide into five equal spaces. Fit six screws per back row and six floor-to-rear-cleat screws at the same width marks. Recheck square after each row.
Check before continuing: All 34 connections use their own row and no screw paths cross.
Tools / setup: Tape, square, pencil, clamps and the tools named in the operation
Before you begin: Install all lamination screws on the bench before fitting the frame into the shell; later cleats and captures obstruct the driver.
Dry-lay the two front-frame layers on the bench
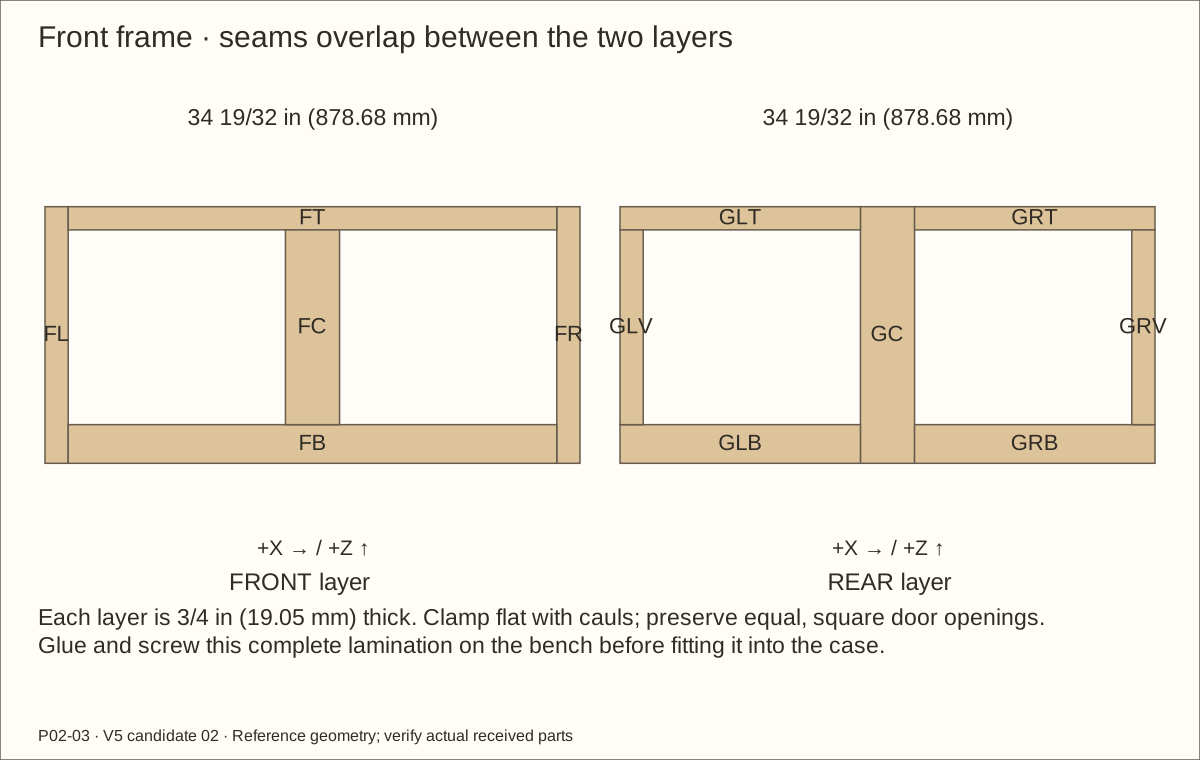
Lay the front layer flat: full-height FL/FR outer stiles, FB/FT rails between them and FC between the rails.
Lay the rear layer with its seams reversed: full-height GC center, split horizontal rails and outer GLV/GRV stiles between the rails. Each butt seam must be overlapped by the other layer.
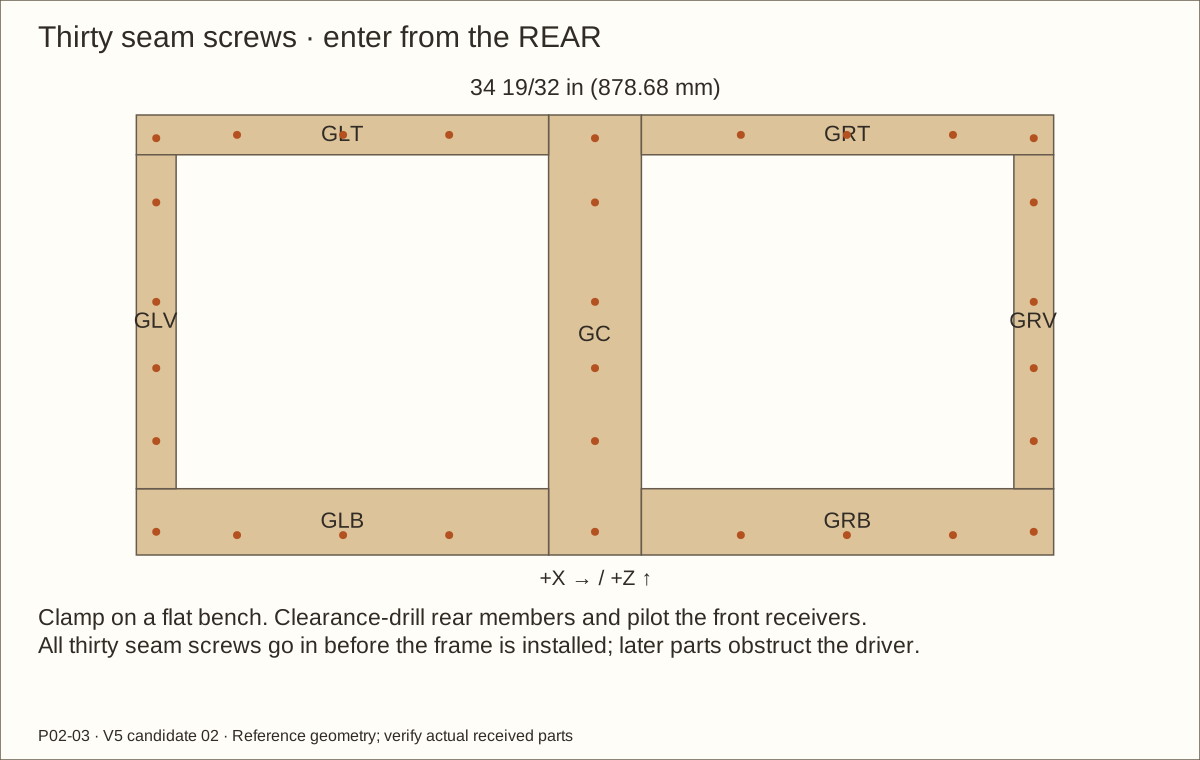
Clamp the complete frame flat on cauls, which are straight boards spreading clamp pressure. Check equal diagonals and equal openings. Mark the 30 seam screws while the rear remains accessible on the bench.
Check before continuing: Both layers bridge all butt joints and lie flat.
Tools / setup: Tape, square, pencil, clamps and the tools named in the operation
Before you begin: Titebond III is not an approval for structural loads or immersion.
Glue and screw the front-frame lamination
Apply glue only to clean bare mating wood, above 47°F (8.3°C). At 70°F (21°C) and 50% relative humidity, the maker gives 8–10 minutes open time and 20–25 minutes total assembly time. Organize clamps before spreading glue.
From the REAR, mark the centerline of each outer stile and the center post. Use six screws per row: 7/8 in (22.23 mm) from the frame ends and four absolute heights 5 in (127 mm), 7 3/4 in (196.85 mm), 10 1/4 in (260.35 mm) and 14 in (355.6 mm) above the floor underside, transferred during dry fit.
For each horizontal seam row, mark 3/4 in (19.05 mm) from its nearest frame edge and width stations 4 1/2 in (114.3 mm), 8 1/2 in (215.9 mm) and 12 1/2 in (317.5 mm) inward from each outside side face. Clearance-drill the first layer, pilot the receiver and fit the twelve horizontal screws. Keep all 30 heads flush.
Check before continuing: The frame remains flat and square with all seams overlapped.
Required wait: Do not stress or machine the glue-up for at least 24 hours; colder/damper conditions and current manufacturer instructions govern.
Parts: Completed front frame; eight side and seven floor S8 screws
Tools / setup: Tape, square, pencil, clamps and the tools named in the operation
Fit the cured front frame into the shell
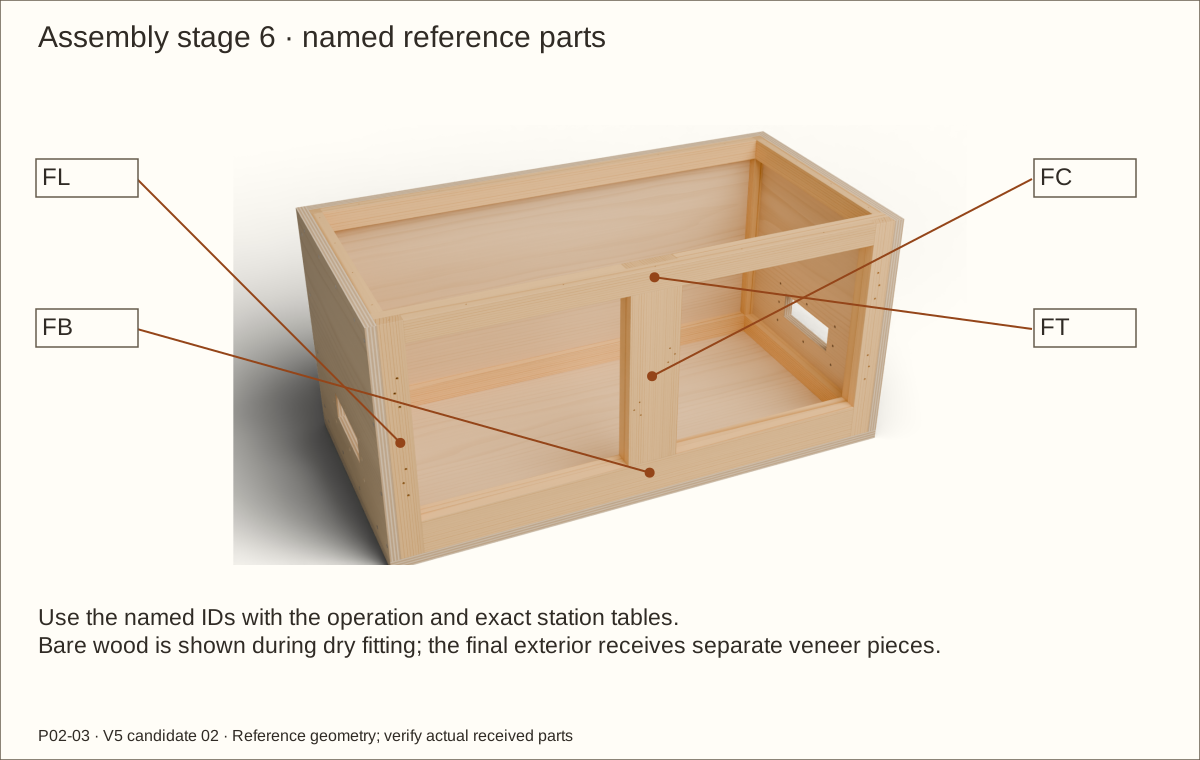
After the glue hold, fit the frame between the sides, standing on P01 with its front face flush with the side fronts. Confirm the 3 1/2 in (88.9 mm) center post and 2 1/2 in (63.5 mm) bare sill above the floor.
For each side row, transfer the center of the front pine layer, 3/8 in (9.53 mm) behind FRONT. Mark 1 in (25.4 mm), 5 in (127 mm) and 10 in (254 mm) above the side bottom plus 1 in (25.4 mm) below the side top; drill and fit four screws.
Through P01, use the same 3/8 in (9.53 mm)-behind-FRONT line. Mark both outer-stile centerlines plus 6 in (152.4 mm), 12 in (304.8 mm), 18 in (457.2 mm), 24 in (609.6 mm) and 30 in (762 mm) from outside LEFT. Fit seven screws with the assembly fully supported.
Check before continuing: The case is square and both front openings agree.
Tools / setup: Mesh snips, files, gloves for handling, eye protection, caliper and square
Before you begin: Half-inch mesh has no universal animal-containment approval.
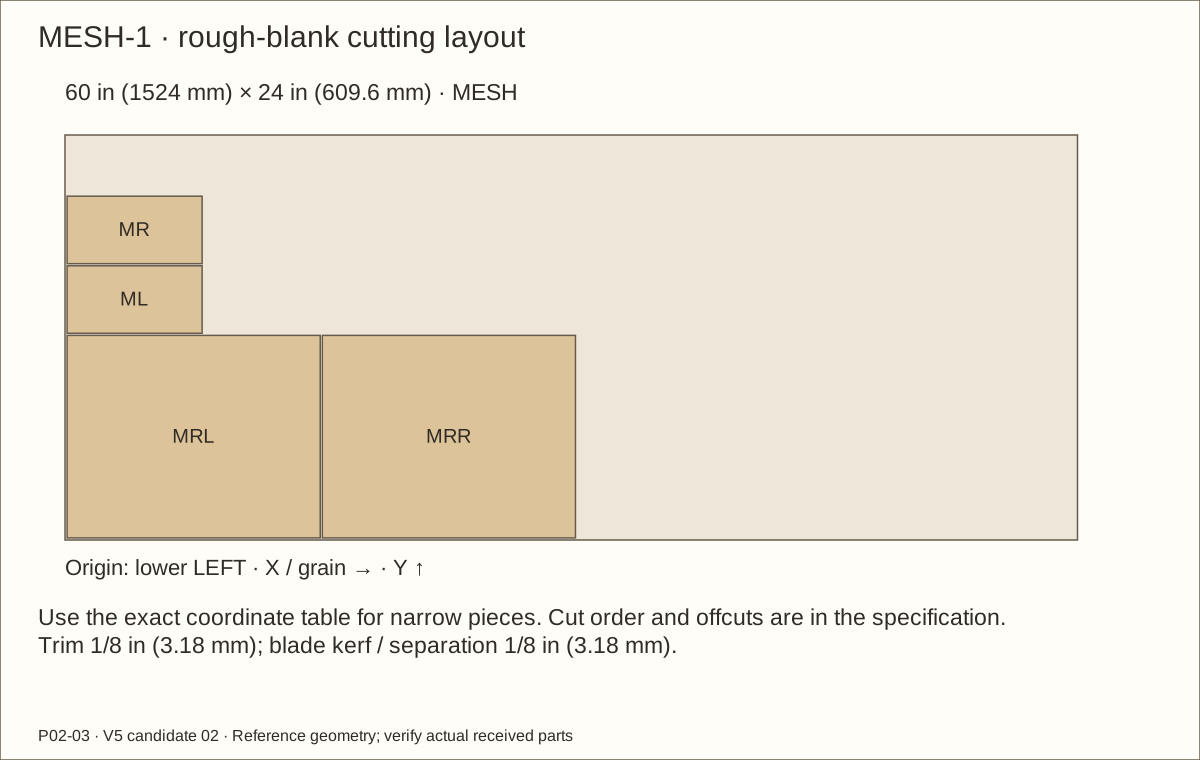
Cut and deburr the four screen blanks
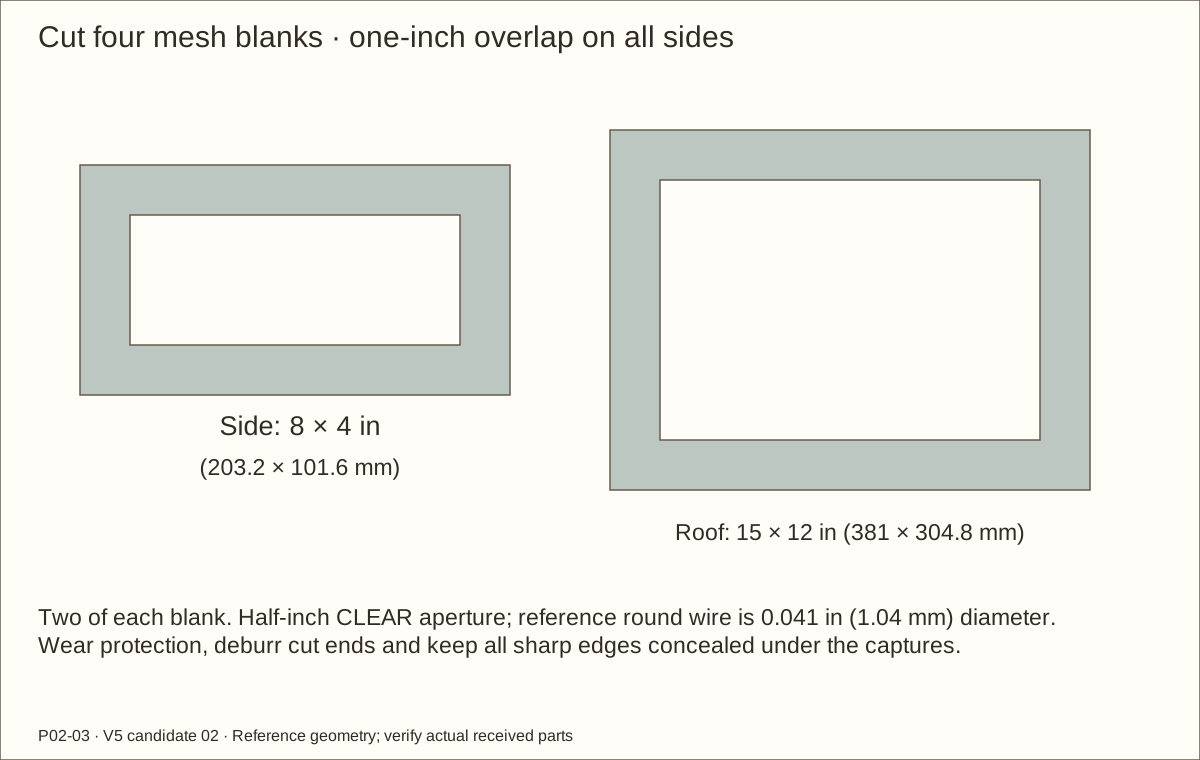
On a protected bench cut two 8 in (203.2 mm) × 4 in (101.6 mm) side blanks and two 15 in (381 mm) × 12 in (304.8 mm) roof blanks. Wear eye protection and protect hands from cut wire; remove projecting burrs and flatten the perimeter.
The reference wire is round, 0.041 in (1.04 mm) diameter with 1/2 in (12.7 mm) CLEAR aperture, giving 0.541 in (13.74 mm) center pitch. Measure the actual welded crossing thickness and aperture; do not assume the old half-inch center grid.
Center each blank to overlap its opening by 1 in (25.4 mm) on every side. Keep all cut wire ends concealed beneath its capture frame.
Check before continuing: Four blanks fit, lie flat and have no reachable sharp ends.
Dry-clamp each four-piece capture as a 9 in (228.6 mm) × 5 in (127 mm) frame on a sacrificial carrier. Its 3/4 in (19.05 mm) thickness remains supported; never route narrow loose pieces freehand.
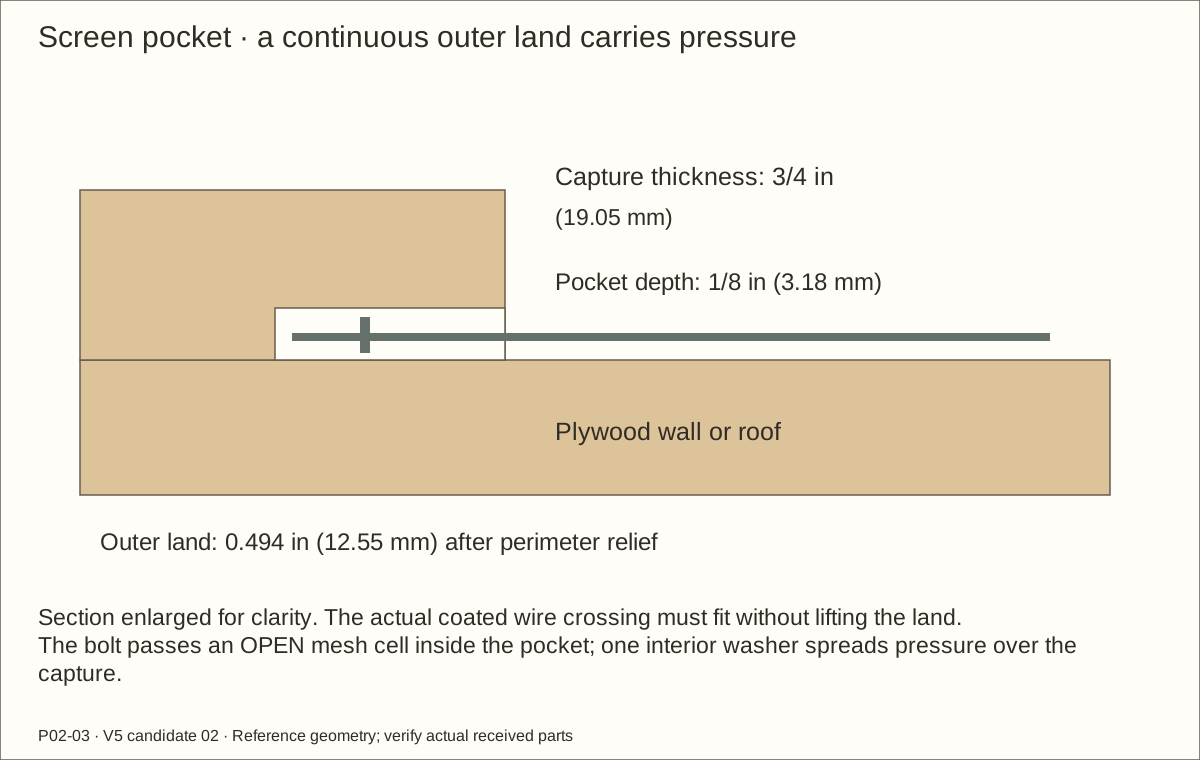
On the wall-facing side, use a clamped template to route the centered mesh footprint plus 0.006 in (0.15 mm) relief at every perimeter edge, 1/8 in (3.18 mm) deep. Square the corners. This leaves a continuous 0.494 in (12.55 mm) outer bearing land.
Test actual wire crossings plus cured coating against a side-panel offcut. The outer land must sit flat while the pocket covers all cut wire ends. If the stack does not fit, resolve H05 before changing the pocket.
Check before continuing: The complete outer land bears flat; mesh does not jack the capture off the wall.
18. Transfer side bolts through actual open wire cells
Parts: ML/MR, eight cap strips; sixteen B10 sets
Tools / setup: Clamps, backing board, actual mesh, drill, 7/32 in (5.56 mm) bit and transfer jig
Before you begin: Do not cut a mesh wire to make a hole fit. The receiving trial must preserve full wood bearing and tool access.
Transfer side bolts through actual open wire cells
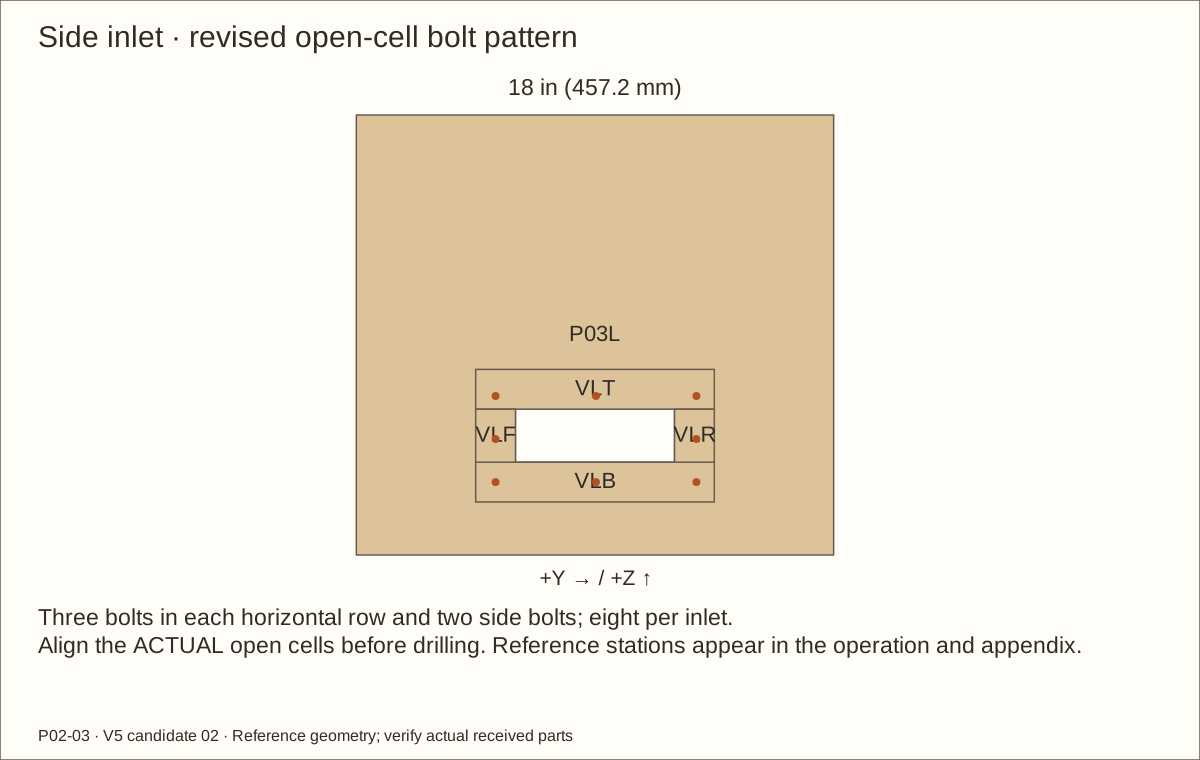
Clamp the mesh and capture against the side with the outer land fully seated. Use the reference dot pattern as a starting jig, then align the actual open cells before drilling.
For each side, the reference Y stations from FRONT are 5 1/4 in (133.35 mm), 9.037 in (229.54 mm) and 12.824 in (325.73 mm). Z stations from FLOOR UNDERSIDE are 3 29/64 in (87.71 mm) and 6.699125 in (170.16 mm) for the three-bolt rows, plus two end bolts at Z 5.076125 in (128.93 mm). Do not substitute the superseded half-inch grid.
Transfer and drill eight 7/32 in (5.56 mm) through-holes per side through open cells, never wire or a weld. A shifted received grid must still preserve the solid capture land, washer support and clearance from the cleats.
Check before continuing: All sixteen bolts pass through open cells with supported washers and concealed wire ends.
Parts: P03L/P03R and later P04; B10 actual flat-head sample
Tools / setup: 82° countersink, stopped drill, actual B10 sample, 1/8 in (3.18 mm) hex key, caliper, clamps and backing
Before you begin: H05 offcut fit and H07 qualified bearing review remain required. A digital model cannot establish connection strength.
Countersink only the outside plywood faces
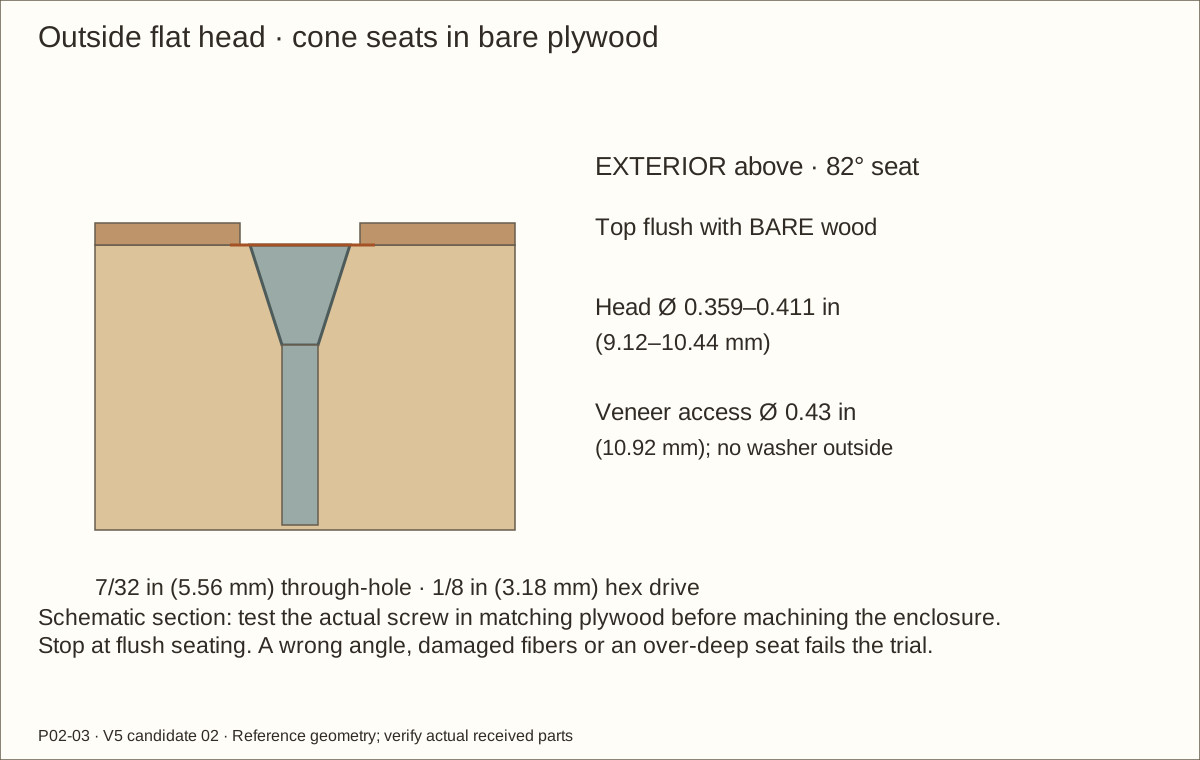
After transferring the 7/32 in (5.56 mm) through-holes, separate the stack. Clamp the plywood over sacrificial backing. Use an 82° countersink on the OUTSIDE face only; the cone supports the flat screw head.
Practice in matching offcuts first. Advance in small cuts, stop the drill and test the actual screw each time. Its top must be flush with bare wood. Published head diameter is 0.359 in (9.12 mm) – 0.411 in (10.44 mm); the maximum reference cone is about 0.127 in (3.23 mm) deep, leaving about 0.576 in (14.63 mm) of reference plywood below it.
Reject splitting, crushed fibers, voids, an oversized seat or a head below the face. Do not use a 90° countersink. Mark 0.43 in (10.92 mm) circular access in the later veneer so a 1/8 in (3.18 mm) hex key can reach each head; veneer must not carry clamping pressure.
Check before continuing: All outside heads seat flat and flush; the original through-hole and interior capture stay aligned.
Tools / setup: 1/8 in (3.18 mm) hex key, two slim 3/8 in (9.53 mm) wrenches, socket, caliper, vise, hacksaw and file
Before you begin: Stainless threads can seize. Work slowly by hand; stop for binding and follow supplier galling guidance. Any lubricant needs separate contact/finish approval. Never cut metal beside mesh or glazing.
Fit and shorten screen bolts off the enclosure
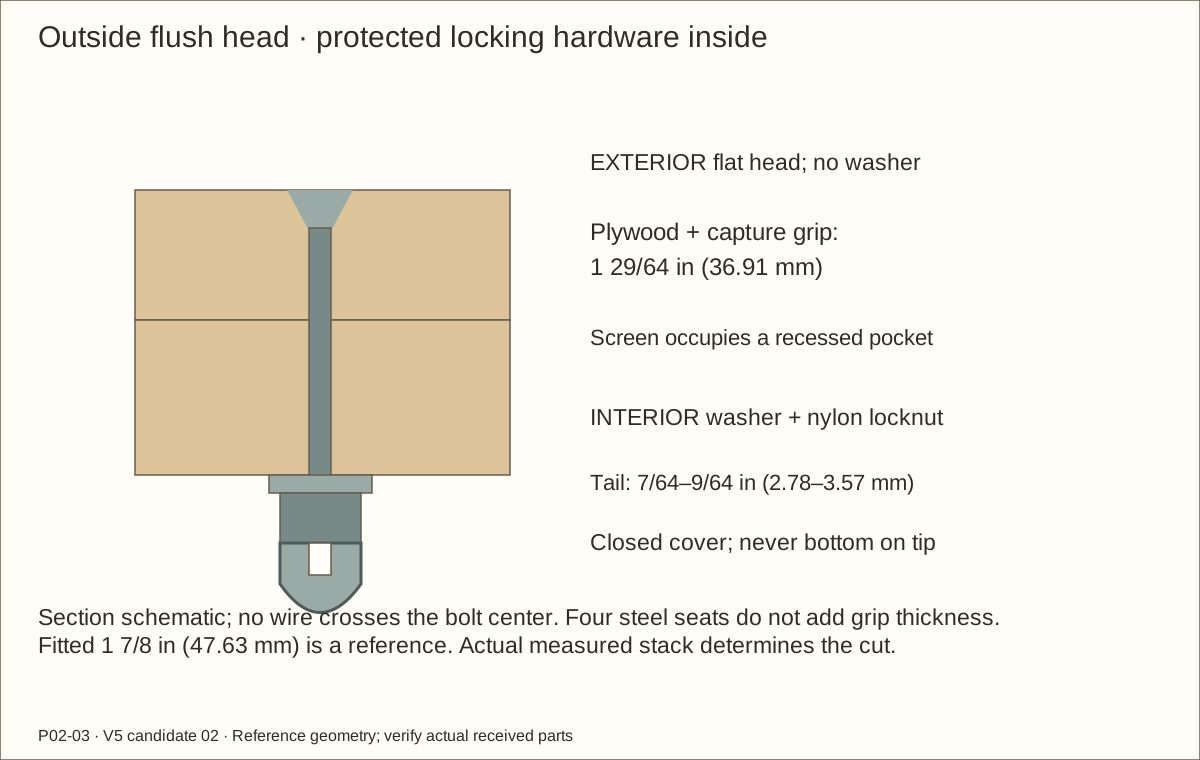
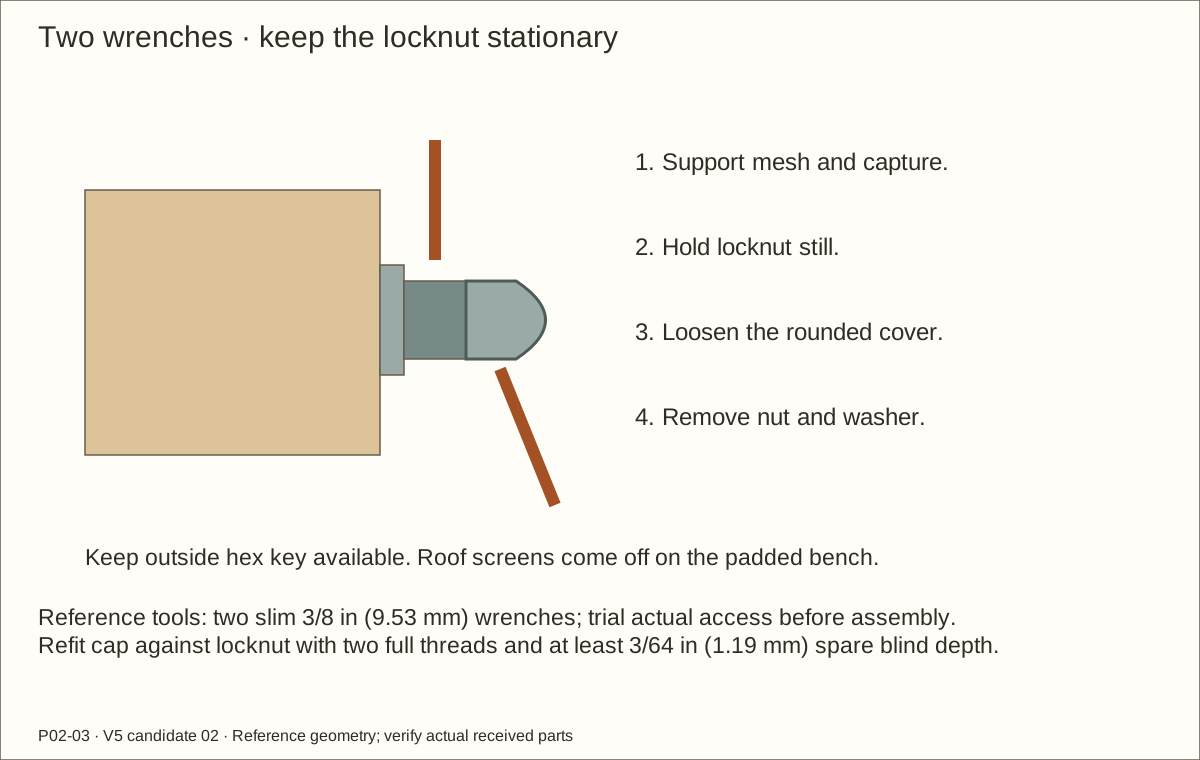
Insert each flat head from outside. Inside, place ONE washer against the capture and add the nylon locknut. Hold the head with a 1/8 in (3.18 mm) hex key and seat the nut slowly with a 3/8 in (9.53 mm) tool. Stop when lands touch; do not crush wood. A 5/8 in (15.88 mm)-outside-diameter-or-smaller socket and two slim wrenches must fit the actual trial.
Start with purchased 2 in (50.8 mm) screws, measured from the top of the head. Reference fitted length is 1 7/8 in (47.63 mm). Measure the actual plywood/capture grip, washer and nut; leave 7/64 in (2.78 mm) – 9/64 in (3.57 mm) beyond the nut. Remove the screw, clamp in a vise, cut and file with no more than 1/64 in (0.4 mm) chamfer. Keep at least two complete cap threads after the chamfer.
Refit the screw, washer and locknut. Thread on the closed cover by hand. Its 3/16 in (4.76 mm) blind depth must not bottom on the tip; leave at least 3/64 in (1.19 mm) spare depth. Hold the locknut stationary with one wrench while snugging the cover with another. The locknut retains the joint; the cap only covers the tail.
Check before continuing: Every head is flush outside; every interior tail is covered, positively engaged and accessible without crushing wood.
Tools / setup: Tape, square, pencil, clamps and the tools named in the operation
Lay out the revised door members
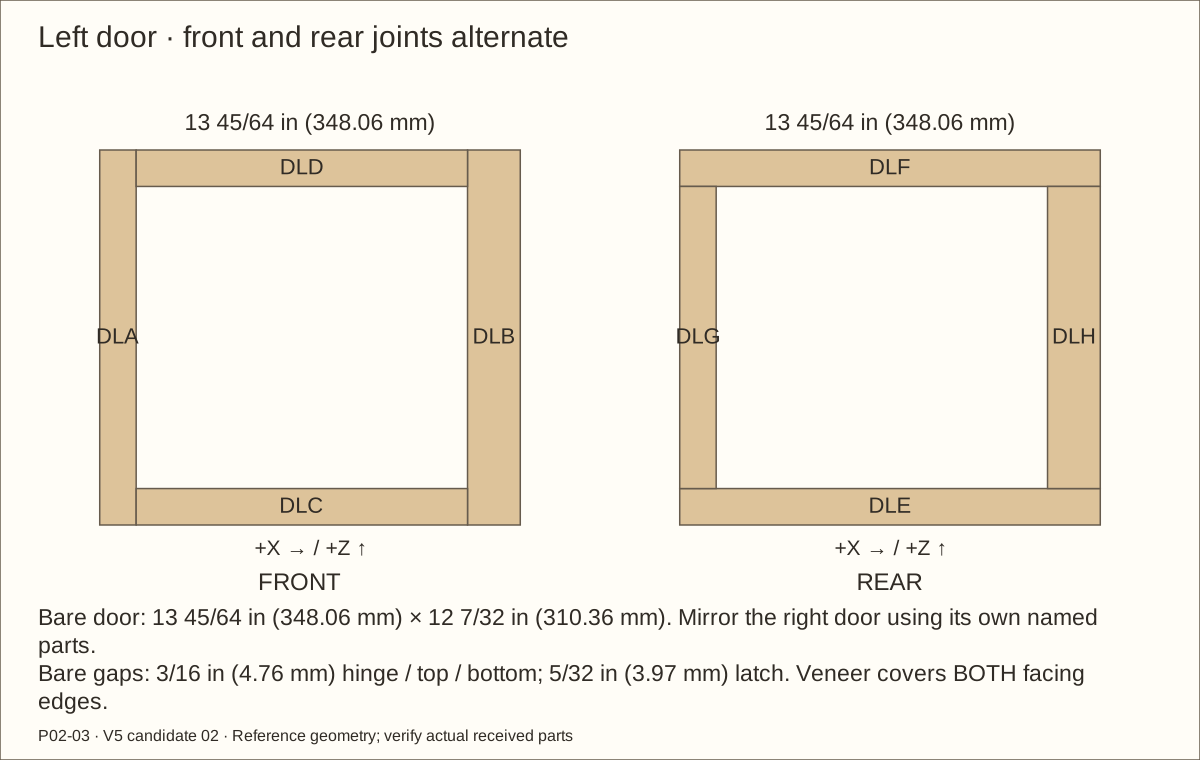
Fit each door to its own opening. Leave 3/16 in (4.76 mm) bare gaps at the hinge, top and bottom, and 5/32 in (3.97 mm) at the latch. These allow veneer on BOTH facing surfaces.
Each reference bare door is 13 45/64 in (348.06 mm) wide × 12 7/32 in (310.36 mm) high. The hinge stile and horizontal rails are 1 3/16 in (30.16 mm) wide; the latch stile is 1 23/32 in (43.66 mm). Mirror the right-hand layout.
Front layers have full-height stiles; rear layers have full-width rails. Keep the bare viewing opening 10 51/64 in (274.24 mm) × 9 27/32 in (250.03 mm) and its original rabbet datum. Use the labeled cut table, not the old 1/8 in (3.18 mm)-gap door dimensions.
Check before continuing: Both door frames fit with the revised bare gauges and unchanged viewing openings.
Parts: Door layers; twelve S8 screws; Titebond III
Tools / setup: Tape, square, pencil, clamps and the tools named in the operation
Glue and screw both door laminations
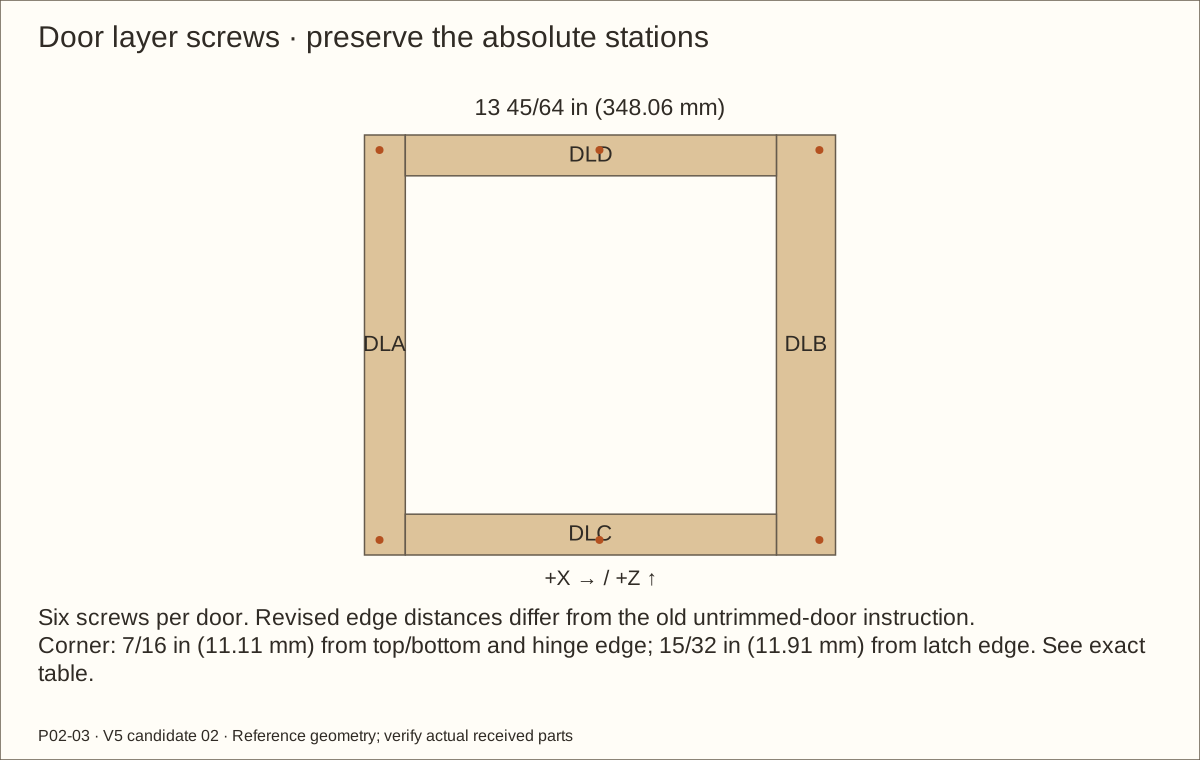
Dry-clamp each door flat and compare diagonals. Glue bare mating faces under the same temperature and assembly-time conditions as the front frame.
At the retained absolute screw stations, the corner holes are 7/16 in (11.11 mm) from the newly trimmed top/bottom and hinge edges, and 15/32 in (11.91 mm) from the newly trimmed latch edge. Rail-center holes keep the original viewing-opening centerline.
Use the exact door drawing for all six holes per leaf. Clearance-drill the front layer, pilot the rear, and fit the twelve S8 screws without twisting the glue-up.
Check before continuing: Both laminations are flat and square with no exposed tips.
Required wait: At least 24 hours without stressing or machining new glue joints; follow the glue maker’s conditions.
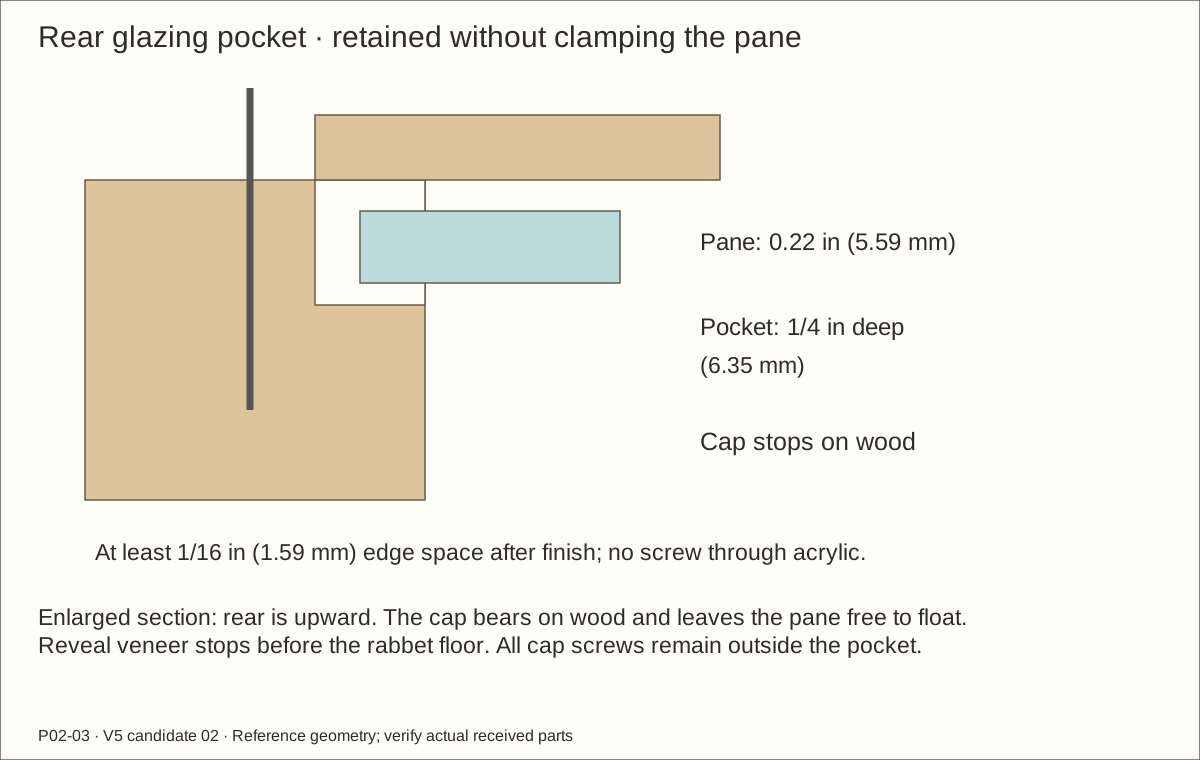
A rabbet is a shallow edge pocket. On a laminated offcut, set the router to remove 3/8 in (9.53 mm) outward from the bare viewing opening and 1/4 in (6.35 mm) into the rear face.
Support and clamp the full door on a carrier. Guide the router around the REAR opening in controlled passes, then square the corners with a sharp chisel.
Check depth against the actual acrylic plus coating trial. Veneer on the viewing reveal stops before the rabbet floor at Y 1 1/4 in (31.75 mm); no veneer is placed inside the glazing pocket.
Check before continuing: The pocket is continuous and square without overcutting the thin surrounding wood.
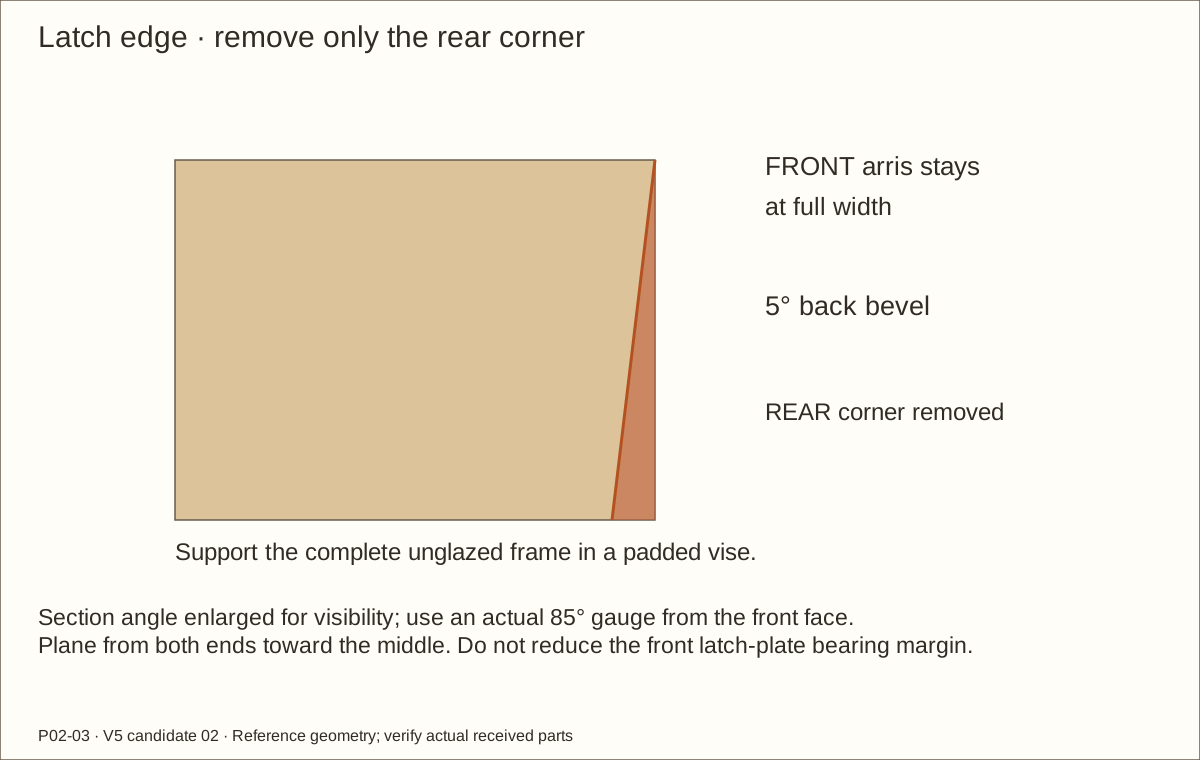
Set a sliding bevel to 85° from the front face, which is 5° from square. Trial on a laminated scrap first. Mark the full-width front arris, meaning the sharp meeting edge of the two faces.
Clamp the whole door edge-up in a padded vise. Plane thin shavings from both ends toward the middle to avoid breaking out the rail ends. Remove only the rear latch corner; preserve the new front width.
Check the angle along the whole edge, mirror it on the other door, and refit the bare gap gauges. Do not trim the latch edge farther: the hasp plate has very little spare supporting wood.
Check before continuing: Each rear corner clears while its front arris and latch-plate support remain intact.
Parts: SP-HL0/HL1/HR0/HR1 left and right; HSP aluminium bar
Tools / setup: Vise, supported metal saw, drill, clamps, backing block, file and caliper
Before you begin: This custom stand-off mounting has no tested load rating; H01 must be resolved before use.
Make the eight proposed hinge spacers
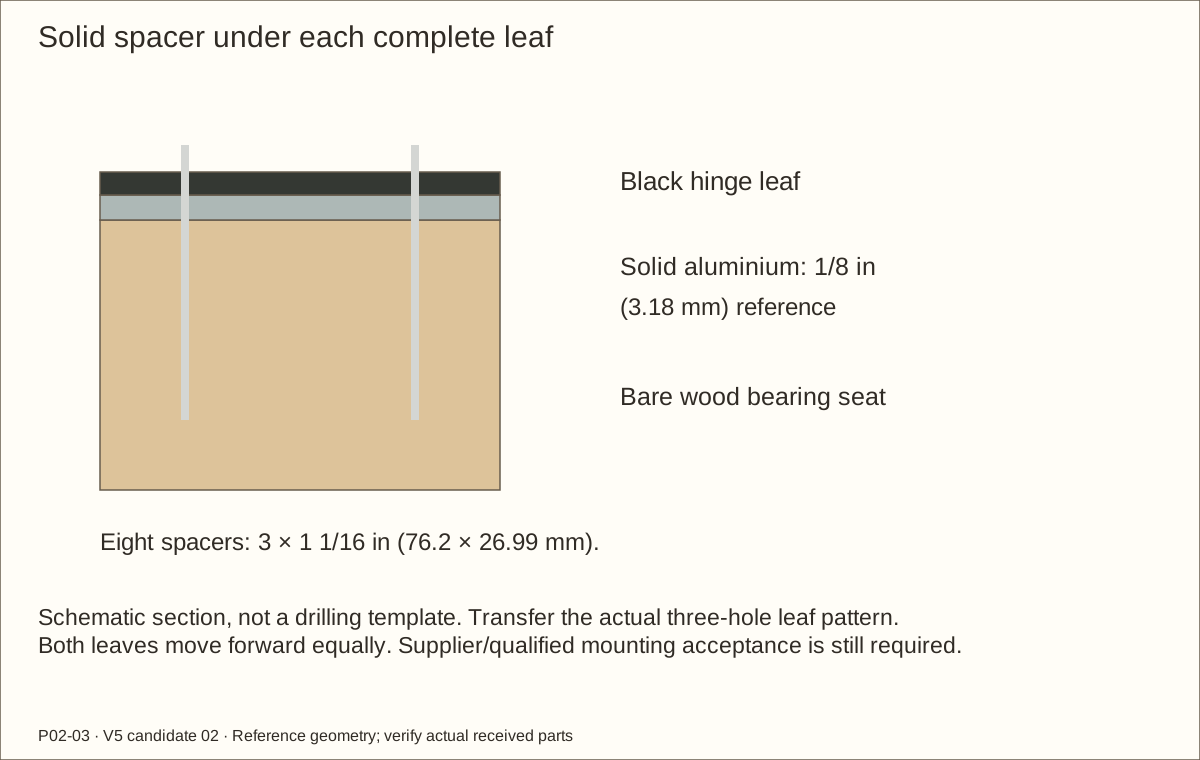
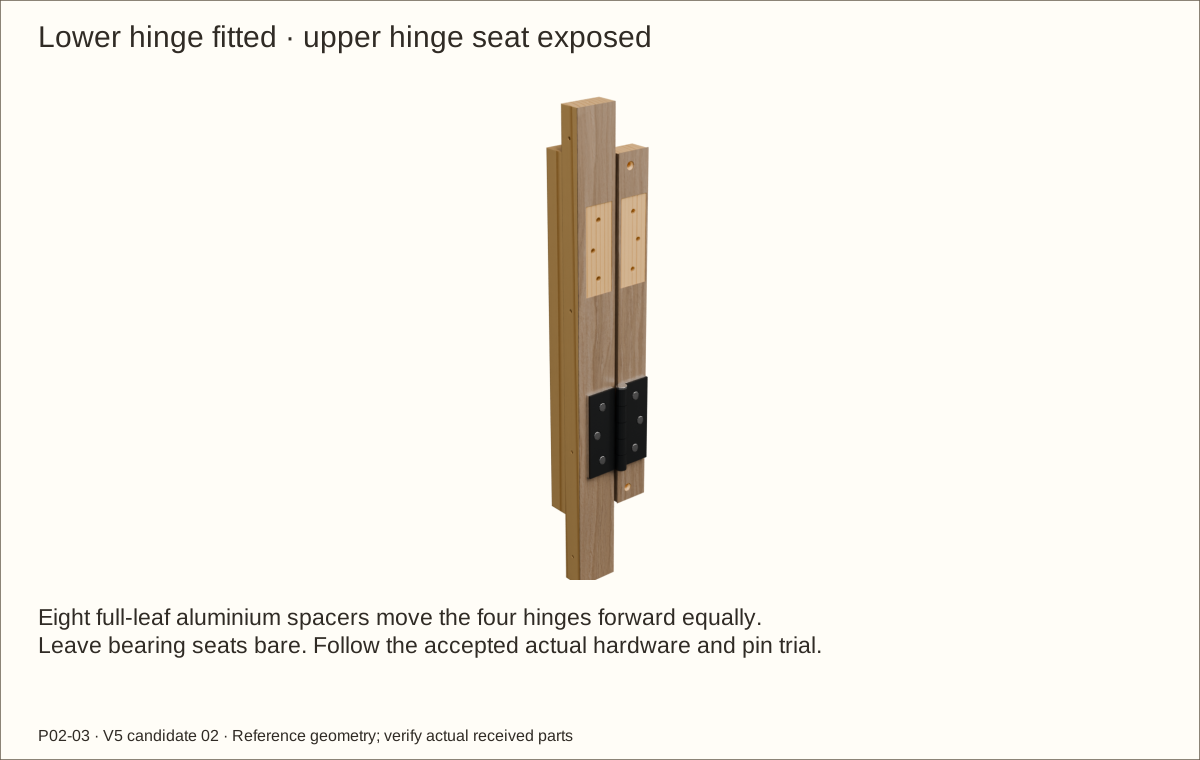
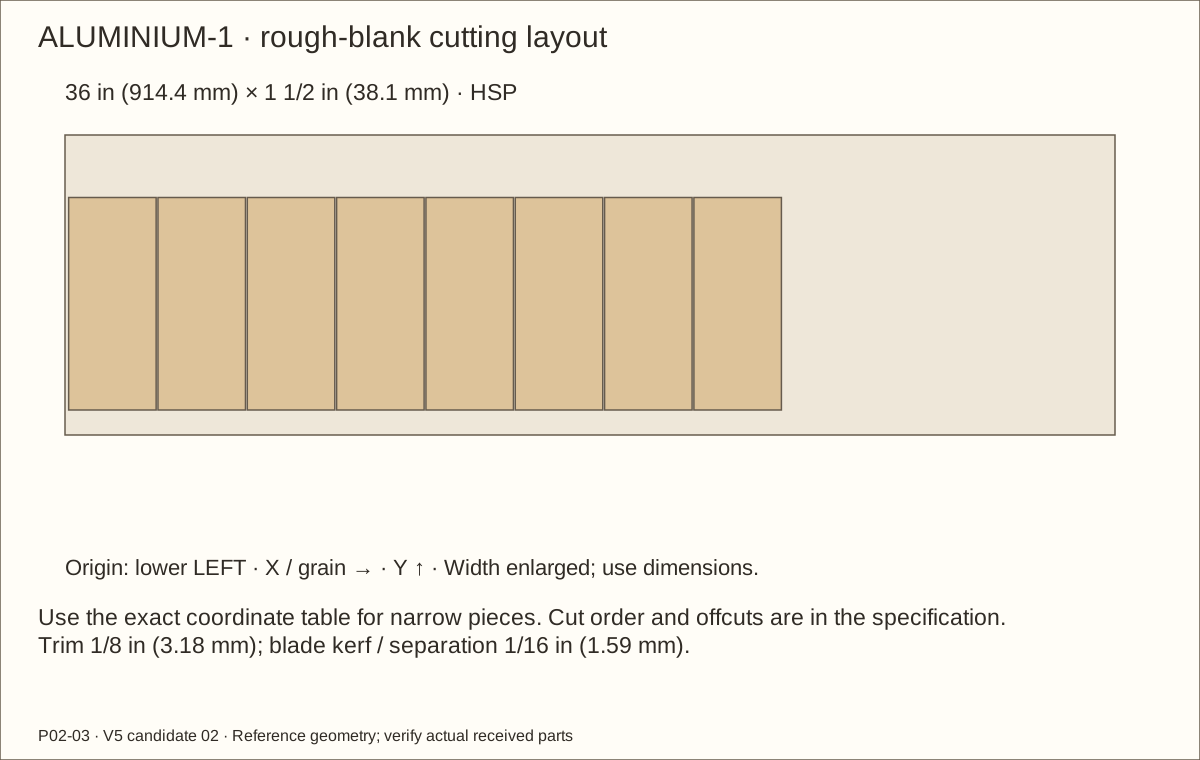
After H01 mounting acceptance, cut eight solid spacers 3 in (76.2 mm) × 1 1/16 in (26.99 mm) × 1/8 in (3.18 mm) from the allocated aluminium bar. Clamp the bar and waste for each cut; file edges smooth and keep both faces flat.
Measure equal thickness on every spacer; minimum permitted is 7/64 in (2.78 mm). Each supports one complete hinge-leaf bearing footprint. There is no veneer or adhesive between spacer and wood.
Clamp the actual leaf over its labeled spacer and transfer the three holes. Drill 11/64 in (4.37 mm) clearance through the aluminium over backing and deburr both sides. The received screw/head trial still controls fit.
Check before continuing: All eight spacers are flat, equal, fully support the leaves and match the actual holes.
Tools / setup: Tape, square, pencil, clamps and the tools named in the operation
Before you begin: Do not reuse the old three-inch end setting after trimming the door.
Measure hinge pins and choose the end setting
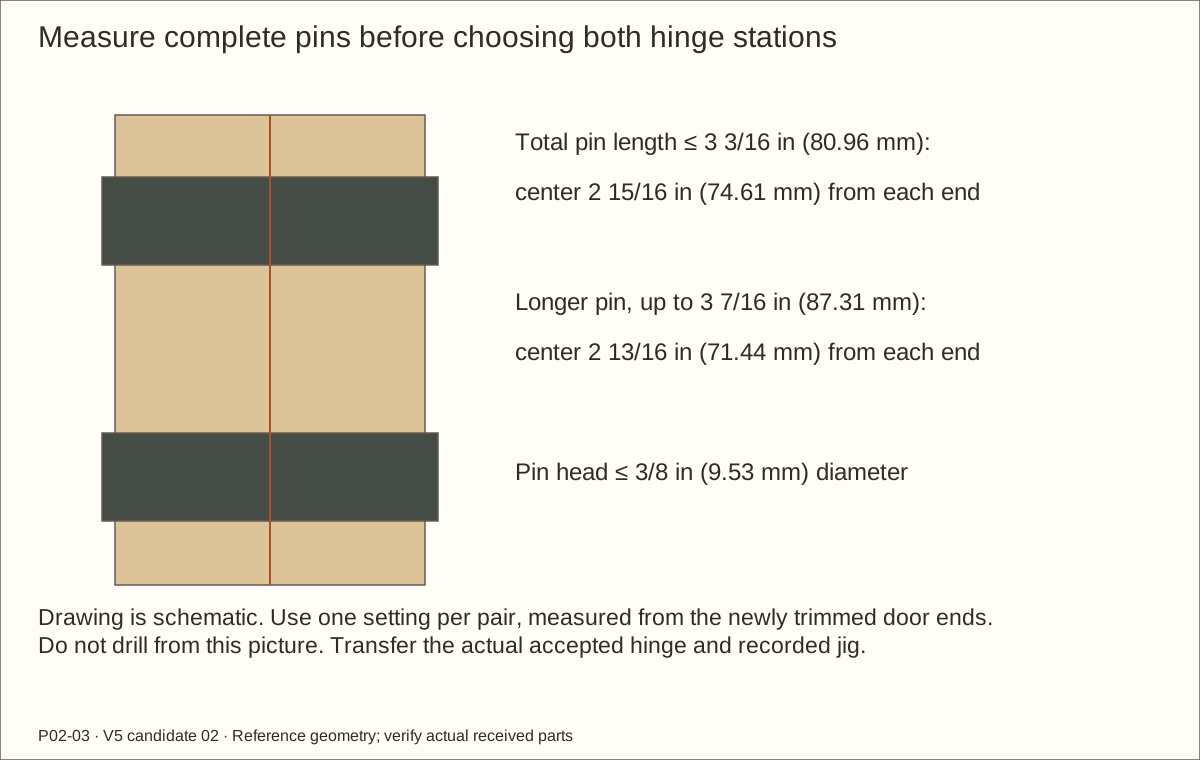
Check each hinge against the manufacturer drawing: 3 in (76.2 mm) high, 2 1/2 in (63.5 mm) overall width, 0.08 in (2.03 mm) leaf thickness and six #8 holes. Middle holes are nominally 0.31 in (7.87 mm) from outer long edges; end holes are 0.53 in (13.46 mm) from both adjacent edges. Accept hole-center differences no greater than 1/32 in (0.79 mm).
Remove each pin and measure its full length including the head. For total length no more than 3 3/16 in (80.96 mm), mark hinge centers 2 15/16 in (74.61 mm) from the new door ends. For longer pins up to 3 7/16 in (87.31 mm), use 2 13/16 in (71.44 mm) at BOTH ends. Use one setting for each pair.
Pin-head diameter must be no more than 3/8 in (9.53 mm). Return a nonconforming hinge; do not enlarge metal holes or invent a third setting. The drawings/model show the shorter-pin reference setting.
Check before continuing: Exact hardware, pin dimensions and selected setting are recorded.
27. Trial the complete hinge stack on laminated offcuts
Parts: Two 1 1/2-inch laminated scraps; hinges, spacers and S8H
Tools / setup: Laminated test jig, caliper, square, straightedge, stopped drill and hand driver
Before you begin: Do not infer adequacy from screw length alone; supplier/qualified mounting acceptance remains necessary.
Trial the complete hinge stack on laminated offcuts
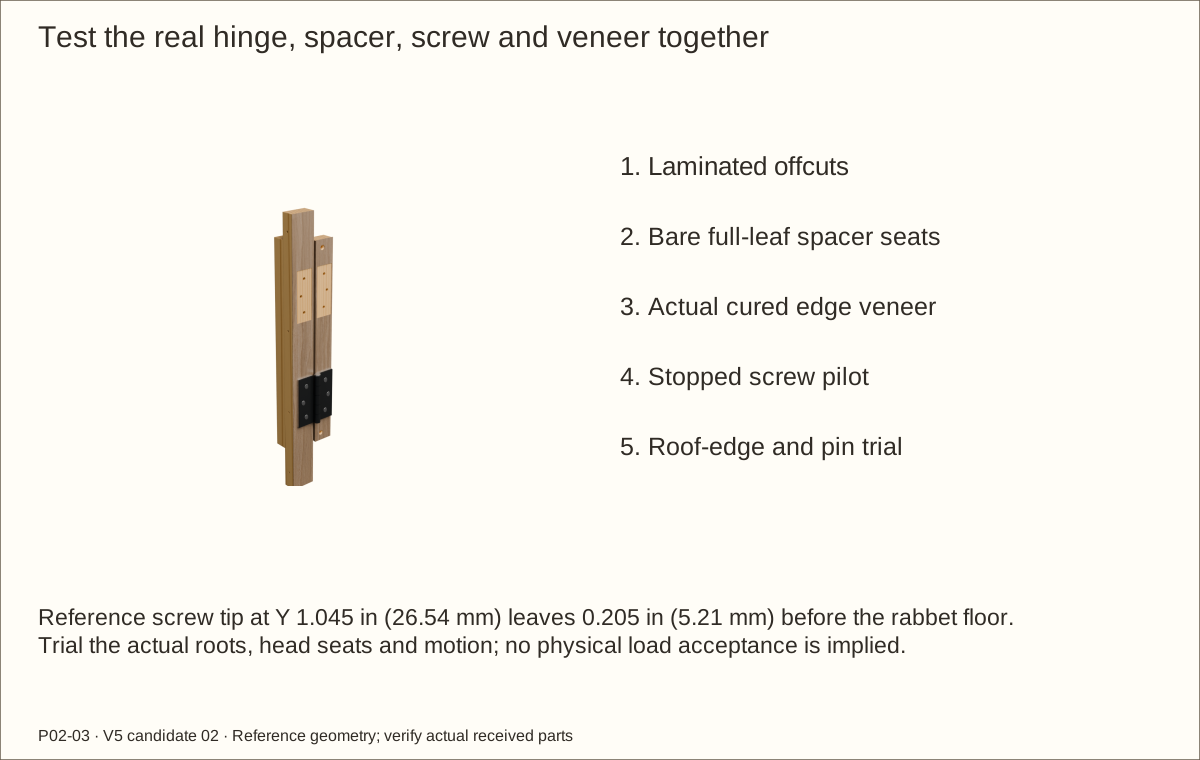
Make a flush pair of laminated-pine scraps separated by the revised bare hinge gap. Add accepted veneer samples on exposed edges, leaving the spacer bearing seats bare. Transfer the chosen hinge spacing from the door with a measuring strip.
Fit both leaves on equal spacers. Align barrels with a straightedge. Trial the #8 × 1 1/4 in (31.75 mm) screws: head flush in metal, no bottoming, and stopped pilot into the pine. The reference tip reaches Y 1.045 in (26.54 mm), leaving 0.205 in (5.21 mm) before the glazing-rabbet floor.
Use the actual screw root for the pilot, starting with 7/64 in (2.78 mm). Check at least 1/16 in (1.59 mm) wood beyond every tip. Open through 100° and rehearse complete pin extraction with a mock roof edge and the actual veneer stack.
Check before continuing: All leaves bear flat, pins move freely and the complete removal path clears.
Tools / setup: Tape, square, pencil, clamps and the tools named in the operation
Transfer and fit both hinge pairs
With helpers, support the empty shell on its back. Block each door front flush with the frame using 3/16 in (4.76 mm) bare hinge/top/bottom and 5/32 in (3.97 mm) latch gauges.
Place the labeled hinges and spacers at the accepted setting. Use the retained absolute pin/holes drawing and actual trial; the pin axis is not newly centered in the enlarged gap. Align both barrels with one straightedge and clamp.
Transfer all six holes per hinge, remove the metal and drill square stopped pilots. Keep clear of earlier fasteners. Refit by hand and support the door when opening. Never pull a twisted leaf flat with its screws.
Check before continuing: Both doors move freely through the tested range with the full veneer trial in place.
Tools / setup: Actual hasp, laminated trial, caliper, clamps, stopped drill and hand driver
Before you begin: The model’s formed offsets are illustrative; the actual folded hasp controls acceptance.
Trial and fit the two independent hasps
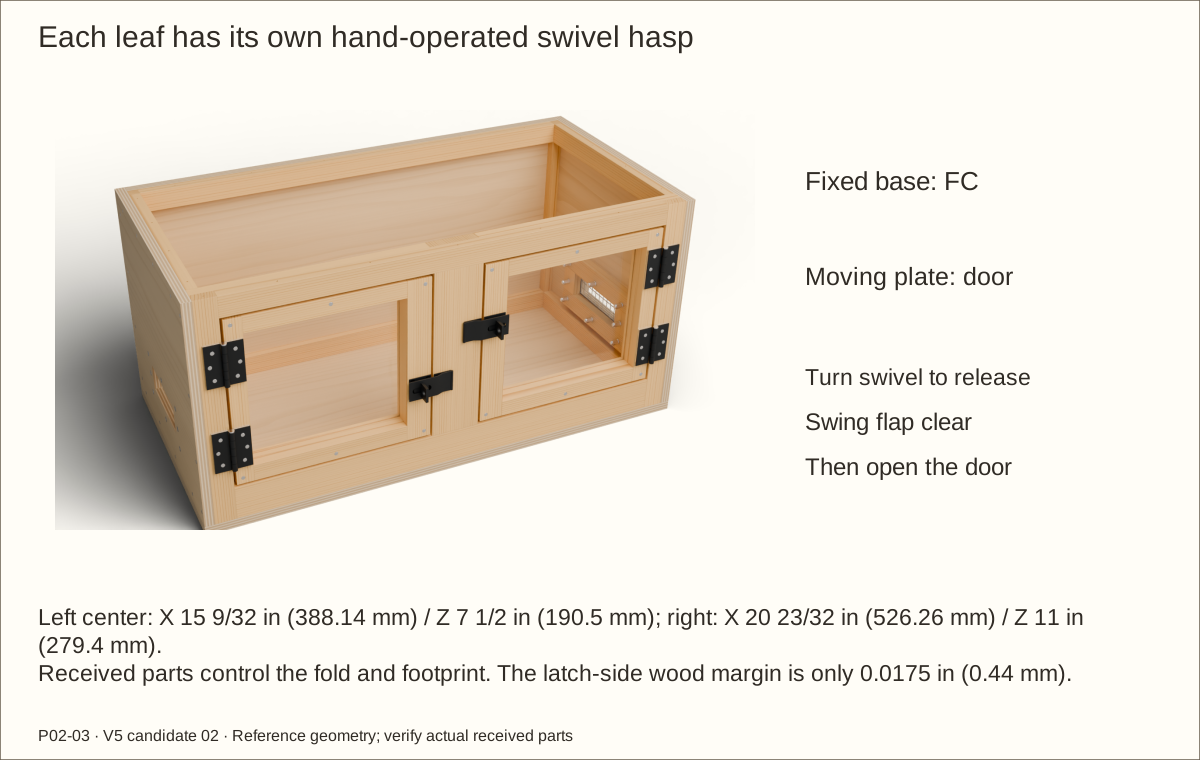
Place each fixed hasp base on FC and the swivel plate on its moving latch stile. Reference swivel centers are X 15 9/32 in (388.14 mm) / Z 7 1/2 in (190.5 mm) for LEFT and X 20 23/32 in (526.26 mm) / Z 11 in (279.4 mm) for RIGHT, measured from outside LEFT and FLOOR UNDERSIDE.
Trial received plates on laminated offcuts across the actual finished gap. Both plates and every hole must be fully supported. The nominal latch-side plate margin is only 0.0175 in (0.44 mm); reject overhang or a poor fold fit rather than shaving more door wood.
Transfer three fixed-base and four swivel-plate holes per hasp. Use seven #10 × 5/8 in (15.88 mm) screws each, actual-root-matched stopped pilots and matching metal countersinks. Keep at least 1/16 in (1.59 mm) wood beyond every tip and clear of earlier screws. Longer kit screws are not used.
Check before continuing: Each hasp closes without pulling the door sideways and its flap swings completely clear.
Tools / setup: Tape, square, pencil, clamps and the tools named in the operation
Fit the four rear door stops
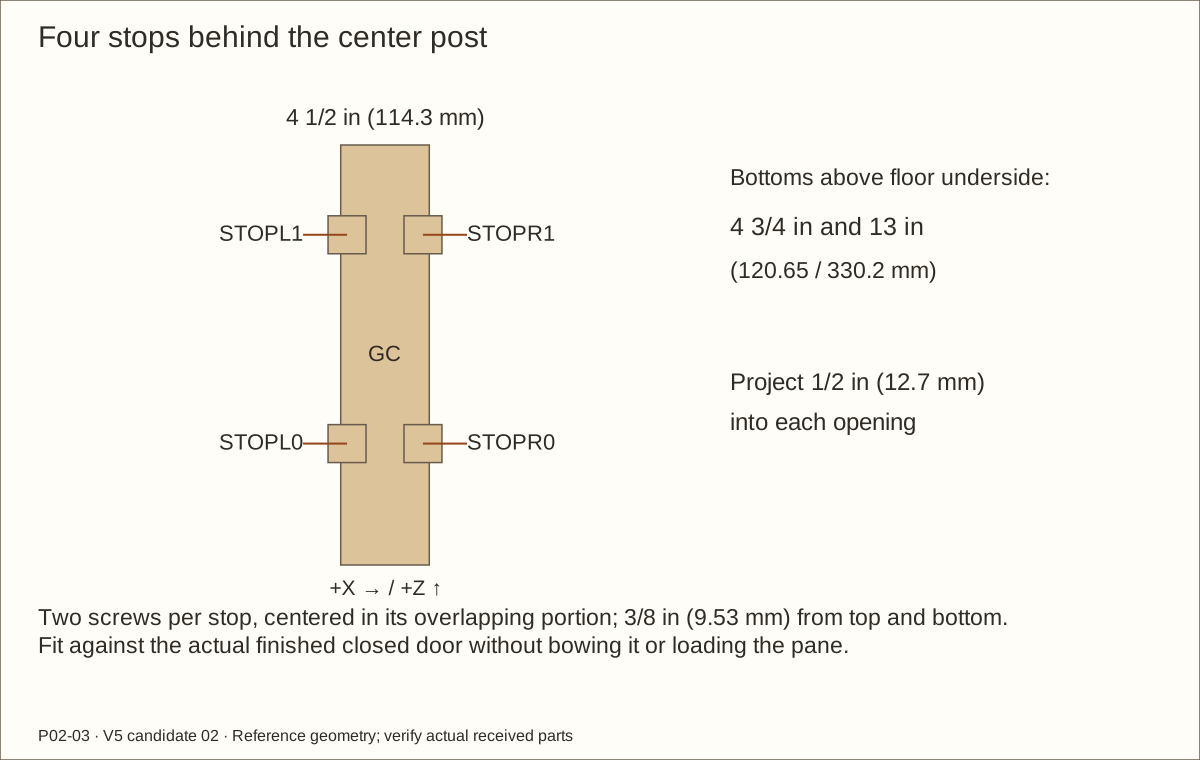
Close and support the doors flush. Set stop bottoms at 4 3/4 in (120.65 mm) and 13 in (330.2 mm) above the floor underside. Project each stop 1/2 in (12.7 mm) into its opening, with 1 in (25.4 mm) overlapping the rear center member.
Mark the middle of the overlapping portion and 3/8 in (9.53 mm) from each stop’s top and bottom. Clearance-drill the stop and pilot the rear center member; fit two screws per stop.
Hand-fit against the closing door after the actual finish is present. Stops must not bow the door, pinch acrylic or prevent the hasp from closing.
Check before continuing: All four stops meet the doors gently and every tip remains buried.
Parts: Supported door, labeled pins, roof temporarily in position
Tools / setup: Helper, padded adjustable support and the actual removable pins
Before you begin: Do not hammer against unsupported glazing or allow a door to hang from one loose pin.
Practice roof-on door removal
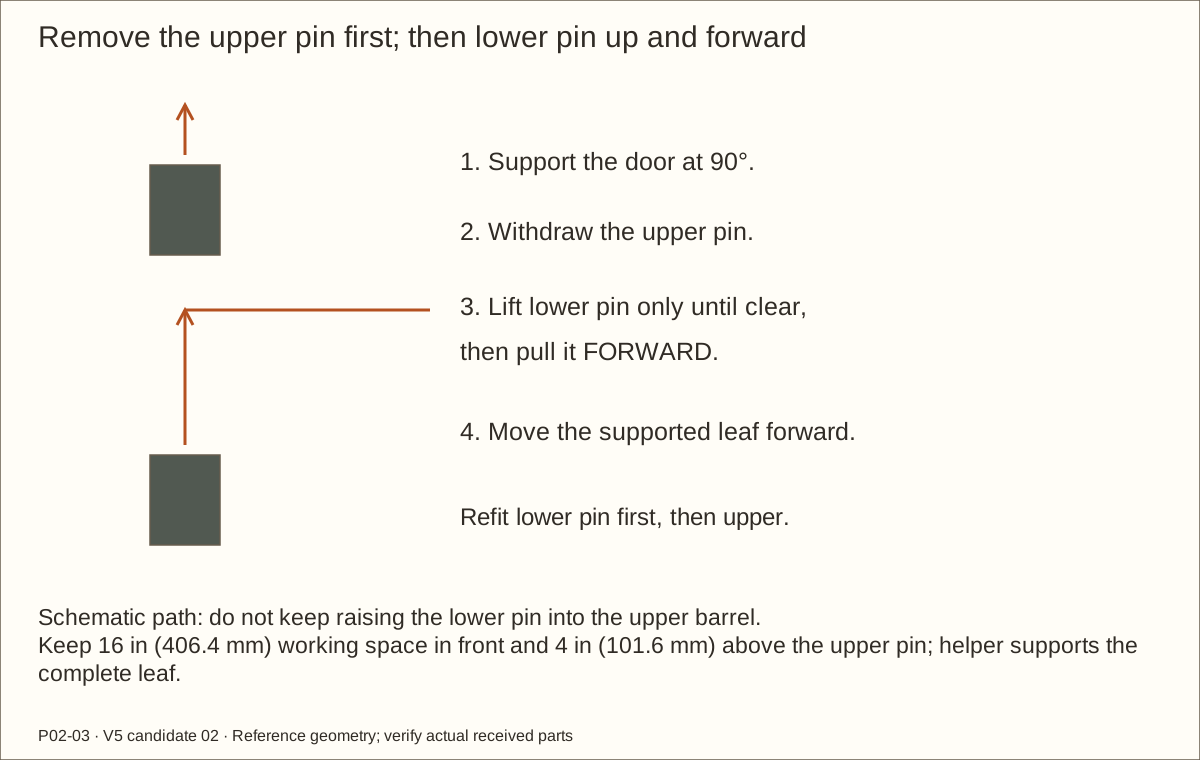
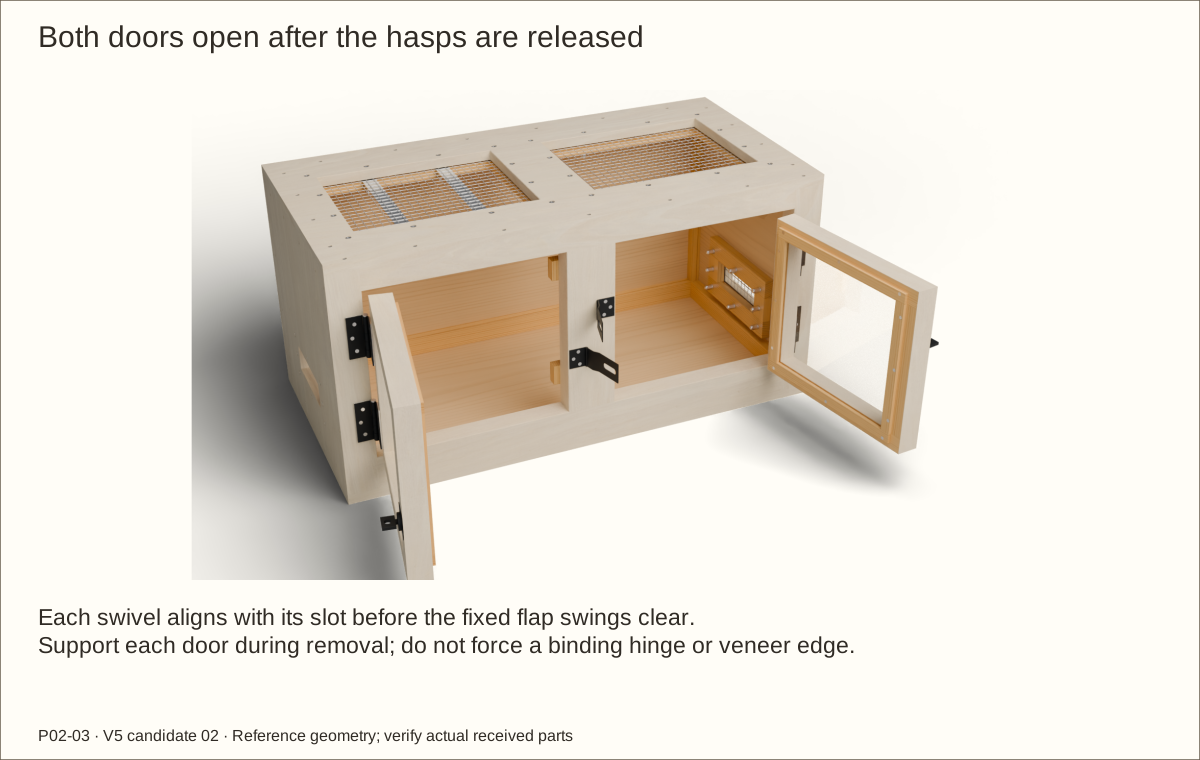
Have a helper support the complete leaf continuously or use a padded adjustable block that follows its arc. Keep the other door latched. Turn the swivel to the slot direction, swing the hasp flap clear and open the supported door to 90°.
Keep 16 in (406.4 mm) working space ahead and 4 in (101.6 mm) above the upper pin. Withdraw the UPPER pin first; then withdraw the LOWER pin only until its tip clears its own barrel and pull it forward. Do not keep lifting the lower pin into the upper barrel.
Move the supported leaf forward onto padding. To refit, align the barrels without forcing them and insert the lower pin first, then the upper. Close and hand-latch before repeating the other leaf.
Check before continuing: Both complete removal/refit paths pass with the roof and trial veneer in place.
Parts: RCLF/RCLB/RCLL/RCLR and matching RCR pieces
Tools / setup: Router, template, carrier, chisel and depth gauge
Machine the two roof capture frames
Dry-clamp each 16 in (406.4 mm) × 13 in (330.2 mm) frame on a safe carrier. On the roof-facing side, route the centered 15 in (381 mm) × 12 in (304.8 mm) mesh footprint plus 0.006 in (0.15 mm) perimeter relief, 1/8 in (3.18 mm) deep.
Square the pocket corners and retain the continuous 0.494 in (12.55 mm) outer bearing land. Test the actual welded stack and cured finish against a roof offcut.
Keep the left and right pieces labeled; only RCLF/RCLB receive the steel end seats in the next operation.
Check before continuing: Each frame sits flat over the sample mesh without exposing wire ends.
Tools / setup: Vise, metal saw, file, guided router/chisel, carrier and actual stack samples
Cut the steel bars and deepen their end seats
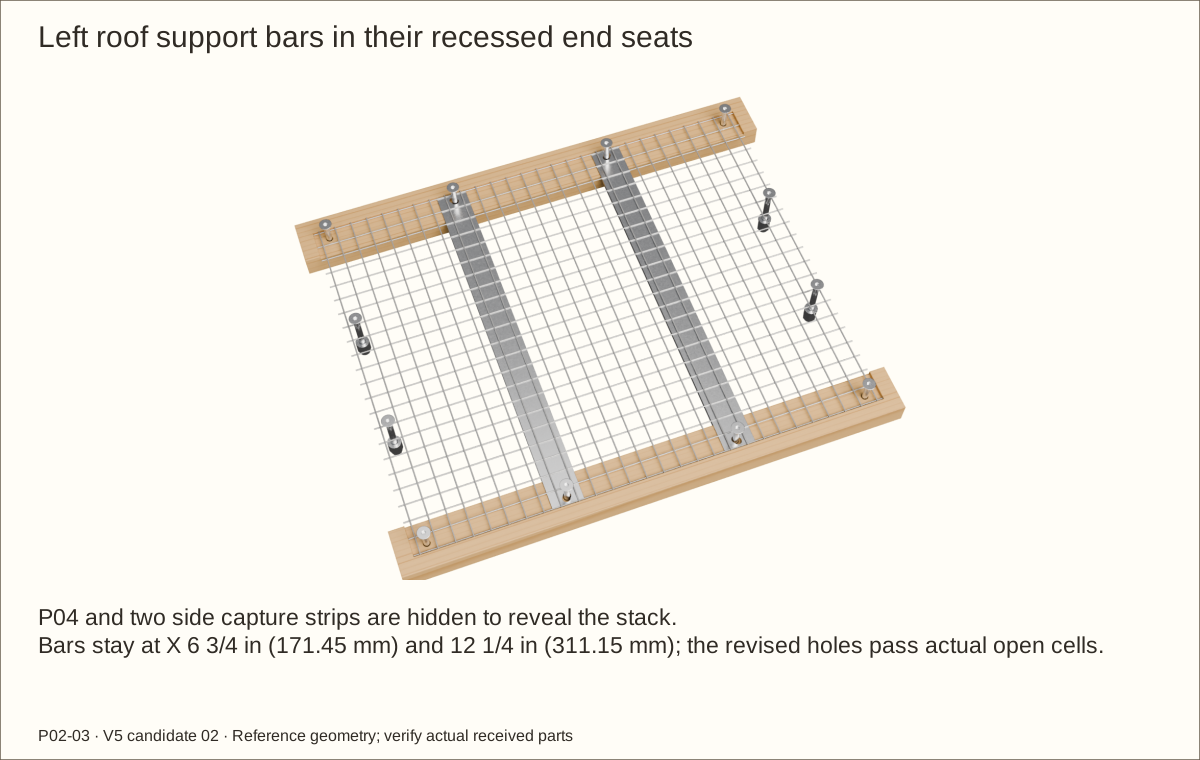
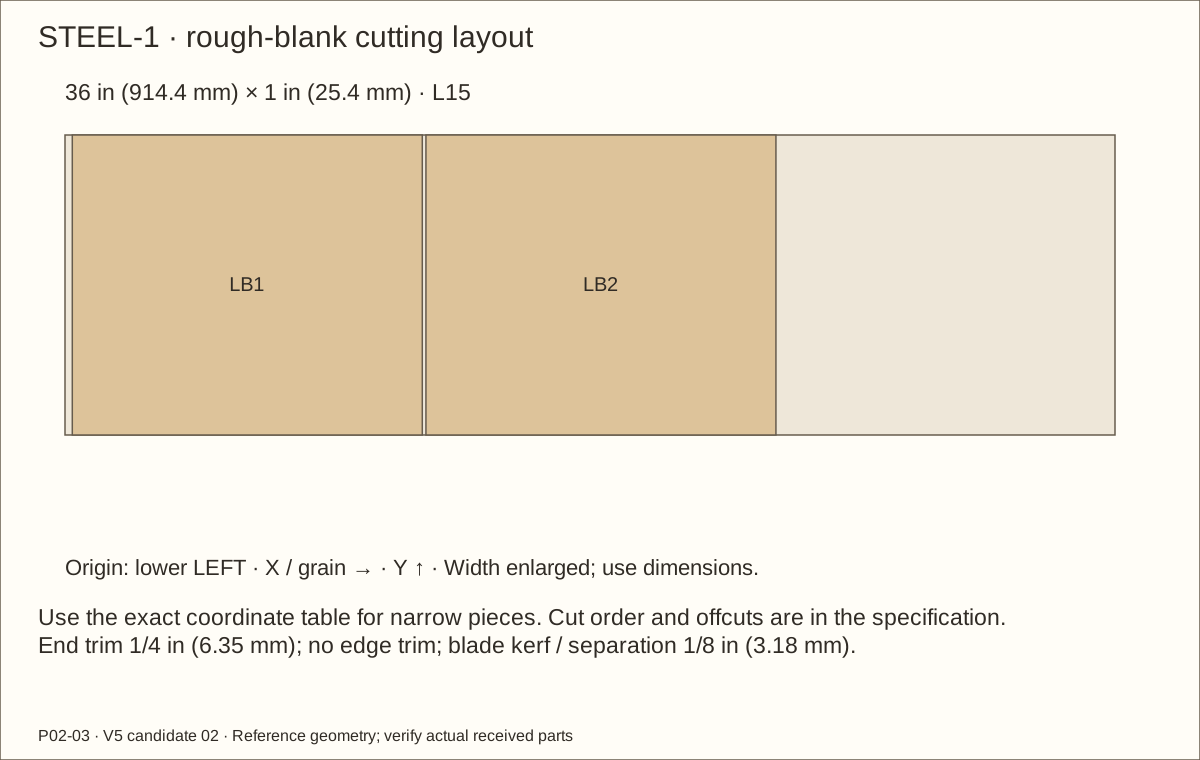
Cut two 12 in (304.8 mm) lengths of the specified 1 in (25.4 mm) × 1/8 in (3.18 mm) steel bar in a vise. File every cut edge. Their centerlines remain X 6 3/4 in (171.45 mm) and 12 1/4 in (311.15 mm), running from Y 3 in (76.2 mm) to 15 in (381 mm) beneath the LEFT screen.
On RCLF/RCLB, mark 1 in (25.4 mm)-wide seats centered 5 1/4 in (133.35 mm) and 10 3/4 in (273.05 mm) from the rail LEFT end. Each extends 1 in (25.4 mm) inward from the existing mesh-relief edge, preserving the outer land.
Clamp the rails on a carrier and deepen only these seats with a guided router or chisel. Trial actual steel plus mesh and cured film against a roof offcut: the land must sit flat while both bars support the mesh.
Check before continuing: Four seats fit without removing the outer bearing land or adding stack height.
Tools / setup: Actual mesh stack, clamps, drill, metal bits, backing board and files
Before you begin: The revised stations replace the original half-inch-pitch and quarter-inch-from-steel-end drilling rules.
Drill roof bolts through mesh and steel
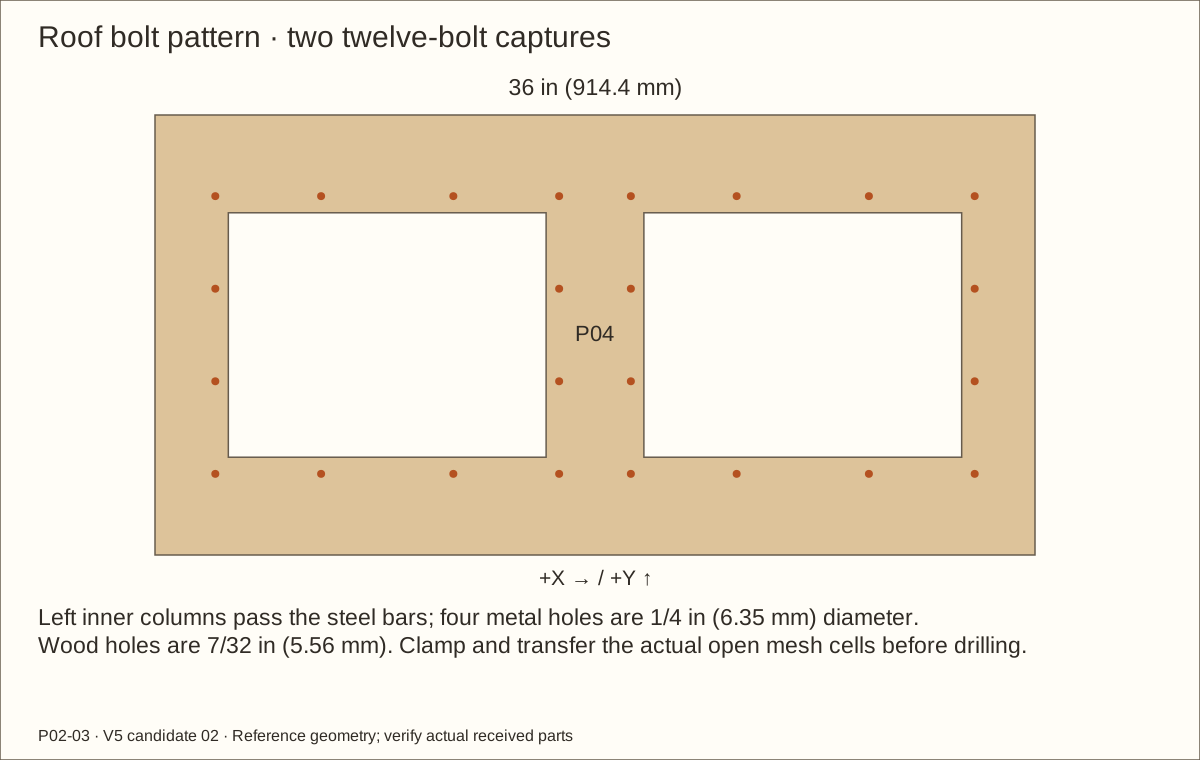
Dry-clamp the complete stack and align the actual mesh cells. The reference left X columns are 2.467 in (62.66 mm), 6.795 in (172.59 mm), 12.205 in (310.01 mm) and 16.533 in (419.94 mm); add 17 in (431.8 mm) for the right screen. Front/back Y rows are 3.3195 in (84.32 mm) and 14.6805 in (372.88 mm). Side-row Y stations are 7.1065 in (180.51 mm) and 10.8935 in (276.69 mm).
Transfer the four steel holes from the two inner left columns and front/back rows. They sit 0.045 in (1.14 mm) toward enclosure center from each bar centerline and 0.3195 in (8.12 mm) from its ends. Remove the bars, clamp over backing, drill 1/4 in (6.35 mm) holes and deburr both faces.
Drill the twenty-four 7/32 in (5.56 mm) wood-stack holes through actual open cells. Separate the roof and countersink its OUTSIDE top face at 82° as in the side trial. Refit twelve sets per opening: flat head above, washer/locknut/closed cover below. Four pass the recessed steel without added grip thickness. Fit and shorten removed screws by the measured tail rule.
Check before continuing: All 24 bolts pass open cells; four pass steel; every land bears flat.
Tools / setup: Tape, square, pencil, clamps and the tools named in the operation
Before you begin: Do not lift the enclosure by its removable roof.
Lower and screw down the screened roof
With a helper, lower the roof onto the side ledgers, rear ledger and front frame. Verify underside captures clear the ledgers and every bearing face touches.
For each side ledger, transfer its centerline and mark Y 2 1/2 in (63.5 mm), 7 in (177.8 mm), 11 1/2 in (292.1 mm) and 15 3/4 in (400.05 mm). For the rear, reuse the six equally spaced width marks between X 4 in (101.6 mm) and 32 in (812.8 mm).
For the front frame, use Y 3/8 in (9.53 mm) and both outer-stile centerlines plus X 6 in (152.4 mm), 12 in (304.8 mm), 18 in (457.2 mm), 24 in (609.6 mm) and 30 in (762 mm). Drill clearance/pilot pairs and fit all 21 screws. Preserve access to every screen nut and roof screw.
Check before continuing: The roof sits without rocking, both vents are clear and no fastener tip is exposed.
Parts: Left screen and LB1/LB2; actual optional fixture
Tools / setup: Tape, square, pencil, clamps and the tools named in the operation
Before you begin: Do not energize an unaccepted fixture installation or infer heat safety from the render.
Trial the proposed left fixture provision
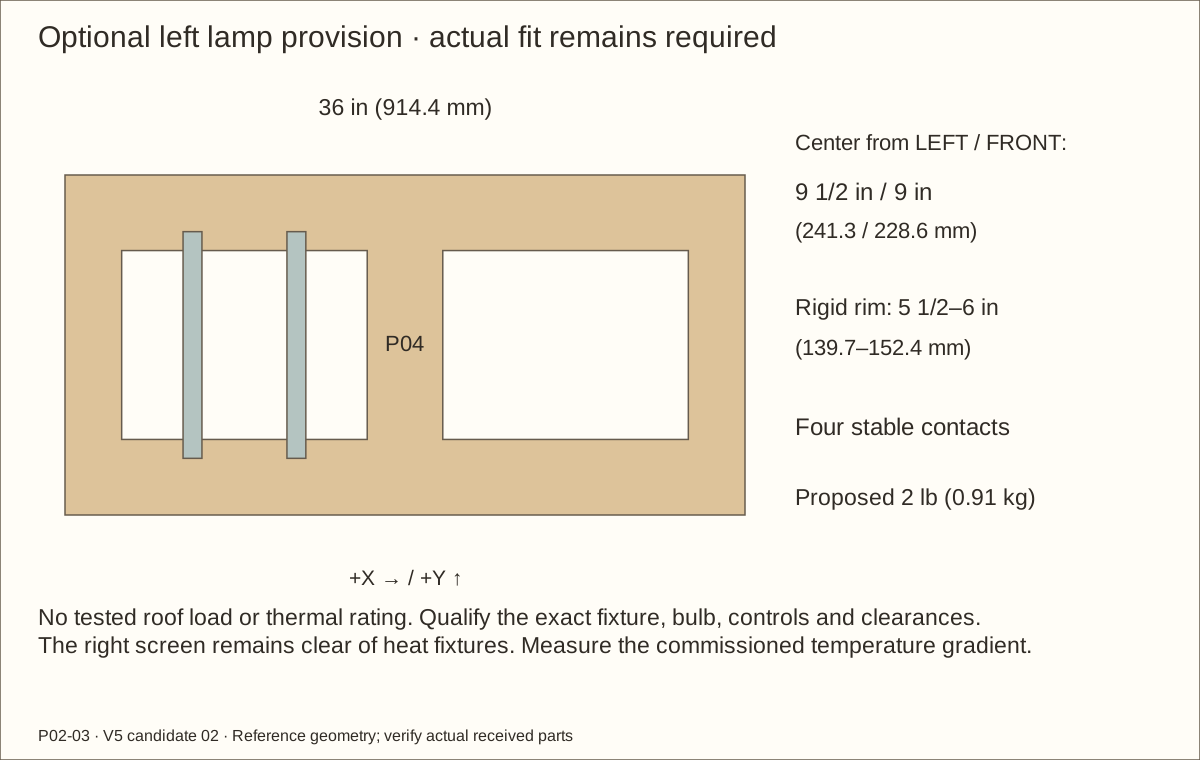
Only after H07 acceptance, trial the actual fixture with its center 9 1/2 in (241.3 mm) from LEFT and 9 in (228.6 mm) from FRONT. Its rigid flat rim must be 5 1/2 in (139.7 mm) through 6 in (152.4 mm) across, overall diameter no more than 6 in (152.4 mm).
Verify four stable rim contacts on both steel strips through the mesh. Record assembled fixture/bulb weight; the proposed design scenario is at most 2 lb (0.91 kg), which is not a tested load rating.
Keep the right screen free of heat fixtures. Follow fixture and bulb clearances, choose controls separately and plan measured thermal commissioning. Acrylic is not a heat shield or a basis for ultraviolet-B delivery.
Check before continuing: Exact fixture fit, contacts, weight and qualified load/thermal review are documented.
Parts: Dry-fitted shell, doors, captures and labeled hardware
Tools / setup: Tape, square, pencil, clamps and the tools named in the operation
Before you begin: Never sand, spray or cut metal beside fitted acrylic.
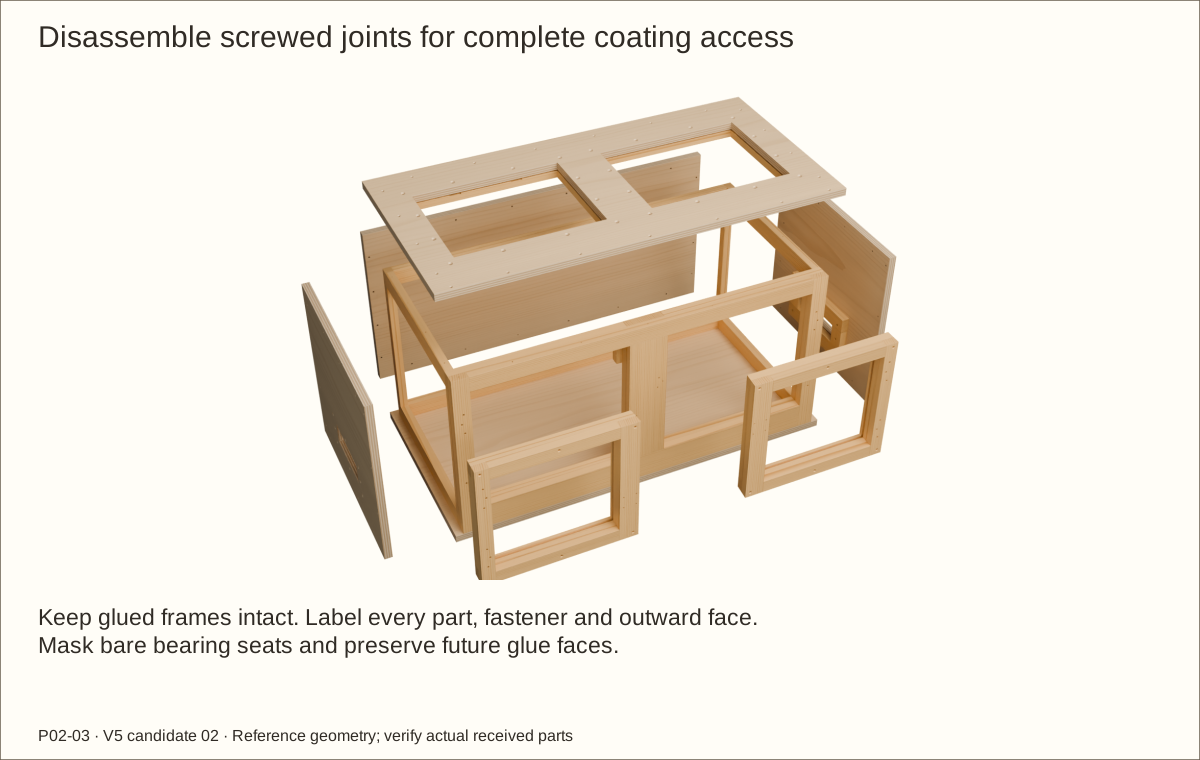
Label and dismantle after the dry trial
Photograph and label every matched part and fastener location. Remove glazing if fitted, then hardware and mesh. Support each panel while dismantling screwed joints; leave glued laminations intact.
Mark the bare hardware/spacer/washer bearing footprints and screw-access holes before coating and veneer. The outside finish must not shift metal seats or cover removable seams.
Lay panels flat on clean supports with access to all edges, rabbets and concealed wood. Mask any remaining future wood-glue faces.
Check before continuing: All coating surfaces are reachable and no hardware or pane can be contaminated.
Parts: Trial plywood/pine, selected PSA veneer and Varathane
Tools / setup: Tape, square, pencil, clamps and the tools named in the operation
Approve a cured veneer and coating sample
Prepare representative flat, edge, reveal and hardware-seat samples with the selected sealer, veneer and topcoat. Follow the veneer supplier’s confirmed balance and compatibility directions.
Measure the whole cured stack, including backing, adhesive and coatings. Reference is 0.0305 in (0.77 mm); maximum is 0.046 in (1.17 mm). Verify bond, edge trimming and the finished two-sided door-gap trial.
Record acclimation, application pressure and confirmed dwell. No numeric PSA dwell is invented here. A failed bond, warping or extra balancing layer requires revised construction before final pieces are covered.
Check before continuing: H03/H06 acceptance and the actual stack are recorded.
Required wait: Supplier-prescribed acclimation and adhesive dwell, plus full coating cure before acceptance.
Parts: All wood faces and edges; compatible approved sealer/finish
Tools / setup: Tape, square, pencil, clamps and the tools named in the operation
Before you begin: The finish maker excludes floor applications. Obtain H06 acceptance of this enclosure floor’s abrasion/cleaning exposure before coating it. No immersion or animal-safety approval is inferred.
Seal the prepared wood and cure the sealer
Sand clean dry wood from 120 through 220 grit, vacuum and wipe with a clean lint-free cloth. Keep glued mating faces and the specified bare metal seats protected.
For the selected Varathane Triple Thick clear satin, stir rather than shake and apply a uniform coat along the grain with a synthetic-bristle brush. Work at 60–90°F (16–32°C), below 85% relative humidity, with ventilation. Follow the accepted veneer-substrate preparation for surfaces receiving PSA.
The combined upper coating allowance is 101.502 ft² (9.43 m²), including veneer topcoat, trial and contingency. At the reference 50 ft² (4.65 m²) per quart, three quarts are needed; buy two two-quart packs. Extra coats require recalculation.
Check before continuing: All intended faces, edges, reveals, rabbets and concealed wood are uniformly treated without flooded fits.
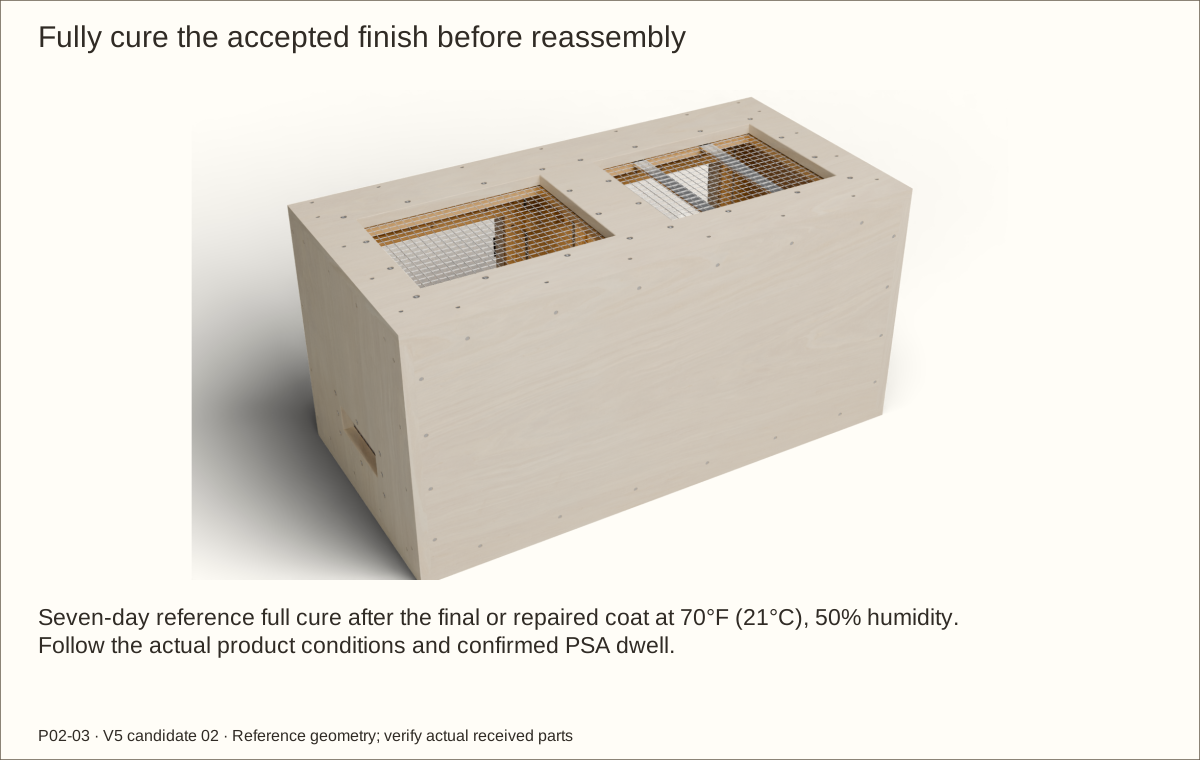
Required wait: Seven-day reference full cure after the final/repair coat at 70°F (21°C), 50% relative humidity; adverse conditions take longer. Follow the accepted sealer/PSA sequence.
Parts: One chosen 48 × 120-inch veneer sheet; V-parts
Tools / setup: Sharp knife, straightedge, cutting board, labels and current layout
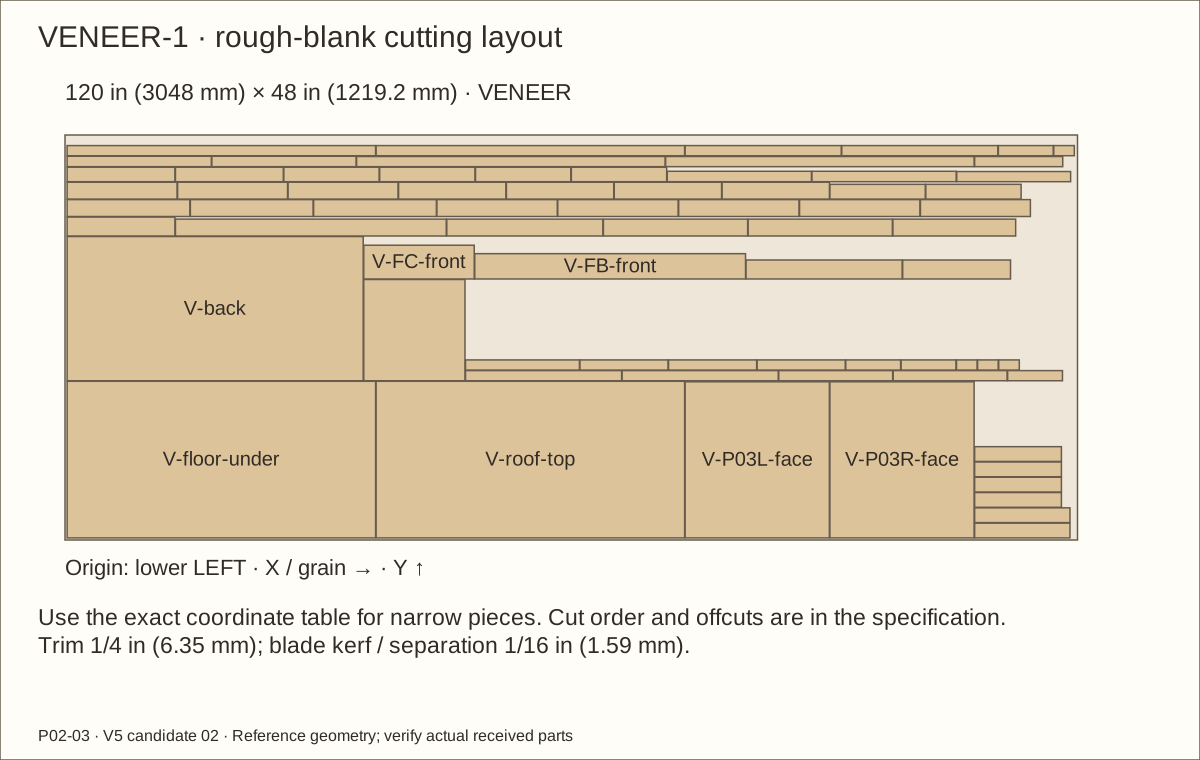
Cut and label the seventy veneer blanks
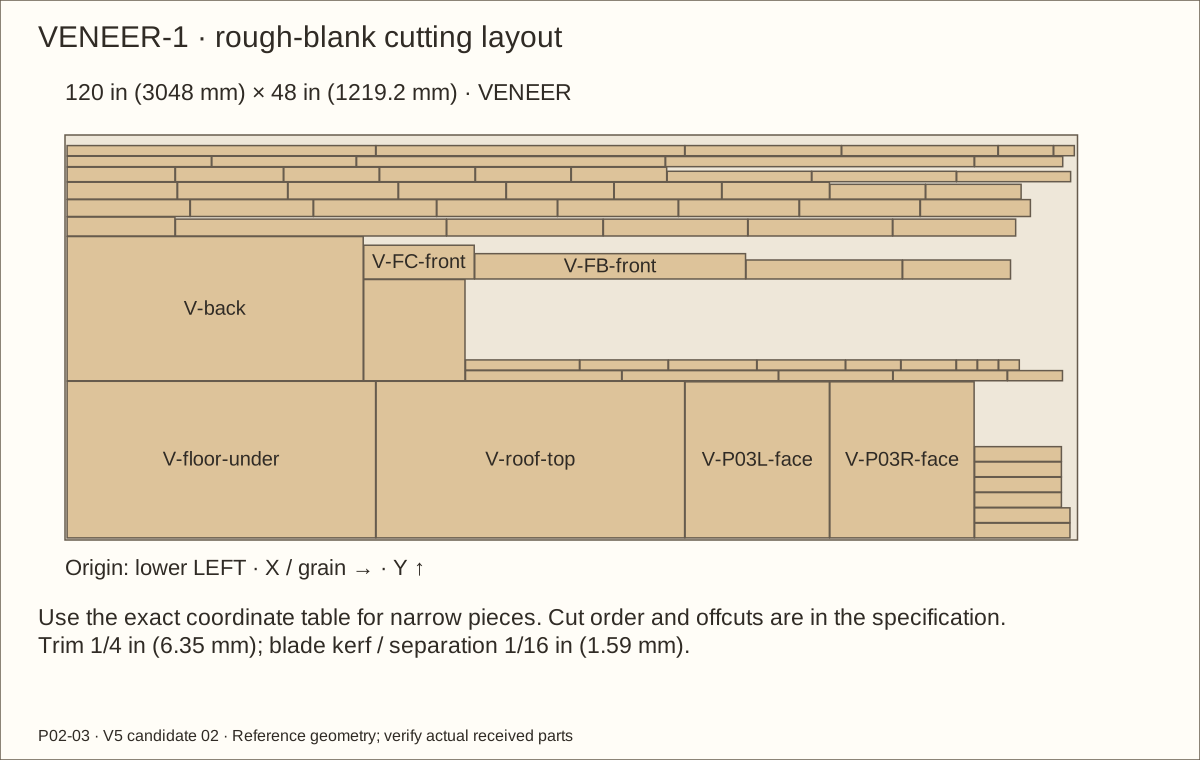
Follow the VENEER-1 layout and exact coordinate table. Use one species throughout; maple, white oak and walnut are appearance choices, not three sets to purchase.
Cut rough blanks with the backing intact using a sharp knife, straightedge and sacrificial board. Keep the scheduled grain direction and trimming allowance. Label each V-ID and its parent wood part on the backing.
Separate face sheets, edge strips and opening reveals. The roof, floor underside, back, sides, front, door edges and reveals all receive their named pieces; no sheet bridges a removable joint.
Check before continuing: All seventy IDs are allocated with consistent grain and correct parent parts.
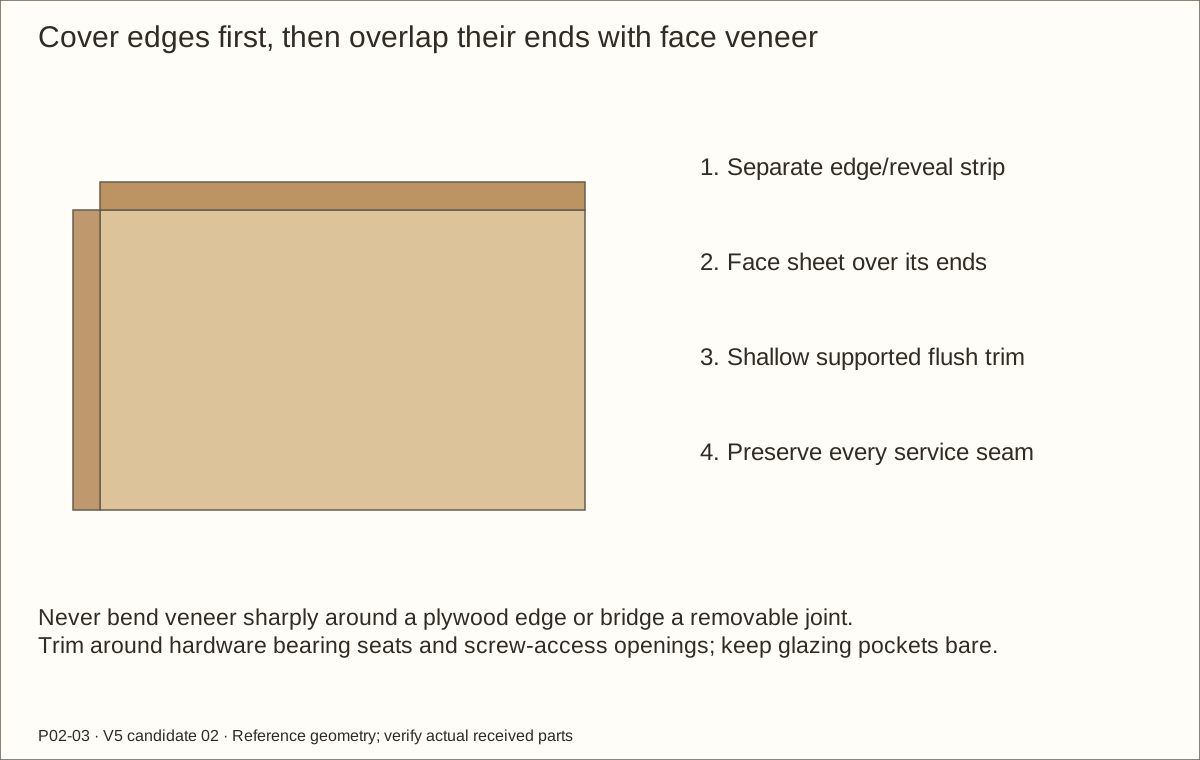
Clean and prepare the accepted substrate as the veneer maker directs. Dry-position each piece before removing release paper. Apply the specified firm pressure with the recommended scraper; do not trap air.
Cover exposed plywood edges and opening reveals using separate strips. Do not bend a flat strip around a sharp corner. Support fibers with a block and flush-trim in shallow knife passes, then ease the edge lightly.
Keep strips separate at roof, door and other service seams. Door viewing reveals stop at the rabbet floor; leave glazing pockets, hinge-spacer seats, hasp seats and flush-head access circles clear.
Check before continuing: Edges and reveals are covered, seams remain free and no hardware bearing surface is raised.
Required wait: Observe the supplier’s confirmed adhesive dwell before loading or topcoating the bond.
42. Apply matching face sheets and preserve access
Parts: All exterior V-face parts
Tools / setup: Scraper, knife, cutting guide, actual hardware templates and backing block
Apply matching face sheets and preserve access
Apply each face sheet with the chosen grain axis. Face sheets overlap the ends of the already fitted edge strips; trim lightly to a clean butt line without cutting the substrate.
Cover the roof top and its edges, both sides, back, floor underside, front-frame members and door front faces. Keep every removable joint separate and the grain physically straight along each part.
Transfer and cut only the scheduled bare bearing footprints and screw-head access openings. Fit metal directly on its original datum, with the solid spacers under hinges. Do not hide service screws beneath an unbroken sheet.
Check before continuing: The entire exposed wooden exterior is uniform and all service access remains usable.
Required wait: Use the veneer supplier’s confirmed dwell before topcoating or assembling.
Parts: Approved veneer system and selected clear finish
Tools / setup: Tape, square, pencil, clamps and the tools named in the operation
Before you begin: Keep heat hotspots and permanent wet contact away from this indoor wood system.
Topcoat the veneer and record full cure
After the accepted adhesive dwell, apply the compatible topcoat along the grain. Inspect corners, narrow reveals and masked bearing seats for drips or bridges.
For the selected one-coat Varathane formula, a further coat is only added when needed and counted in coverage. Sand with 220 grit before another coat; reference recoat time is two hours under the maker’s stated conditions.
Record final-coat time, temperature and relative humidity. Treat 48-hour light use, touch-dry and lack of odor as distinct from full cure. Recheck flatness and bond after curing.
Check before continuing: Finish is uniform, fully cured and free of joint bridges or delamination.
Required wait: At least seven days after the final or repaired coat at 70°F (21°C) and 50% relative humidity; extend for adverse conditions and follow current product instructions.
Before you begin: Acrylic is not an approved heat shield. Confirm received material, room-temperature sizing and cleaner compatibility.
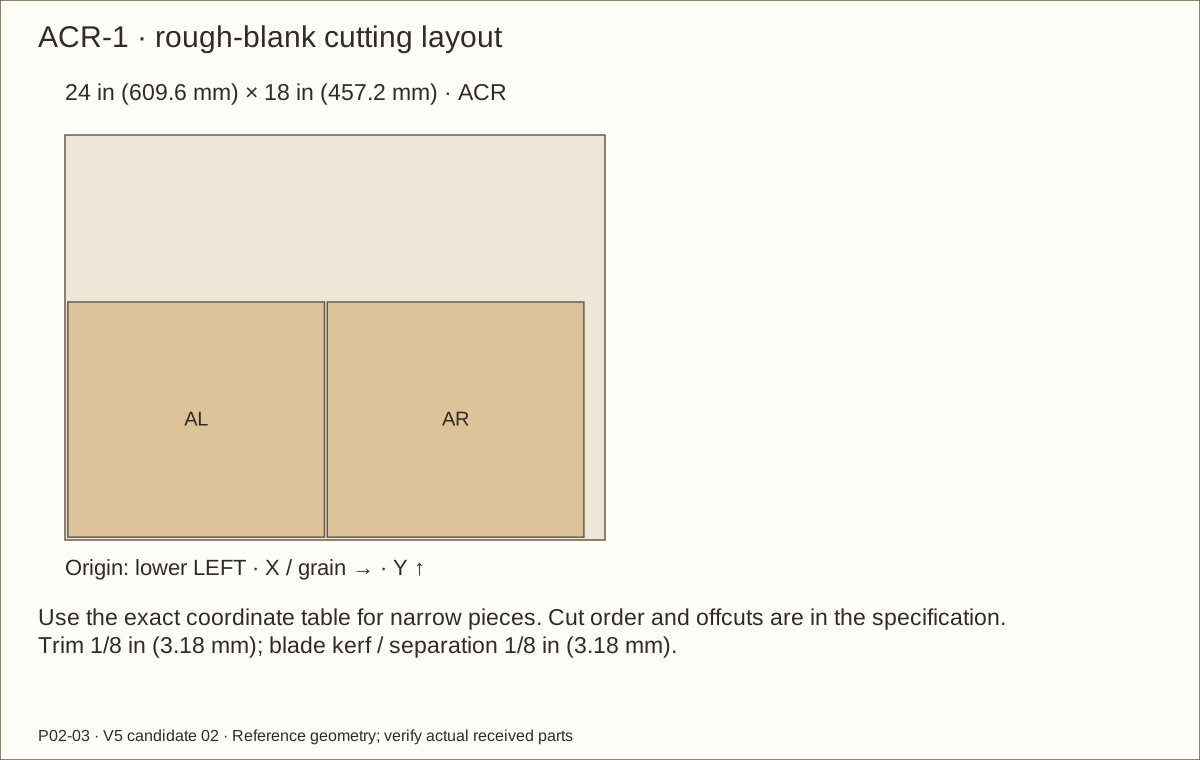
Measure and cut the floating acrylic panes
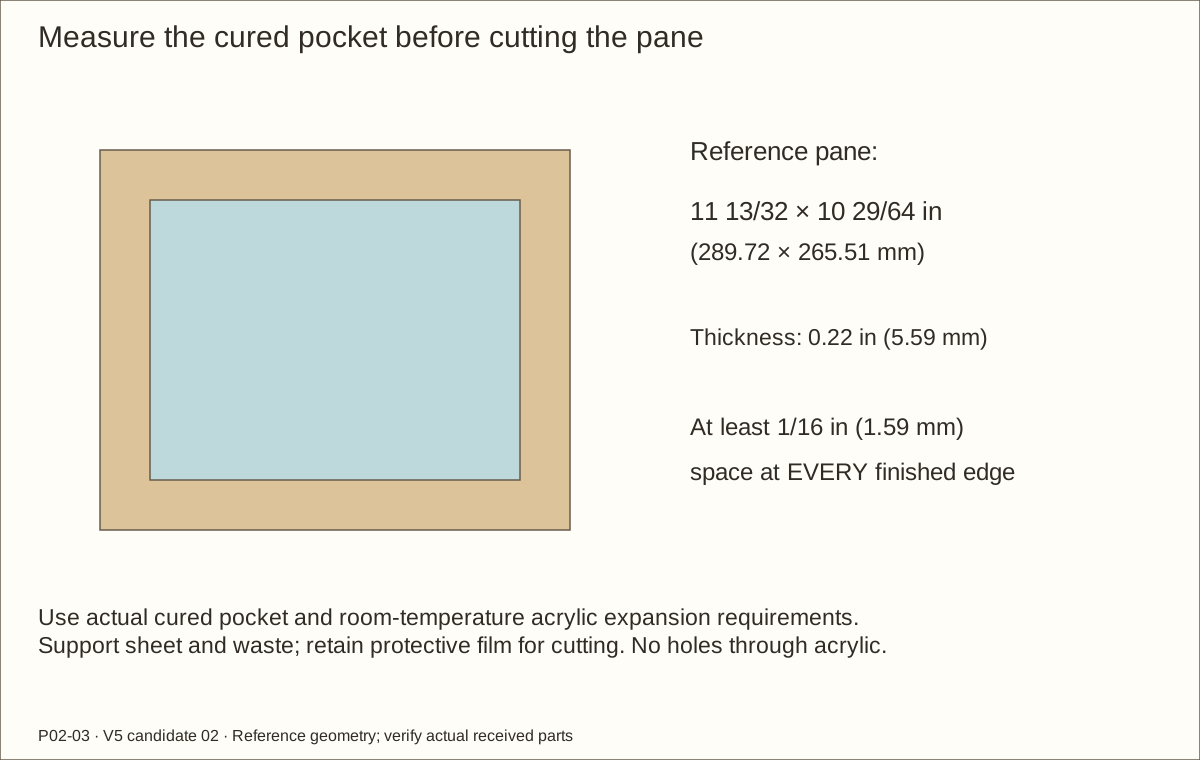
At room temperature measure each fully finished rabbet pocket separately. Allow at least 1/16 in (1.59 mm) at every pane edge. Reference panes are 11 13/32 in (289.72 mm) × 10 29/64 in (265.51 mm) × 0.22 in (5.59 mm); actual pocket and acrylic expansion requirements control final size.
Keep protective film during cutting. Use a sharp acrylic-rated blade or suitable supplier cutting service, fully support the sheet and waste, and avoid heat buildup or force. Smooth every cut edge without rounding away required capture overlap.
No hole goes through the acrylic. Trial the pane in its pocket with loose 1/16 in (1.59 mm) gauges all around, then remove the gauges. A tight pane is removed and trimmed off the enclosure.
Check before continuing: Each pane fits without force with edge expansion room and no chipped edge.
Tools / setup: Clamps, stopped drill, 9/64 in (3.57 mm) and 3/32 in (2.38 mm) trial bits, hand driver
Before you begin: Do not use screw pressure to flatten acrylic.
Drill and fit the removable glazing caps
Remove the pane for drilling. Mark every cap screw line 3/16 in (4.76 mm) from the cap edge FARTHER from the viewing opening. Horizontal caps have screws 1/2 in (12.7 mm) from both ends and midway; vertical caps use 1 in (25.4 mm) from both ends and midway.
Clamp caps on wood, drill 9/64 in (3.57 mm) clearance through each cap and starting 3/32 in (2.38 mm) stopped pilots into pine. Check the exact stations and keep all 24 screw paths outside the acrylic pocket.
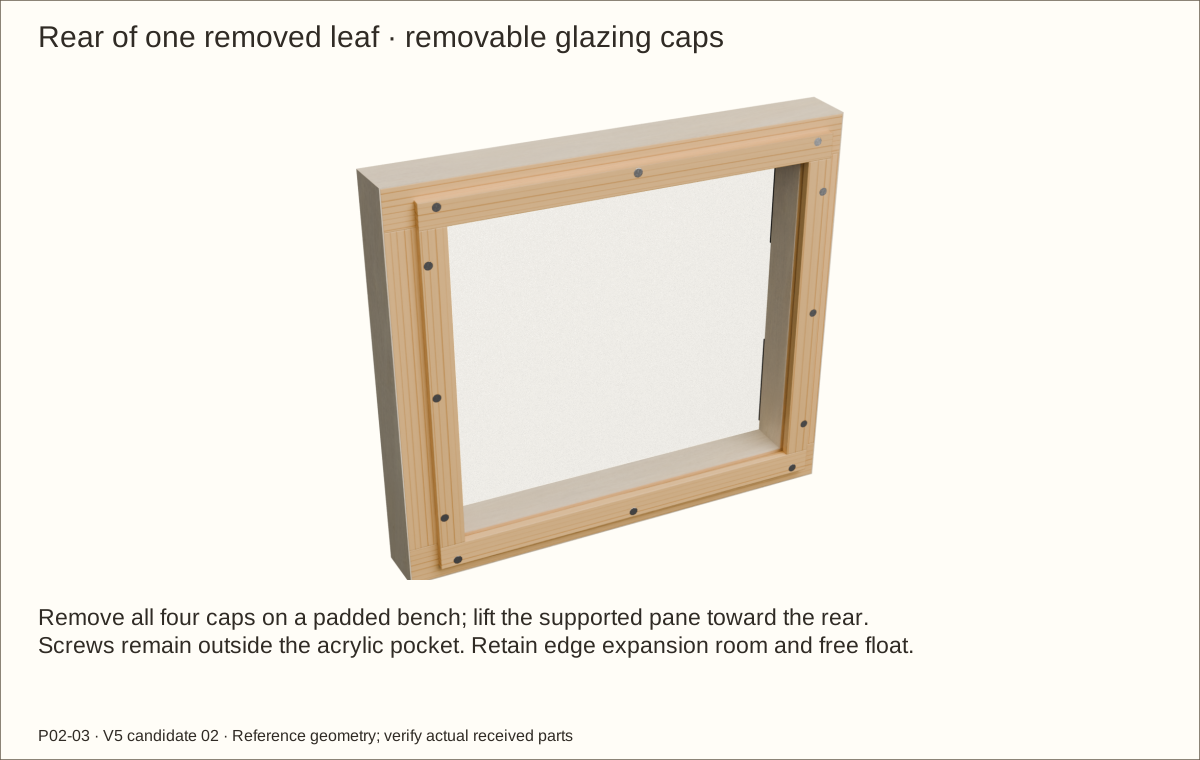
Refit the pane and 1/4 in (6.35 mm) caps. Seat S6 heads flush and stop the cap on wood, without bowing or squeezing the pane. Reference front and rear float is 0.012 in (0.3 mm) each after film; confirm real free retention.
Check before continuing: Every pane edge remains captured with at least 1/16 in (1.59 mm) expansion space and no screw contact.
46. Reassemble the cured enclosure in supported order
Parts: Labeled shell, captures, roof, doors and hardware
Tools / setup: Tape, square, pencil, clamps and the tools named in the operation
Before you begin: Fully cure any disturbed finish again before completing assembly.
Reassemble the cured enclosure in supported order
Reassemble floor cleats, sides/ledgers, back and already laminated front frame using their labeled holes. Stop if a screw strips or a joint will not close; do not compensate with a longer screw.
Refit mesh captures with outside flush heads and interior washer, locknut and closed cover. Verify full lands, open cells, measured tails and no cap bottoming. Assemble roof screens on the padded bench before lowering the roof. Refit door spacers, hinges, stops, glazing caps and hasps in their tested locations.
Measure finished door gaps with a 1/16 in (1.59 mm) gauge. Reference hinge/top/bottom gap is 0.1265 in (3.21 mm) and latch gap 0.09525 in (2.42 mm). At the maximum veneer stack they become 0.0955 in (2.43 mm) and 0.06425 in (1.63 mm); the latch margin is small. A failed fit requires revised hardware/frame review, not more unsupported edge trimming.
Check before continuing: All finished gaps, hardware seats and free pane retention pass the recorded checks.
Tools / setup: Tape, square, pencil, clamps and the tools named in the operation
Before you begin: A smooth digital animation is not physical or animal-containment testing.
Check both doors and every closure
Support each door and test opening through the intended range without rubbing veneer, catches or acrylic. Repeat roof-on removal and refit with the final cured surfaces.
To open one leaf, align its swivel with the slot, swing the fixed flap clear and move the door. To close, seat the door, return the flap and turn the swivel across the slot. Repeat while the other leaf remains latched.
Check every hinge/spacer seat, screw grip, stop, gap and reachable edge. A padlock is optional secondary security and is not included. Obtain animal-specific containment review for actual gaps and mesh.
Check before continuing: Both doors latch independently by hand and all service paths remain usable.
Parts: Finished enclosure; chosen dry substrate and furnishings
Tools / setup: Tape, square, pencil, clamps and the tools named in the operation
Before you begin: Do not add animals until the physical, thermal and containment acceptance records are complete.
Keep bedding and furnishings below the inlets
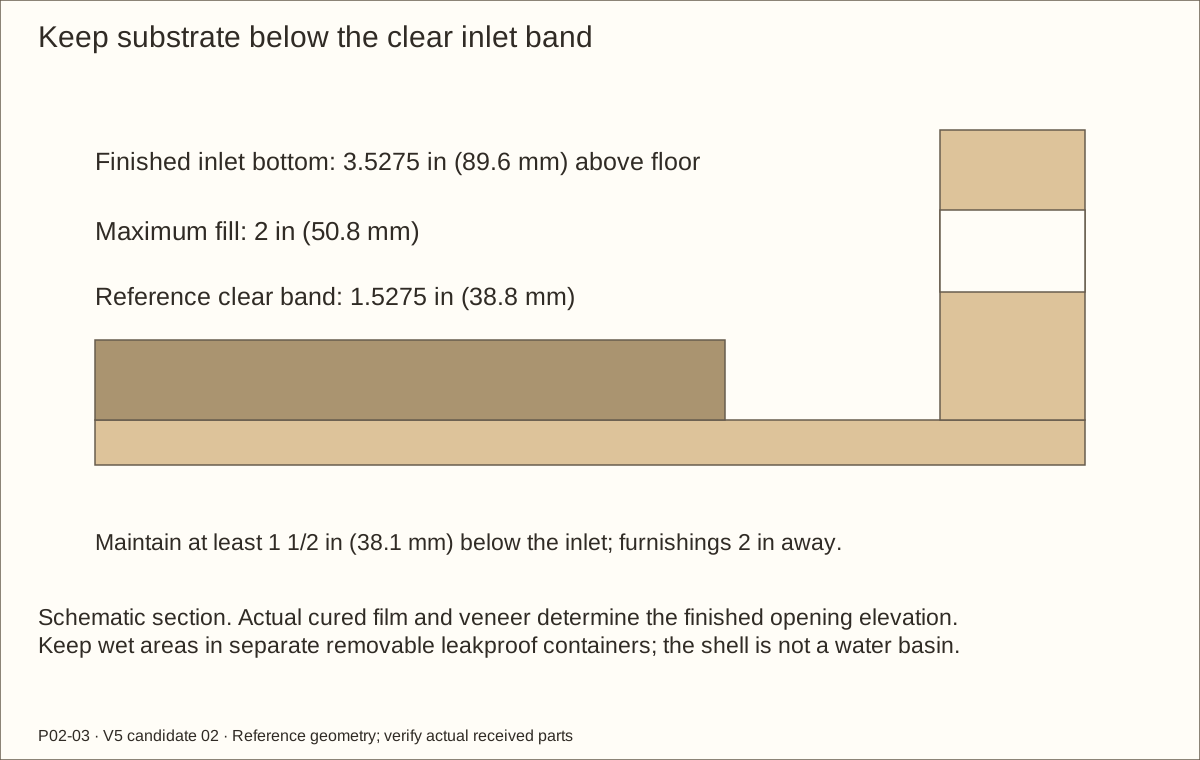
Keep substrate at or below 2 in (50.8 mm) above the finished inside floor. The reference finished inlet bottom is 3.5275 in (89.6 mm) above that floor, leaving 1.5275 in (38.8 mm) above the fill. Maintain at least 1 1/2 in (38.1 mm) clear vertically below both inlets.
Keep furnishings at least 2 in (50.8 mm) away from inlet openings and leave roof exhaust clear. Use separate removable leakproof containers for any wet area; the shell has no liner or water-holding claim.
Record actual support load and measure the commissioned temperature/humidity setup with selected equipment and thermostat. Vent positions alone do not establish measured air exchange or a suitable gradient.
Check before continuing: Both inlets remain visible and clear at the actual fill depth; intended animal/equipment review is complete.
Parts: Removed supported leaf, caps and acrylic pane
Tools / setup: Padded bench, hand driver, clean soft cloth and compatible cleaner
Remove and service a pane on the bench
Disconnect equipment, secure the animal elsewhere and empty the enclosure. Remove the supported door using the pictured upper-pin-then-lower-pin sequence and lay its front on clean padding.
Remove all twelve glazing-cap screws and the four labeled caps. Support the whole pane and lift it straight out toward the rear. Do not pry against a pane edge or drag it through a screw tip.
Clean with an acrylic-compatible product and soft cloth; avoid unapproved solvents or abrasives. Inspect the pocket and coating, fully cure any repair, then reinstall with the original edge clearances and free floating caps.
Check before continuing: The pane is unchipped, screws miss it and all caps seat on wood.
Tools / setup: Helper, temporary clamps, 1/8 in (3.18 mm) hex key, two slim 3/8 in (9.53 mm) wrenches, padded bench and compatible cleaning supplies
Before you begin: Never service screens around an animal or allow equipment to hang from the removed roof.
Remove and clean roof or inlet screens
Empty the enclosure and disconnect/remove all fixture equipment. Support the roof, remove its twenty-one case screws and lift the complete roof assembly to a padded bench before releasing roof-screen fasteners. Open and support both doors for side-screen access.
Support the capture and mesh with a helper or temporary clamp. Keep the exterior 1/8 in (3.18 mm) hex key available. Hold the interior locknut stationary with a slim 3/8 in (9.53 mm) wrench while removing its cover with another; then remove the locknut and washer. Move captures inward under control so sharp mesh edges cannot fall free.
Clean without bending wire or opening gaps. Inspect lands, countersinks, coating, steel seats and welds. Refit all forty screw/washer/locknut/cover sets and repeat the measured tail, two-thread, no-bottoming and snugness checks. Fully cure any finish repair before returning to service.
Check before continuing: All screens seat flat, sharp ends stay concealed, covers are secure and the finished doors/roof operate freely.
Tools / setup: Tape, square, pencil, clamps and the tools named in the operation
Inspect after cleaning and before reuse
Empty dry debris into containers and wipe spills promptly. Never tip a loaded enclosure or flood the wooden floor. Keep ventilation open while the interior dries.
Check coating, veneer bond, acrylic edges, hardware seats, screw grip, mesh capture and all closures. Record defects and repairs; cure each coating or adhesive repair for its full required time.
Repeat affected fit, removal, load, thermal and containment checks after any change. Research, calculations, digital checks, prototype, physical tests, qualified review and publication stay separate statuses.
Check before continuing: All required records are complete for the actual configuration; no unfinished repair is hidden.
Choose ONE veneer species: one 48 × 120 in (1219.2 × 3048 mm) sheet. Five pine boards supply parts; a sixth is dedicated to trials. Two two-quart coating packs provide four quart cans. Resolve H01–H07 first; no local inventory or complete affiliate cart is verified.
Interior plywood is not waterproof. Accept uniform plywood from 11/16 in (17.46 mm) through 23/32 in (18.26 mm); use actual offcut gauges and field-fit dependent cuts. No store cutting service assumed.
Production layouts plus one dedicated hardware, capture and veneer trial board. Plane quarter-inch cap stock while still wide; follow tool minimum feed/support requirements.
1AG2123A Needed 1; 1 per package; buy 1 package(s)
Two un-drilled floating panes; same own-build rabbet. Bare edge allowance 0.0703125 in (1.79 mm) per edge, reference finished 0.0673125 in (1.71 mm) per edge; received thickness, coating and expansion trial required.
Materials and hardware · continued
Choose ONE veneer species: one 48 × 120 in (1219.2 × 3048 mm) sheet. Five pine boards supply parts; a sixth is dedicated to trials. Two two-quart coating packs provide four quart cans. Resolve H01–H07 first; no local inventory or complete affiliate cart is verified.
Two pairs. Front surface mount, no mortises. Included unknown-length screws unused. Transfer actual holes with the supported fitting procedure. Capacity not rated.
35054 Needed 24; 100 per package; buy 1 package(s)
With the 1/8 in (3.18 mm) spacer, the reference screw tip is at Y 1.045 in (26.54 mm), leaving 0.205 in (5.21 mm) before the rabbet floor and 0.295 in (7.49 mm) engagement in the rear layer. Actual head, root and supported offcut trial required; H01 mounting acceptance remains open. Do not use longer kit screws.
Materials and hardware · continued
Choose ONE veneer species: one 48 × 120 in (1219.2 × 3048 mm) sheet. Five pine boards supply parts; a sixth is dedicated to trials. Two two-quart coating packs provide four quart cans. Resolve H01–H07 first; no local inventory or complete affiliate cart is verified.
Forty #10-24 × 2 in (50.8 mm) socket flat-head screws, 82-degree head, 1/8 in (3.18 mm) hex drive. Outside head seats flush in bare wood. Length includes head; fitted 1 7/8 in (47.63 mm) is only a reference. Actual grip plus washer plus nut plus 7/64 in (2.78 mm) – 9/64 in (3.57 mm) protected tail determines final length. Verify threads reach the entire nut and cover. Cut removed screws in a vise, file ≤1/64 in (0.4 mm) chamfer, refit. Four roof screws retain the recessed steel strips.
Materials and hardware · continued
Choose ONE veneer species: one 48 × 120 in (1219.2 × 3048 mm) sheet. Five pine boards supply parts; a sixth is dedicated to trials. Two two-quart coating packs provide four quart cans. Resolve H01–H07 first; no local inventory or complete affiliate cart is verified.
Forty interior nylon-insert locknuts; 3/8 in (9.53 mm) flats, listed height 0.229 in (5.82 mm) – 0.249 in (6.32 mm). Locknut is primary retention. Fit slowly by hand; stop for binding/galling. Do not use an impact driver. Follow supplier advice on compatible lubricant only after animal/contact and finish compatibility review. Fixture temperature, clamping and connection capacity remain H07.
Forty washers, one between each interior capture and locknut. Published OD 7/16 in (11.11 mm) and ID 7/32 in (5.56 mm); thickness unpublished. Reference 0.05 in (1.27 mm), receive no more than 1/16 in (1.59 mm) and calculate actual fitted screw length. No exterior washer.
Apply above 47°F (8.3°C); 8–10 minutes open and 20–25 minutes total assembly time at 70°F (21°C), 50% relative humidity. Do not stress for at least 24 hours. Manufacturer excludes structural/load-bearing use and continuous submersion; no animal-safe inference.
Materials and hardware · continued
Choose ONE veneer species: one 48 × 120 in (1219.2 × 3048 mm) sheet. Five pine boards supply parts; a sixth is dedicated to trials. Two two-quart coating packs provide four quart cans. Resolve H01–H07 first; no local inventory or complete affiliate cart is verified.
Computed all-wood upper bound plus veneer and sample, 15% loss; selected compatible coating and required full cure. Not aquarium, immersed-use or containment certification.
HASP · National Hardware black swivel-staple safety hasp, 3-1/4 inch Direct product listing
N305-979 Needed 2; 1 per package; buy 2 package(s)
Hand-operated quarter-turn closure. Trial actual plate support, head seating and free flap release on matching offcuts; padlock is optional.
825391 Needed 14; 12 per package; buy 2 package(s)
Trial received heads in the hasp countersinks; stopped pilots and hand tightening. Keep at least 1/16 in (1.59 mm) of wood behind each tip.
Materials and hardware · continued
Choose ONE veneer species: one 48 × 120 in (1219.2 × 3048 mm) sheet. Five pine boards supply parts; a sixth is dedicated to trials. Two two-quart coating packs provide four quart cans. Resolve H01–H07 first; no local inventory or complete affiliate cart is verified.
Seat ends beneath left mesh in RCLF/RCLB using the actual stack gauge. Four existing roof bolts pass through 1/4 in (6.35 mm) holes in steel; deburr before assembly.
Eight 3 in (76.2 mm) × 1 1/16 in (26.99 mm) × 1/8 in (3.18 mm) full-leaf bearing spacers, 24 clearance holes, plus offcut trial. Pair thicknesses must match. Supplier/qualified acceptance of this custom hinge mounting and actual screw engagement is H01; no load rating.
Full exterior faces, roof, edges, reveals and trial. Written balance, substrate/finish and service-environment acceptance required.
Materials and hardware · continued
Choose ONE veneer species: one 48 × 120 in (1219.2 × 3048 mm) sheet. Five pine boards supply parts; a sixth is dedicated to trials. Two two-quart coating packs provide four quart cans. Resolve H01–H07 first; no local inventory or complete affiliate cart is verified.
Full exterior faces, roof, edges, reveals and trial. Written balance, substrate/finish and service-environment acceptance required.
CAP10 · McMaster 91855A450 #10-24 closed-end stainless tip covers Direct product listing
91855A450 Needed 40; 10 per package; buy 4 package(s)
Forty 18-8 stainless closed-end #10-24 tip covers; buy four packs of ten. Published blind depth 3/16 in (4.76 mm), height 13/32 in (10.32 mm), flats 3/8 in (9.53 mm). Cover seats against the locknut without bottoming. Hold the locknut stationary with a second wrench while snugging the cover. Minimum two full threads after chamfer; cap remains removable. Check tightness and snag safety after service.
Cut list
Cut list
One of each ID. Length follows the allocated grain. Rough blanks include trimming; finished sizes describe the reference assembly. V-parts represent the complete cured veneer stack. Field-fit dependent lengths to received stock and finished pockets.
Part
Rough length × width
Finished length × width × thickness
P01 · Floor
36 1/8 in (917.58 mm) × 18 in (457.2 mm)
36 in (914.4 mm) × 18 in (457.2 mm) × 45/64 in (17.86 mm)
P02 · Back
34 23/32 in (881.86 mm) × 16 19/32 in (421.48 mm)
34 19/32 in (878.68 mm) × 16 19/32 in (421.48 mm) × 45/64 in (17.86 mm)
P03L · L side
18 1/8 in (460.38 mm) × 16 19/32 in (421.48 mm)
18 in (457.2 mm) × 16 19/32 in (421.48 mm) × 45/64 in (17.86 mm)
P03R · R side
18 1/8 in (460.38 mm) × 16 19/32 in (421.48 mm)
18 in (457.2 mm) × 16 19/32 in (421.48 mm) × 45/64 in (17.86 mm)
P04 · Removable roof
36 1/8 in (917.58 mm) × 18 in (457.2 mm)
36 in (914.4 mm) × 18 in (457.2 mm) × 45/64 in (17.86 mm)
CLB · Side floor cleat L
15 11/64 in (385.37 mm) × 1 1/2 in (38.1 mm)
15 3/64 in (382.19 mm) × 1 1/2 in (38.1 mm) × 3/4 in (19.05 mm)
CLT · Side roof ledger L
15 11/64 in (385.37 mm) × 1 1/2 in (38.1 mm)
15 3/64 in (382.19 mm) × 1 1/2 in (38.1 mm) × 3/4 in (19.05 mm)
CRB · Side floor cleat R
15 11/64 in (385.37 mm) × 1 1/2 in (38.1 mm)
15 3/64 in (382.19 mm) × 1 1/2 in (38.1 mm) × 3/4 in (19.05 mm)
CRT · Side roof ledger R
15 11/64 in (385.37 mm) × 1 1/2 in (38.1 mm)
15 3/64 in (382.19 mm) × 1 1/2 in (38.1 mm) × 3/4 in (19.05 mm)
CLV · Rear corner cleat L
16 23/32 in (424.66 mm) × 3/4 in (19.05 mm)
16 19/32 in (421.48 mm) × 3/4 in (19.05 mm) × 3/4 in (19.05 mm)
Cut list · continued
One of each ID. Length follows the allocated grain. Rough blanks include trimming; finished sizes describe the reference assembly. V-parts represent the complete cured veneer stack. Field-fit dependent lengths to received stock and finished pockets.
Part
Rough length × width
Finished length × width × thickness
CRV · Rear corner cleat R
16 23/32 in (424.66 mm) × 3/4 in (19.05 mm)
16 19/32 in (421.48 mm) × 3/4 in (19.05 mm) × 3/4 in (19.05 mm)
CBACKB · Rear base cleat
33 7/32 in (843.76 mm) × 1 1/2 in (38.1 mm)
33 3/32 in (840.58 mm) × 1 1/2 in (38.1 mm) × 3/4 in (19.05 mm)
CBACKT · Rear roof ledger
33 7/32 in (843.76 mm) × 1 1/2 in (38.1 mm)
33 3/32 in (840.58 mm) × 1 1/2 in (38.1 mm) × 3/4 in (19.05 mm)
FL · Front frame FL
16 23/32 in (424.66 mm) × 1 1/2 in (38.1 mm)
16 19/32 in (421.48 mm) × 1 1/2 in (38.1 mm) × 3/4 in (19.05 mm)
FR · Front frame FR
16 23/32 in (424.66 mm) × 1 1/2 in (38.1 mm)
16 19/32 in (421.48 mm) × 1 1/2 in (38.1 mm) × 3/4 in (19.05 mm)
FB · Front frame FB
31 23/32 in (805.66 mm) × 2 1/2 in (63.5 mm)
31 19/32 in (802.48 mm) × 2 1/2 in (63.5 mm) × 3/4 in (19.05 mm)
FT · Front frame FT
31 23/32 in (805.66 mm) × 1 1/2 in (38.1 mm)
31 19/32 in (802.48 mm) × 1 1/2 in (38.1 mm) × 3/4 in (19.05 mm)
FC · Front frame FC
12 23/32 in (323.06 mm) × 3 1/2 in (88.9 mm)
12 19/32 in (319.88 mm) × 3 1/2 in (88.9 mm) × 3/4 in (19.05 mm)
GC · Front frame GC
16 23/32 in (424.66 mm) × 3 1/2 in (88.9 mm)
16 19/32 in (421.48 mm) × 3 1/2 in (88.9 mm) × 3/4 in (19.05 mm)
GLB · Front frame GLB
15 43/64 in (398.07 mm) × 2 1/2 in (63.5 mm)
15 35/64 in (394.89 mm) × 2 1/2 in (63.5 mm) × 3/4 in (19.05 mm)
Cut list · continued
One of each ID. Length follows the allocated grain. Rough blanks include trimming; finished sizes describe the reference assembly. V-parts represent the complete cured veneer stack. Field-fit dependent lengths to received stock and finished pockets.
Part
Rough length × width
Finished length × width × thickness
GLT · Front frame GLT
15 43/64 in (398.07 mm) × 1 1/2 in (38.1 mm)
15 35/64 in (394.89 mm) × 1 1/2 in (38.1 mm) × 3/4 in (19.05 mm)
GLV · Front frame GLV
12 23/32 in (323.06 mm) × 1 1/2 in (38.1 mm)
12 19/32 in (319.88 mm) × 1 1/2 in (38.1 mm) × 3/4 in (19.05 mm)
GRB · Front frame GRB
15 43/64 in (398.07 mm) × 2 1/2 in (63.5 mm)
15 35/64 in (394.89 mm) × 2 1/2 in (63.5 mm) × 3/4 in (19.05 mm)
GRT · Front frame GRT
15 43/64 in (398.07 mm) × 1 1/2 in (38.1 mm)
15 35/64 in (394.89 mm) × 1 1/2 in (38.1 mm) × 3/4 in (19.05 mm)
GRV · Front frame GRV
12 23/32 in (323.06 mm) × 1 1/2 in (38.1 mm)
12 19/32 in (319.88 mm) × 1 1/2 in (38.1 mm) × 3/4 in (19.05 mm)
ML · Side inlet mesh L
8 in (203.2 mm) × 4 in (101.6 mm)
8 in (203.2 mm) × 4 in (101.6 mm) × 0.082 in (2.08 mm)
VLB · Inlet cap LB
9 1/8 in (231.78 mm) × 1 1/2 in (38.1 mm)
9 in (228.6 mm) × 1 1/2 in (38.1 mm) × 3/4 in (19.05 mm)
VLT · Inlet cap LT
9 1/8 in (231.78 mm) × 1 1/2 in (38.1 mm)
9 in (228.6 mm) × 1 1/2 in (38.1 mm) × 3/4 in (19.05 mm)
VLF · Inlet cap LF
2 1/8 in (53.98 mm) × 1 1/2 in (38.1 mm)
2 in (50.8 mm) × 1 1/2 in (38.1 mm) × 3/4 in (19.05 mm)
VLR · Inlet cap LR
2 1/8 in (53.98 mm) × 1 1/2 in (38.1 mm)
2 in (50.8 mm) × 1 1/2 in (38.1 mm) × 3/4 in (19.05 mm)
Cut list · continued
One of each ID. Length follows the allocated grain. Rough blanks include trimming; finished sizes describe the reference assembly. V-parts represent the complete cured veneer stack. Field-fit dependent lengths to received stock and finished pockets.
Part
Rough length × width
Finished length × width × thickness
MR · Side inlet mesh R
8 in (203.2 mm) × 4 in (101.6 mm)
8 in (203.2 mm) × 4 in (101.6 mm) × 0.082 in (2.08 mm)
VRB · Inlet cap RB
9 1/8 in (231.78 mm) × 1 1/2 in (38.1 mm)
9 in (228.6 mm) × 1 1/2 in (38.1 mm) × 3/4 in (19.05 mm)
VRT · Inlet cap RT
9 1/8 in (231.78 mm) × 1 1/2 in (38.1 mm)
9 in (228.6 mm) × 1 1/2 in (38.1 mm) × 3/4 in (19.05 mm)
VRF · Inlet cap RF
2 1/8 in (53.98 mm) × 1 1/2 in (38.1 mm)
2 in (50.8 mm) × 1 1/2 in (38.1 mm) × 3/4 in (19.05 mm)
VRR · Inlet cap RR
2 1/8 in (53.98 mm) × 1 1/2 in (38.1 mm)
2 in (50.8 mm) × 1 1/2 in (38.1 mm) × 3/4 in (19.05 mm)
DLA · Door L member A
12 11/32 in (313.53 mm) × 1 3/16 in (30.16 mm)
12 7/32 in (310.36 mm) × 1 3/16 in (30.16 mm) × 3/4 in (19.05 mm)
DLB · Door L member B
12 11/32 in (313.53 mm) × 1 23/32 in (43.66 mm)
12 7/32 in (310.36 mm) × 1 23/32 in (43.66 mm) × 3/4 in (19.05 mm)
DLC · Door L member C
10 59/64 in (277.42 mm) × 1 3/16 in (30.16 mm)
10 51/64 in (274.24 mm) × 1 3/16 in (30.16 mm) × 3/4 in (19.05 mm)
DLD · Door L member D
10 59/64 in (277.42 mm) × 1 3/16 in (30.16 mm)
10 51/64 in (274.24 mm) × 1 3/16 in (30.16 mm) × 3/4 in (19.05 mm)
DLE · Door L member E
13 53/64 in (351.23 mm) × 1 3/16 in (30.16 mm)
13 45/64 in (348.06 mm) × 1 3/16 in (30.16 mm) × 3/4 in (19.05 mm)
Cut list · continued
One of each ID. Length follows the allocated grain. Rough blanks include trimming; finished sizes describe the reference assembly. V-parts represent the complete cured veneer stack. Field-fit dependent lengths to received stock and finished pockets.
Part
Rough length × width
Finished length × width × thickness
DLF · Door L member F
13 53/64 in (351.23 mm) × 1 3/16 in (30.16 mm)
13 45/64 in (348.06 mm) × 1 3/16 in (30.16 mm) × 3/4 in (19.05 mm)
DLG · Door L member G
9 31/32 in (253.21 mm) × 1 3/16 in (30.16 mm)
9 27/32 in (250.03 mm) × 1 3/16 in (30.16 mm) × 3/4 in (19.05 mm)
DLH · Door L member H
9 31/32 in (253.21 mm) × 1 23/32 in (43.66 mm)
9 27/32 in (250.03 mm) × 1 23/32 in (43.66 mm) × 3/4 in (19.05 mm)
AL · Floating acrylic L
11 13/32 in (289.72 mm) × 10 29/64 in (265.51 mm)
11 13/32 in (289.72 mm) × 10 29/64 in (265.51 mm) × 0.22 in (5.59 mm)
QLB · Removable glazing cap LB
12 27/64 in (315.52 mm) × 3/4 in (19.05 mm)
12 19/64 in (312.34 mm) × 3/4 in (19.05 mm) × 1/4 in (6.35 mm)
QLT · Removable glazing cap LT
12 27/64 in (315.52 mm) × 3/4 in (19.05 mm)
12 19/64 in (312.34 mm) × 3/4 in (19.05 mm) × 1/4 in (6.35 mm)
QLL · Removable glazing cap LL
9 31/32 in (253.21 mm) × 3/4 in (19.05 mm)
9 27/32 in (250.03 mm) × 3/4 in (19.05 mm) × 1/4 in (6.35 mm)
QLR · Removable glazing cap LR
9 31/32 in (253.21 mm) × 3/4 in (19.05 mm)
9 27/32 in (250.03 mm) × 3/4 in (19.05 mm) × 1/4 in (6.35 mm)
STOPL0 · Latch-side rear stop L0
1 5/8 in (41.28 mm) × 1 1/2 in (38.1 mm)
1 1/2 in (38.1 mm) × 1 1/2 in (38.1 mm) × 3/4 in (19.05 mm)
STOPL1 · Latch-side rear stop L1
1 5/8 in (41.28 mm) × 1 1/2 in (38.1 mm)
1 1/2 in (38.1 mm) × 1 1/2 in (38.1 mm) × 3/4 in (19.05 mm)
Cut list · continued
One of each ID. Length follows the allocated grain. Rough blanks include trimming; finished sizes describe the reference assembly. V-parts represent the complete cured veneer stack. Field-fit dependent lengths to received stock and finished pockets.
Part
Rough length × width
Finished length × width × thickness
DRA · Door R member A
12 11/32 in (313.53 mm) × 1 23/32 in (43.66 mm)
12 7/32 in (310.36 mm) × 1 23/32 in (43.66 mm) × 3/4 in (19.05 mm)
DRB · Door R member B
12 11/32 in (313.53 mm) × 1 3/16 in (30.16 mm)
12 7/32 in (310.36 mm) × 1 3/16 in (30.16 mm) × 3/4 in (19.05 mm)
DRC · Door R member C
10 59/64 in (277.42 mm) × 1 3/16 in (30.16 mm)
10 51/64 in (274.24 mm) × 1 3/16 in (30.16 mm) × 3/4 in (19.05 mm)
DRD · Door R member D
10 59/64 in (277.42 mm) × 1 3/16 in (30.16 mm)
10 51/64 in (274.24 mm) × 1 3/16 in (30.16 mm) × 3/4 in (19.05 mm)
DRE · Door R member E
13 53/64 in (351.23 mm) × 1 3/16 in (30.16 mm)
13 45/64 in (348.06 mm) × 1 3/16 in (30.16 mm) × 3/4 in (19.05 mm)
DRF · Door R member F
13 53/64 in (351.23 mm) × 1 3/16 in (30.16 mm)
13 45/64 in (348.06 mm) × 1 3/16 in (30.16 mm) × 3/4 in (19.05 mm)
DRG · Door R member G
9 31/32 in (253.21 mm) × 1 23/32 in (43.66 mm)
9 27/32 in (250.03 mm) × 1 23/32 in (43.66 mm) × 3/4 in (19.05 mm)
DRH · Door R member H
9 31/32 in (253.21 mm) × 1 3/16 in (30.16 mm)
9 27/32 in (250.03 mm) × 1 3/16 in (30.16 mm) × 3/4 in (19.05 mm)
AR · Floating acrylic R
11 13/32 in (289.72 mm) × 10 29/64 in (265.51 mm)
11 13/32 in (289.72 mm) × 10 29/64 in (265.51 mm) × 0.22 in (5.59 mm)
QRB · Removable glazing cap RB
12 27/64 in (315.52 mm) × 3/4 in (19.05 mm)
12 19/64 in (312.34 mm) × 3/4 in (19.05 mm) × 1/4 in (6.35 mm)
Cut list · continued
One of each ID. Length follows the allocated grain. Rough blanks include trimming; finished sizes describe the reference assembly. V-parts represent the complete cured veneer stack. Field-fit dependent lengths to received stock and finished pockets.
Part
Rough length × width
Finished length × width × thickness
QRT · Removable glazing cap RT
12 27/64 in (315.52 mm) × 3/4 in (19.05 mm)
12 19/64 in (312.34 mm) × 3/4 in (19.05 mm) × 1/4 in (6.35 mm)
QRL · Removable glazing cap RL
9 31/32 in (253.21 mm) × 3/4 in (19.05 mm)
9 27/32 in (250.03 mm) × 3/4 in (19.05 mm) × 1/4 in (6.35 mm)
QRR · Removable glazing cap RR
9 31/32 in (253.21 mm) × 3/4 in (19.05 mm)
9 27/32 in (250.03 mm) × 3/4 in (19.05 mm) × 1/4 in (6.35 mm)
STOPR0 · Latch-side rear stop R0
1 5/8 in (41.28 mm) × 1 1/2 in (38.1 mm)
1 1/2 in (38.1 mm) × 1 1/2 in (38.1 mm) × 3/4 in (19.05 mm)
STOPR1 · Latch-side rear stop R1
1 5/8 in (41.28 mm) × 1 1/2 in (38.1 mm)
1 1/2 in (38.1 mm) × 1 1/2 in (38.1 mm) × 3/4 in (19.05 mm)
MRL · Roof mesh L
15 in (381 mm) × 12 in (304.8 mm)
15 in (381 mm) × 12 in (304.8 mm) × 0.082 in (2.08 mm)
RCLF · Roof capture LF
16 1/8 in (409.58 mm) × 1 1/2 in (38.1 mm)
16 in (406.4 mm) × 1 1/2 in (38.1 mm) × 3/4 in (19.05 mm)
RCLB · Roof capture LB
16 1/8 in (409.58 mm) × 1 1/2 in (38.1 mm)
16 in (406.4 mm) × 1 1/2 in (38.1 mm) × 3/4 in (19.05 mm)
RCLL · Roof capture LL
10 1/8 in (257.18 mm) × 1 1/2 in (38.1 mm)
10 in (254 mm) × 1 1/2 in (38.1 mm) × 3/4 in (19.05 mm)
RCLR · Roof capture LR
10 1/8 in (257.18 mm) × 1 1/2 in (38.1 mm)
10 in (254 mm) × 1 1/2 in (38.1 mm) × 3/4 in (19.05 mm)
Cut list · continued
One of each ID. Length follows the allocated grain. Rough blanks include trimming; finished sizes describe the reference assembly. V-parts represent the complete cured veneer stack. Field-fit dependent lengths to received stock and finished pockets.
Part
Rough length × width
Finished length × width × thickness
MRR · Roof mesh R
15 in (381 mm) × 12 in (304.8 mm)
15 in (381 mm) × 12 in (304.8 mm) × 0.082 in (2.08 mm)
RCRF · Roof capture RF
16 1/8 in (409.58 mm) × 1 1/2 in (38.1 mm)
16 in (406.4 mm) × 1 1/2 in (38.1 mm) × 3/4 in (19.05 mm)
RCRB · Roof capture RB
16 1/8 in (409.58 mm) × 1 1/2 in (38.1 mm)
16 in (406.4 mm) × 1 1/2 in (38.1 mm) × 3/4 in (19.05 mm)
RCRL · Roof capture RL
10 1/8 in (257.18 mm) × 1 1/2 in (38.1 mm)
10 in (254 mm) × 1 1/2 in (38.1 mm) × 3/4 in (19.05 mm)
RCRR · Roof capture RR
10 1/8 in (257.18 mm) × 1 1/2 in (38.1 mm)
10 in (254 mm) × 1 1/2 in (38.1 mm) × 3/4 in (19.05 mm)
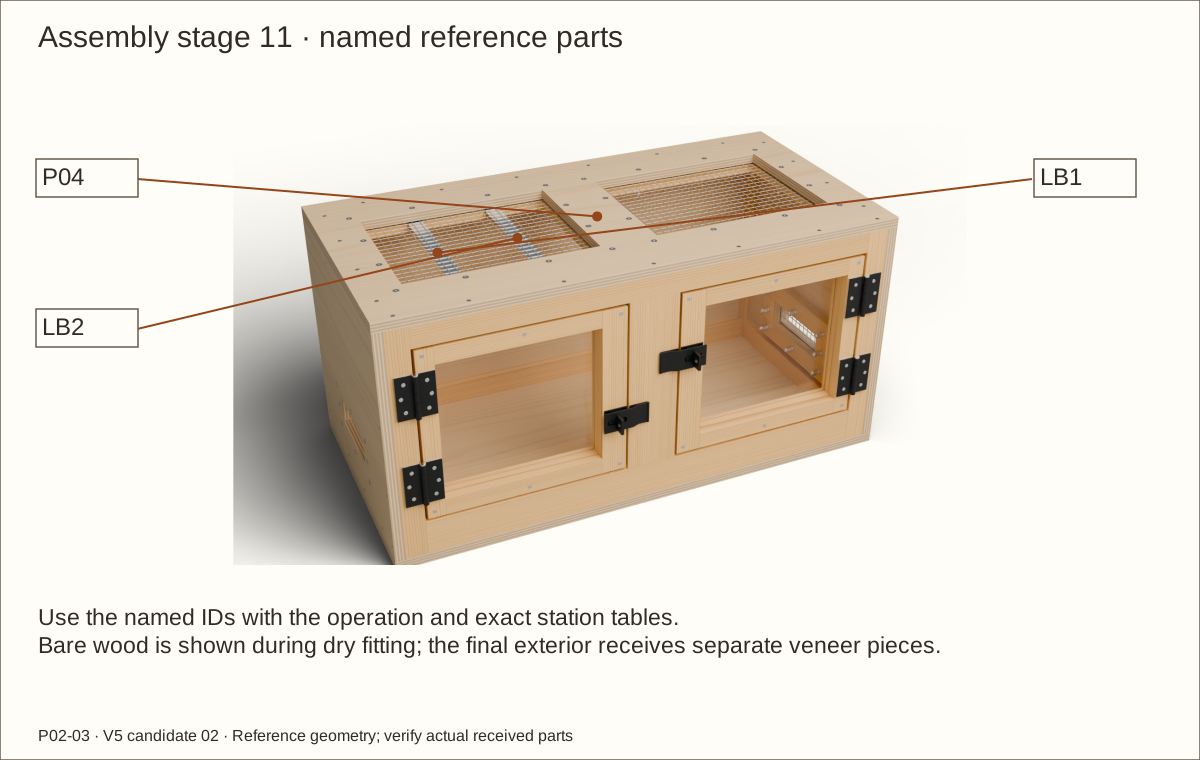
LB1 · Steel support below left lamp area
12 in (304.8 mm) × 1 in (25.4 mm)
12 in (304.8 mm) × 1 in (25.4 mm) × 1/8 in (3.18 mm)
LB2 · Steel support below left lamp area
12 in (304.8 mm) × 1 in (25.4 mm)
12 in (304.8 mm) × 1 in (25.4 mm) × 1/8 in (3.18 mm)
SP-HL0-left · Solid hinge bearing spacer HL0 left
3 in (76.2 mm) × 1 1/16 in (26.99 mm)
3 in (76.2 mm) × 1 1/16 in (26.99 mm) × 1/8 in (3.18 mm)
SP-HL0-right · Solid hinge bearing spacer HL0 right
3 in (76.2 mm) × 1 1/16 in (26.99 mm)
3 in (76.2 mm) × 1 1/16 in (26.99 mm) × 1/8 in (3.18 mm)
SP-HL1-left · Solid hinge bearing spacer HL1 left
3 in (76.2 mm) × 1 1/16 in (26.99 mm)
3 in (76.2 mm) × 1 1/16 in (26.99 mm) × 1/8 in (3.18 mm)
Cut list · continued
One of each ID. Length follows the allocated grain. Rough blanks include trimming; finished sizes describe the reference assembly. V-parts represent the complete cured veneer stack. Field-fit dependent lengths to received stock and finished pockets.
Part
Rough length × width
Finished length × width × thickness
SP-HL1-right · Solid hinge bearing spacer HL1 right
3 in (76.2 mm) × 1 1/16 in (26.99 mm)
3 in (76.2 mm) × 1 1/16 in (26.99 mm) × 1/8 in (3.18 mm)
SP-HR0-left · Solid hinge bearing spacer HR0 left
3 in (76.2 mm) × 1 1/16 in (26.99 mm)
3 in (76.2 mm) × 1 1/16 in (26.99 mm) × 1/8 in (3.18 mm)
SP-HR0-right · Solid hinge bearing spacer HR0 right
3 in (76.2 mm) × 1 1/16 in (26.99 mm)
3 in (76.2 mm) × 1 1/16 in (26.99 mm) × 1/8 in (3.18 mm)
SP-HR1-left · Solid hinge bearing spacer HR1 left
3 in (76.2 mm) × 1 1/16 in (26.99 mm)
3 in (76.2 mm) × 1 1/16 in (26.99 mm) × 1/8 in (3.18 mm)
SP-HR1-right · Solid hinge bearing spacer HR1 right
3 in (76.2 mm) × 1 1/16 in (26.99 mm)
3 in (76.2 mm) × 1 1/16 in (26.99 mm) × 1/8 in (3.18 mm)
V-floor-under · Exterior veneer · floor-under
36.561 in (928.65 mm) × 18.561 in (471.45 mm)
36.061 in (915.95 mm) × 18.061 in (458.75 mm) × 0.0305 in (0.77 mm)
V-roof-top · Exterior veneer · roof-top
36.561 in (928.65 mm) × 18.561 in (471.45 mm)
36.061 in (915.95 mm) × 18.061 in (458.75 mm) × 0.0305 in (0.77 mm)
V-P01-front · Exterior veneer · P01-front
36.561 in (928.65 mm) × 1 13/64 in (30.56 mm)
36.061 in (915.95 mm) × 45/64 in (17.86 mm) × 0.0305 in (0.77 mm)
V-P01-back · Exterior veneer · P01-back
36.561 in (928.65 mm) × 1 13/64 in (30.56 mm)
36.061 in (915.95 mm) × 45/64 in (17.86 mm) × 0.0305 in (0.77 mm)
V-P01-left · Exterior veneer · P01-left
18 1/2 in (469.9 mm) × 1 13/64 in (30.56 mm)
18 in (457.2 mm) × 45/64 in (17.86 mm) × 0.0305 in (0.77 mm)
Cut list · continued
One of each ID. Length follows the allocated grain. Rough blanks include trimming; finished sizes describe the reference assembly. V-parts represent the complete cured veneer stack. Field-fit dependent lengths to received stock and finished pockets.
Part
Rough length × width
Finished length × width × thickness
V-P01-right · Exterior veneer · P01-right
18 1/2 in (469.9 mm) × 1 13/64 in (30.56 mm)
18 in (457.2 mm) × 45/64 in (17.86 mm) × 0.0305 in (0.77 mm)
V-P04-front · Exterior veneer · P04-front
36.561 in (928.65 mm) × 1 13/64 in (30.56 mm)
36.061 in (915.95 mm) × 45/64 in (17.86 mm) × 0.0305 in (0.77 mm)
V-P04-back · Exterior veneer · P04-back
36.561 in (928.65 mm) × 1 13/64 in (30.56 mm)
36.061 in (915.95 mm) × 45/64 in (17.86 mm) × 0.0305 in (0.77 mm)
V-P04-left · Exterior veneer · P04-left
18 1/2 in (469.9 mm) × 1 13/64 in (30.56 mm)
18 in (457.2 mm) × 45/64 in (17.86 mm) × 0.0305 in (0.77 mm)
V-P04-right · Exterior veneer · P04-right
18 1/2 in (469.9 mm) × 1 13/64 in (30.56 mm)
18 in (457.2 mm) × 45/64 in (17.86 mm) × 0.0305 in (0.77 mm)
V-P03L-face · Exterior veneer · P03L-face
17 3/32 in (434.18 mm) × 18 1/2 in (469.9 mm)
16 19/32 in (421.48 mm) × 18 in (457.2 mm) × 0.0305 in (0.77 mm)
V-P03L-front · Exterior veneer · P03L-front
17 3/32 in (434.18 mm) × 1.233625 in (31.33 mm)
16 19/32 in (421.48 mm) × 0.733625 in (18.63 mm) × 0.0305 in (0.77 mm)
V-P03L-back · Exterior veneer · P03L-back
17 3/32 in (434.18 mm) × 1.233625 in (31.33 mm)
16 19/32 in (421.48 mm) × 0.733625 in (18.63 mm) × 0.0305 in (0.77 mm)
1.939 in (49.25 mm) × 45/64 in (17.86 mm) × 0.0305 in (0.77 mm)
V-P03L-vent-far · Exterior veneer · P03L-vent-far
2.439 in (61.95 mm) × 1 13/64 in (30.56 mm)
1.939 in (49.25 mm) × 45/64 in (17.86 mm) × 0.0305 in (0.77 mm)
Cut list · continued
One of each ID. Length follows the allocated grain. Rough blanks include trimming; finished sizes describe the reference assembly. V-parts represent the complete cured veneer stack. Field-fit dependent lengths to received stock and finished pockets.
6 in (152.4 mm) × 45/64 in (17.86 mm) × 0.0305 in (0.77 mm)
V-P03R-vent-top · Exterior veneer · P03R-vent-top
6 1/2 in (165.1 mm) × 1 13/64 in (30.56 mm)
6 in (152.4 mm) × 45/64 in (17.86 mm) × 0.0305 in (0.77 mm)
V-back · Exterior veneer · back
35 3/32 in (891.38 mm) × 17 3/32 in (434.18 mm)
34 19/32 in (878.68 mm) × 16 19/32 in (421.48 mm) × 0.0305 in (0.77 mm)
Cut list · continued
One of each ID. Length follows the allocated grain. Rough blanks include trimming; finished sizes describe the reference assembly. V-parts represent the complete cured veneer stack. Field-fit dependent lengths to received stock and finished pockets.
Part
Rough length × width
Finished length × width × thickness
V-roof-L-left · Exterior veneer · roof-L-left
10.439 in (265.15 mm) × 1 13/64 in (30.56 mm)
9.939 in (252.45 mm) × 45/64 in (17.86 mm) × 0.0305 in (0.77 mm)
V-roof-L-right · Exterior veneer · roof-L-right
10.439 in (265.15 mm) × 1 13/64 in (30.56 mm)
9.939 in (252.45 mm) × 45/64 in (17.86 mm) × 0.0305 in (0.77 mm)
V-roof-L-front · Exterior veneer · roof-L-front
13 1/2 in (342.9 mm) × 1 13/64 in (30.56 mm)
13 in (330.2 mm) × 45/64 in (17.86 mm) × 0.0305 in (0.77 mm)
V-roof-L-back · Exterior veneer · roof-L-back
13 1/2 in (342.9 mm) × 1 13/64 in (30.56 mm)
13 in (330.2 mm) × 45/64 in (17.86 mm) × 0.0305 in (0.77 mm)
V-roof-R-left · Exterior veneer · roof-R-left
10.439 in (265.15 mm) × 1 13/64 in (30.56 mm)
9.939 in (252.45 mm) × 45/64 in (17.86 mm) × 0.0305 in (0.77 mm)
V-roof-R-right · Exterior veneer · roof-R-right
10.439 in (265.15 mm) × 1 13/64 in (30.56 mm)
9.939 in (252.45 mm) × 45/64 in (17.86 mm) × 0.0305 in (0.77 mm)
V-roof-R-front · Exterior veneer · roof-R-front
13 1/2 in (342.9 mm) × 1 13/64 in (30.56 mm)
13 in (330.2 mm) × 45/64 in (17.86 mm) × 0.0305 in (0.77 mm)
V-roof-R-back · Exterior veneer · roof-R-back
13 1/2 in (342.9 mm) × 1 13/64 in (30.56 mm)
13 in (330.2 mm) × 45/64 in (17.86 mm) × 0.0305 in (0.77 mm)
V-FL-front · Exterior veneer · FL-front
17 3/32 in (434.18 mm) × 2 in (50.8 mm)
16 19/32 in (421.48 mm) × 1 1/2 in (38.1 mm) × 0.0305 in (0.77 mm)
V-FR-front · Exterior veneer · FR-front
17 3/32 in (434.18 mm) × 2 in (50.8 mm)
16 19/32 in (421.48 mm) × 1 1/2 in (38.1 mm) × 0.0305 in (0.77 mm)
Cut list · continued
One of each ID. Length follows the allocated grain. Rough blanks include trimming; finished sizes describe the reference assembly. V-parts represent the complete cured veneer stack. Field-fit dependent lengths to received stock and finished pockets.
Part
Rough length × width
Finished length × width × thickness
V-FB-front · Exterior veneer · FB-front
32 3/32 in (815.18 mm) × 3 in (76.2 mm)
31 19/32 in (802.48 mm) × 2 1/2 in (63.5 mm) × 0.0305 in (0.77 mm)
V-FT-front · Exterior veneer · FT-front
32 3/32 in (815.18 mm) × 2 in (50.8 mm)
31 19/32 in (802.48 mm) × 1 1/2 in (38.1 mm) × 0.0305 in (0.77 mm)
V-FC-front · Exterior veneer · FC-front
13 3/32 in (332.58 mm) × 4 in (101.6 mm)
12 19/32 in (319.88 mm) × 3 1/2 in (88.9 mm) × 0.0305 in (0.77 mm)
V-L-jamb-left · Exterior veneer · L-jamb-left
13.03275 in (331.03 mm) × 2 in (50.8 mm)
12.53275 in (318.33 mm) × 1 1/2 in (38.1 mm) × 0.0305 in (0.77 mm)
V-L-jamb-right · Exterior veneer · L-jamb-right
13.03275 in (331.03 mm) × 2 in (50.8 mm)
12.53275 in (318.33 mm) × 1 1/2 in (38.1 mm) × 0.0305 in (0.77 mm)
V-L-sill · Exterior veneer · L-sill
14 35/64 in (369.49 mm) × 2 in (50.8 mm)
14 3/64 in (356.79 mm) × 1 1/2 in (38.1 mm) × 0.0305 in (0.77 mm)
V-L-head · Exterior veneer · L-head
14 35/64 in (369.49 mm) × 2 in (50.8 mm)
14 3/64 in (356.79 mm) × 1 1/2 in (38.1 mm) × 0.0305 in (0.77 mm)
V-R-jamb-left · Exterior veneer · R-jamb-left
13.03275 in (331.03 mm) × 2 in (50.8 mm)
12.53275 in (318.33 mm) × 1 1/2 in (38.1 mm) × 0.0305 in (0.77 mm)
V-R-jamb-right · Exterior veneer · R-jamb-right
13.03275 in (331.03 mm) × 2 in (50.8 mm)
12.53275 in (318.33 mm) × 1 1/2 in (38.1 mm) × 0.0305 in (0.77 mm)
V-R-sill · Exterior veneer · R-sill
14 35/64 in (369.49 mm) × 2 in (50.8 mm)
14 3/64 in (356.79 mm) × 1 1/2 in (38.1 mm) × 0.0305 in (0.77 mm)
Cut list · continued
One of each ID. Length follows the allocated grain. Rough blanks include trimming; finished sizes describe the reference assembly. V-parts represent the complete cured veneer stack. Field-fit dependent lengths to received stock and finished pockets.
Part
Rough length × width
Finished length × width × thickness
V-R-head · Exterior veneer · R-head
14 35/64 in (369.49 mm) × 2 in (50.8 mm)
14 3/64 in (356.79 mm) × 1 1/2 in (38.1 mm) × 0.0305 in (0.77 mm)
V-DLA-front · Exterior veneer · DLA-front
12.77975 in (324.61 mm) × 1.718 in (43.64 mm)
12.27975 in (311.91 mm) × 1.218 in (30.94 mm) × 0.0305 in (0.77 mm)
V-DLB-front · Exterior veneer · DLB-front
12.77975 in (324.61 mm) × 2.24925 in (57.13 mm)
12.27975 in (311.91 mm) × 1.74925 in (44.43 mm) × 0.0305 in (0.77 mm)
V-DLC-front · Exterior veneer · DLC-front
11 19/64 in (286.94 mm) × 1.718 in (43.64 mm)
10 51/64 in (274.24 mm) × 1.218 in (30.94 mm) × 0.0305 in (0.77 mm)
V-DLD-front · Exterior veneer · DLD-front
11 19/64 in (286.94 mm) × 1.718 in (43.64 mm)
10 51/64 in (274.24 mm) × 1.218 in (30.94 mm) × 0.0305 in (0.77 mm)
9.78275 in (248.48 mm) × 1 1/4 in (31.75 mm) × 0.0305 in (0.77 mm)
Cut list · continued
One of each ID. Length follows the allocated grain. Rough blanks include trimming; finished sizes describe the reference assembly. V-parts represent the complete cured veneer stack. Field-fit dependent lengths to received stock and finished pockets.
12 7/32 in (310.36 mm) × 1 1/2 in (38.1 mm) × 0.0305 in (0.77 mm)
V-doorR-bottom · Exterior veneer · doorR-bottom
14.264125 in (362.31 mm) × 2 in (50.8 mm)
13.764125 in (349.61 mm) × 1 1/2 in (38.1 mm) × 0.0305 in (0.77 mm)
Cut list · continued
One of each ID. Length follows the allocated grain. Rough blanks include trimming; finished sizes describe the reference assembly. V-parts represent the complete cured veneer stack. Field-fit dependent lengths to received stock and finished pockets.
Part
Rough length × width
Finished length × width × thickness
V-doorR-top · Exterior veneer · doorR-top
14.264125 in (362.31 mm) × 2 in (50.8 mm)
13.764125 in (349.61 mm) × 1 1/2 in (38.1 mm) × 0.0305 in (0.77 mm)
Use the labeled IDs with exact coordinates; retain grain, trim and kerf
Grain-fixed guillotine plan; 1/4 in (6.35 mm) end trim only. Full 3 1/2 in (88.9 mm) factory width required for center members; reject undersize stock. Plane cap blanks before supported ripping.
PINE-2 · rough-stock cutting plan
Use the labeled IDs with exact coordinates; retain grain, trim and kerf
Grain-fixed guillotine plan; 1/4 in (6.35 mm) end trim only. Full 3 1/2 in (88.9 mm) factory width required for center members; reject undersize stock. Plane cap blanks before supported ripping.
PINE-3 · rough-stock cutting plan
Use the labeled IDs with exact coordinates; retain grain, trim and kerf
Grain-fixed guillotine plan; 1/4 in (6.35 mm) end trim only. Full 3 1/2 in (88.9 mm) factory width required for center members; reject undersize stock. Plane cap blanks before supported ripping.
PINE-4 · rough-stock cutting plan
Use the labeled IDs with exact coordinates; retain grain, trim and kerf
Grain-fixed guillotine plan; 1/4 in (6.35 mm) end trim only. Full 3 1/2 in (88.9 mm) factory width required for center members; reject undersize stock. Plane cap blanks before supported ripping.
PINE-5 · rough-stock cutting plan
Use the labeled IDs with exact coordinates; retain grain, trim and kerf
Grain-fixed guillotine plan; 1/4 in (6.35 mm) end trim only. Full 3 1/2 in (88.9 mm) factory width required for center members; reject undersize stock. Plane cap blanks before supported ripping.
PINE-TRIAL · rough-stock cutting plan
Use the labeled IDs with exact coordinates; retain grain, trim and kerf
X runs along the stock length; Y across its width, from the illustrated lower-left corner. These are stock coordinates, not assembled fastener positions. Keep every blank labeled.
ID
Stock X / Y
Rough length × width
P01
1/8 in (3.18 mm) / 1/8 in (3.18 mm)
36 1/8 in (917.58 mm) × 18 in (457.2 mm)
P04
1/8 in (3.18 mm) / 18 1/4 in (463.55 mm)
36 1/8 in (917.58 mm) × 18 in (457.2 mm)
P02
36 3/8 in (923.93 mm) / 1/8 in (3.18 mm)
34 23/32 in (881.86 mm) × 16 19/32 in (421.48 mm)
P03L
71 7/32 in (1808.96 mm) / 1/8 in (3.18 mm)
18 1/8 in (460.38 mm) × 16 19/32 in (421.48 mm)
P03R
71 7/32 in (1808.96 mm) / 16 27/32 in (427.83 mm)
18 1/8 in (460.38 mm) × 16 19/32 in (421.48 mm)
Stock 96 in (2438.4 mm) × 48 in (1219.2 mm); Trim 1/8 in (3.18 mm); kerf/separation 1/8 in (3.18 mm). The full cut order and offcuts are in the specification.
PINE-1 · exact rough blank positions
X runs along the stock length; Y across its width, from the illustrated lower-left corner. These are stock coordinates, not assembled fastener positions. Keep every blank labeled.
ID
Stock X / Y
Rough length × width
GC
1/4 in (6.35 mm) / 0 in (0 mm)
16 23/32 in (424.66 mm) × 3 1/2 in (88.9 mm)
FC
17 3/32 in (434.18 mm) / 0 in (0 mm)
12 23/32 in (323.06 mm) × 3 1/2 in (88.9 mm)
FB
29 15/16 in (760.41 mm) / 0 in (0 mm)
31 23/32 in (805.66 mm) × 2 1/2 in (63.5 mm)
GLB
61 25/32 in (1569.24 mm) / 0 in (0 mm)
15 43/64 in (398.07 mm) × 2 1/2 in (63.5 mm)
GRB
77 37/64 in (1970.48 mm) / 0 in (0 mm)
15 43/64 in (398.07 mm) × 2 1/2 in (63.5 mm)
VLF
93 3/8 in (2371.73 mm) / 0 in (0 mm)
2 1/8 in (53.98 mm) × 1 1/2 in (38.1 mm)
VLR
93 3/8 in (2371.73 mm) / 1 5/8 in (41.28 mm)
2 1/8 in (53.98 mm) × 1 1/2 in (38.1 mm)
CLV
29 15/16 in (760.41 mm) / 2 5/8 in (66.68 mm)
16 23/32 in (424.66 mm) × 3/4 in (19.05 mm)
QLB
61 25/32 in (1569.24 mm) / 2 5/8 in (66.68 mm)
12 27/64 in (315.52 mm) × 3/4 in (19.05 mm)
QLT
77 37/64 in (1970.48 mm) / 2 5/8 in (66.68 mm)
12 27/64 in (315.52 mm) × 3/4 in (19.05 mm)
QRB
46 25/32 in (1188.24 mm) / 2 5/8 in (66.68 mm)
12 27/64 in (315.52 mm) × 3/4 in (19.05 mm)
Stock 96 in (2438.4 mm) × 3 1/2 in (88.9 mm); End trim 1/4 in (6.35 mm); no edge trim; kerf/separation 1/8 in (3.18 mm). The full cut order and offcuts are in the specification.
PINE-2 · exact rough blank positions
X runs along the stock length; Y across its width, from the illustrated lower-left corner. These are stock coordinates, not assembled fastener positions. Keep every blank labeled.
ID
Stock X / Y
Rough length × width
DLB
1/4 in (6.35 mm) / 0 in (0 mm)
12 11/32 in (313.53 mm) × 1 23/32 in (43.66 mm)
DRA
12 23/32 in (323.06 mm) / 0 in (0 mm)
12 11/32 in (313.53 mm) × 1 23/32 in (43.66 mm)
DLH
25 3/16 in (639.76 mm) / 0 in (0 mm)
9 31/32 in (253.21 mm) × 1 23/32 in (43.66 mm)
DRG
35 9/32 in (896.14 mm) / 0 in (0 mm)
9 31/32 in (253.21 mm) × 1 23/32 in (43.66 mm)
CBACKB
1/4 in (6.35 mm) / 1 27/32 in (46.83 mm)
33 7/32 in (843.76 mm) × 1 1/2 in (38.1 mm)
CBACKT
33 19/32 in (853.28 mm) / 1 27/32 in (46.83 mm)
33 7/32 in (843.76 mm) × 1 1/2 in (38.1 mm)
FT
45 3/8 in (1152.53 mm) / 0 in (0 mm)
31 23/32 in (805.66 mm) × 1 1/2 in (38.1 mm)
FL
66 15/16 in (1700.21 mm) / 1 27/32 in (46.83 mm)
16 23/32 in (424.66 mm) × 1 1/2 in (38.1 mm)
FR
77 7/32 in (1961.36 mm) / 0 in (0 mm)
16 23/32 in (424.66 mm) × 1 1/2 in (38.1 mm)
RCLL
83 25/32 in (2128.04 mm) / 1 27/32 in (46.83 mm)
10 1/8 in (257.18 mm) × 1 1/2 in (38.1 mm)
STOPL0
94 1/16 in (2389.19 mm) / 0 in (0 mm)
1 5/8 in (41.28 mm) × 1 1/2 in (38.1 mm)
STOPL1
94 1/32 in (2388.39 mm) / 1 27/32 in (46.83 mm)
1 5/8 in (41.28 mm) × 1 1/2 in (38.1 mm)
Stock 96 in (2438.4 mm) × 3 1/2 in (88.9 mm); End trim 1/4 in (6.35 mm); no edge trim; kerf/separation 1/8 in (3.18 mm). The full cut order and offcuts are in the specification.
PINE-3 · exact rough blank positions
X runs along the stock length; Y across its width, from the illustrated lower-left corner. These are stock coordinates, not assembled fastener positions. Keep every blank labeled.
ID
Stock X / Y
Rough length × width
RCLF
1/4 in (6.35 mm) / 0 in (0 mm)
16 1/8 in (409.58 mm) × 1 1/2 in (38.1 mm)
RCLB
16 1/2 in (419.1 mm) / 0 in (0 mm)
16 1/8 in (409.58 mm) × 1 1/2 in (38.1 mm)
RCRF
32 3/4 in (831.85 mm) / 0 in (0 mm)
16 1/8 in (409.58 mm) × 1 1/2 in (38.1 mm)
RCRB
49 in (1244.6 mm) / 0 in (0 mm)
16 1/8 in (409.58 mm) × 1 1/2 in (38.1 mm)
GLT
65 1/4 in (1657.35 mm) / 0 in (0 mm)
15 43/64 in (398.07 mm) × 1 1/2 in (38.1 mm)
GRT
1/4 in (6.35 mm) / 1 5/8 in (41.28 mm)
15 43/64 in (398.07 mm) × 1 1/2 in (38.1 mm)
CLB
16 3/64 in (407.59 mm) / 1 5/8 in (41.28 mm)
15 11/64 in (385.37 mm) × 1 1/2 in (38.1 mm)
CLT
31 11/32 in (796.13 mm) / 1 5/8 in (41.28 mm)
15 11/64 in (385.37 mm) × 1 1/2 in (38.1 mm)
CRB
46 41/64 in (1184.67 mm) / 1 5/8 in (41.28 mm)
15 11/64 in (385.37 mm) × 1 1/2 in (38.1 mm)
CRT
61 15/16 in (1573.21 mm) / 1 5/8 in (41.28 mm)
15 11/64 in (385.37 mm) × 1 1/2 in (38.1 mm)
GLV
81 3/64 in (2058.59 mm) / 0 in (0 mm)
12 23/32 in (323.06 mm) × 1 1/2 in (38.1 mm)
GRV
77 15/64 in (1961.75 mm) / 1 5/8 in (41.28 mm)
12 23/32 in (323.06 mm) × 1 1/2 in (38.1 mm)
VRF
90 5/64 in (2287.98 mm) / 1 5/8 in (41.28 mm)
2 1/8 in (53.98 mm) × 1 1/2 in (38.1 mm)
VRR
92 21/64 in (2345.13 mm) / 1 5/8 in (41.28 mm)
2 1/8 in (53.98 mm) × 1 1/2 in (38.1 mm)
STOPR0
93 57/64 in (2384.82 mm) / 0 in (0 mm)
1 5/8 in (41.28 mm) × 1 1/2 in (38.1 mm)
Stock 96 in (2438.4 mm) × 3 1/2 in (88.9 mm); End trim 1/4 in (6.35 mm); no edge trim; kerf/separation 1/8 in (3.18 mm). The full cut order and offcuts are in the specification.
PINE-4 · exact rough blank positions
X runs along the stock length; Y across its width, from the illustrated lower-left corner. These are stock coordinates, not assembled fastener positions. Keep every blank labeled.
ID
Stock X / Y
Rough length × width
CRV
1/4 in (6.35 mm) / 0 in (0 mm)
16 23/32 in (424.66 mm) × 3/4 in (19.05 mm)
DLE
1/4 in (6.35 mm) / 7/8 in (22.23 mm)
13 53/64 in (351.23 mm) × 1 3/16 in (30.16 mm)
DLF
1/4 in (6.35 mm) / 2 3/16 in (55.56 mm)
13 53/64 in (351.23 mm) × 1 3/16 in (30.16 mm)
DRE
17 3/32 in (434.18 mm) / 0 in (0 mm)
13 53/64 in (351.23 mm) × 1 3/16 in (30.16 mm)
DRF
17 3/32 in (434.18 mm) / 1 5/16 in (33.34 mm)
13 53/64 in (351.23 mm) × 1 3/16 in (30.16 mm)
QRT
17 3/32 in (434.18 mm) / 2 5/8 in (66.68 mm)
12 27/64 in (315.52 mm) × 3/4 in (19.05 mm)
DLA
31 3/64 in (788.59 mm) / 0 in (0 mm)
12 11/32 in (313.53 mm) × 1 3/16 in (30.16 mm)
DRB
31 3/64 in (788.59 mm) / 1 5/16 in (33.34 mm)
12 11/32 in (313.53 mm) × 1 3/16 in (30.16 mm)
DLC
43 33/64 in (1105.3 mm) / 0 in (0 mm)
10 59/64 in (277.42 mm) × 1 3/16 in (30.16 mm)
DLD
43 33/64 in (1105.3 mm) / 1 5/16 in (33.34 mm)
10 59/64 in (277.42 mm) × 1 3/16 in (30.16 mm)
DRC
54 9/16 in (1385.89 mm) / 0 in (0 mm)
10 59/64 in (277.42 mm) × 1 3/16 in (30.16 mm)
RCLR
54 9/16 in (1385.89 mm) / 1 5/16 in (33.34 mm)
10 1/8 in (257.18 mm) × 1 1/2 in (38.1 mm)
RCRL
65 39/64 in (1666.48 mm) / 0 in (0 mm)
10 1/8 in (257.18 mm) × 1 1/2 in (38.1 mm)
RCRR
65 39/64 in (1666.48 mm) / 1 5/8 in (41.28 mm)
10 1/8 in (257.18 mm) × 1 1/2 in (38.1 mm)
QLL
31 3/64 in (788.59 mm) / 2 5/8 in (66.68 mm)
9 31/32 in (253.21 mm) × 3/4 in (19.05 mm)
QLR
43 33/64 in (1105.3 mm) / 2 5/8 in (66.68 mm)
9 31/32 in (253.21 mm) × 3/4 in (19.05 mm)
Stock 96 in (2438.4 mm) × 3 1/2 in (88.9 mm); End trim 1/4 in (6.35 mm); no edge trim; kerf/separation 1/8 in (3.18 mm). The full cut order and offcuts are in the specification.
PINE-4 · exact rough blank positions
X runs along the stock length; Y across its width, from the illustrated lower-left corner. These are stock coordinates, not assembled fastener positions. Keep every blank labeled.
ID
Stock X / Y
Rough length × width
VLB
75 55/64 in (1926.83 mm) / 0 in (0 mm)
9 1/8 in (231.78 mm) × 1 1/2 in (38.1 mm)
VLT
75 55/64 in (1926.83 mm) / 1 5/8 in (41.28 mm)
9 1/8 in (231.78 mm) × 1 1/2 in (38.1 mm)
VRB
85 7/64 in (2161.78 mm) / 0 in (0 mm)
9 1/8 in (231.78 mm) × 1 1/2 in (38.1 mm)
VRT
85 7/64 in (2161.78 mm) / 1 5/8 in (41.28 mm)
9 1/8 in (231.78 mm) × 1 1/2 in (38.1 mm)
STOPR1
14 13/64 in (360.76 mm) / 7/8 in (22.23 mm)
1 5/8 in (41.28 mm) × 1 1/2 in (38.1 mm)
Stock 96 in (2438.4 mm) × 3 1/2 in (88.9 mm); End trim 1/4 in (6.35 mm); no edge trim; kerf/separation 1/8 in (3.18 mm). The full cut order and offcuts are in the specification.
PINE-5 · exact rough blank positions
X runs along the stock length; Y across its width, from the illustrated lower-left corner. These are stock coordinates, not assembled fastener positions. Keep every blank labeled.
ID
Stock X / Y
Rough length × width
DRD
1/4 in (6.35 mm) / 0 in (0 mm)
10 59/64 in (277.42 mm) × 1 3/16 in (30.16 mm)
DLG
1/4 in (6.35 mm) / 1 5/16 in (33.34 mm)
9 31/32 in (253.21 mm) × 1 3/16 in (30.16 mm)
DRH
11 19/64 in (286.94 mm) / 0 in (0 mm)
9 31/32 in (253.21 mm) × 1 3/16 in (30.16 mm)
QRL
1/4 in (6.35 mm) / 2 5/8 in (66.68 mm)
9 31/32 in (253.21 mm) × 3/4 in (19.05 mm)
QRR
11 19/64 in (286.94 mm) / 1 5/16 in (33.34 mm)
9 31/32 in (253.21 mm) × 3/4 in (19.05 mm)
Stock 96 in (2438.4 mm) × 3 1/2 in (88.9 mm); End trim 1/4 in (6.35 mm); no edge trim; kerf/separation 1/8 in (3.18 mm). The full cut order and offcuts are in the specification.
PINE-TRIAL · exact rough blank positions
X runs along the stock length; Y across its width, from the illustrated lower-left corner. These are stock coordinates, not assembled fastener positions. Keep every blank labeled.
ID
Stock X / Y
Rough length × width
TRIAL-latch-fixed
1/8 in (3.18 mm) / 1/8 in (3.18 mm)
14 in (355.6 mm) × 3 1/4 in (82.55 mm)
TRIAL-latch-door
14 1/4 in (361.95 mm) / 1/8 in (3.18 mm)
14 in (355.6 mm) × 1 3/4 in (44.45 mm)
TRIAL-hinge-fixed
28 3/8 in (720.73 mm) / 1/8 in (3.18 mm)
18 in (457.2 mm) × 1 1/2 in (38.1 mm)
TRIAL-hinge-door
28 3/8 in (720.73 mm) / 1 3/4 in (44.45 mm)
18 in (457.2 mm) × 1 1/2 in (38.1 mm)
TRIAL-capture
46 1/2 in (1181.1 mm) / 1/8 in (3.18 mm)
14 in (355.6 mm) × 1 1/2 in (38.1 mm)
Stock 96 in (2438.4 mm) × 3 1/2 in (88.9 mm); Trim 1/8 in (3.18 mm); kerf/separation 1/8 in (3.18 mm). The full cut order and offcuts are in the specification.
ACR-1 · exact rough blank positions
X runs along the stock length; Y across its width, from the illustrated lower-left corner. These are stock coordinates, not assembled fastener positions. Keep every blank labeled.
ID
Stock X / Y
Rough length × width
AL
1/8 in (3.18 mm) / 1/8 in (3.18 mm)
11 13/32 in (289.72 mm) × 10 29/64 in (265.51 mm)
AR
11 21/32 in (296.07 mm) / 1/8 in (3.18 mm)
11 13/32 in (289.72 mm) × 10 29/64 in (265.51 mm)
Stock 24 in (609.6 mm) × 18 in (457.2 mm); Trim 1/8 in (3.18 mm); kerf/separation 1/8 in (3.18 mm). The full cut order and offcuts are in the specification.
MESH-1 · exact rough blank positions
X runs along the stock length; Y across its width, from the illustrated lower-left corner. These are stock coordinates, not assembled fastener positions. Keep every blank labeled.
ID
Stock X / Y
Rough length × width
MRL
1/8 in (3.18 mm) / 1/8 in (3.18 mm)
15 in (381 mm) × 12 in (304.8 mm)
MRR
15 1/4 in (387.35 mm) / 1/8 in (3.18 mm)
15 in (381 mm) × 12 in (304.8 mm)
ML
1/8 in (3.18 mm) / 12 1/4 in (311.15 mm)
8 in (203.2 mm) × 4 in (101.6 mm)
MR
1/8 in (3.18 mm) / 16 3/8 in (415.93 mm)
8 in (203.2 mm) × 4 in (101.6 mm)
Stock 60 in (1524 mm) × 24 in (609.6 mm); Trim 1/8 in (3.18 mm); kerf/separation 1/8 in (3.18 mm). The full cut order and offcuts are in the specification.
STEEL-1 · exact rough blank positions
X runs along the stock length; Y across its width, from the illustrated lower-left corner. These are stock coordinates, not assembled fastener positions. Keep every blank labeled.
ID
Stock X / Y
Rough length × width
LB1
1/4 in (6.35 mm) / 0 in (0 mm)
12 in (304.8 mm) × 1 in (25.4 mm)
LB2
12 3/8 in (314.33 mm) / 0 in (0 mm)
12 in (304.8 mm) × 1 in (25.4 mm)
Stock 36 in (914.4 mm) × 1 in (25.4 mm); End trim 1/4 in (6.35 mm); no edge trim; kerf/separation 1/8 in (3.18 mm). The full cut order and offcuts are in the specification.
ALUMINIUM-1 · exact rough blank positions
X runs along the stock length; Y across its width, from the illustrated lower-left corner. These are stock coordinates, not assembled fastener positions. Keep every blank labeled.
ID
Stock X / Y
Rough length × width
SP-HL0-left
1/8 in (3.18 mm) / 1/8 in (3.18 mm)
3 in (76.2 mm) × 1 1/16 in (26.99 mm)
SP-HL0-right
3 3/16 in (80.96 mm) / 1/8 in (3.18 mm)
3 in (76.2 mm) × 1 1/16 in (26.99 mm)
SP-HL1-left
6 1/4 in (158.75 mm) / 1/8 in (3.18 mm)
3 in (76.2 mm) × 1 1/16 in (26.99 mm)
SP-HL1-right
9 5/16 in (236.54 mm) / 1/8 in (3.18 mm)
3 in (76.2 mm) × 1 1/16 in (26.99 mm)
SP-HR0-left
12 3/8 in (314.33 mm) / 1/8 in (3.18 mm)
3 in (76.2 mm) × 1 1/16 in (26.99 mm)
SP-HR0-right
15 7/16 in (392.11 mm) / 1/8 in (3.18 mm)
3 in (76.2 mm) × 1 1/16 in (26.99 mm)
SP-HR1-left
18 1/2 in (469.9 mm) / 1/8 in (3.18 mm)
3 in (76.2 mm) × 1 1/16 in (26.99 mm)
SP-HR1-right
21 9/16 in (547.69 mm) / 1/8 in (3.18 mm)
3 in (76.2 mm) × 1 1/16 in (26.99 mm)
Stock 36 in (914.4 mm) × 1 1/2 in (38.1 mm); Trim 1/8 in (3.18 mm); kerf/separation 1/16 in (1.59 mm). The full cut order and offcuts are in the specification.
VENEER-1 · exact rough blank positions
X runs along the stock length; Y across its width, from the illustrated lower-left corner. These are stock coordinates, not assembled fastener positions. Keep every blank labeled.
ID
Stock X / Y
Rough length × width
V-floor-under
1/4 in (6.35 mm) / 1/4 in (6.35 mm)
36.561 in (928.65 mm) × 18.561 in (471.45 mm)
V-roof-top
36.8735 in (936.59 mm) / 1/4 in (6.35 mm)
36.561 in (928.65 mm) × 18.561 in (471.45 mm)
V-P03L-face
73.497 in (1866.82 mm) / 1/4 in (6.35 mm)
17 3/32 in (434.18 mm) × 18 1/2 in (469.9 mm)
V-P03R-face
90.65325 in (2302.59 mm) / 1/4 in (6.35 mm)
17 3/32 in (434.18 mm) × 18 1/2 in (469.9 mm)
V-back
1/4 in (6.35 mm) / 18.8735 in (479.39 mm)
35 3/32 in (891.38 mm) × 17 3/32 in (434.18 mm)
V-TRIAL-bond
35 13/32 in (899.32 mm) / 18.8735 in (479.39 mm)
12 in (304.8 mm) × 12 in (304.8 mm)
V-FC-front
35 13/32 in (899.32 mm) / 30.936 in (785.77 mm)
13 3/32 in (332.58 mm) × 4 in (101.6 mm)
V-FB-front
48 9/16 in (1233.49 mm) / 30.936 in (785.77 mm)
32 3/32 in (815.18 mm) × 3 in (76.2 mm)
V-TRIAL-door
80 23/32 in (2050.26 mm) / 30.936 in (785.77 mm)
18 1/2 in (469.9 mm) × 2 1/4 in (57.15 mm)
V-DLB-front
99 9/32 in (2521.74 mm) / 30.936 in (785.77 mm)
12.77975 in (324.61 mm) × 2.24925 in (57.13 mm)
V-DRA-front
1/4 in (6.35 mm) / 36.02975 in (915.16 mm)
12.77975 in (324.61 mm) × 2.24925 in (57.13 mm)
V-FT-front
13.09225 in (332.54 mm) / 36.02975 in (915.16 mm)
32 3/32 in (815.18 mm) × 2 in (50.8 mm)
V-TRIAL-frame
45.2485 in (1149.31 mm) / 36.02975 in (915.16 mm)
18 1/2 in (469.9 mm) × 2 in (50.8 mm)
V-FL-front
63.811 in (1620.8 mm) / 36.02975 in (915.16 mm)
17 3/32 in (434.18 mm) × 2 in (50.8 mm)
V-FR-front
80.96725 in (2056.57 mm) / 36.02975 in (915.16 mm)
17 3/32 in (434.18 mm) × 2 in (50.8 mm)
V-L-sill
98.1235 in (2492.34 mm) / 36.02975 in (915.16 mm)
14 35/64 in (369.49 mm) × 2 in (50.8 mm)
Stock 120 in (3048 mm) × 48 in (1219.2 mm); Trim 1/4 in (6.35 mm); kerf/separation 1/16 in (1.59 mm). The full cut order and offcuts are in the specification.
VENEER-1 · exact rough blank positions
X runs along the stock length; Y across its width, from the illustrated lower-left corner. These are stock coordinates, not assembled fastener positions. Keep every blank labeled.
ID
Stock X / Y
Rough length × width
V-L-head
1/4 in (6.35 mm) / 38.3415 in (973.87 mm)
14 35/64 in (369.49 mm) × 2 in (50.8 mm)
V-R-sill
14 55/64 in (377.43 mm) / 38.3415 in (973.87 mm)
14 35/64 in (369.49 mm) × 2 in (50.8 mm)
V-R-head
29 15/32 in (748.51 mm) / 38.3415 in (973.87 mm)
14 35/64 in (369.49 mm) × 2 in (50.8 mm)
V-doorL-bottom
44 5/64 in (1119.58 mm) / 38.3415 in (973.87 mm)
14.264125 in (362.31 mm) × 2 in (50.8 mm)
V-doorL-top
58.40475 in (1483.48 mm) / 38.3415 in (973.87 mm)
14.264125 in (362.31 mm) × 2 in (50.8 mm)
V-doorR-bottom
72.731375 in (1847.38 mm) / 38.3415 in (973.87 mm)
14.264125 in (362.31 mm) × 2 in (50.8 mm)
V-doorR-top
87.058 in (2211.27 mm) / 38.3415 in (973.87 mm)
14.264125 in (362.31 mm) × 2 in (50.8 mm)
V-L-jamb-left
101.384625 in (2575.17 mm) / 38.3415 in (973.87 mm)
13.03275 in (331.03 mm) × 2 in (50.8 mm)
V-L-jamb-right
1/4 in (6.35 mm) / 40.404 in (1026.26 mm)
13.03275 in (331.03 mm) × 2 in (50.8 mm)
V-R-jamb-left
13.34525 in (338.97 mm) / 40.404 in (1026.26 mm)
13.03275 in (331.03 mm) × 2 in (50.8 mm)
V-R-jamb-right
26.4405 in (671.59 mm) / 40.404 in (1026.26 mm)
13.03275 in (331.03 mm) × 2 in (50.8 mm)
V-doorL-hinge-edge
39.53575 in (1004.21 mm) / 40.404 in (1026.26 mm)
12 23/32 in (323.06 mm) × 2 in (50.8 mm)
V-doorL-latch-edge
52.317 in (1328.85 mm) / 40.404 in (1026.26 mm)
12 23/32 in (323.06 mm) × 2 in (50.8 mm)
V-doorR-hinge-edge
65.09825 in (1653.5 mm) / 40.404 in (1026.26 mm)
12 23/32 in (323.06 mm) × 2 in (50.8 mm)
V-doorR-latch-edge
77.8795 in (1978.14 mm) / 40.404 in (1026.26 mm)
12 23/32 in (323.06 mm) × 2 in (50.8 mm)
V-doorL-window-bottom
90.66075 in (2302.78 mm) / 40.404 in (1026.26 mm)
11 19/64 in (286.94 mm) × 1 3/4 in (44.45 mm)
Stock 120 in (3048 mm) × 48 in (1219.2 mm); Trim 1/4 in (6.35 mm); kerf/separation 1/16 in (1.59 mm). The full cut order and offcuts are in the specification.
VENEER-1 · exact rough blank positions
X runs along the stock length; Y across its width, from the illustrated lower-left corner. These are stock coordinates, not assembled fastener positions. Keep every blank labeled.
ID
Stock X / Y
Rough length × width
V-doorL-window-top
102.020125 in (2591.31 mm) / 40.404 in (1026.26 mm)
11 19/64 in (286.94 mm) × 1 3/4 in (44.45 mm)
V-doorR-window-bottom
107.8095 in (2738.36 mm) / 1/4 in (6.35 mm)
11 19/64 in (286.94 mm) × 1 3/4 in (44.45 mm)
V-doorR-window-top
107.8095 in (2738.36 mm) / 2 1/16 in (52.39 mm)
11 19/64 in (286.94 mm) × 1 3/4 in (44.45 mm)
V-doorL-window-left
107.8095 in (2738.36 mm) / 3 7/8 in (98.43 mm)
10.28275 in (261.18 mm) × 1 3/4 in (44.45 mm)
V-doorL-window-right
107.8095 in (2738.36 mm) / 5 11/16 in (144.46 mm)
10.28275 in (261.18 mm) × 1 3/4 in (44.45 mm)
V-doorR-window-left
107.8095 in (2738.36 mm) / 7 1/2 in (190.5 mm)
10.28275 in (261.18 mm) × 1 3/4 in (44.45 mm)
V-doorR-window-right
107.8095 in (2738.36 mm) / 9 5/16 in (236.54 mm)
10.28275 in (261.18 mm) × 1 3/4 in (44.45 mm)
V-DLA-front
1/4 in (6.35 mm) / 42.4665 in (1078.65 mm)
12.77975 in (324.61 mm) × 1.718 in (43.64 mm)
V-DRB-front
13.09225 in (332.54 mm) / 42.4665 in (1078.65 mm)
12.77975 in (324.61 mm) × 1.718 in (43.64 mm)
V-DLC-front
25.9345 in (658.74 mm) / 42.4665 in (1078.65 mm)
11 19/64 in (286.94 mm) × 1.718 in (43.64 mm)
V-DLD-front
37.293875 in (947.26 mm) / 42.4665 in (1078.65 mm)
11 19/64 in (286.94 mm) × 1.718 in (43.64 mm)
V-DRC-front
48.65325 in (1235.79 mm) / 42.4665 in (1078.65 mm)
11 19/64 in (286.94 mm) × 1.718 in (43.64 mm)
V-DRD-front
60.012625 in (1524.32 mm) / 42.4665 in (1078.65 mm)
11 19/64 in (286.94 mm) × 1.718 in (43.64 mm)
V-P03L-front
71.372 in (1812.85 mm) / 42.4665 in (1078.65 mm)
17 3/32 in (434.18 mm) × 1.233625 in (31.33 mm)
V-P03L-back
88.52825 in (2248.62 mm) / 42.4665 in (1078.65 mm)
17 3/32 in (434.18 mm) × 1.233625 in (31.33 mm)
V-P03R-front
1/4 in (6.35 mm) / 44.247 in (1123.87 mm)
17 3/32 in (434.18 mm) × 1.233625 in (31.33 mm)
Stock 120 in (3048 mm) × 48 in (1219.2 mm); Trim 1/4 in (6.35 mm); kerf/separation 1/16 in (1.59 mm). The full cut order and offcuts are in the specification.
VENEER-1 · exact rough blank positions
X runs along the stock length; Y across its width, from the illustrated lower-left corner. These are stock coordinates, not assembled fastener positions. Keep every blank labeled.
ID
Stock X / Y
Rough length × width
V-P03R-back
17 13/32 in (442.12 mm) / 44.247 in (1123.87 mm)
17 3/32 in (434.18 mm) × 1.233625 in (31.33 mm)
V-P01-front
34 9/16 in (877.89 mm) / 44.247 in (1123.87 mm)
36.561 in (928.65 mm) × 1 13/64 in (30.56 mm)
V-P01-back
71.186 in (1808.12 mm) / 44.247 in (1123.87 mm)
36.561 in (928.65 mm) × 1 13/64 in (30.56 mm)
V-P04-front
1/4 in (6.35 mm) / 45.543125 in (1156.8 mm)
36.561 in (928.65 mm) × 1 13/64 in (30.56 mm)
V-P04-back
36.8735 in (936.59 mm) / 45.543125 in (1156.8 mm)
36.561 in (928.65 mm) × 1 13/64 in (30.56 mm)
V-P01-left
73.497 in (1866.82 mm) / 45.543125 in (1156.8 mm)
18 1/2 in (469.9 mm) × 1 13/64 in (30.56 mm)
V-P01-right
92.0595 in (2338.31 mm) / 45.543125 in (1156.8 mm)
18 1/2 in (469.9 mm) × 1 13/64 in (30.56 mm)
V-P04-left
47 15/32 in (1205.71 mm) / 18.8735 in (479.39 mm)
18 1/2 in (469.9 mm) × 1 13/64 in (30.56 mm)
V-P04-right
66 1/32 in (1677.19 mm) / 18.8735 in (479.39 mm)
18 1/2 in (469.9 mm) × 1 13/64 in (30.56 mm)
V-roof-L-front
84 19/32 in (2148.68 mm) / 18.8735 in (479.39 mm)
13 1/2 in (342.9 mm) × 1 13/64 in (30.56 mm)
V-roof-L-back
98 5/32 in (2493.17 mm) / 18.8735 in (479.39 mm)
13 1/2 in (342.9 mm) × 1 13/64 in (30.56 mm)
V-roof-R-front
105.6845 in (2684.39 mm) / 42.4665 in (1078.65 mm)
13 1/2 in (342.9 mm) × 1 13/64 in (30.56 mm)
V-roof-R-back
47 15/32 in (1205.71 mm) / 20.139125 in (511.53 mm)
13 1/2 in (342.9 mm) × 1 13/64 in (30.56 mm)
V-roof-L-left
107.8095 in (2738.36 mm) / 44.247 in (1123.87 mm)
10.439 in (265.15 mm) × 1 13/64 in (30.56 mm)
V-roof-L-right
61 1/32 in (1550.19 mm) / 20.139125 in (511.53 mm)
10.439 in (265.15 mm) × 1 13/64 in (30.56 mm)
V-roof-R-left
71.53275 in (1816.93 mm) / 20.139125 in (511.53 mm)
10.439 in (265.15 mm) × 1 13/64 in (30.56 mm)
Stock 120 in (3048 mm) × 48 in (1219.2 mm); Trim 1/4 in (6.35 mm); kerf/separation 1/16 in (1.59 mm). The full cut order and offcuts are in the specification.
VENEER-1 · exact rough blank positions
X runs along the stock length; Y across its width, from the illustrated lower-left corner. These are stock coordinates, not assembled fastener positions. Keep every blank labeled.
ID
Stock X / Y
Rough length × width
V-roof-R-right
82.03425 in (2083.67 mm) / 20.139125 in (511.53 mm)
10.439 in (265.15 mm) × 1 13/64 in (30.56 mm)
V-P03L-vent-bottom
110.622 in (2809.8 mm) / 45.543125 in (1156.8 mm)
6 1/2 in (165.1 mm) × 1 13/64 in (30.56 mm)
V-P03L-vent-top
111 23/32 in (2837.66 mm) / 18.8735 in (479.39 mm)
6 1/2 in (165.1 mm) × 1 13/64 in (30.56 mm)
V-P03R-vent-bottom
92.53575 in (2350.41 mm) / 20.139125 in (511.53 mm)
6 1/2 in (165.1 mm) × 1 13/64 in (30.56 mm)
V-P03R-vent-top
99.09825 in (2517.1 mm) / 20.139125 in (511.53 mm)
6 1/2 in (165.1 mm) × 1 13/64 in (30.56 mm)
V-P03L-vent-near
117.1845 in (2976.49 mm) / 45.543125 in (1156.8 mm)
2.439 in (61.95 mm) × 1 13/64 in (30.56 mm)
V-P03L-vent-far
105.66075 in (2683.78 mm) / 20.139125 in (511.53 mm)
2.439 in (61.95 mm) × 1 13/64 in (30.56 mm)
V-P03R-vent-near
108.16225 in (2747.32 mm) / 20.139125 in (511.53 mm)
2.439 in (61.95 mm) × 1 13/64 in (30.56 mm)
V-P03R-vent-far
110.66375 in (2810.86 mm) / 20.139125 in (511.53 mm)
2.439 in (61.95 mm) × 1 13/64 in (30.56 mm)
Stock 120 in (3048 mm) × 48 in (1219.2 mm); Trim 1/4 in (6.35 mm); kerf/separation 1/16 in (1.59 mm). The full cut order and offcuts are in the specification.
Use the exact fastener stations
X / Y / Z start at outside LEFT / outside FRONT / FLOOR UNDERSIDE. Direction gives the driver axis. Transfer actual clamped receiver centerlines. Include the drill point in the depth stop. Hardware samples control metal holes and countersinks.
All front-frame lamination screws are installed on the bench before the frame enters the shell. Veneer leaves head-access and metal-bearing seats clear. Hinges use the eight scheduled solid spacers.
Coordinates use the outside assembly datums. Named first members receive clearance holes; pine receivers receive stopped pilots. Screen bolts enter outside flush at 82 degrees; one interior washer, locknut and closed cover. Length includes the head.
ID / type
Through → receiver
Start X / Y / Z
Direction / length
FL0 · S8
P01 → CLB
1.078125 / 2.5 / 0 in 27.38 / 63.50 / 0.00 mm
+Z · 1 1/4 in (31.75 mm)
SLB0 · S8
P03L → CLB
0 / 2.75 / 1.453125 in 0.00 / 69.85 / 36.91 mm
+X · 1 1/4 in (31.75 mm)
SLT0 · S8
P03L → CLT
0 / 2.5 / 16.546875 in 0.00 / 63.50 / 420.29 mm
+X · 1 1/4 in (31.75 mm)
RL0 · S8
P04 → CLT
1.078125 / 2.5 / 18 in 27.38 / 63.50 / 457.20 mm
−Z · 1 1/4 in (31.75 mm)
FL1 · S8
P01 → CLB
1.078125 / 7 / 0 in 27.38 / 177.80 / 0.00 mm
+Z · 1 1/4 in (31.75 mm)
SLB1 · S8
P03L → CLB
0 / 7.25 / 1.453125 in 0.00 / 184.15 / 36.91 mm
+X · 1 1/4 in (31.75 mm)
SLT1 · S8
P03L → CLT
0 / 7 / 16.546875 in 0.00 / 177.80 / 420.29 mm
+X · 1 1/4 in (31.75 mm)
RL1 · S8
P04 → CLT
1.078125 / 7 / 18 in 27.38 / 177.80 / 457.20 mm
−Z · 1 1/4 in (31.75 mm)
FL2 · S8
P01 → CLB
1.078125 / 11.5 / 0 in 27.38 / 292.10 / 0.00 mm
+Z · 1 1/4 in (31.75 mm)
SLB2 · S8
P03L → CLB
0 / 11.75 / 1.453125 in 0.00 / 298.45 / 36.91 mm
+X · 1 1/4 in (31.75 mm)
SLT2 · S8
P03L → CLT
0 / 11.5 / 16.546875 in 0.00 / 292.10 / 420.29 mm
+X · 1 1/4 in (31.75 mm)
RL2 · S8
P04 → CLT
1.078125 / 11.5 / 18 in 27.38 / 292.10 / 457.20 mm
−Z · 1 1/4 in (31.75 mm)
FL3 · S8
P01 → CLB
1.078125 / 15.75 / 0 in 27.38 / 400.05 / 0.00 mm
+Z · 1 1/4 in (31.75 mm)
SLB3 · S8
P03L → CLB
0 / 16 / 1.453125 in 0.00 / 406.40 / 36.91 mm
+X · 1 1/4 in (31.75 mm)
Fastener stations · 15–28
Coordinates use the outside assembly datums. Named first members receive clearance holes; pine receivers receive stopped pilots. Screen bolts enter outside flush at 82 degrees; one interior washer, locknut and closed cover. Length includes the head.
ID / type
Through → receiver
Start X / Y / Z
Direction / length
SLT3 · S8
P03L → CLT
0 / 15.75 / 16.546875 in 0.00 / 400.05 / 420.29 mm
+X · 1 1/4 in (31.75 mm)
RL3 · S8
P04 → CLT
1.078125 / 15.75 / 18 in 27.38 / 400.05 / 457.20 mm
−Z · 1 1/4 in (31.75 mm)
FR0 · S8
P01 → CRB
34.921875 / 2.5 / 0 in 887.02 / 63.50 / 0.00 mm
+Z · 1 1/4 in (31.75 mm)
SRB0 · S8
P03R → CRB
36 / 2.75 / 1.453125 in 914.40 / 69.85 / 36.91 mm
−X · 1 1/4 in (31.75 mm)
SRT0 · S8
P03R → CRT
36 / 2.5 / 16.546875 in 914.40 / 63.50 / 420.29 mm
−X · 1 1/4 in (31.75 mm)
RR0 · S8
P04 → CRT
34.921875 / 2.5 / 18 in 887.02 / 63.50 / 457.20 mm
−Z · 1 1/4 in (31.75 mm)
FR1 · S8
P01 → CRB
34.921875 / 7 / 0 in 887.02 / 177.80 / 0.00 mm
+Z · 1 1/4 in (31.75 mm)
SRB1 · S8
P03R → CRB
36 / 7.25 / 1.453125 in 914.40 / 184.15 / 36.91 mm
−X · 1 1/4 in (31.75 mm)
SRT1 · S8
P03R → CRT
36 / 7 / 16.546875 in 914.40 / 177.80 / 420.29 mm
−X · 1 1/4 in (31.75 mm)
RR1 · S8
P04 → CRT
34.921875 / 7 / 18 in 887.02 / 177.80 / 457.20 mm
−Z · 1 1/4 in (31.75 mm)
FR2 · S8
P01 → CRB
34.921875 / 11.5 / 0 in 887.02 / 292.10 / 0.00 mm
+Z · 1 1/4 in (31.75 mm)
SRB2 · S8
P03R → CRB
36 / 11.75 / 1.453125 in 914.40 / 298.45 / 36.91 mm
−X · 1 1/4 in (31.75 mm)
SRT2 · S8
P03R → CRT
36 / 11.5 / 16.546875 in 914.40 / 292.10 / 420.29 mm
−X · 1 1/4 in (31.75 mm)
RR2 · S8
P04 → CRT
34.921875 / 11.5 / 18 in 887.02 / 292.10 / 457.20 mm
−Z · 1 1/4 in (31.75 mm)
Fastener stations · 29–42
Coordinates use the outside assembly datums. Named first members receive clearance holes; pine receivers receive stopped pilots. Screen bolts enter outside flush at 82 degrees; one interior washer, locknut and closed cover. Length includes the head.
ID / type
Through → receiver
Start X / Y / Z
Direction / length
FR3 · S8
P01 → CRB
34.921875 / 15.75 / 0 in 887.02 / 400.05 / 0.00 mm
+Z · 1 1/4 in (31.75 mm)
SRB3 · S8
P03R → CRB
36 / 16 / 1.453125 in 914.40 / 406.40 / 36.91 mm
−X · 1 1/4 in (31.75 mm)
SRT3 · S8
P03R → CRT
36 / 15.75 / 16.546875 in 914.40 / 400.05 / 420.29 mm
−X · 1 1/4 in (31.75 mm)
RR3 · S8
P04 → CRT
34.921875 / 15.75 / 18 in 887.02 / 400.05 / 457.20 mm
−Z · 1 1/4 in (31.75 mm)
BVL0 · S8
P02 → CLV
1.078125 / 18 / 3.203125 in 27.38 / 457.20 / 81.36 mm
−Y · 1 1/4 in (31.75 mm)
BVL1 · S8
P02 → CLV
1.078125 / 18 / 7.067708 in 27.38 / 457.20 / 179.52 mm
−Y · 1 1/4 in (31.75 mm)
BVL2 · S8
P02 → CLV
1.078125 / 18 / 10.932292 in 27.38 / 457.20 / 277.68 mm
−Y · 1 1/4 in (31.75 mm)
BVL3 · S8
P02 → CLV
1.078125 / 18 / 14.796875 in 27.38 / 457.20 / 375.84 mm
−Y · 1 1/4 in (31.75 mm)
SCL0 · S8
P03L → CLV
0 / 16.921875 / 2.203125 in 0.00 / 429.82 / 55.96 mm
+X · 1 1/4 in (31.75 mm)
SCL1 · S8
P03L → CLV
0 / 16.921875 / 6.734375 in 0.00 / 429.82 / 171.05 mm
+X · 1 1/4 in (31.75 mm)
SCL2 · S8
P03L → CLV
0 / 16.921875 / 11.265625 in 0.00 / 429.82 / 286.15 mm
+X · 1 1/4 in (31.75 mm)
SCL3 · S8
P03L → CLV
0 / 16.921875 / 15.796875 in 0.00 / 429.82 / 401.24 mm
+X · 1 1/4 in (31.75 mm)
BVR0 · S8
P02 → CRV
34.921875 / 18 / 3.203125 in 887.02 / 457.20 / 81.36 mm
−Y · 1 1/4 in (31.75 mm)
BVR1 · S8
P02 → CRV
34.921875 / 18 / 7.067708 in 887.02 / 457.20 / 179.52 mm
−Y · 1 1/4 in (31.75 mm)
Fastener stations · 43–56
Coordinates use the outside assembly datums. Named first members receive clearance holes; pine receivers receive stopped pilots. Screen bolts enter outside flush at 82 degrees; one interior washer, locknut and closed cover. Length includes the head.
ID / type
Through → receiver
Start X / Y / Z
Direction / length
BVR2 · S8
P02 → CRV
34.921875 / 18 / 10.932292 in 887.02 / 457.20 / 277.68 mm
−Y · 1 1/4 in (31.75 mm)
BVR3 · S8
P02 → CRV
34.921875 / 18 / 14.796875 in 887.02 / 457.20 / 375.84 mm
−Y · 1 1/4 in (31.75 mm)
SCR0 · S8
P03R → CRV
36 / 16.921875 / 2.203125 in 914.40 / 429.82 / 55.96 mm
−X · 1 1/4 in (31.75 mm)
SCR1 · S8
P03R → CRV
36 / 16.921875 / 6.734375 in 914.40 / 429.82 / 171.05 mm
−X · 1 1/4 in (31.75 mm)
SCR2 · S8
P03R → CRV
36 / 16.921875 / 11.265625 in 914.40 / 429.82 / 286.15 mm
−X · 1 1/4 in (31.75 mm)
SCR3 · S8
P03R → CRV
36 / 16.921875 / 15.796875 in 914.40 / 429.82 / 401.24 mm
−X · 1 1/4 in (31.75 mm)
BKB0 · S8
P02 → CBACKB
4 / 18 / 1.453125 in 101.60 / 457.20 / 36.91 mm
−Y · 1 1/4 in (31.75 mm)
BKZB0 · S8
P01 → CBACKB
4 / 16.921875 / 0 in 101.60 / 429.82 / 0.00 mm
+Z · 1 1/4 in (31.75 mm)
BKB1 · S8
P02 → CBACKB
9.6 / 18 / 1.453125 in 243.84 / 457.20 / 36.91 mm
−Y · 1 1/4 in (31.75 mm)
BKZB1 · S8
P01 → CBACKB
9.6 / 16.921875 / 0 in 243.84 / 429.82 / 0.00 mm
+Z · 1 1/4 in (31.75 mm)
BKB2 · S8
P02 → CBACKB
15.2 / 18 / 1.453125 in 386.08 / 457.20 / 36.91 mm
−Y · 1 1/4 in (31.75 mm)
BKZB2 · S8
P01 → CBACKB
15.2 / 16.921875 / 0 in 386.08 / 429.82 / 0.00 mm
+Z · 1 1/4 in (31.75 mm)
BKB3 · S8
P02 → CBACKB
20.8 / 18 / 1.453125 in 528.32 / 457.20 / 36.91 mm
−Y · 1 1/4 in (31.75 mm)
BKZB3 · S8
P01 → CBACKB
20.8 / 16.921875 / 0 in 528.32 / 429.82 / 0.00 mm
+Z · 1 1/4 in (31.75 mm)
Fastener stations · 57–70
Coordinates use the outside assembly datums. Named first members receive clearance holes; pine receivers receive stopped pilots. Screen bolts enter outside flush at 82 degrees; one interior washer, locknut and closed cover. Length includes the head.
ID / type
Through → receiver
Start X / Y / Z
Direction / length
BKB4 · S8
P02 → CBACKB
26.4 / 18 / 1.453125 in 670.56 / 457.20 / 36.91 mm
−Y · 1 1/4 in (31.75 mm)
BKZB4 · S8
P01 → CBACKB
26.4 / 16.921875 / 0 in 670.56 / 429.82 / 0.00 mm
+Z · 1 1/4 in (31.75 mm)
BKB5 · S8
P02 → CBACKB
32 / 18 / 1.453125 in 812.80 / 457.20 / 36.91 mm
−Y · 1 1/4 in (31.75 mm)
BKZB5 · S8
P01 → CBACKB
32 / 16.921875 / 0 in 812.80 / 429.82 / 0.00 mm
+Z · 1 1/4 in (31.75 mm)
BKT0 · S8
P02 → CBACKT
4 / 18 / 16.546875 in 101.60 / 457.20 / 420.29 mm
−Y · 1 1/4 in (31.75 mm)
BKZT0 · S8
P04 → CBACKT
4 / 16.921875 / 18 in 101.60 / 429.82 / 457.20 mm
−Z · 1 1/4 in (31.75 mm)
BKT1 · S8
P02 → CBACKT
9.6 / 18 / 16.546875 in 243.84 / 457.20 / 420.29 mm
−Y · 1 1/4 in (31.75 mm)
BKZT1 · S8
P04 → CBACKT
9.6 / 16.921875 / 18 in 243.84 / 429.82 / 457.20 mm
−Z · 1 1/4 in (31.75 mm)
BKT2 · S8
P02 → CBACKT
15.2 / 18 / 16.546875 in 386.08 / 457.20 / 420.29 mm
−Y · 1 1/4 in (31.75 mm)
BKZT2 · S8
P04 → CBACKT
15.2 / 16.921875 / 18 in 386.08 / 429.82 / 457.20 mm
−Z · 1 1/4 in (31.75 mm)
BKT3 · S8
P02 → CBACKT
20.8 / 18 / 16.546875 in 528.32 / 457.20 / 420.29 mm
−Y · 1 1/4 in (31.75 mm)
BKZT3 · S8
P04 → CBACKT
20.8 / 16.921875 / 18 in 528.32 / 429.82 / 457.20 mm
−Z · 1 1/4 in (31.75 mm)
BKT4 · S8
P02 → CBACKT
26.4 / 18 / 16.546875 in 670.56 / 457.20 / 420.29 mm
−Y · 1 1/4 in (31.75 mm)
BKZT4 · S8
P04 → CBACKT
26.4 / 16.921875 / 18 in 670.56 / 429.82 / 457.20 mm
−Z · 1 1/4 in (31.75 mm)
Fastener stations · 71–84
Coordinates use the outside assembly datums. Named first members receive clearance holes; pine receivers receive stopped pilots. Screen bolts enter outside flush at 82 degrees; one interior washer, locknut and closed cover. Length includes the head.
ID / type
Through → receiver
Start X / Y / Z
Direction / length
BKT5 · S8
P02 → CBACKT
32 / 18 / 16.546875 in 812.80 / 457.20 / 420.29 mm
−Y · 1 1/4 in (31.75 mm)
BKZT5 · S8
P04 → CBACKT
32 / 16.921875 / 18 in 812.80 / 429.82 / 457.20 mm
−Z · 1 1/4 in (31.75 mm)
LAML0 · S8
GLB → FL
1.453125 / 1.5 / 1.578125 in 36.91 / 38.10 / 40.08 mm
−Y · 1 1/4 in (31.75 mm)
LAML1 · S8
GLV → FL
1.453125 / 1.5 / 5 in 36.91 / 38.10 / 127.00 mm
−Y · 1 1/4 in (31.75 mm)
LAML2 · S8
GLV → FL
1.453125 / 1.5 / 7.75 in 36.91 / 38.10 / 196.85 mm
−Y · 1 1/4 in (31.75 mm)
LAML3 · S8
GLV → FL
1.453125 / 1.5 / 10.25 in 36.91 / 38.10 / 260.35 mm
−Y · 1 1/4 in (31.75 mm)
LAML4 · S8
GLV → FL
1.453125 / 1.5 / 14 in 36.91 / 38.10 / 355.60 mm
−Y · 1 1/4 in (31.75 mm)
LAML5 · S8
GLT → FL
1.453125 / 1.5 / 16.421875 in 36.91 / 38.10 / 417.12 mm
−Y · 1 1/4 in (31.75 mm)
LAMR0 · S8
GRB → FR
34.546875 / 1.5 / 1.578125 in 877.49 / 38.10 / 40.08 mm
−Y · 1 1/4 in (31.75 mm)
LAMR1 · S8
GRV → FR
34.546875 / 1.5 / 5 in 877.49 / 38.10 / 127.00 mm
−Y · 1 1/4 in (31.75 mm)
LAMR2 · S8
GRV → FR
34.546875 / 1.5 / 7.75 in 877.49 / 38.10 / 196.85 mm
−Y · 1 1/4 in (31.75 mm)
LAMR3 · S8
GRV → FR
34.546875 / 1.5 / 10.25 in 877.49 / 38.10 / 260.35 mm
−Y · 1 1/4 in (31.75 mm)
LAMR4 · S8
GRV → FR
34.546875 / 1.5 / 14 in 877.49 / 38.10 / 355.60 mm
−Y · 1 1/4 in (31.75 mm)
LAMR5 · S8
GRT → FR
34.546875 / 1.5 / 16.421875 in 877.49 / 38.10 / 417.12 mm
−Y · 1 1/4 in (31.75 mm)
Fastener stations · 85–98
Coordinates use the outside assembly datums. Named first members receive clearance holes; pine receivers receive stopped pilots. Screen bolts enter outside flush at 82 degrees; one interior washer, locknut and closed cover. Length includes the head.
ID / type
Through → receiver
Start X / Y / Z
Direction / length
LAMC0 · S8
GC → FB
18 / 1.5 / 1.578125 in 457.20 / 38.10 / 40.08 mm
−Y · 1 1/4 in (31.75 mm)
LAMC1 · S8
GC → FC
18 / 1.5 / 5 in 457.20 / 38.10 / 127.00 mm
−Y · 1 1/4 in (31.75 mm)
LAMC2 · S8
GC → FC
18 / 1.5 / 7.75 in 457.20 / 38.10 / 196.85 mm
−Y · 1 1/4 in (31.75 mm)
LAMC3 · S8
GC → FC
18 / 1.5 / 10.25 in 457.20 / 38.10 / 260.35 mm
−Y · 1 1/4 in (31.75 mm)
LAMC4 · S8
GC → FC
18 / 1.5 / 14 in 457.20 / 38.10 / 355.60 mm
−Y · 1 1/4 in (31.75 mm)
LAMC5 · S8
GC → FT
18 / 1.5 / 16.421875 in 457.20 / 38.10 / 417.12 mm
−Y · 1 1/4 in (31.75 mm)
FHB0 · S8
GLB → FB
4.5 / 1.5 / 1.453125 in 114.30 / 38.10 / 36.91 mm
−Y · 1 1/4 in (31.75 mm)
FHB1 · S8
GLB → FB
8.5 / 1.5 / 1.453125 in 215.90 / 38.10 / 36.91 mm
−Y · 1 1/4 in (31.75 mm)
FHB2 · S8
GLB → FB
12.5 / 1.5 / 1.453125 in 317.50 / 38.10 / 36.91 mm
−Y · 1 1/4 in (31.75 mm)
FHB3 · S8
GRB → FB
23.5 / 1.5 / 1.453125 in 596.90 / 38.10 / 36.91 mm
−Y · 1 1/4 in (31.75 mm)
FHB4 · S8
GRB → FB
27.5 / 1.5 / 1.453125 in 698.50 / 38.10 / 36.91 mm
−Y · 1 1/4 in (31.75 mm)
FHB5 · S8
GRB → FB
31.5 / 1.5 / 1.453125 in 800.10 / 38.10 / 36.91 mm
−Y · 1 1/4 in (31.75 mm)
FHT0 · S8
GLT → FT
4.5 / 1.5 / 16.546875 in 114.30 / 38.10 / 420.29 mm
−Y · 1 1/4 in (31.75 mm)
FHT1 · S8
GLT → FT
8.5 / 1.5 / 16.546875 in 215.90 / 38.10 / 420.29 mm
−Y · 1 1/4 in (31.75 mm)
Fastener stations · 99–112
Coordinates use the outside assembly datums. Named first members receive clearance holes; pine receivers receive stopped pilots. Screen bolts enter outside flush at 82 degrees; one interior washer, locknut and closed cover. Length includes the head.
ID / type
Through → receiver
Start X / Y / Z
Direction / length
FHT2 · S8
GLT → FT
12.5 / 1.5 / 16.546875 in 317.50 / 38.10 / 420.29 mm
−Y · 1 1/4 in (31.75 mm)
FHT3 · S8
GRT → FT
23.5 / 1.5 / 16.546875 in 596.90 / 38.10 / 420.29 mm
−Y · 1 1/4 in (31.75 mm)
FHT4 · S8
GRT → FT
27.5 / 1.5 / 16.546875 in 698.50 / 38.10 / 420.29 mm
−Y · 1 1/4 in (31.75 mm)
FHT5 · S8
GRT → FT
31.5 / 1.5 / 16.546875 in 800.10 / 38.10 / 420.29 mm
−Y · 1 1/4 in (31.75 mm)
FSL0 · S8
P03L → FL
0 / 0.375 / 1.703125 in 0.00 / 9.52 / 43.26 mm
+X · 1 1/4 in (31.75 mm)
FSL1 · S8
P03L → FL
0 / 0.375 / 5.703125 in 0.00 / 9.52 / 144.86 mm
+X · 1 1/4 in (31.75 mm)
FSL2 · S8
P03L → FL
0 / 0.375 / 10.703125 in 0.00 / 9.52 / 271.86 mm
+X · 1 1/4 in (31.75 mm)
FSL3 · S8
P03L → FL
0 / 0.375 / 16.296875 in 0.00 / 9.52 / 413.94 mm
+X · 1 1/4 in (31.75 mm)
FSR0 · S8
P03R → FR
36 / 0.375 / 1.703125 in 914.40 / 9.52 / 43.26 mm
−X · 1 1/4 in (31.75 mm)
FSR1 · S8
P03R → FR
36 / 0.375 / 5.703125 in 914.40 / 9.52 / 144.86 mm
−X · 1 1/4 in (31.75 mm)
FSR2 · S8
P03R → FR
36 / 0.375 / 10.703125 in 914.40 / 9.52 / 271.86 mm
−X · 1 1/4 in (31.75 mm)
FSR3 · S8
P03R → FR
36 / 0.375 / 16.296875 in 914.40 / 9.52 / 413.94 mm
−X · 1 1/4 in (31.75 mm)
FF0 · S8
P01 → FL
1.453125 / 0.375 / 0 in 36.91 / 9.52 / 0.00 mm
+Z · 1 1/4 in (31.75 mm)
FRF0 · S8
P04 → FL
1.453125 / 0.375 / 18 in 36.91 / 9.52 / 457.20 mm
−Z · 1 1/4 in (31.75 mm)
Fastener stations · 113–126
Coordinates use the outside assembly datums. Named first members receive clearance holes; pine receivers receive stopped pilots. Screen bolts enter outside flush at 82 degrees; one interior washer, locknut and closed cover. Length includes the head.
ID / type
Through → receiver
Start X / Y / Z
Direction / length
FF1 · S8
P01 → FB
6 / 0.375 / 0 in 152.40 / 9.52 / 0.00 mm
+Z · 1 1/4 in (31.75 mm)
FRF1 · S8
P04 → FT
6 / 0.375 / 18 in 152.40 / 9.52 / 457.20 mm
−Z · 1 1/4 in (31.75 mm)
FF2 · S8
P01 → FB
12 / 0.375 / 0 in 304.80 / 9.52 / 0.00 mm
+Z · 1 1/4 in (31.75 mm)
FRF2 · S8
P04 → FT
12 / 0.375 / 18 in 304.80 / 9.52 / 457.20 mm
−Z · 1 1/4 in (31.75 mm)
FF3 · S8
P01 → FB
18 / 0.375 / 0 in 457.20 / 9.52 / 0.00 mm
+Z · 1 1/4 in (31.75 mm)
FRF3 · S8
P04 → FT
18 / 0.375 / 18 in 457.20 / 9.52 / 457.20 mm
−Z · 1 1/4 in (31.75 mm)
FF4 · S8
P01 → FB
24 / 0.375 / 0 in 609.60 / 9.52 / 0.00 mm
+Z · 1 1/4 in (31.75 mm)
FRF4 · S8
P04 → FT
24 / 0.375 / 18 in 609.60 / 9.52 / 457.20 mm
−Z · 1 1/4 in (31.75 mm)
FF5 · S8
P01 → FB
30 / 0.375 / 0 in 762.00 / 9.52 / 0.00 mm
+Z · 1 1/4 in (31.75 mm)
FRF5 · S8
P04 → FT
30 / 0.375 / 18 in 762.00 / 9.52 / 457.20 mm
−Z · 1 1/4 in (31.75 mm)
FF6 · S8
P01 → FR
34.546875 / 0.375 / 0 in 877.49 / 9.52 / 0.00 mm
+Z · 1 1/4 in (31.75 mm)
FRF6 · S8
P04 → FR
34.546875 / 0.375 / 18 in 877.49 / 9.52 / 457.20 mm
Coordinates use the outside assembly datums. Named first members receive clearance holes; pine receivers receive stopped pilots. Screen bolts enter outside flush at 82 degrees; one interior washer, locknut and closed cover. Length includes the head.
36 / 12.824 / 5.076125 in 914.40 / 325.73 / 128.93 mm
−X · 1 7/8 in (47.63 mm)
Fastener stations · 141–154
Coordinates use the outside assembly datums. Named first members receive clearance holes; pine receivers receive stopped pilots. Screen bolts enter outside flush at 82 degrees; one interior washer, locknut and closed cover. Length includes the head.
ID / type
Through → receiver
Start X / Y / Z
Direction / length
DSL0 · S8
DLA → DLE
2.828125 / 0 / 3.828125 in 71.83 / 0.00 / 97.23 mm
+Y · 1 1/4 in (31.75 mm)
DSL1 · S8
DLB → DLE
15.625 / 0 / 3.828125 in 396.88 / 0.00 / 97.23 mm
+Y · 1 1/4 in (31.75 mm)
DSL2 · S8
DLA → DLF
2.828125 / 0 / 15.171875 in 71.83 / 0.00 / 385.37 mm
+Y · 1 1/4 in (31.75 mm)
DSL3 · S8
DLB → DLF
15.625 / 0 / 15.171875 in 396.88 / 0.00 / 385.37 mm
+Y · 1 1/4 in (31.75 mm)
DSL4 · S8
DLC → DLE
9.226562 / 0 / 3.828125 in 234.35 / 0.00 / 97.23 mm
+Y · 1 1/4 in (31.75 mm)
DSL5 · S8
DLD → DLF
9.226562 / 0 / 15.171875 in 234.35 / 0.00 / 385.37 mm
+Y · 1 1/4 in (31.75 mm)
QSLB0 · S6
QLB → DLE
3.328125 / 1.75 / 4.015625 in 84.53 / 44.45 / 102.00 mm
−Y · 1 in (25.4 mm)
QSLB1 · S6
QLB → DLE
8.976562 / 1.75 / 4.015625 in 228.00 / 44.45 / 102.00 mm
−Y · 1 in (25.4 mm)
QSLB2 · S6
QLB → DLE
14.625 / 1.75 / 4.015625 in 371.47 / 44.45 / 102.00 mm
−Y · 1 in (25.4 mm)
QSLT0 · S6
QLT → DLF
3.328125 / 1.75 / 14.984375 in 84.53 / 44.45 / 380.60 mm
−Y · 1 in (25.4 mm)
QSLT1 · S6
QLT → DLF
8.976562 / 1.75 / 14.984375 in 228.00 / 44.45 / 380.60 mm
−Y · 1 in (25.4 mm)
QSLT2 · S6
QLT → DLF
14.625 / 1.75 / 14.984375 in 371.47 / 44.45 / 380.60 mm
−Y · 1 in (25.4 mm)
QSLL0 · S6
QLL → DLG
3.015625 / 1.75 / 5.578125 in 76.60 / 44.45 / 141.68 mm
−Y · 1 in (25.4 mm)
QSLL1 · S6
QLL → DLG
3.015625 / 1.75 / 9.5 in 76.60 / 44.45 / 241.30 mm
−Y · 1 in (25.4 mm)
Fastener stations · 155–168
Coordinates use the outside assembly datums. Named first members receive clearance holes; pine receivers receive stopped pilots. Screen bolts enter outside flush at 82 degrees; one interior washer, locknut and closed cover. Length includes the head.
ID / type
Through → receiver
Start X / Y / Z
Direction / length
QSLL2 · S6
QLL → DLG
3.015625 / 1.75 / 13.421875 in 76.60 / 44.45 / 340.92 mm
−Y · 1 in (25.4 mm)
QSLR0 · S6
QLR → DLH
14.9375 / 1.75 / 5.578125 in 379.41 / 44.45 / 141.68 mm
−Y · 1 in (25.4 mm)
QSLR1 · S6
QLR → DLH
14.9375 / 1.75 / 9.5 in 379.41 / 44.45 / 241.30 mm
−Y · 1 in (25.4 mm)
QSLR2 · S6
QLR → DLH
14.9375 / 1.75 / 13.421875 in 379.41 / 44.45 / 340.92 mm
−Y · 1 in (25.4 mm)
HSL0-10 · S8H
HL0 + SP-HL0-left + FL → GLV
1.545625 / -0.205 / 5.358125 in 39.26 / -5.21 / 136.10 mm
+Y · 1 1/4 in (31.75 mm)
HSL0-11 · S8H
HL0 + SP-HL0-left + FL → GLV
1.325625 / -0.205 / 6.328125 in 33.67 / -5.21 / 160.73 mm
+Y · 1 1/4 in (31.75 mm)
HSL0-12 · S8H
HL0 + SP-HL0-left + FL → GLV
1.545625 / -0.205 / 7.298125 in 39.26 / -5.21 / 185.37 mm
+Y · 1 1/4 in (31.75 mm)
HSL010 · S8H
HL0 + SP-HL0-right + DLA → DLG
2.985625 / -0.205 / 5.358125 in 75.83 / -5.21 / 136.10 mm
+Y · 1 1/4 in (31.75 mm)
HSL011 · S8H
HL0 + SP-HL0-right + DLA → DLG
3.205625 / -0.205 / 6.328125 in 81.42 / -5.21 / 160.73 mm
+Y · 1 1/4 in (31.75 mm)
HSL012 · S8H
HL0 + SP-HL0-right + DLA → DLG
2.985625 / -0.205 / 7.298125 in 75.83 / -5.21 / 185.37 mm
+Y · 1 1/4 in (31.75 mm)
HSL1-10 · S8H
HL1 + SP-HL1-left + FL → GLV
1.545625 / -0.205 / 11.701875 in 39.26 / -5.21 / 297.23 mm
+Y · 1 1/4 in (31.75 mm)
HSL1-11 · S8H
HL1 + SP-HL1-left + FL → GLV
1.325625 / -0.205 / 12.671875 in 33.67 / -5.21 / 321.87 mm
+Y · 1 1/4 in (31.75 mm)
HSL1-12 · S8H
HL1 + SP-HL1-left + FL → GLV
1.545625 / -0.205 / 13.641875 in 39.26 / -5.21 / 346.50 mm
+Y · 1 1/4 in (31.75 mm)
HSL110 · S8H
HL1 + SP-HL1-right + DLA → DLG
2.985625 / -0.205 / 11.701875 in 75.83 / -5.21 / 297.23 mm
+Y · 1 1/4 in (31.75 mm)
Fastener stations · 169–182
Coordinates use the outside assembly datums. Named first members receive clearance holes; pine receivers receive stopped pilots. Screen bolts enter outside flush at 82 degrees; one interior washer, locknut and closed cover. Length includes the head.
ID / type
Through → receiver
Start X / Y / Z
Direction / length
HSL111 · S8H
HL1 + SP-HL1-right + DLA → DLG
3.205625 / -0.205 / 12.671875 in 81.42 / -5.21 / 321.87 mm
+Y · 1 1/4 in (31.75 mm)
HSL112 · S8H
HL1 + SP-HL1-right + DLA → DLG
2.985625 / -0.205 / 13.641875 in 75.83 / -5.21 / 346.50 mm
+Y · 1 1/4 in (31.75 mm)
STOPSCL00 · S8
STOPL0 → GC
16.875 / 2.25 / 5.125 in 428.62 / 57.15 / 130.17 mm
−Y · 1 1/4 in (31.75 mm)
STOPSCL01 · S8
STOPL0 → GC
16.875 / 2.25 / 5.875 in 428.62 / 57.15 / 149.22 mm
−Y · 1 1/4 in (31.75 mm)
STOPSCL10 · S8
STOPL1 → GC
16.875 / 2.25 / 13.375 in 428.62 / 57.15 / 339.72 mm
−Y · 1 1/4 in (31.75 mm)
STOPSCL11 · S8
STOPL1 → GC
16.875 / 2.25 / 14.125 in 428.62 / 57.15 / 358.77 mm
−Y · 1 1/4 in (31.75 mm)
DSR0 · S8
DRA → DRE
20.375 / 0 / 3.828125 in 517.52 / 0.00 / 97.23 mm
+Y · 1 1/4 in (31.75 mm)
DSR1 · S8
DRB → DRE
33.171875 / 0 / 3.828125 in 842.57 / 0.00 / 97.23 mm
+Y · 1 1/4 in (31.75 mm)
DSR2 · S8
DRA → DRF
20.375 / 0 / 15.171875 in 517.52 / 0.00 / 385.37 mm
+Y · 1 1/4 in (31.75 mm)
DSR3 · S8
DRB → DRF
33.171875 / 0 / 15.171875 in 842.57 / 0.00 / 385.37 mm
+Y · 1 1/4 in (31.75 mm)
DSR4 · S8
DRC → DRE
26.773438 / 0 / 3.828125 in 680.05 / 0.00 / 97.23 mm
+Y · 1 1/4 in (31.75 mm)
DSR5 · S8
DRD → DRF
26.773438 / 0 / 15.171875 in 680.05 / 0.00 / 385.37 mm
+Y · 1 1/4 in (31.75 mm)
QSRB0 · S6
QRB → DRE
21.375 / 1.75 / 4.015625 in 542.92 / 44.45 / 102.00 mm
−Y · 1 in (25.4 mm)
QSRB1 · S6
QRB → DRE
27.023438 / 1.75 / 4.015625 in 686.40 / 44.45 / 102.00 mm
−Y · 1 in (25.4 mm)
Fastener stations · 183–196
Coordinates use the outside assembly datums. Named first members receive clearance holes; pine receivers receive stopped pilots. Screen bolts enter outside flush at 82 degrees; one interior washer, locknut and closed cover. Length includes the head.
ID / type
Through → receiver
Start X / Y / Z
Direction / length
QSRB2 · S6
QRB → DRE
32.671875 / 1.75 / 4.015625 in 829.87 / 44.45 / 102.00 mm
−Y · 1 in (25.4 mm)
QSRT0 · S6
QRT → DRF
21.375 / 1.75 / 14.984375 in 542.92 / 44.45 / 380.60 mm
−Y · 1 in (25.4 mm)
QSRT1 · S6
QRT → DRF
27.023438 / 1.75 / 14.984375 in 686.40 / 44.45 / 380.60 mm
−Y · 1 in (25.4 mm)
QSRT2 · S6
QRT → DRF
32.671875 / 1.75 / 14.984375 in 829.87 / 44.45 / 380.60 mm
−Y · 1 in (25.4 mm)
QSRL0 · S6
QRL → DRG
21.0625 / 1.75 / 5.578125 in 534.99 / 44.45 / 141.68 mm
−Y · 1 in (25.4 mm)
QSRL1 · S6
QRL → DRG
21.0625 / 1.75 / 9.5 in 534.99 / 44.45 / 241.30 mm
−Y · 1 in (25.4 mm)
QSRL2 · S6
QRL → DRG
21.0625 / 1.75 / 13.421875 in 534.99 / 44.45 / 340.92 mm
−Y · 1 in (25.4 mm)
QSRR0 · S6
QRR → DRH
32.984375 / 1.75 / 5.578125 in 837.80 / 44.45 / 141.68 mm
−Y · 1 in (25.4 mm)
QSRR1 · S6
QRR → DRH
32.984375 / 1.75 / 9.5 in 837.80 / 44.45 / 241.30 mm
−Y · 1 in (25.4 mm)
QSRR2 · S6
QRR → DRH
32.984375 / 1.75 / 13.421875 in 837.80 / 44.45 / 340.92 mm
−Y · 1 in (25.4 mm)
HSR0-10 · S8H
HR0 + SP-HR0-left + DRB → DRH
33.014375 / -0.205 / 5.358125 in 838.57 / -5.21 / 136.10 mm
+Y · 1 1/4 in (31.75 mm)
HSR0-11 · S8H
HR0 + SP-HR0-left + DRB → DRH
32.794375 / -0.205 / 6.328125 in 832.98 / -5.21 / 160.73 mm
+Y · 1 1/4 in (31.75 mm)
HSR0-12 · S8H
HR0 + SP-HR0-left + DRB → DRH
33.014375 / -0.205 / 7.298125 in 838.57 / -5.21 / 185.37 mm
+Y · 1 1/4 in (31.75 mm)
HSR010 · S8H
HR0 + SP-HR0-right + FR → GRV
34.454375 / -0.205 / 5.358125 in 875.14 / -5.21 / 136.10 mm
+Y · 1 1/4 in (31.75 mm)
Fastener stations · 197–210
Coordinates use the outside assembly datums. Named first members receive clearance holes; pine receivers receive stopped pilots. Screen bolts enter outside flush at 82 degrees; one interior washer, locknut and closed cover. Length includes the head.
ID / type
Through → receiver
Start X / Y / Z
Direction / length
HSR011 · S8H
HR0 + SP-HR0-right + FR → GRV
34.674375 / -0.205 / 6.328125 in 880.73 / -5.21 / 160.73 mm
+Y · 1 1/4 in (31.75 mm)
HSR012 · S8H
HR0 + SP-HR0-right + FR → GRV
34.454375 / -0.205 / 7.298125 in 875.14 / -5.21 / 185.37 mm
+Y · 1 1/4 in (31.75 mm)
HSR1-10 · S8H
HR1 + SP-HR1-left + DRB → DRH
33.014375 / -0.205 / 11.701875 in 838.57 / -5.21 / 297.23 mm
+Y · 1 1/4 in (31.75 mm)
HSR1-11 · S8H
HR1 + SP-HR1-left + DRB → DRH
32.794375 / -0.205 / 12.671875 in 832.98 / -5.21 / 321.87 mm
+Y · 1 1/4 in (31.75 mm)
HSR1-12 · S8H
HR1 + SP-HR1-left + DRB → DRH
33.014375 / -0.205 / 13.641875 in 838.57 / -5.21 / 346.50 mm
+Y · 1 1/4 in (31.75 mm)
HSR110 · S8H
HR1 + SP-HR1-right + FR → GRV
34.454375 / -0.205 / 11.701875 in 875.14 / -5.21 / 297.23 mm
+Y · 1 1/4 in (31.75 mm)
HSR111 · S8H
HR1 + SP-HR1-right + FR → GRV
34.674375 / -0.205 / 12.671875 in 880.73 / -5.21 / 321.87 mm
+Y · 1 1/4 in (31.75 mm)
HSR112 · S8H
HR1 + SP-HR1-right + FR → GRV
34.454375 / -0.205 / 13.641875 in 875.14 / -5.21 / 346.50 mm
+Y · 1 1/4 in (31.75 mm)
STOPSCR00 · S8
STOPR0 → GC
19.125 / 2.25 / 5.125 in 485.77 / 57.15 / 130.17 mm
−Y · 1 1/4 in (31.75 mm)
STOPSCR01 · S8
STOPR0 → GC
19.125 / 2.25 / 5.875 in 485.77 / 57.15 / 149.22 mm
−Y · 1 1/4 in (31.75 mm)
STOPSCR10 · S8
STOPR1 → GC
19.125 / 2.25 / 13.375 in 485.77 / 57.15 / 339.72 mm
−Y · 1 1/4 in (31.75 mm)
STOPSCR11 · S8
STOPR1 → GC
19.125 / 2.25 / 14.125 in 485.77 / 57.15 / 358.77 mm
Coordinates use the outside assembly datums. Named first members receive clearance holes; pine receivers receive stopped pilots. Screen bolts enter outside flush at 82 degrees; one interior washer, locknut and closed cover. Length includes the head.
33.533 / 3.3195 / 18 in 851.74 / 84.32 / 457.20 mm
−Z · 1 7/8 in (47.63 mm)
Fastener stations · 225–238
Coordinates use the outside assembly datums. Named first members receive clearance holes; pine receivers receive stopped pilots. Screen bolts enter outside flush at 82 degrees; one interior washer, locknut and closed cover. Length includes the head.
33.533 / 10.8935 / 18 in 851.74 / 276.69 / 457.20 mm
−Z · 1 7/8 in (47.63 mm)
L-HP1 · S10
L-HP-base → FC
16.60125 / -0.07 / 7.5 in 421.67 / -1.78 / 190.50 mm
+Y · 5/8 in (15.88 mm)
L-HP2 · S10
L-HP-base → FC
16.97125 / -0.07 / 8 in 431.07 / -1.78 / 203.20 mm
+Y · 5/8 in (15.88 mm)
L-HP3 · S10
L-HP-base → FC
17.07125 / -0.07 / 7 in 433.61 / -1.78 / 177.80 mm
+Y · 5/8 in (15.88 mm)
L-ST1 · S10
L-ST-base → DLB
14.72125 / -0.07 / 6.94 in 373.92 / -1.78 / 176.28 mm
+Y · 5/8 in (15.88 mm)
L-ST2 · S10
L-ST-base → DLB
15.84125 / -0.07 / 6.94 in 402.37 / -1.78 / 176.28 mm
+Y · 5/8 in (15.88 mm)
L-ST3 · S10
L-ST-base → DLB
14.72125 / -0.07 / 8.06 in 373.92 / -1.78 / 204.72 mm
+Y · 5/8 in (15.88 mm)
Fastener stations · 239–246
Coordinates use the outside assembly datums. Named first members receive clearance holes; pine receivers receive stopped pilots. Screen bolts enter outside flush at 82 degrees; one interior washer, locknut and closed cover. Length includes the head.
ID / type
Through → receiver
Start X / Y / Z
Direction / length
L-ST4 · S10
L-ST-base → DLB
15.84125 / -0.07 / 8.06 in 402.37 / -1.78 / 204.72 mm
+Y · 5/8 in (15.88 mm)
R-HP1 · S10
R-HP-base → FC
19.39875 / -0.07 / 11 in 492.73 / -1.78 / 279.40 mm
+Y · 5/8 in (15.88 mm)
R-HP2 · S10
R-HP-base → FC
19.02875 / -0.07 / 11.5 in 483.33 / -1.78 / 292.10 mm
+Y · 5/8 in (15.88 mm)
R-HP3 · S10
R-HP-base → FC
18.92875 / -0.07 / 10.5 in 480.79 / -1.78 / 266.70 mm
+Y · 5/8 in (15.88 mm)
R-ST1 · S10
R-ST-base → DRA
21.27875 / -0.07 / 10.44 in 540.48 / -1.78 / 265.18 mm
+Y · 5/8 in (15.88 mm)
R-ST2 · S10
R-ST-base → DRA
20.15875 / -0.07 / 10.44 in 512.03 / -1.78 / 265.18 mm
+Y · 5/8 in (15.88 mm)
R-ST3 · S10
R-ST-base → DRA
21.27875 / -0.07 / 11.56 in 540.48 / -1.78 / 293.62 mm
+Y · 5/8 in (15.88 mm)
R-ST4 · S10
R-ST-base → DRA
20.15875 / -0.07 / 11.56 in 512.03 / -1.78 / 293.62 mm
+Y · 5/8 in (15.88 mm)
Machining envelopes
Outside assembly datums. Cut envelopes remove only their intersection with the named part. Use the operation’s actual-stock, pocket-depth and hardware trial before machining.
Cut / part
Lower X / Y / Z
Size X × Y × Z
P03L-recess-1 / P03L
-0.1 in (-2.54 mm) / 6 in (152.4 mm) / 4 13/64 in (106.76 mm)
0.903125 in (22.94 mm) × 6 in (152.4 mm) × 2 in (50.8 mm)
P03R-recess-1 / P03R
35.196875 in (894 mm) / 6 in (152.4 mm) / 4 13/64 in (106.76 mm)
0.903125 in (22.94 mm) × 6 in (152.4 mm) × 2 in (50.8 mm)
P04-recess-1 / P04
3 in (76.2 mm) / 4 in (101.6 mm) / 17.196875 in (436.8 mm)
13 in (330.2 mm) × 10 in (254 mm) × 0.903125 in (22.94 mm)
P04-recess-2 / P04
20 in (508 mm) / 4 in (101.6 mm) / 17.196875 in (436.8 mm)
13 in (330.2 mm) × 10 in (254 mm) × 0.903125 in (22.94 mm)
VLB-recess-1 / VLB
45/64 in (17.86 mm) / 4.994 in (126.85 mm) / 3.197125 in (81.21 mm)
1/8 in (3.18 mm) × 8.012 in (203.5 mm) × 4.012 in (101.9 mm)
VLT-recess-1 / VLT
45/64 in (17.86 mm) / 4.994 in (126.85 mm) / 3.197125 in (81.21 mm)
1/8 in (3.18 mm) × 8.012 in (203.5 mm) × 4.012 in (101.9 mm)
VLF-recess-1 / VLF
45/64 in (17.86 mm) / 4.994 in (126.85 mm) / 3.197125 in (81.21 mm)
1/8 in (3.18 mm) × 8.012 in (203.5 mm) × 4.012 in (101.9 mm)
VLR-recess-1 / VLR
45/64 in (17.86 mm) / 4.994 in (126.85 mm) / 3.197125 in (81.21 mm)
1/8 in (3.18 mm) × 8.012 in (203.5 mm) × 4.012 in (101.9 mm)
Machining envelopes · continued
Outside assembly datums. Cut envelopes remove only their intersection with the named part. Use the operation’s actual-stock, pocket-depth and hardware trial before machining.
Cut / part
Lower X / Y / Z
Size X × Y × Z
VRB-recess-1 / VRB
35 11/64 in (893.37 mm) / 4.994 in (126.85 mm) / 3.197125 in (81.21 mm)
1/8 in (3.18 mm) × 8.012 in (203.5 mm) × 4.012 in (101.9 mm)
VRT-recess-1 / VRT
35 11/64 in (893.37 mm) / 4.994 in (126.85 mm) / 3.197125 in (81.21 mm)
1/8 in (3.18 mm) × 8.012 in (203.5 mm) × 4.012 in (101.9 mm)
VRF-recess-1 / VRF
35 11/64 in (893.37 mm) / 4.994 in (126.85 mm) / 3.197125 in (81.21 mm)
1/8 in (3.18 mm) × 8.012 in (203.5 mm) × 4.012 in (101.9 mm)
VRR-recess-1 / VRR
35 11/64 in (893.37 mm) / 4.994 in (126.85 mm) / 3.197125 in (81.21 mm)
1/8 in (3.18 mm) × 8.012 in (203.5 mm) × 4.012 in (101.9 mm)
DLE-recess-1 / DLE
3 13/64 in (81.36 mm) / 1 1/4 in (31.75 mm) / 4 13/64 in (106.76 mm)
11 35/64 in (293.29 mm) × 0.3 in (7.62 mm) × 10 19/32 in (269.08 mm)
DLF-recess-1 / DLF
3 13/64 in (81.36 mm) / 1 1/4 in (31.75 mm) / 4 13/64 in (106.76 mm)
11 35/64 in (293.29 mm) × 0.3 in (7.62 mm) × 10 19/32 in (269.08 mm)
DLG-recess-1 / DLG
3 13/64 in (81.36 mm) / 1 1/4 in (31.75 mm) / 4 13/64 in (106.76 mm)
11 35/64 in (293.29 mm) × 0.3 in (7.62 mm) × 10 19/32 in (269.08 mm)
DLH-recess-1 / DLH
3 13/64 in (81.36 mm) / 1 1/4 in (31.75 mm) / 4 13/64 in (106.76 mm)
11 35/64 in (293.29 mm) × 0.3 in (7.62 mm) × 10 19/32 in (269.08 mm)
Machining envelopes · continued
Outside assembly datums. Cut envelopes remove only their intersection with the named part. Use the operation’s actual-stock, pocket-depth and hardware trial before machining.
Cut / part
Lower X / Y / Z
Size X × Y × Z
DRE-recess-1 / DRE
21 1/4 in (539.75 mm) / 1 1/4 in (31.75 mm) / 4 13/64 in (106.76 mm)
11 35/64 in (293.29 mm) × 0.3 in (7.62 mm) × 10 19/32 in (269.08 mm)
DRF-recess-1 / DRF
21 1/4 in (539.75 mm) / 1 1/4 in (31.75 mm) / 4 13/64 in (106.76 mm)
11 35/64 in (293.29 mm) × 0.3 in (7.62 mm) × 10 19/32 in (269.08 mm)
DRG-recess-1 / DRG
21 1/4 in (539.75 mm) / 1 1/4 in (31.75 mm) / 4 13/64 in (106.76 mm)
11 35/64 in (293.29 mm) × 0.3 in (7.62 mm) × 10 19/32 in (269.08 mm)
DRH-recess-1 / DRH
21 1/4 in (539.75 mm) / 1 1/4 in (31.75 mm) / 4 13/64 in (106.76 mm)
11 35/64 in (293.29 mm) × 0.3 in (7.62 mm) × 10 19/32 in (269.08 mm)
RCLF-recess-1 / RCLF
1.994 in (50.65 mm) / 2.994 in (76.05 mm) / 17 11/64 in (436.17 mm)
15.012 in (381.3 mm) × 12.012 in (305.1 mm) × 1/8 in (3.18 mm)
RCLF-recess-2 / RCLF
6 1/4 in (158.75 mm) / 3 in (76.2 mm) / 17.089875 in (434.08 mm)
1 in (25.4 mm) × 1 in (25.4 mm) × 0.207 in (5.26 mm)
RCLF-recess-3 / RCLF
11 3/4 in (298.45 mm) / 3 in (76.2 mm) / 17.089875 in (434.08 mm)
1 in (25.4 mm) × 1 in (25.4 mm) × 0.207 in (5.26 mm)
RCLB-recess-1 / RCLB
1.994 in (50.65 mm) / 2.994 in (76.05 mm) / 17 11/64 in (436.17 mm)
15.012 in (381.3 mm) × 12.012 in (305.1 mm) × 1/8 in (3.18 mm)
Machining envelopes · continued
Outside assembly datums. Cut envelopes remove only their intersection with the named part. Use the operation’s actual-stock, pocket-depth and hardware trial before machining.
Cut / part
Lower X / Y / Z
Size X × Y × Z
RCLB-recess-2 / RCLB
6 1/4 in (158.75 mm) / 14 in (355.6 mm) / 17.089875 in (434.08 mm)
1 in (25.4 mm) × 1 in (25.4 mm) × 0.207 in (5.26 mm)
RCLB-recess-3 / RCLB
11 3/4 in (298.45 mm) / 14 in (355.6 mm) / 17.089875 in (434.08 mm)
1 in (25.4 mm) × 1 in (25.4 mm) × 0.207 in (5.26 mm)
RCLL-recess-1 / RCLL
1.994 in (50.65 mm) / 2.994 in (76.05 mm) / 17 11/64 in (436.17 mm)
15.012 in (381.3 mm) × 12.012 in (305.1 mm) × 1/8 in (3.18 mm)
RCLR-recess-1 / RCLR
1.994 in (50.65 mm) / 2.994 in (76.05 mm) / 17 11/64 in (436.17 mm)
15.012 in (381.3 mm) × 12.012 in (305.1 mm) × 1/8 in (3.18 mm)
RCRF-recess-1 / RCRF
18.994 in (482.45 mm) / 2.994 in (76.05 mm) / 17 11/64 in (436.17 mm)
15.012 in (381.3 mm) × 12.012 in (305.1 mm) × 1/8 in (3.18 mm)
RCRB-recess-1 / RCRB
18.994 in (482.45 mm) / 2.994 in (76.05 mm) / 17 11/64 in (436.17 mm)
15.012 in (381.3 mm) × 12.012 in (305.1 mm) × 1/8 in (3.18 mm)
RCRL-recess-1 / RCRL
18.994 in (482.45 mm) / 2.994 in (76.05 mm) / 17 11/64 in (436.17 mm)
15.012 in (381.3 mm) × 12.012 in (305.1 mm) × 1/8 in (3.18 mm)
RCRR-recess-1 / RCRR
18.994 in (482.45 mm) / 2.994 in (76.05 mm) / 17 11/64 in (436.17 mm)
15.012 in (381.3 mm) × 12.012 in (305.1 mm) × 1/8 in (3.18 mm)
Inspection records
Receiving and physical acceptance record
Leave blank until measured or performed. A render, calculation or automated check does not fill these fields.
Required checkpoint
Actual result / date / reviewer
H01 · Exact hinge, stand-off, pin and screw trial Confirm the proposed full-leaf solid aluminium stand-off mounting with hinge supplier/qualified reviewer. Receive 1798A21; compare 3 in (76.2 mm) × 2 1/2 in (63.5 mm) × 0.08 in (2.03 mm) leaves and hole pattern with drawing. Pin head ≤3/8 in (9.53 mm) diameter; equal spacers nominal 1/8 in (3.18 mm), at least 7/64 in (2.78 mm) thick, no veneer underneath. Measure total pin length, choose documented setting, transfer holes and prove roof-on pin extraction and 100-degree motion. Original #8 × 1 1/4 in (31.75 mm) screw now ends at Y1.045 in (26.54 mm); reference rear-layer engagement 0.295 in (7.49 mm), rabbet-floor cover 0.205 in (5.21 mm). Adequacy untested; no load rating.
___________________
___________________
___________________
H02 · Independent hasp fit and edge support Receive both N305-979. Trial bare supported bearing footprints and seven #10 × 5/8 in (15.88 mm) screws each with the actual finished door gap. Latch-side plate-to-wood edge reference is only 0.0175 in (0.44 mm); reject overhang or unsupported holes. Formed offsets are illustrative in model; real fold and hand operation must pass.
___________________
___________________
___________________
Glue time: __________ · Last coating/repair: __________ Temperature / humidity: __________ · Full cure due: __________ Confirmed PSA dwell: __________ · Physical acceptance: __________
Receiving and physical acceptance record
Leave blank until measured or performed. A render, calculation or automated check does not fill these fields.
Required checkpoint
Actual result / date / reviewer
H03 · Veneer system and finished clearances Supplier approval of species, 3M PSA, substrate/sealer, panel balance and indoor environment; received full cured stack at most 0.046 in (1.17 mm). Sample bond and prescribed acclimation/pressure/dwell. Finished latch gap at least 1/16 in (1.59 mm); do not shave beyond the supported latch footprint. If insufficient, revise frame/hardware rather than force the door.
___________________
___________________
___________________
H04 · Plywood, pine and acrylic receiving Plywood uniform 11/16 in (17.46 mm) – 23/32 in (18.26 mm), pine finished 3/4 in (19.05 mm); field-fit dependent cuts. Acrylic actual 0.22 in (5.59 mm) reference, room-temperature sizing, at least 1/16 in (1.59 mm) final pocket edge allowance and free floating retention.
___________________
___________________
___________________
Glue time: __________ · Last coating/repair: __________ Temperature / humidity: __________ · Full cure due: __________ Confirmed PSA dwell: __________ · Physical acceptance: __________
Receiving and physical acceptance record
Leave blank until measured or performed. A render, calculation or automated check does not fill these fields.
Required checkpoint
Actual result / date / reviewer
H05 · Screens, bolts and steel strip seats Measure actual round wire and welded crossings, cured film, steel seats, head, washer thickness, nut and blind cap. Trial exterior 82-degree countersink in matching plywood: flush head without splitting/crushing or excessive depth. Wood remaining under maximum head is approximately 0.576 in (14.63 mm) at reference plywood. Keep full capture lands and open wire cells. Verify actual 5/8 in (15.88 mm)-or-smaller socket and two-wrench access; tail 7/64 in (2.78 mm) – 9/64 in (3.57 mm) before ≤1/64 in (0.4 mm) chamfer; at least two complete threads; no cap bottoming or reachable sharp edges. Reference screw length is not a universal cutting dimension.
___________________
___________________
___________________
H06 · Coating, glue and maintenance compatibility Confirm selected wood/veneer/sealer/topcoat combination and cleaner compatibility. Keep glue and metal seats bare where specified. Follow Titebond temperature and 24-hour unstressed hold; Varathane application and seven-day full-cure record. Do not infer animal safety or water resistance beyond the product limits.
___________________
___________________
___________________
Glue time: __________ · Last coating/repair: __________ Temperature / humidity: __________ · Full cure due: __________ Confirmed PSA dwell: __________ · Physical acceptance: __________
Receiving and physical acceptance record
Leave blank until measured or performed. A render, calculation or automated check does not fill these fields.
Required checkpoint
Actual result / date / reviewer
H07 · Fixture provision and complete enclosure commissioning Actual fixture rigid rim 5 1/2 in (139.7 mm) – 6 in (152.4 mm), overall diameter ≤6 in (152.4 mm), assembled weight ≤2 pounds proposed load; all four rim contacts on the left steel strips. Qualified load/thermal/animal containment review and physical service trials required. No animal-specific equipment chosen. Qualified acceptance of changed countersunk bearing, clamp force and cap retention is required. The model does not establish a tightening torque, heat rating or structural capacity.
___________________
___________________
___________________
Glue time: __________ · Last coating/repair: __________ Temperature / humidity: __________ · Full cure due: __________ Confirmed PSA dwell: __________ · Physical acceptance: __________
Sources, limits and upkeep
Product identity, local stock, received measurements and assembly acceptance are separate questions. Current product links and retrieval evidence are in the review packet.
Separate statuses: research, dimensions, calculations and digital validation have individual evidence. No prototype has been built; physical testing and qualified review have not been performed. Publication is separate from construction acceptance.
This is an indoor non-immersed wooden shell with no liner or water-holding claim. Keep wet areas in separate removable leakproof containers. Disconnect equipment, secure the animal elsewhere and empty the enclosure before maintenance. Follow the pictured removal and cleaning sequence.
Full exterior veneer is included in this guide’s schedule and geometry, subject to supplier balance, bond and actual-stack acceptance. Texture scans illustrate appearance; natural grain and color vary by delivered sheet.