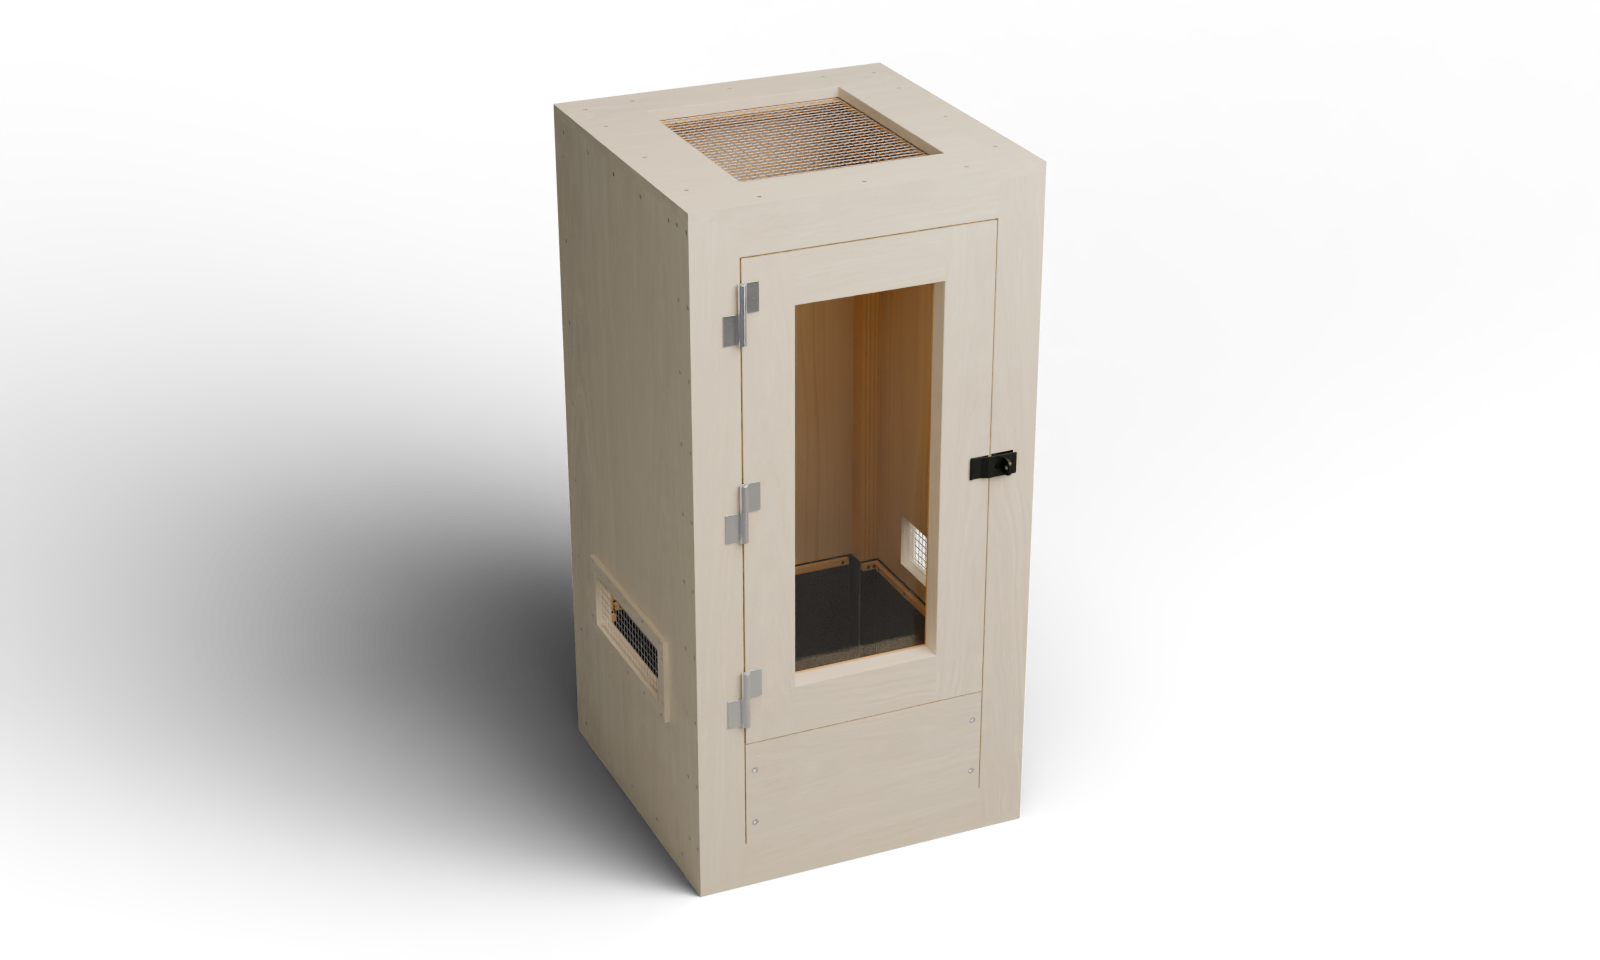
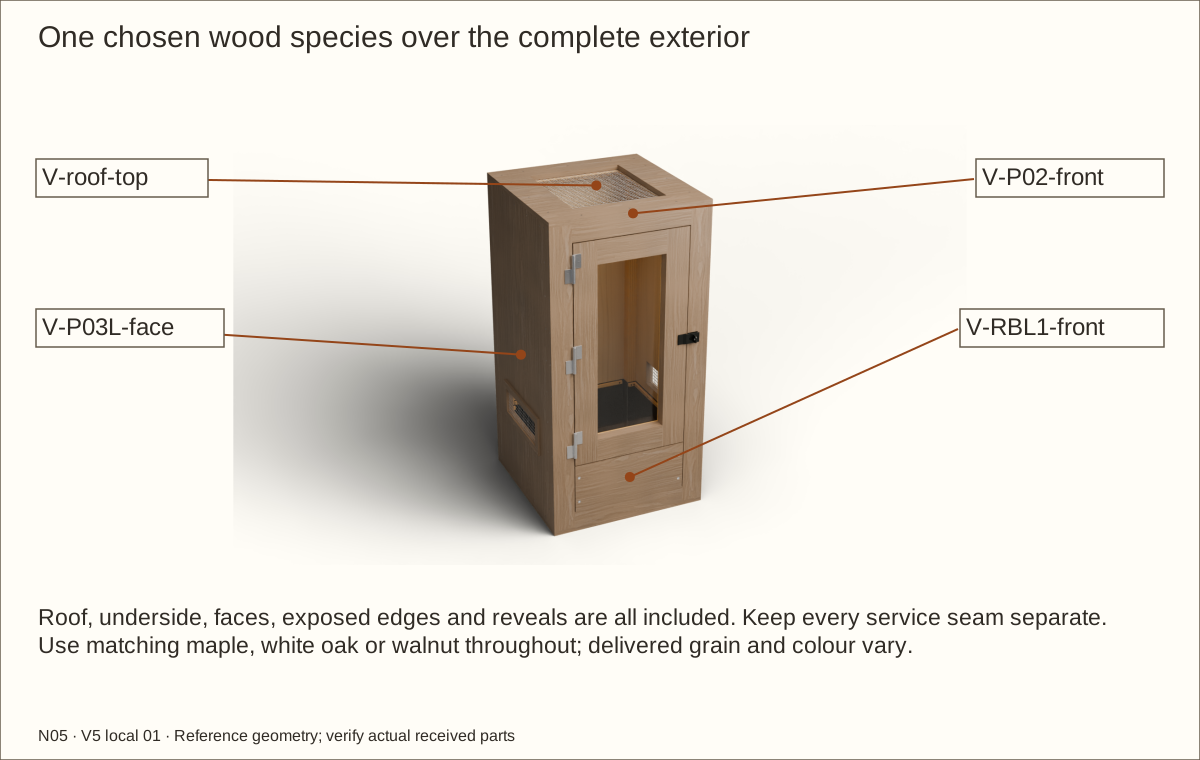
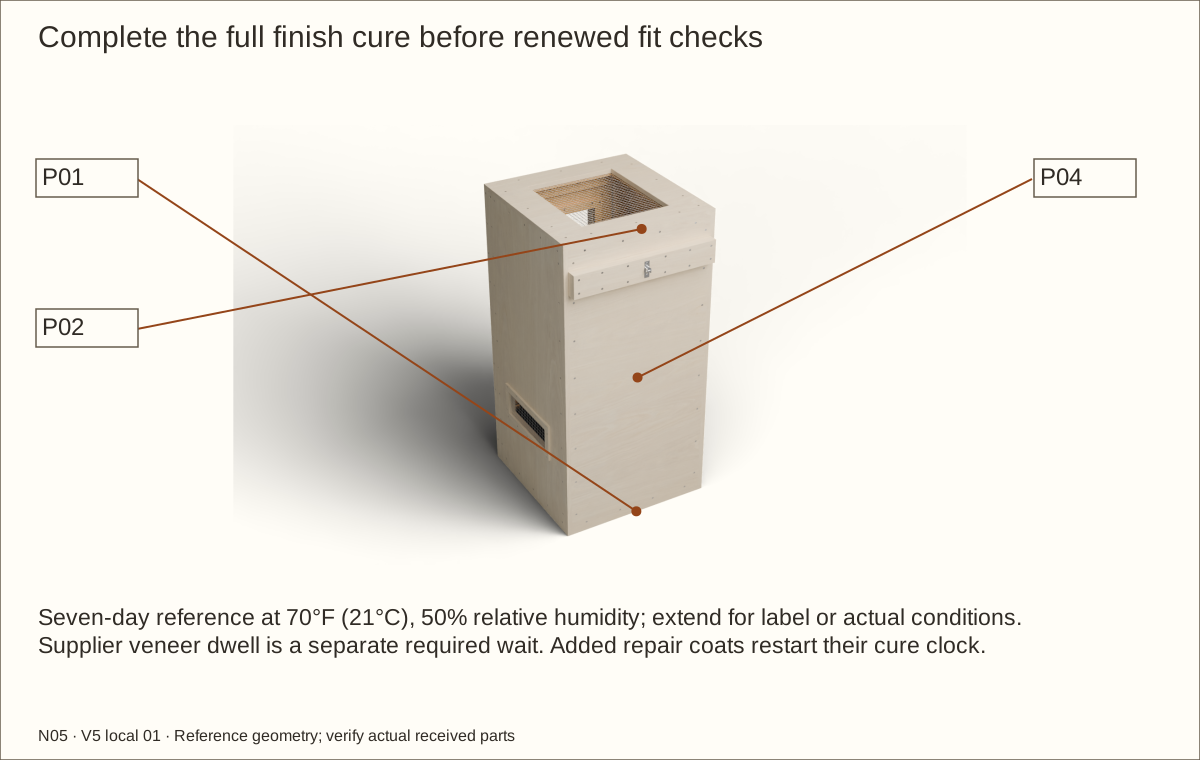
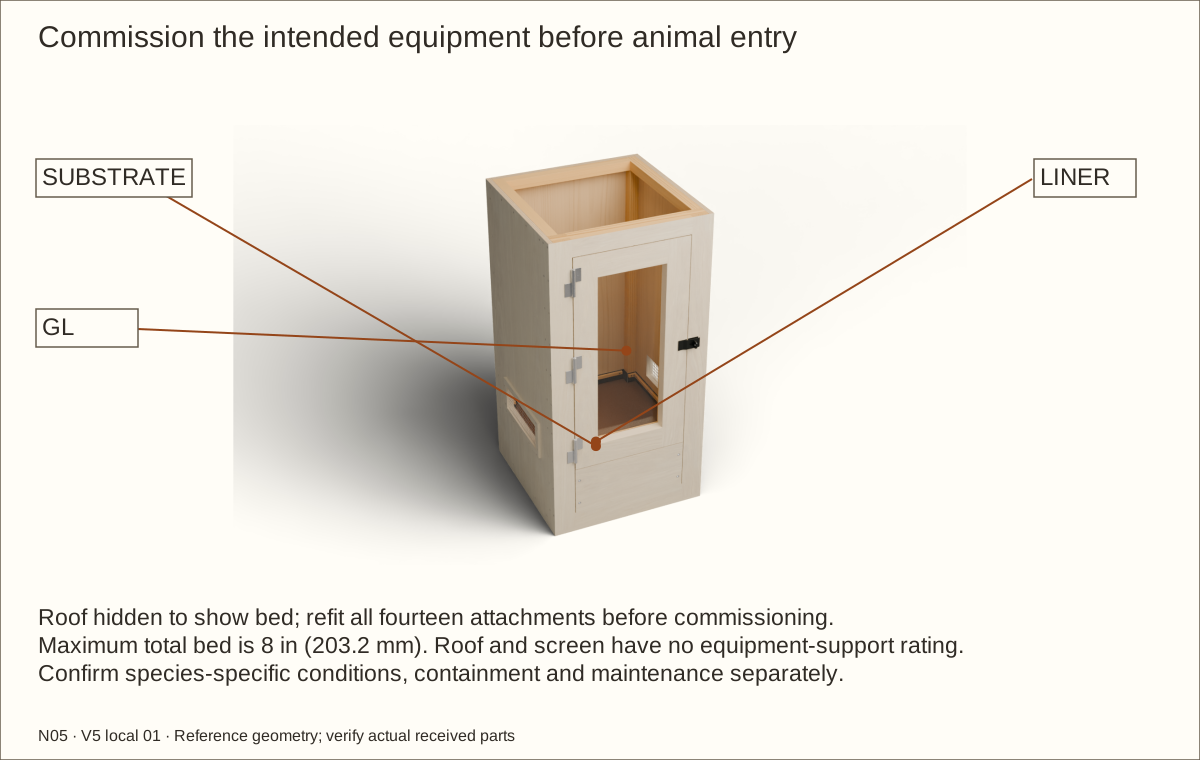
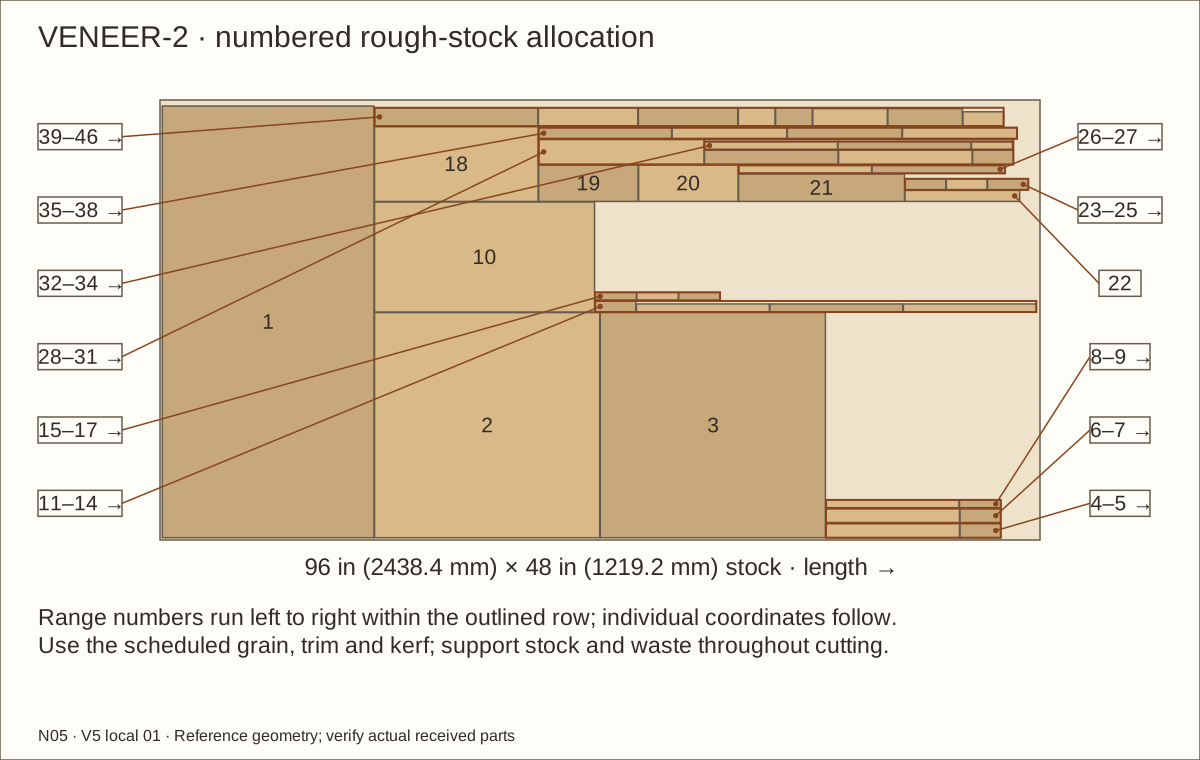
Full exterior veneer: the roof, faces, edges and reveals are included in this guide’s coordinated veneer schedule and geometry. Supplier balance, bond and actual-stack acceptance remain required. Natural grain and color vary.
About these previews
Rendered from this enclosure’s actual reference geometry. Veneer layers preserve service seams and bare hasp seats. Hinges bear on the accepted cured face veneer. The 3D viewer shows maple; these choices change the main picture. Texture scans by Jenelle van Heerden via Poly Haven, CC0 illustrate appearance and are not delivered veneer samples.
One lift-off acrylic door, a one-piece lined bed behind a removable two-layer retainer, and one screened roof opening. Follow 70 pictured operations with named parts, required waits and checks before continuing.
Construction holds: exact hinge/hasp seating, veneer bearing/balance/bond, recessed retainer connections, floating glazing, uncut liner folds, prototype construction, physical testing and qualified review and the site-specific wall restraint remain open.
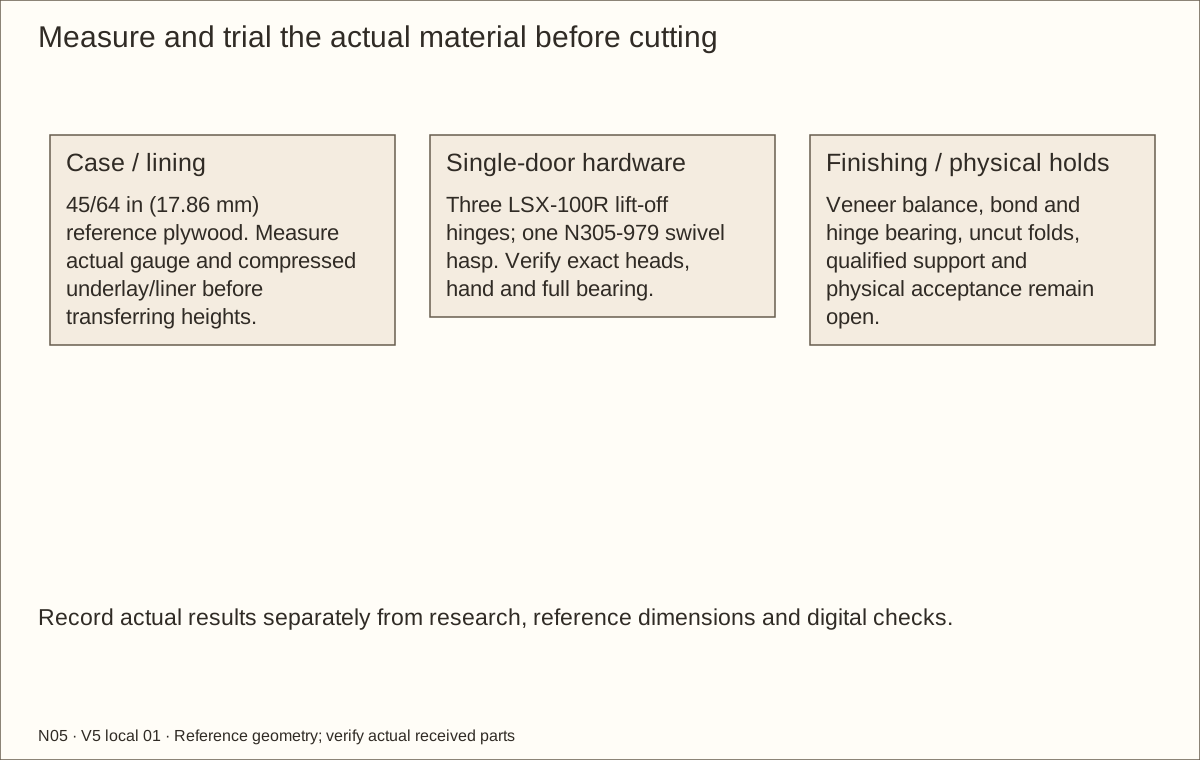
This is the individual N05 hinged lined design. Receive, measure and trial exact materials before dependent final cuts. A changed plywood gauge, lining, hardware or veneer system requires coordinated recalculation.
Measurement
Reference
Bare case
24 × 24 × 48 in (609.6 × 609.6 × 1219.2 mm)
Reference covered case
24.061 in (611.15 mm) × 24.061 in (611.15 mm) × 48.061 in (1220.75 mm)
Maximum covered case
24.092 in (611.94 mm) × 24.092 in (611.94 mm) × 48.092 in (1221.54 mm)
Rear restraint rail
25.5305 in (648.47 mm) behind FRONT at reference; add bracket/cable and actual wall space
External capture width
24.811 in (630.2 mm); allow additional hardware/service room
Finished floor / bed
Floor 53/64 in (21.03 mm) above underside; maximum total bed 8 in (203.2 mm)
Bare leaf size
17 1/4 in (438.15 mm) × 33 19/32 in (853.28 mm) × 1 1/2 in (38.1 mm)
Bare opening above retainer
17 19/32 in (446.88 mm) × 33 31/32 in (862.81 mm)
Removed-door opening
17.53275 in (445.33 mm) × 33.90775 in (861.26 mm) at reference veneer
Complete veneer layer
Reference 0.0305 in (0.77 mm); maximum 0.046 in (1.17 mm)
Datums: assembly X starts at outside LEFT, Y at outside FRONT and Z at FLOOR UNDERSIDE, unless a local part edge is explicitly named. in means inches; mm means millimetres. Exact mating decimals are retained; actual received measurements govern.
Tools, terms and safe workholding
Prepare a padded flat bench, helper, clamps, straight cauls, tape, square, marking knife, straightedge, caliper and drill depth stops. Use supported saw/router/jigsaw setups and sacrificial backing. Follow each tool maker’s guards and minimum feed lengths; never feed narrow short strips without a suitable carrier.
For retainer trials: 1-inch (25.4 mm) flat-bottom boring bit with a 21/32-inch (16.67 mm) stop, 9/32-inch (7.14 mm) through bit, 82-degree countersink, #3 Phillips hand driver and 7/16-inch (11.11 mm) socket no wider than 7/8 inch (22.23 mm). Prove actual bit-point depth and driver/socket clearance on matching scrap. Use root-matched wood pilots and correct hand drivers. Mesh needs snips and edge protection; veneer needs a sharp knife and supplier-specified pressure tool. Use the acrylic maker’s accepted supported cutting and edge-finishing method.
Wear eye/hearing protection, control dust and ventilate adhesives/coatings. Protect hands while handling wire and metal; keep gloves and loose clothing away from rotating tools. Support both work and waste.
Term
Plain meaning
Cleat / lamination
Wood strip receiving screws / layers joined face to face
Jamb / header / retainer
Side of the opening / top frame member / removable front bed wall
Rear edge cut narrower for swing clearance / supported upward removal from hinge pins
PSA / RH
Pressure-sensitive adhesive / relative humidity
EPDM / mil
Ethylene propylene diene monomer rubber / one thousandth of an inch
Record the actual stock and shared heights
Plywood thickness: t = ______ in / ______ mm Compressed underlay + liner: a = ______ in / ______ mm Finished-floor elevation: F = t + a = ______
Part / elevation
Equation in inches
Reference
Floor / roof
24 × 24
24 × 24 in (609.6 × 609.6 mm)
Side height
48 − 2t
46 19/32 in (1183.48 mm)
Back width
24 − 2t
22 19/32 in (573.88 mm)
Fixed frame / bare bay width
24 − 2t − 2 × 2.5
17 19/32 in (446.88 mm)
Retainer width
Bare bay width − 2 × 5/32
17 9/32 in (438.94 mm)
Retainer top
F + 10
10 53/64 in (275.03 mm)
Retainer height
F + 10 − (t + 2.5)
7 5/8 in (193.68 mm)
Maximum bed top
F + 8
8 53/64 in (224.23 mm)
Clamp screw centre
F + 9 3/8
10 13/64 in (259.16 mm)
Liner top
F + 9 3/4
10 37/64 in (268.68 mm)
These equations retain the original core and nominal frame sections. They do not automatically update all joints, hole stations, hinge axes or glazing sizes. Recalculate the entire coordinated candidate whenever a measured input changes. Transfer shared heights with a marked measuring strip.
Why the hinge face stack matters
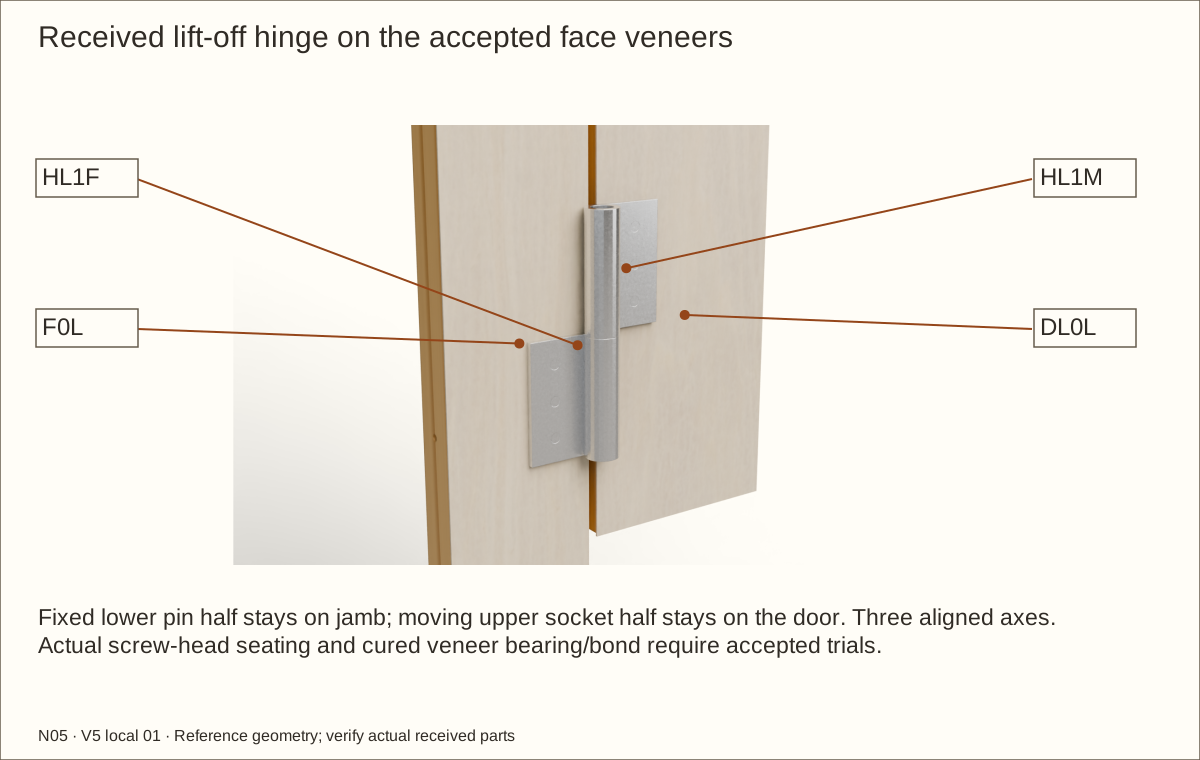
Both lift-off halves mount on equal accepted cured veneer faces
The reference barrel is tangent to its mounting plane. Recessing only the flat leaf into veneer makes that barrel rub the remaining skin. Here the complete unaltered hinge and shared axis move forward by the actual cured face stack: 0.0305 in (0.77 mm) at reference. Keep both bearing faces equally thick, flat, fully bonded and accepted for compression under the leaves. The actual screw heads, supplied holes, bond and bearing require a qualified material trial before drilling the real frame.
Parts: Complete enclosure, support and received inventory, as described below
Tools / setup: Measuring tape, square, pencil and the tools named below
Qualify the support and service position — 1
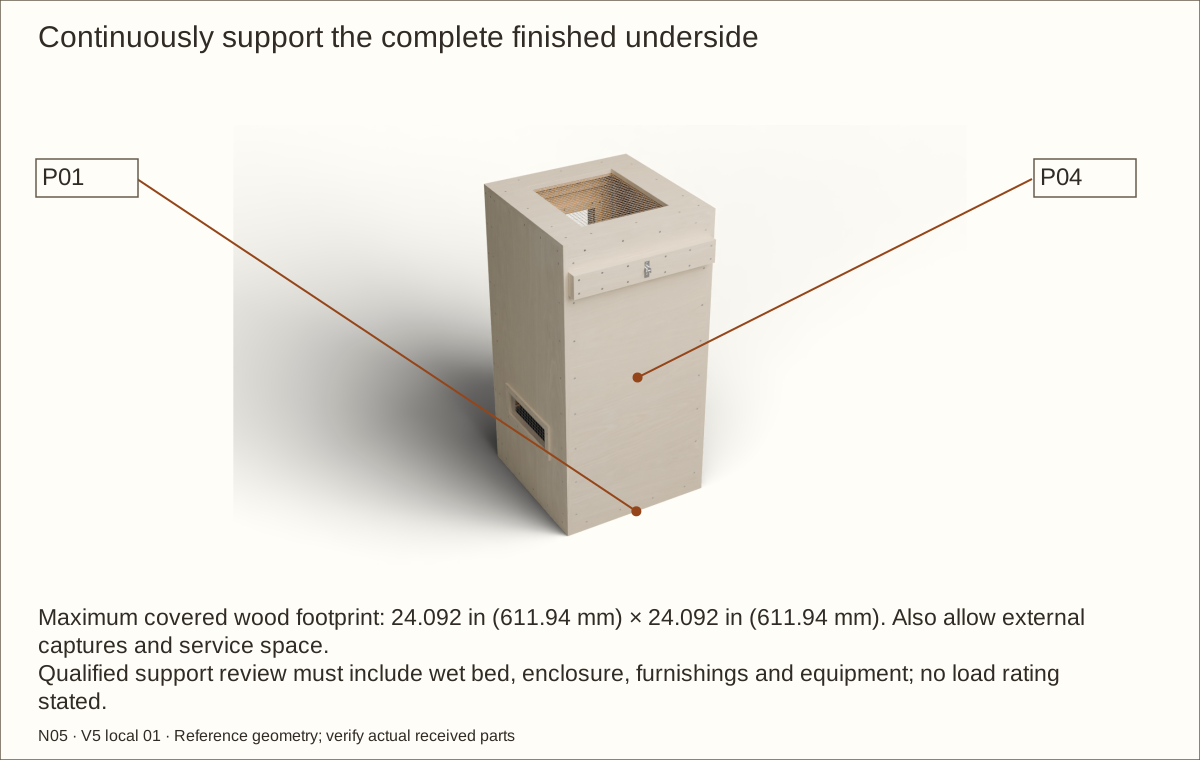
Choose a level, rigid support beneath the entire finished underside, at least 24.092 in (611.94 mm) wide × 24.092 in (611.94 mm) deep. Every edge must bear continuously. This guide does not design the stand or qualify the building floor.
The conservative bed envelope is 2.24 cubic feet (63 L), before framing displacement. At an assumed 100 lb/ft³ (1602 kg/m³), bed mass alone is 224 lb (102 kg). Add shell, water, furnishings and equipment when qualifying the support and building floor.
Check before continuing: Qualified support and the full wet-load planning assumptions are recorded before construction.
Parts: Complete enclosure, support and received inventory, as described below
Tools / setup: Measuring tape, square, pencil and the tools named below
Qualify the support and service position — 2
Keep at least 32 in (812.8 mm) of clear working space in front, 6 in (152.4 mm) beside the door swing and room for complete roof removal. Allow at least 2 in (50.8 mm) upward lift above the opened leaf. The side captures make the reference width 24.811 in (630.2 mm); include that in the empty transport and service plan. The veneered rear restraint rail reaches 25.5305 in (648.47 mm) behind the front datum before bracket/cable space. Plan that actual wall connection before placement.
Locate a verified wall stud behind the planned restraint rail, or have a qualified installer select a masonry fixing. Plan the received 6 in (152.4 mm) cable route without excessive slack or a strained bend. Stabilize the tall empty shell and install the complete restraint before any door trial. Never stack, suspend, climb on or move it loaded.
Check before continuing: The full floor, actual load, wall connection and cleaning route have been planned.
Parts: Complete enclosure, support and received inventory, as described below
Tools / setup: Measuring tape, square, pencil and the tools named below
Receive and measure the materials — 1
Measure the actual plywood thickness at several points. Check pine is 3/4 in (19.05 mm) thick and solid wood supports are 1 1/2 in (38.1 mm) square. Reject warped, split or damaged wood and knots at joints.
Receive three Sugatsune LSX-100R lift-off hinges of the same hand, one National N305-979 swivel hasp and their specified screws. Identify the lower fixed pin half and upper removable socket by the actual manufacturer drawing. Never choose the hand only from the everyday name “left-hung.” Confirm each actual metal hole accepts its specified head without unauthorized machining. Receive the complete TK-400 kit: both brackets, short furniture and longer wall screws, cable, two clevis pins and two keeper pins; identify each part from its current instructions.
Check before continuing: Actual wood gauge, matching hinge hand and complete restraint-kit contents are recorded.
Parts: Complete enclosure, support and received inventory, as described below
Tools / setup: Measuring tape, square, pencil and the tools named below
Receive and measure the materials — 2
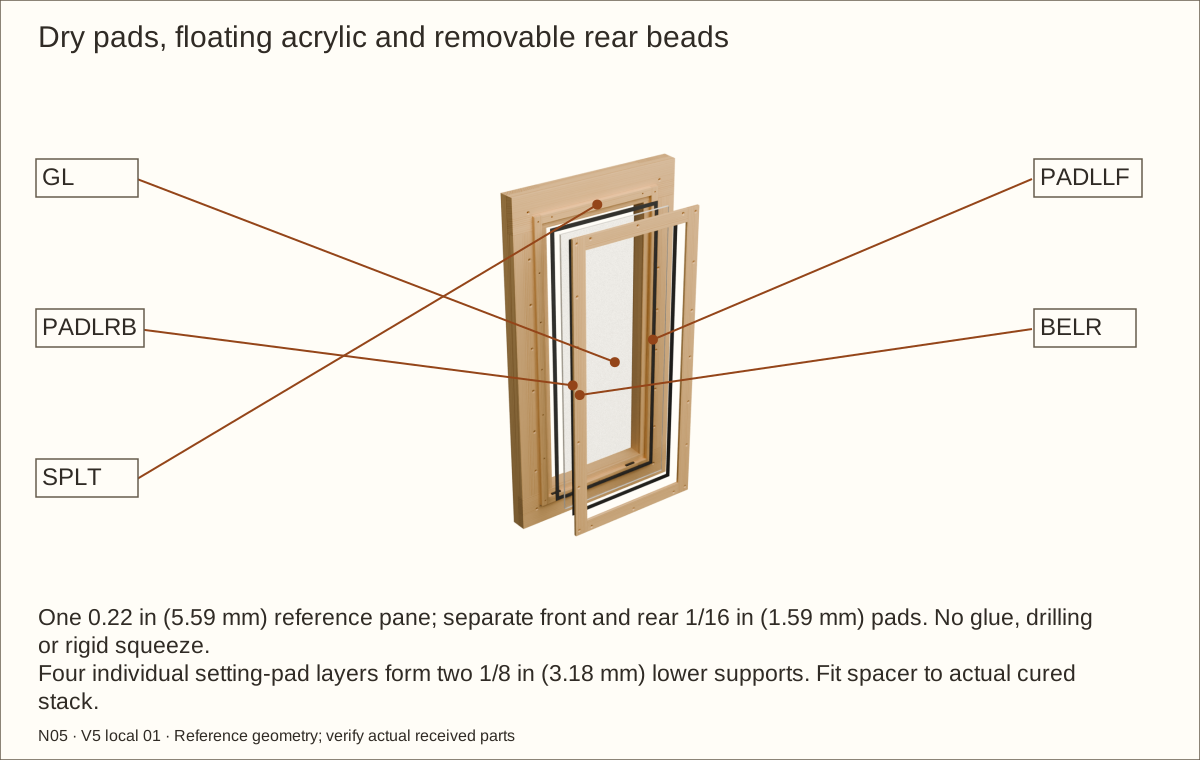
Measure the actual acrylic sold as 0.22 in (5.59 mm) thick, both separate uncompressed 1/16 in (1.59 mm) neoprene pads, and the cured film on the contact samples. The bare spacer starts at 0.351 in (8.92 mm) to leave a finished 0.345 in (8.76 mm) cavity after two 0.003 in (0.08 mm) reference contact films. The lining reference is 0.08 in (2.03 mm) compressed underlay plus 0.045 in (1.14 mm) EPDM, totaling 1/8 in (3.18 mm); measure this actual stack rather than assuming a delivered gauge.
On a spare strip, mark the floor underside. Above it, mark the actual plywood thickness plus compressed lining to locate the finished floor. From that mark, measure up 8 in (203.2 mm) for the maximum bed, 10 in (254 mm) for the retaining-panel top and 11 in (279.4 mm) for the vent bottom. Transfer these marks to the build.
Check before continuing: Actual plywood and lining thicknesses, hinge orientation and purchase quantities are recorded.
Tools / setup: Measuring tape, square, pencil and the tools named below
Before you begin: Support both sides of every cut and use eye/hearing/dust protection. Never reach across a running blade.
Cut and identify the plywood — 1
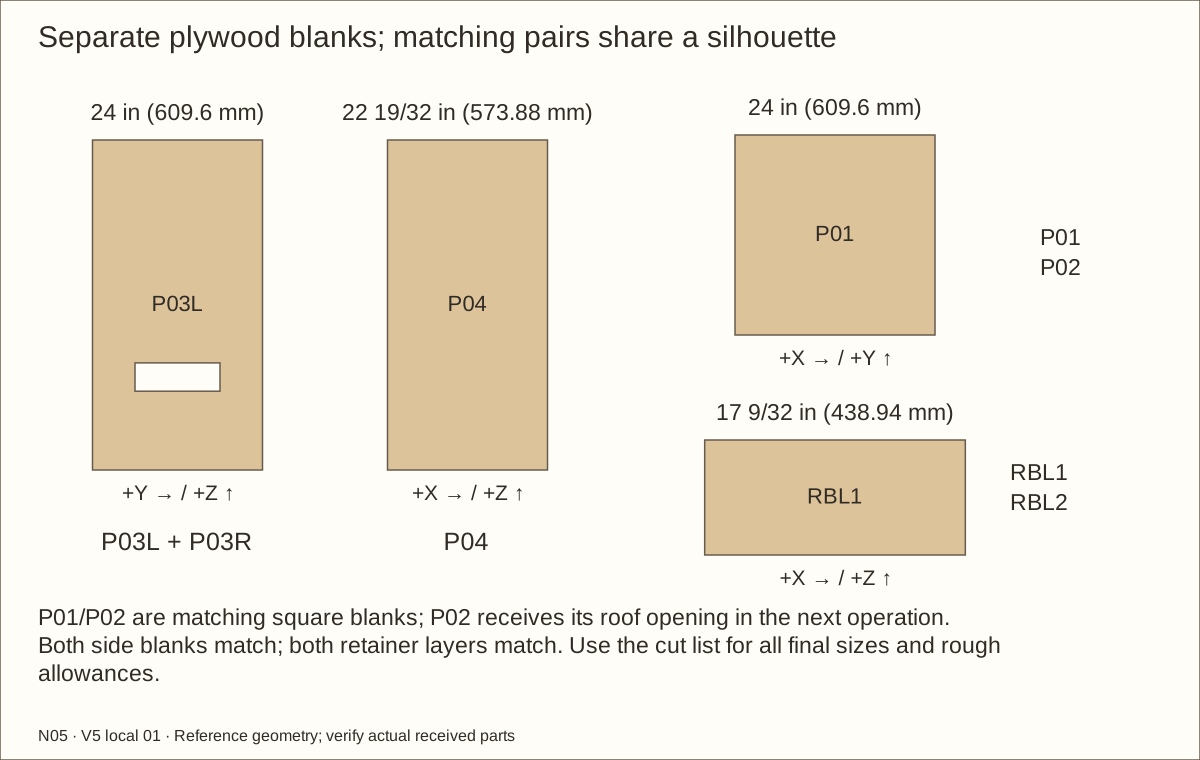
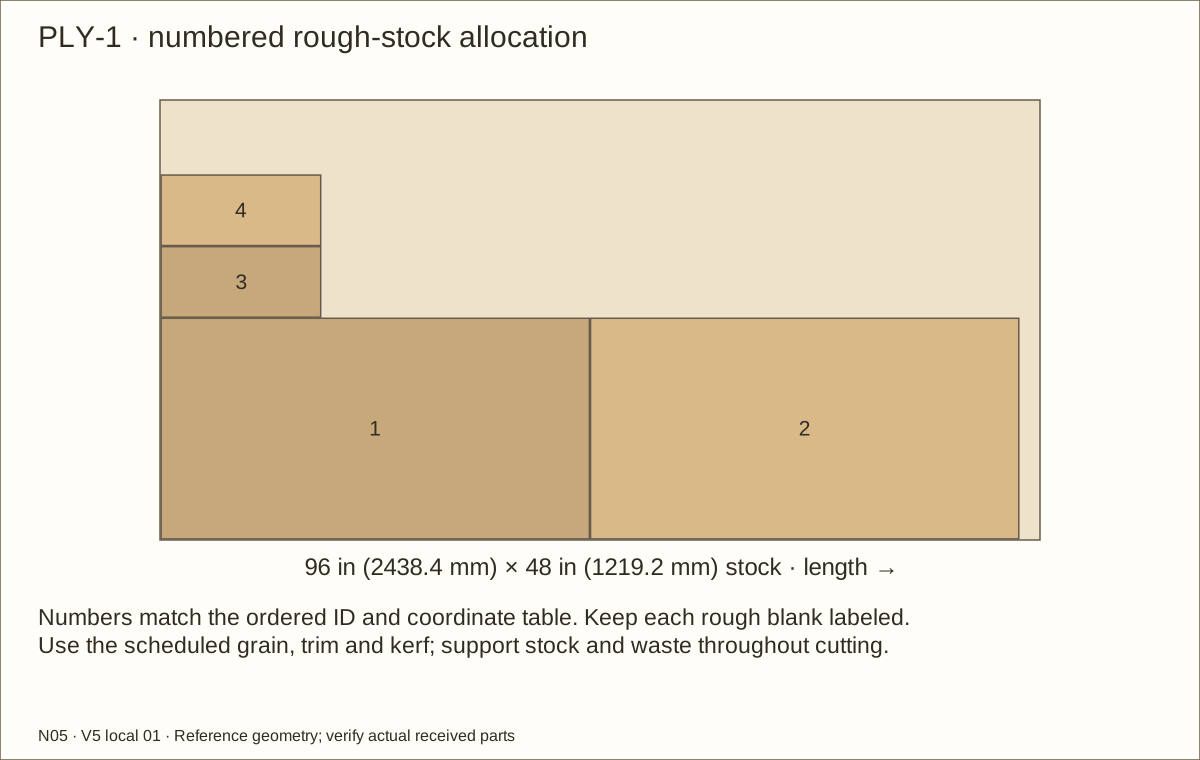
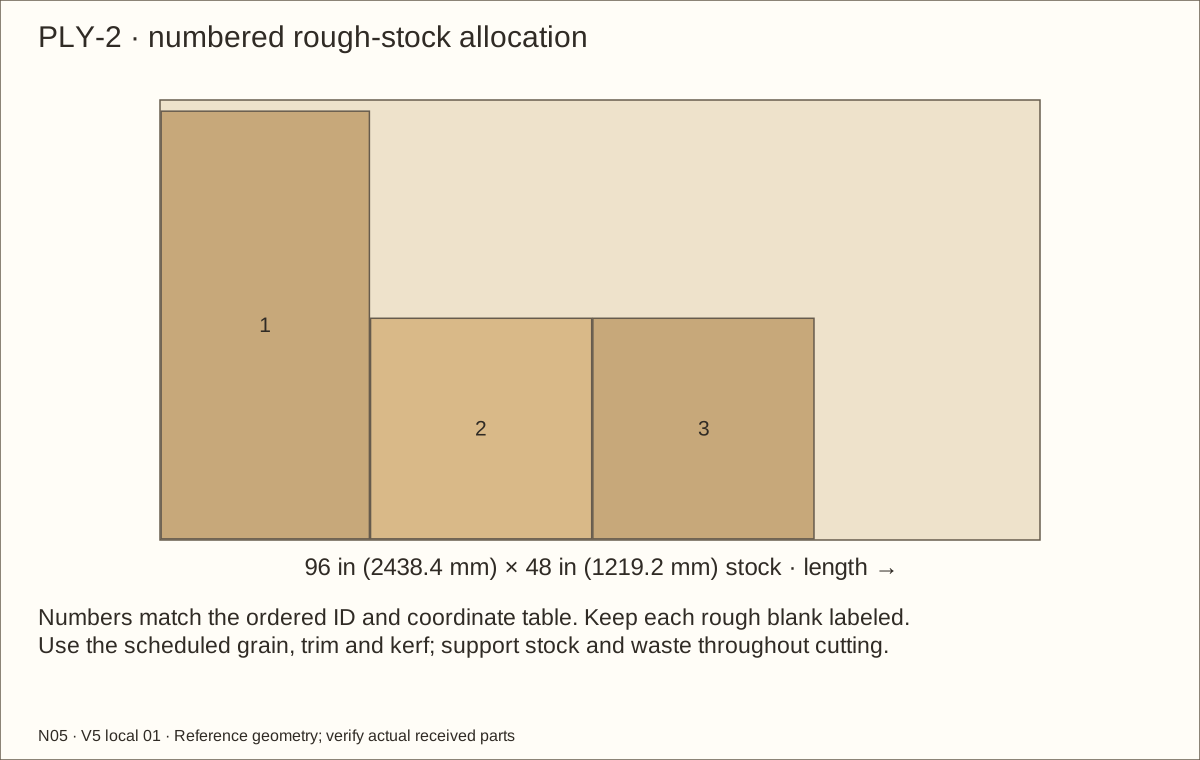
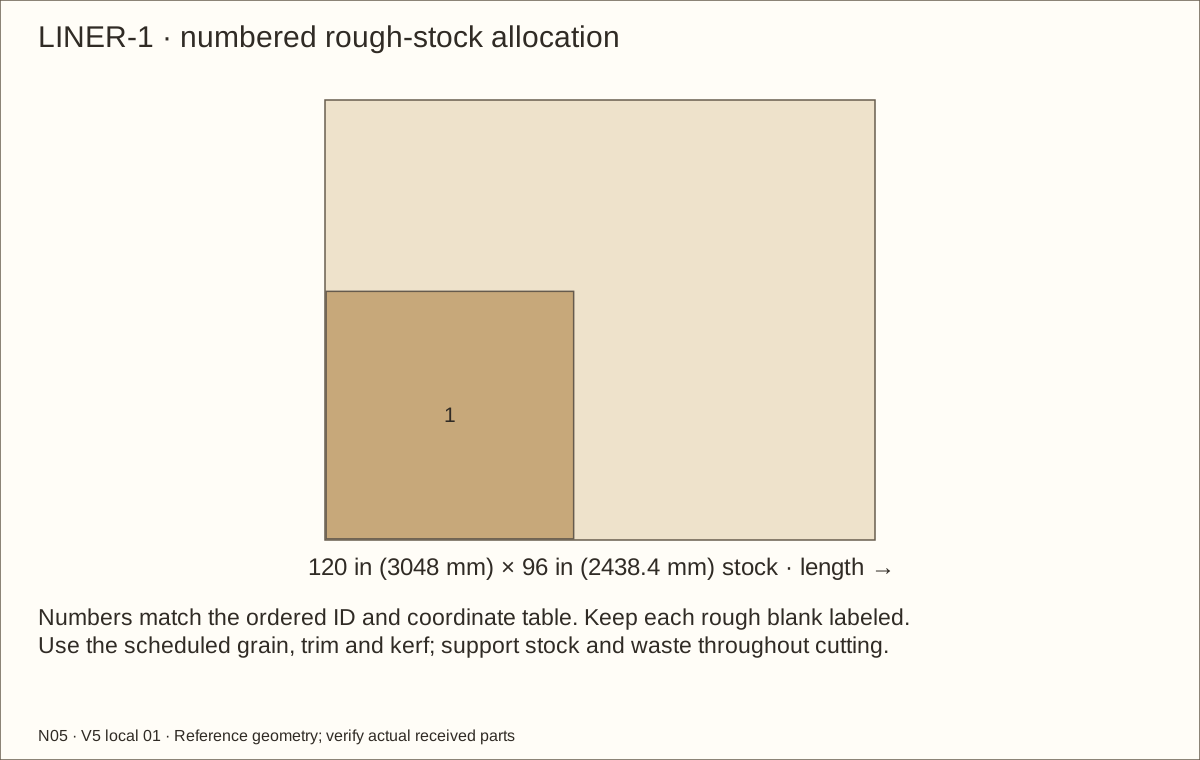
Follow the 2 plywood-sheet layouts. Establish a square edge and label the face. Leave 1/8 in (3.18 mm) saw-cut waste between rough blanks. P01 and P02 finish at 24 in (609.6 mm) × 24 in (609.6 mm); support both sides of every cut.
At the 45/64 in (17.86 mm) plywood reference, each side is 24 in (609.6 mm) × 46 19/32 in (1183.48 mm) and the back is 22 19/32 in (573.88 mm) × 46 19/32 in (1183.48 mm). Fit the sides between floor and roof for the 48 in (1219.2 mm) bare height, and fit the back between the sides. Rough allowances and grain directions are in the current cut list.
Check before continuing: Floor, roof, paired walls and back are labeled, square and fitted to the actual plywood gauge.
Tools / setup: Measuring tape, square, pencil and the tools named below
Before you begin: Support both sides of every cut and use eye/hearing/dust protection. Never reach across a running blade.
Cut and identify the plywood — 2
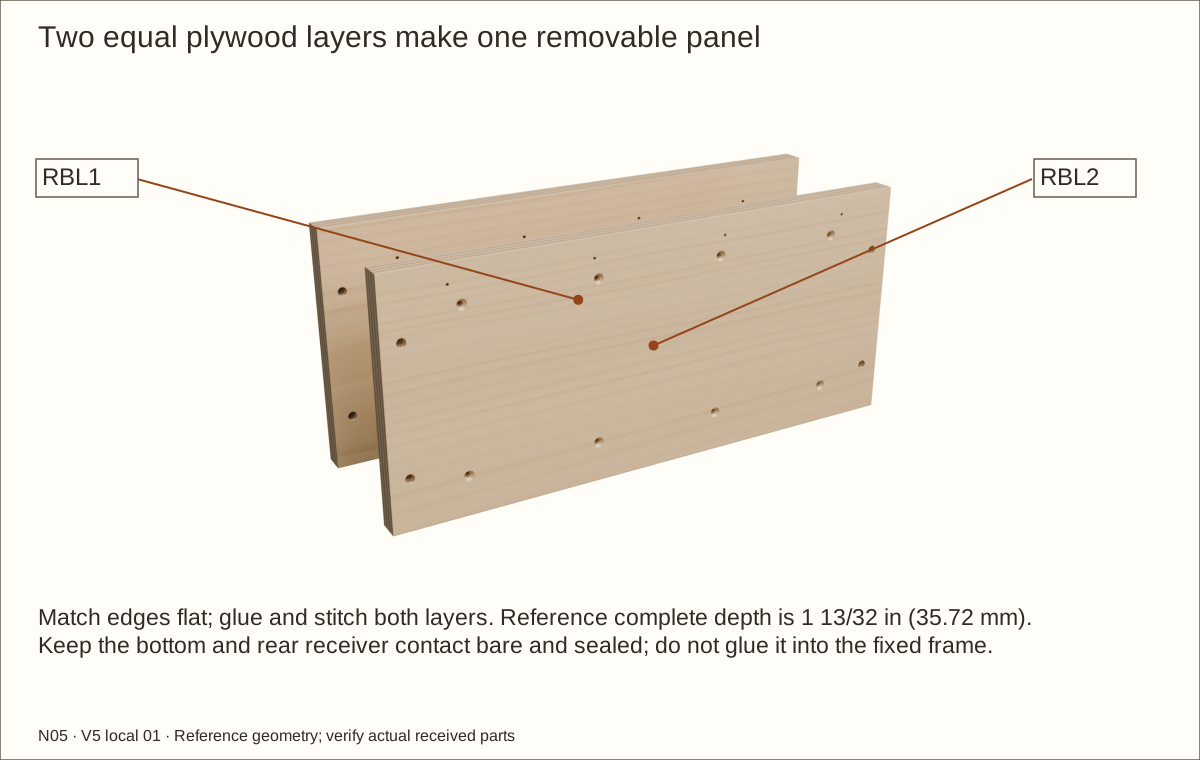
Cut RBL1 and RBL2 to matching rough blanks, then fit each to 17 9/32 in (438.94 mm) wide × 7 5/8 in (193.68 mm) high. Grain runs across the width. The refitted panel leaves 5/32 in (3.97 mm) bare space on each side for opposing veneer; its hidden bottom bears on the sealed kick rail without veneer.
Label every part, its inside face and its measuring edge before cutting. Use inch markings throughout each cut; metric values are rounded equivalents. Sizes marked “about” are starting marks. Leave the line, then fit each piece to its actual adjoining parts before the final cut.
Check before continuing: Every plywood part is labeled, square and checked against the measured-stock schedule.
Tools / setup: Measuring tape, square, pencil and the tools named below
Cut the roof and raised side vents — 1
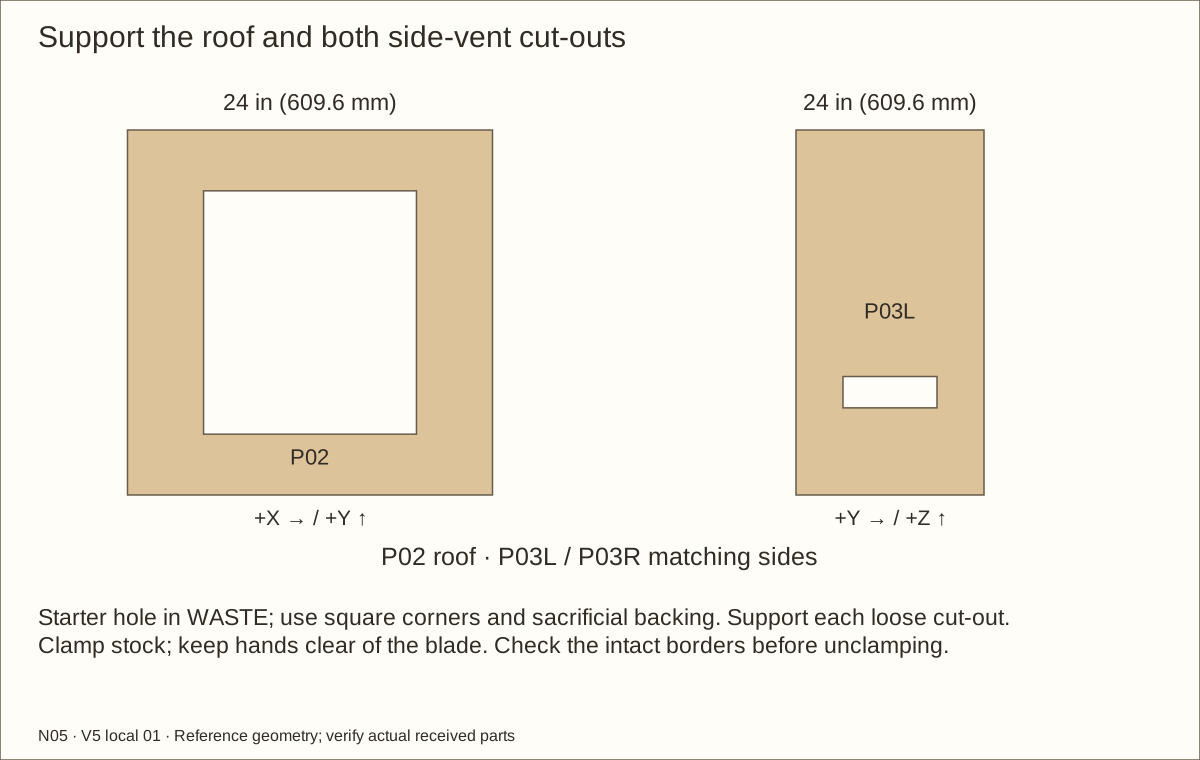
Mark the one roof opening 14 in (355.6 mm) × 16 in (406.4 mm), beginning 5 in (127 mm) from the left and 4 in (101.6 mm) behind the front. Confirm the intact borders before cutting.
Mark a 12 in (304.8 mm) × 4 in (101.6 mm) vent on each side, starting 6 in (152.4 mm) behind the front. Its lower edge is 11 in (279.4 mm) above the finished-floor reference mark, 3 in (76.2 mm) above maximum fill.
Check before continuing: Roof and vent outlines match this build and its finished-floor datum before cutting.
Parts: Complete enclosure, support and received inventory, as described below
Tools / setup: Measuring tape, square, pencil and the tools named below
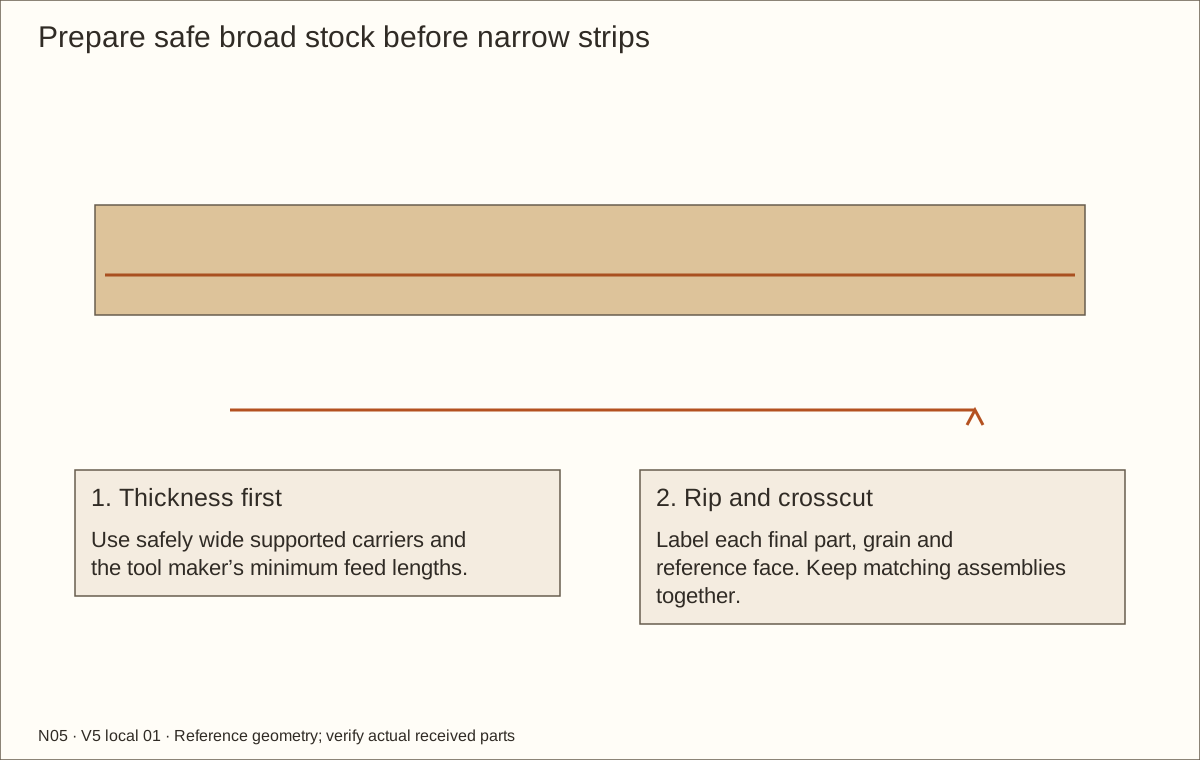
Before you begin: Plane broad supported stock first; never feed short thin strips alone.
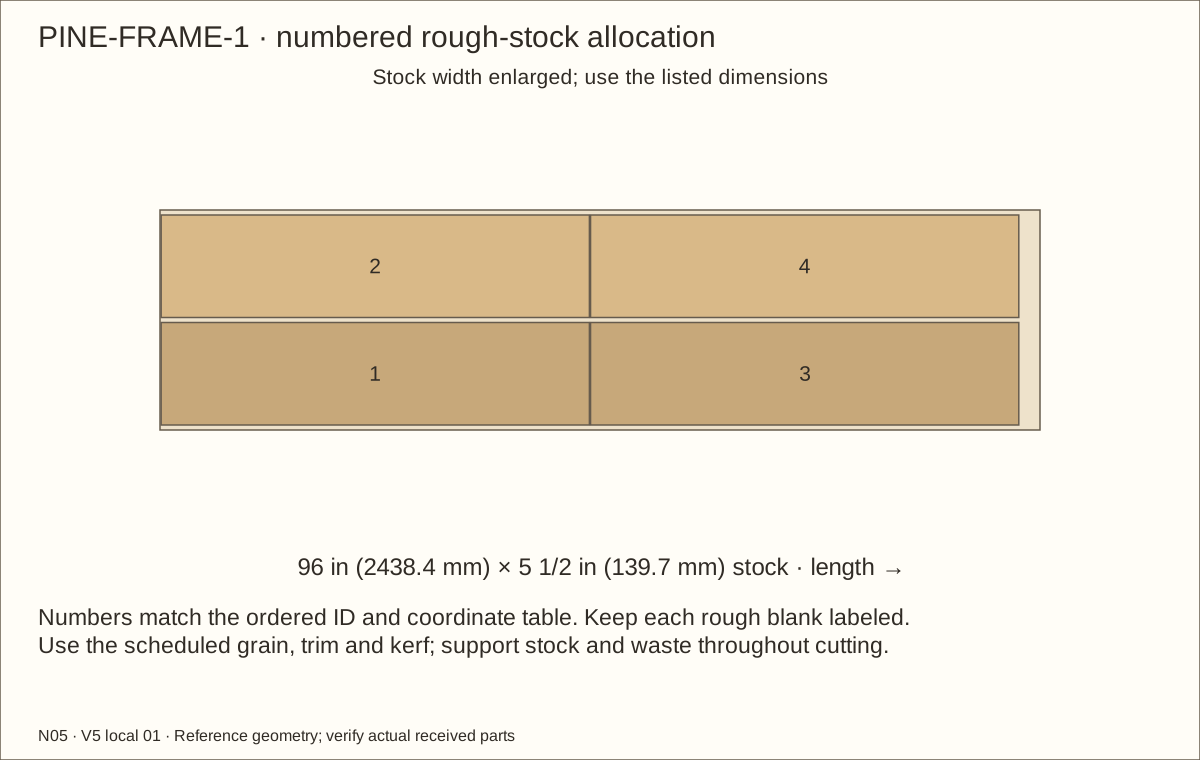
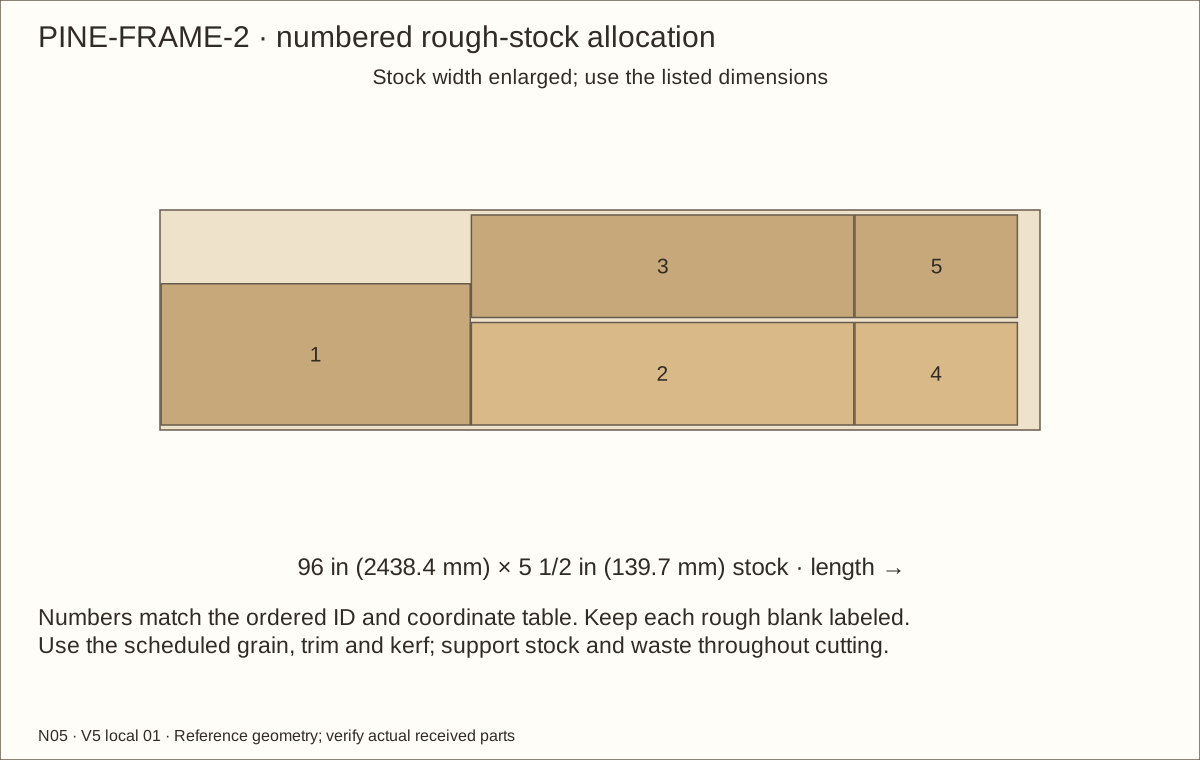
Prepare the pine and thin strips — 1
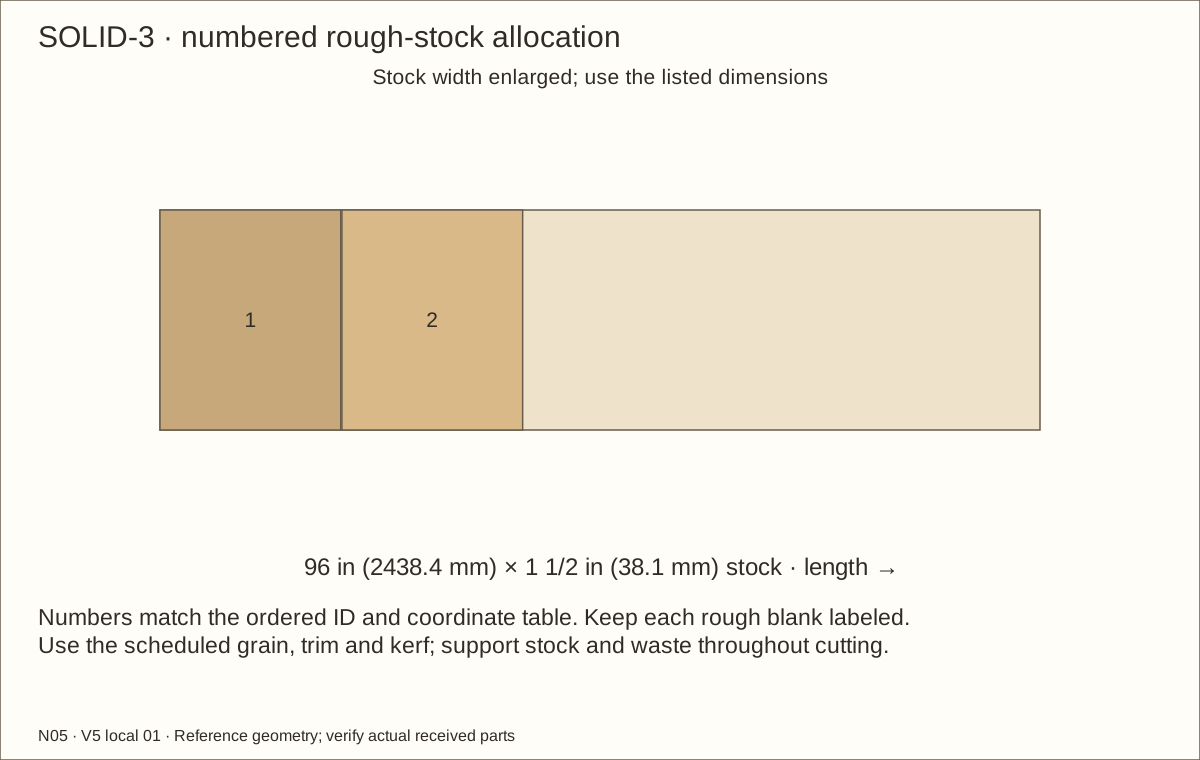
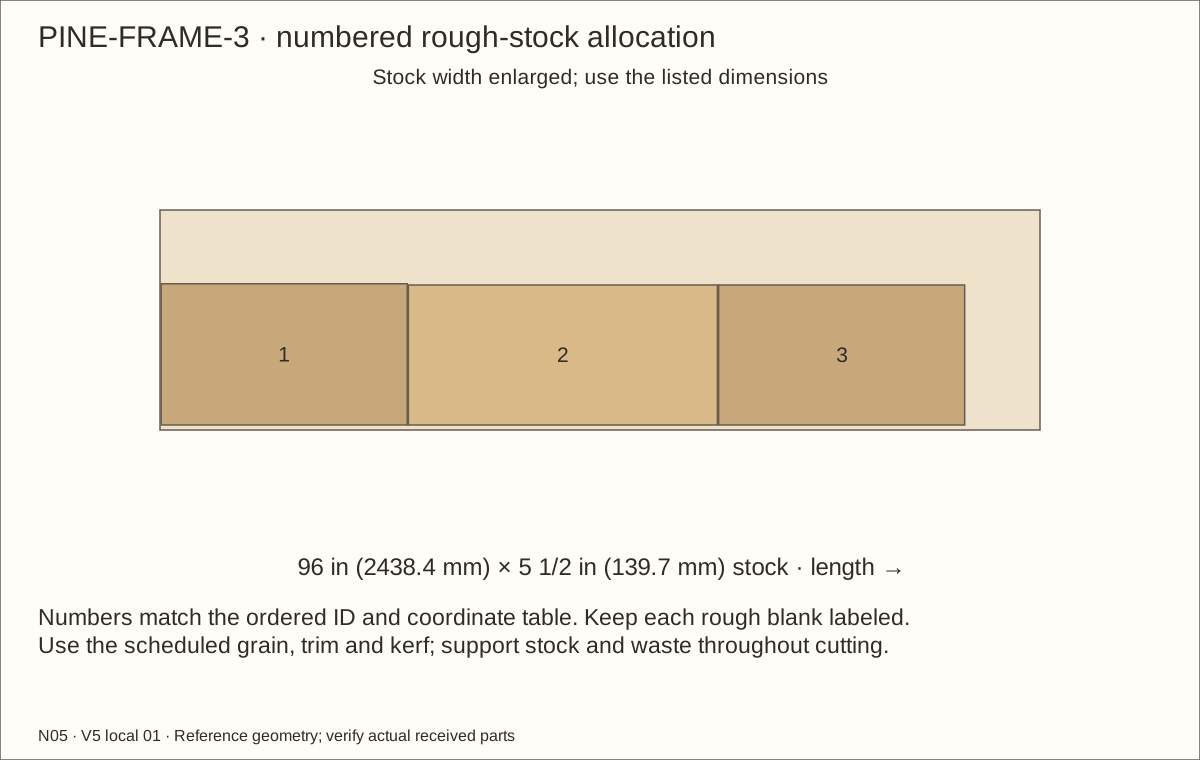
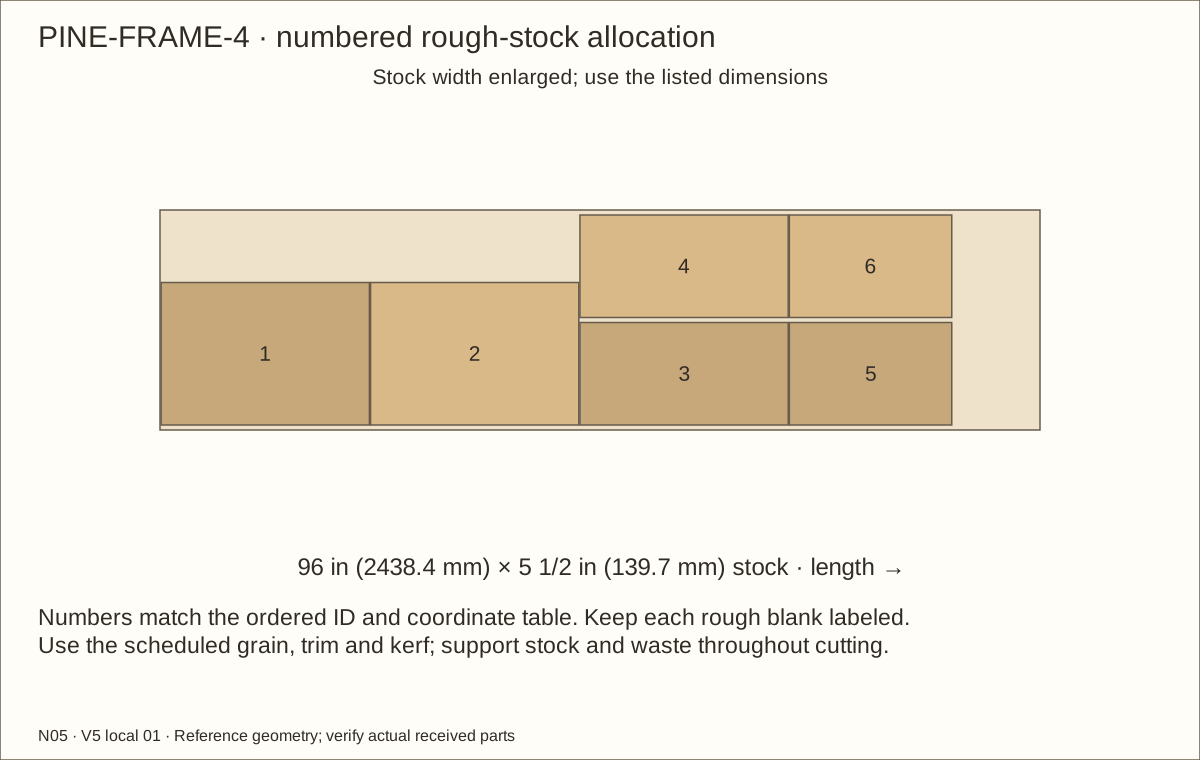
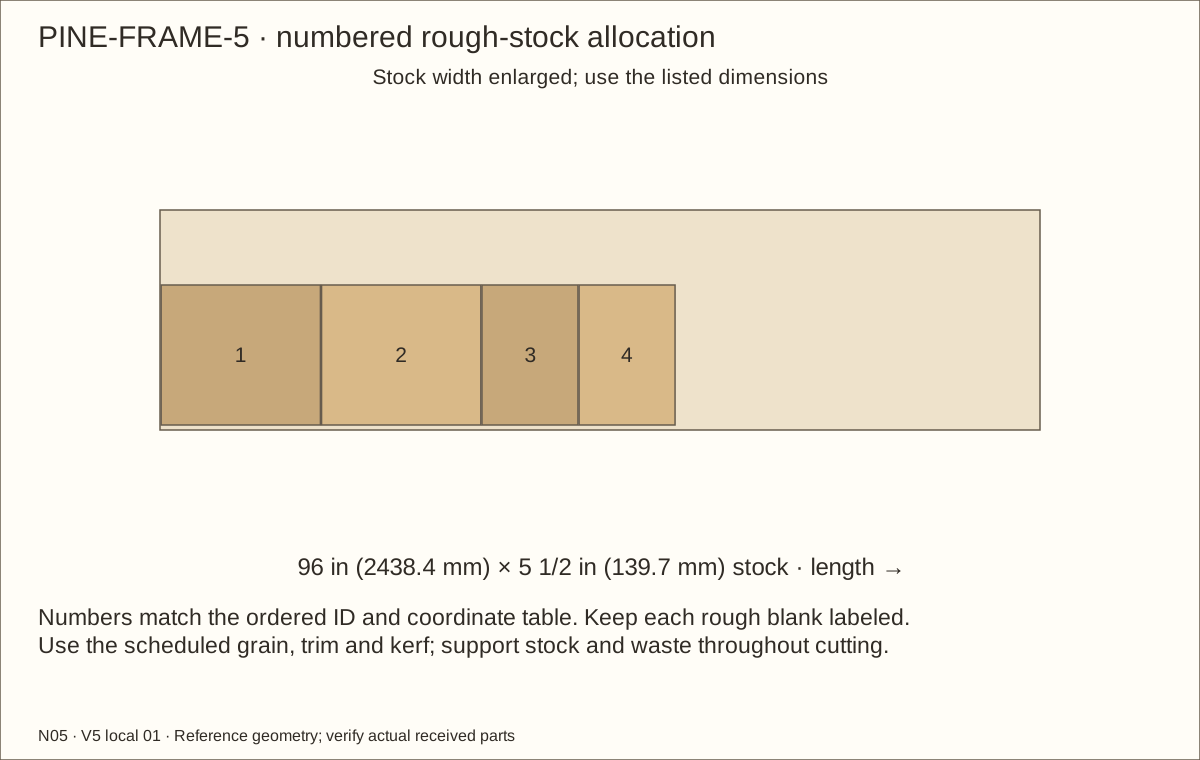
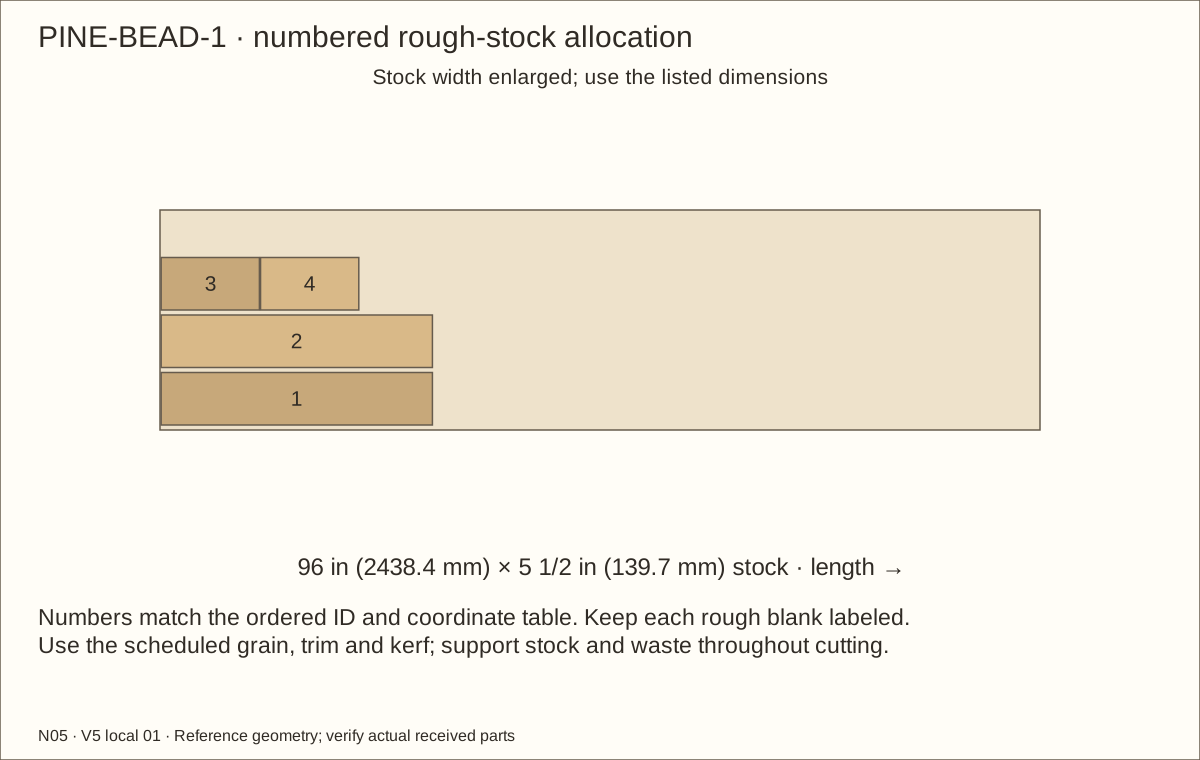
Use the current PINE-FRAME allocations for all twelve fixed-frame pieces and eight door pieces. Start from straight 3/4 in (19.05 mm) × 5 1/2 in (139.7 mm) × 96 in (2438.4 mm) boards. Rip the assigned broad frame strips with guards, push sticks and supported stops. Keep each layer’s ID; similar lengths are not interchangeable. Include both 3 1/2 in (88.9 mm)-wide rear restraint rail layers AR1/AR2; fixed-frame strips here are 2 1/2 in (63.5 mm) wide.
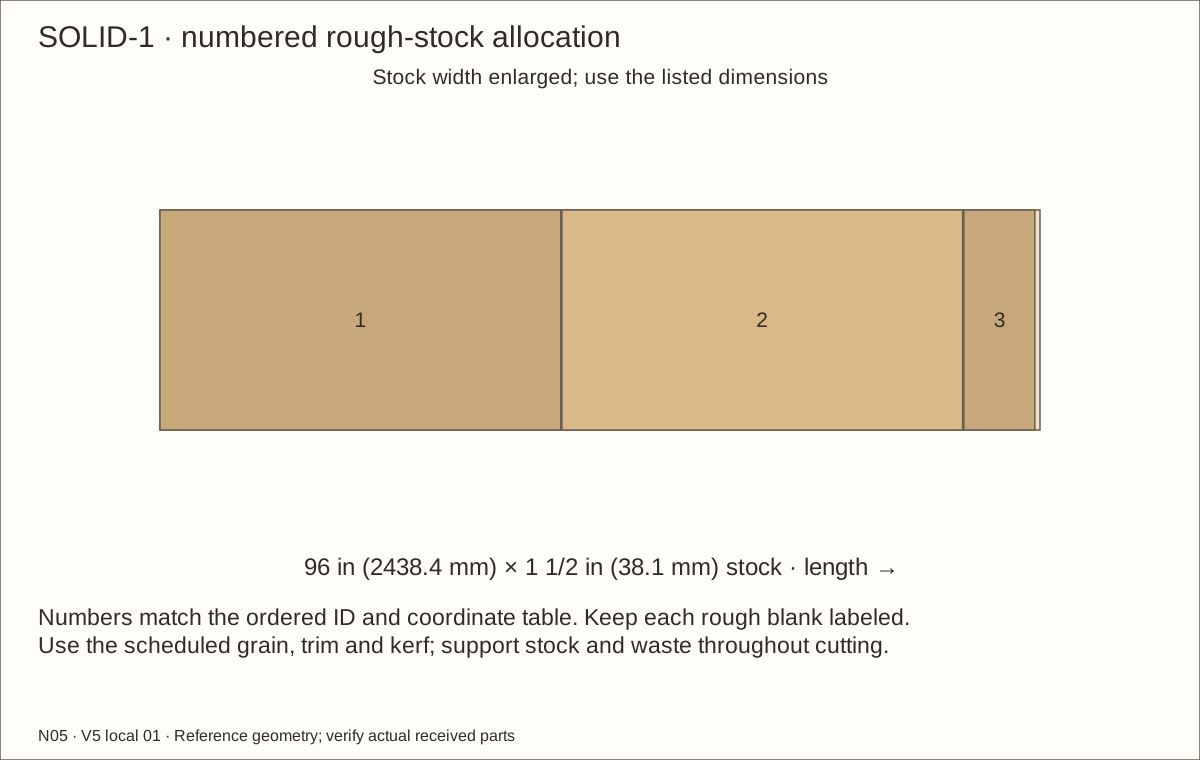
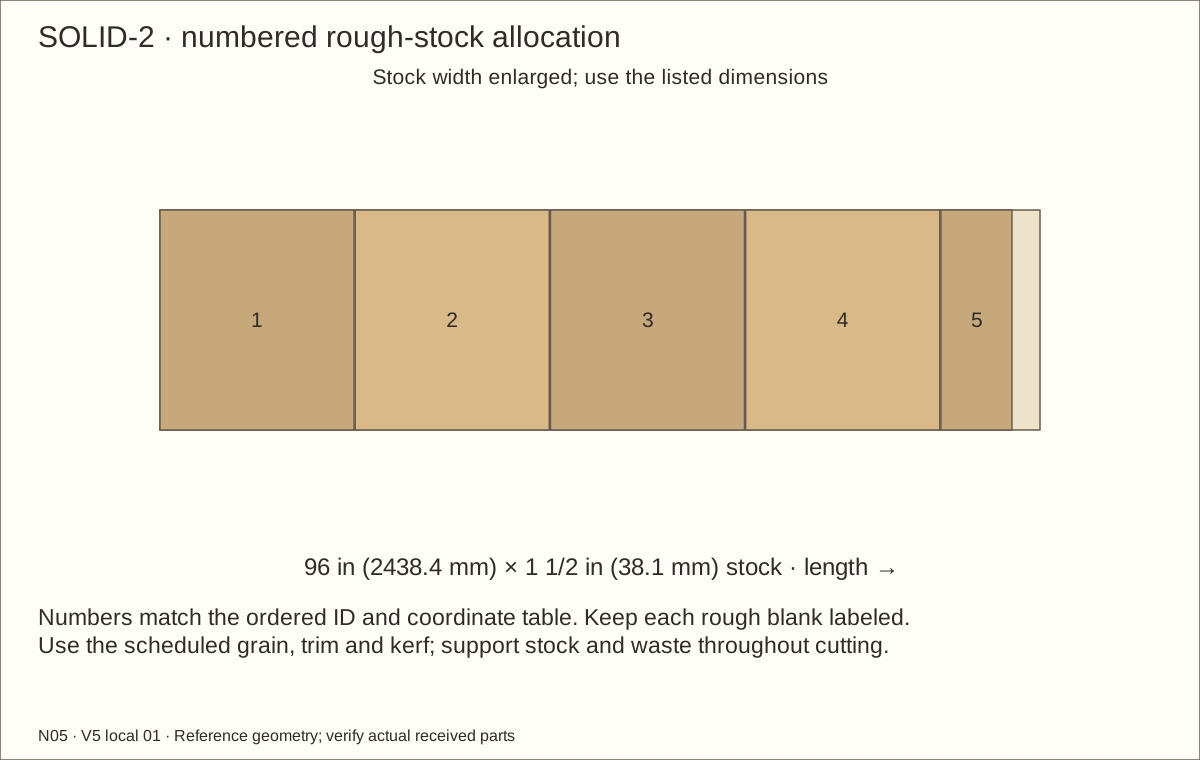
Follow the current SOLID layouts for CLB, CRB, CB, CT, CLU, CRU, CLT, CRT, RCLL and RCLR. Keep the full 1 1/2 in (38.1 mm) square solid section. Cut each named length from its own allocation; do not laminate thinner substitutes.
Check before continuing: All named full-section supports and frame/rail blanks match their allocations and grain direction.
Parts: Complete enclosure, support and received inventory, as described below
Tools / setup: Measuring tape, square, pencil and the tools named below
Before you begin: Plane broad supported stock first; never feed short thin strips alone.
Prepare the pine and thin strips — 2
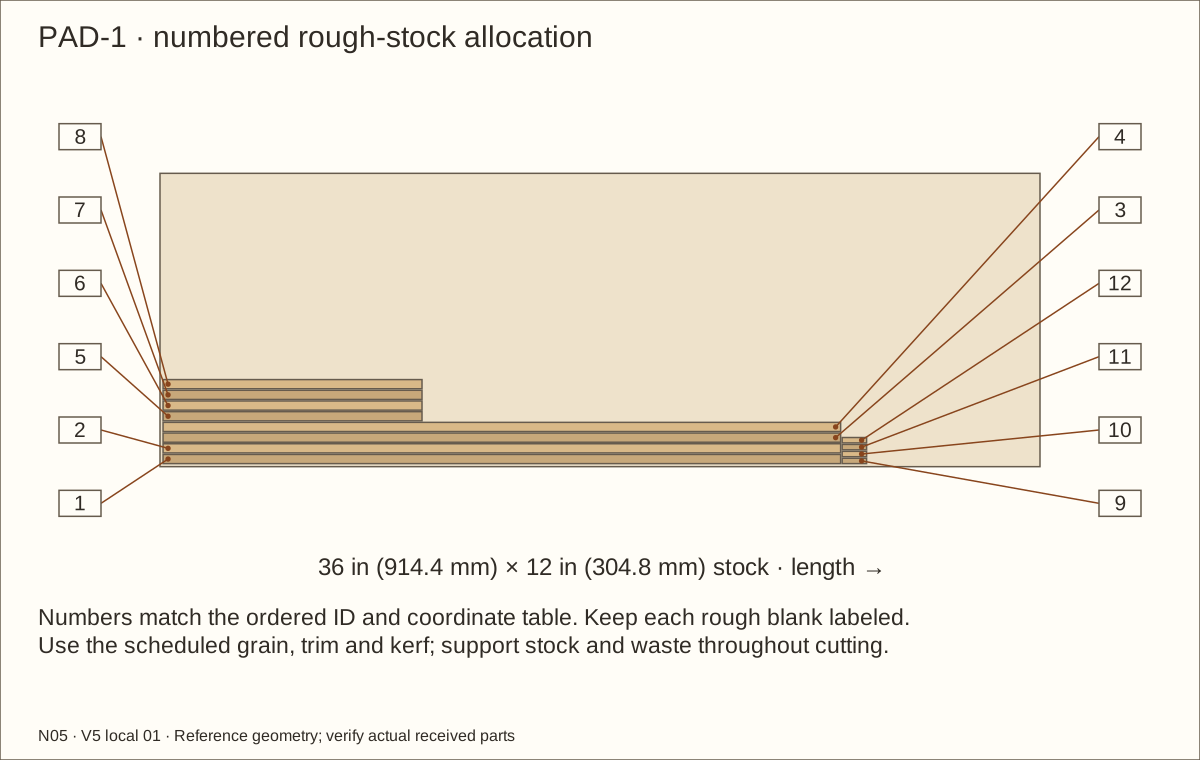
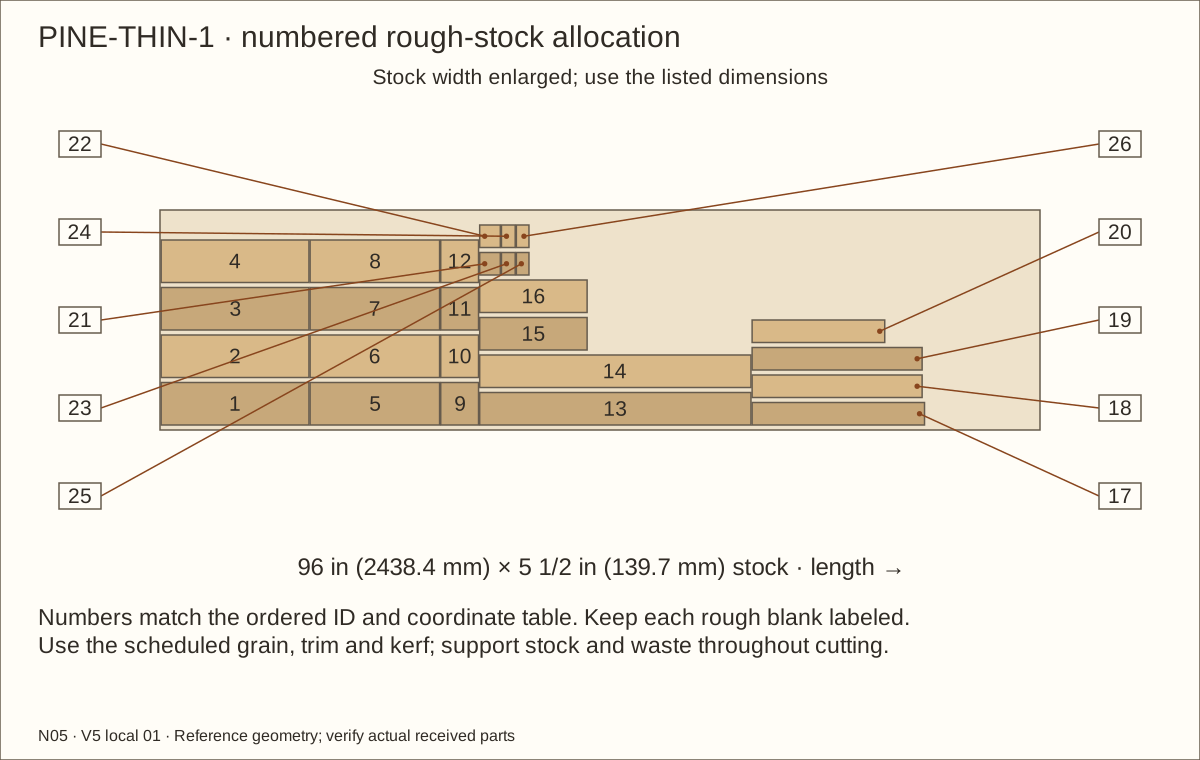
Use the PINE-THIN layouts to plane broad supported stock to 3/8 in (9.53 mm) before ripping the 1 in (25.4 mm) mesh captures and 1/2 in (12.7 mm) liner clamps. A rebate is a shallow pocket cut into a face: each wire capture needs the separate pocket operation below. Never feed a short finished strip into a thickness planer.
Prepare glazing spacers from 3/8 in (9.53 mm) rough thickness and removable beads from 1/4 in (6.35 mm) thickness before cutting narrow strips. Fit the spacer to the actual acrylic, pads and cured contact films; its reference bare depth is 0.351 in (8.92 mm). Preserve the listed spacer and bead widths. Use a qualified mill if the available guarded machine cannot safely support these cuts.
Check before continuing: All parts fit the current cutting layouts, with the required grain and saw-cut waste.
Tools / setup: Measuring tape, square, pencil and the tools named below
Before you begin: Glue is supplementary; every mechanical stitch is required. Keep fresh layers flat and unstressed.
Laminate the fixed front frame — 1
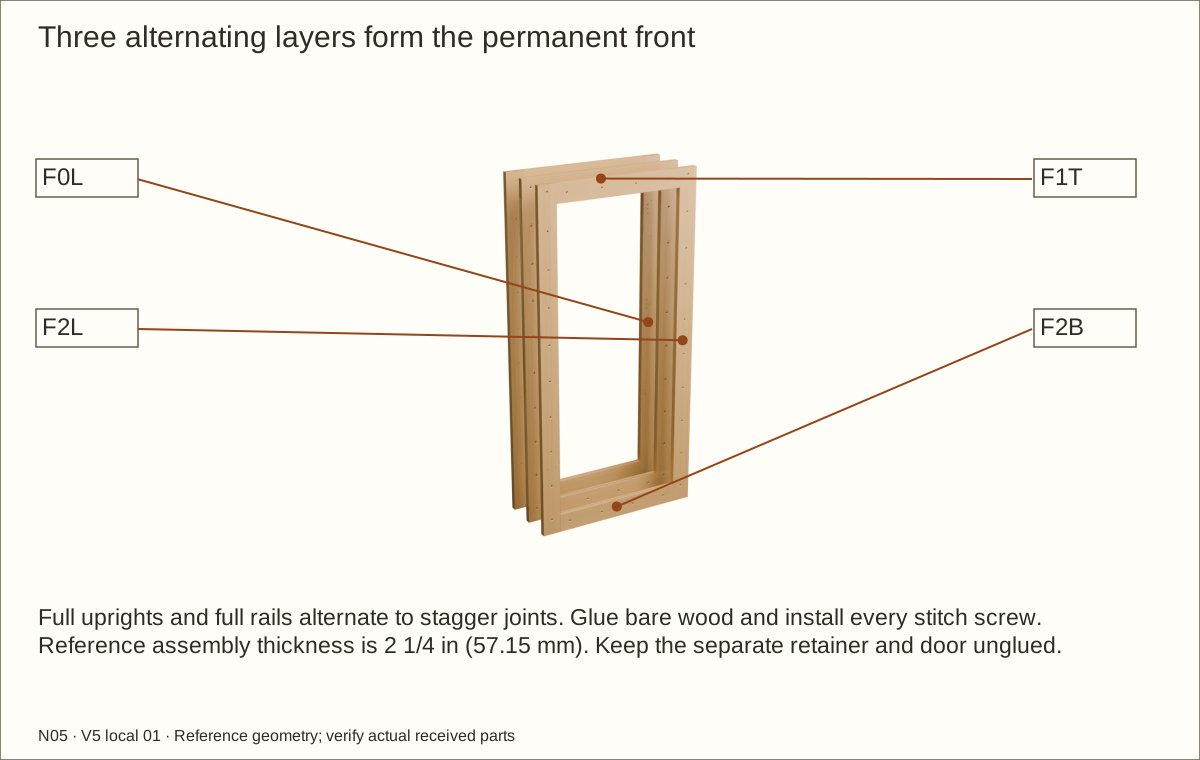
On a flat bench, dry-fit layers 1 and 3 with full-height uprights and rails between. Layer 2 has full-width rails and shorter uprights between them. All members are 2 1/2 in (63.5 mm) wide; no centre divider is used.
Dry-fit the fixed frame to 22 19/32 in (573.88 mm) wide × 46 19/32 in (1183.48 mm) high at the reference plywood gauge. Three 3/4 in (19.05 mm) layers make it 2 1/4 in (57.15 mm) deep. The clear bay is 17 19/32 in (446.88 mm) wide between 2 1/2 in (63.5 mm) jambs. Compare diagonals, transfer every stitch, clearance-drill only the incoming layer and stop pilots inside the receiver before covering the next interface.
Check before continuing: All three frame layers dry-fit flat and square with matched clearance and stopped pilot stations.
Tools / setup: Measuring tape, square, pencil and the tools named below
Before you begin: Glue is supplementary; every mechanical stitch is required. Keep fresh layers flat and unstressed.
Laminate the fixed front frame — 2
Apply Titebond III to one bare mating interface, clamp flat with straight clamping pads and fit all scheduled #8 × 1 1/4 in (31.75 mm) stitches before covering that interface. Repeat for the third layer. Prepare holes and clamps first: published open time is 8–10 minutes at 70°F (21°C) and 50% relative humidity.
Remove squeeze-out, compare diagonals and leave the assembly flat and unstressed at least 24 hours. The glue supplements the complete mechanical joints; it does not establish a structural rating.
Check before continuing: The frame is flat, square and 2 1/4 in (57.15 mm) deep, with all stitches installed.
Tools / setup: Measuring tape, square, pencil and the tools named below
Laminate the unglazed door frame — 1
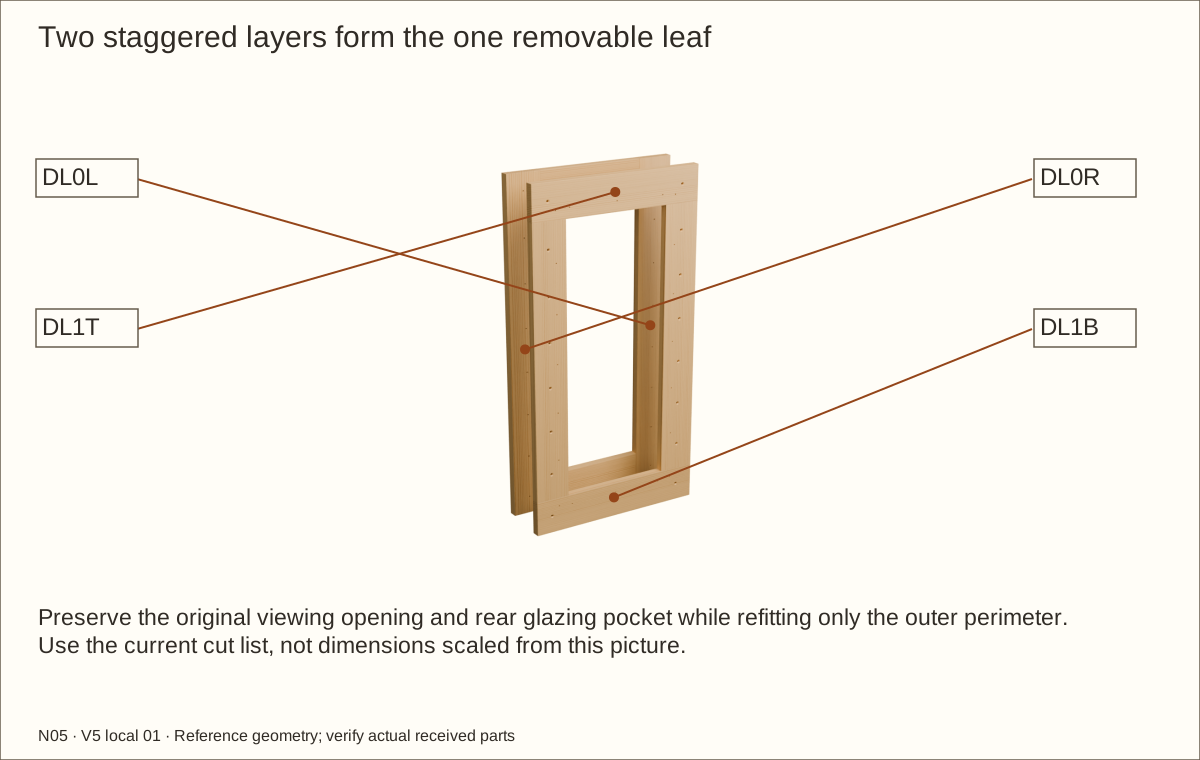
Prepare matching oversized door layers for the dry fit. After lamination and full cure, refit only the outer perimeter to 17 1/4 in (438.15 mm) wide × 33 19/32 in (853.28 mm) high. Keep the original 10 11/32 in (262.73 mm) × 26 23/32 in (678.66 mm) viewing opening and rear glazing datums. Bare gaps are 3/16 in (4.76 mm) at hinge/top/bottom and 5/32 in (3.97 mm) at the latch edge.
In the front layer, uprights run full height with rails between. In the rear layer, rails run full width with short uprights between. Check both diagonals and the sight opening in a flat jig.
Check before continuing: The two door layers dry-fit with staggered joints and unchanged glazing datums.
Tools / setup: Measuring tape, square, pencil and the tools named below
Laminate the unglazed door frame — 2
Transfer the rear-entry stitch stations, clearance-drill the rear layer and pilot the front layer. Apply glue to the bare interface, clamp and install all scheduled #8 × 1 1/4 in (31.75 mm) stitches. Complete the joint within the stated glue open time.
Clean squeeze-out and leave the leaf flat and unstressed for at least 24 hours. Keep glazing, spacers and beads off until the finished shell and hardware fit are proven.
Check before continuing: The door is a square, flat, 1 1/2 in (38.1 mm) thick frame with mechanically joined layers.
Tools / setup: Measuring tape, square, pencil and the tools named below
Before you begin: Keep retainer laminations distinct from the fixed frame. Do not glue the service joint.
Laminate the removable retaining panel — 1
Match RBL1/RBL2 face to face, then fit the two-layer panel to the actual bay. Keep 5/32 in (3.97 mm) bare side gaps, a level lower edge bearing on the fixed kick rail, and flat unveneered contact against the receivers.
Transfer the scheduled stitch grid. Clearance-drill the rear layer and make stopped pilots into the front layer. Trial the #8 × 1 1/4 in (31.75 mm) screws on matching offcuts, retaining at least 1/16 in (1.59 mm) front cover.
Check before continuing: The two retainer layers fit, and stitch pilots retain the required front cover.
Tools / setup: Measuring tape, square, pencil and the tools named below
Before you begin: Keep retainer laminations distinct from the fixed frame. Do not glue the service joint.
Laminate the removable retaining panel — 2
Apply glue, clamp with flat straight clamping pads and install every rear-entry stitch. Keep the panel independent from the fixed frame, bottom rail and receiver wood supports; no glue joins those service interfaces.
Clean squeeze-out and leave both mechanically stitched layers flat and unstressed for at least 24 hours, longer if conditions require. Reject a warped or failed bond before drilling the four connections. Do not glue the panel to the fixed frame.
Check before continuing: The panel consists of two flat plywood layers and remains separately removable.
Tools / setup: Measuring tape, square, pencil and the tools named below
Before you begin: Unresolved hardware/material holds stop the dependent operation.
Prove the received hardware on offcuts — 1
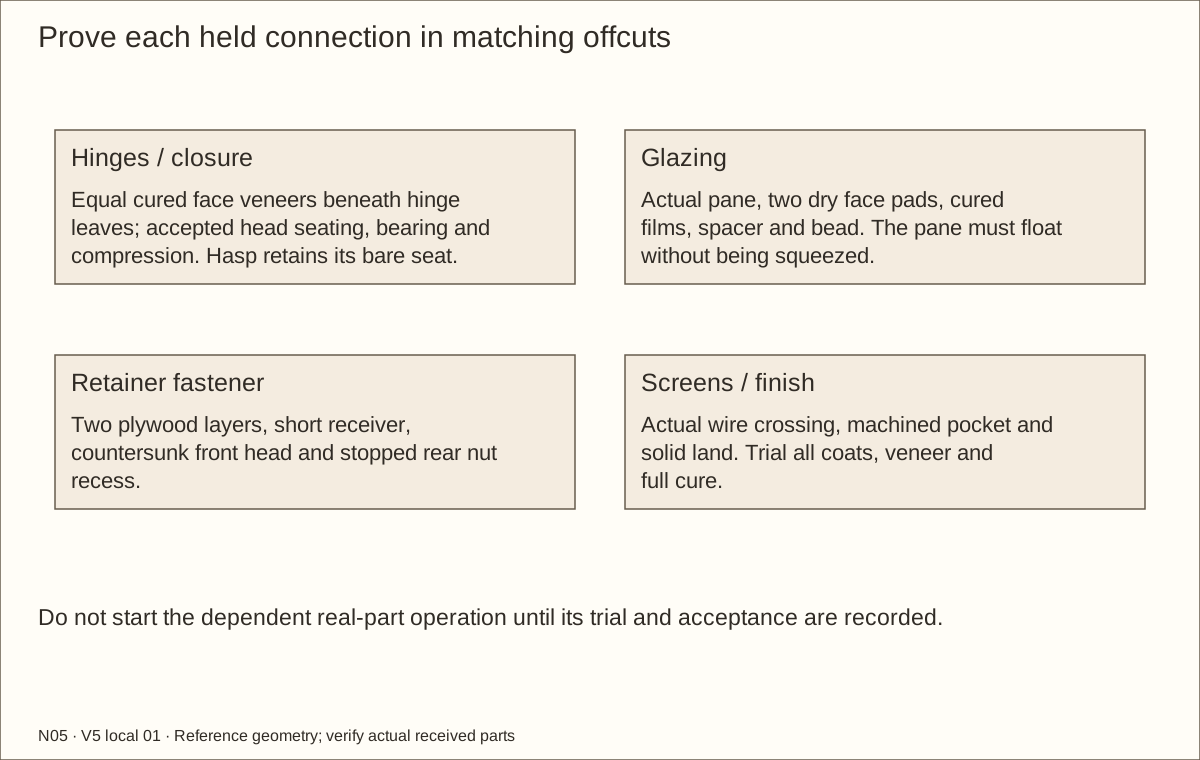
Make a hinge trial from matching offcuts at the intended finished gaps. Apply the accepted cured veneer sample continuously beneath both hinge leaves. Move both halves and the hinge axis forward by that measured face stack, 0.0305 in (0.77 mm) at reference. Obtain acceptance for full bearing, bond and compression before drilling; unequal or compressible layers require redesign. Fit the actual LSX-100R and six #6 × 1 1/4 in (31.75 mm) screws only after their head seating is accepted. Do not countersink the hinge without manufacturer approval. Pilot with a depth stop and check covered tips.
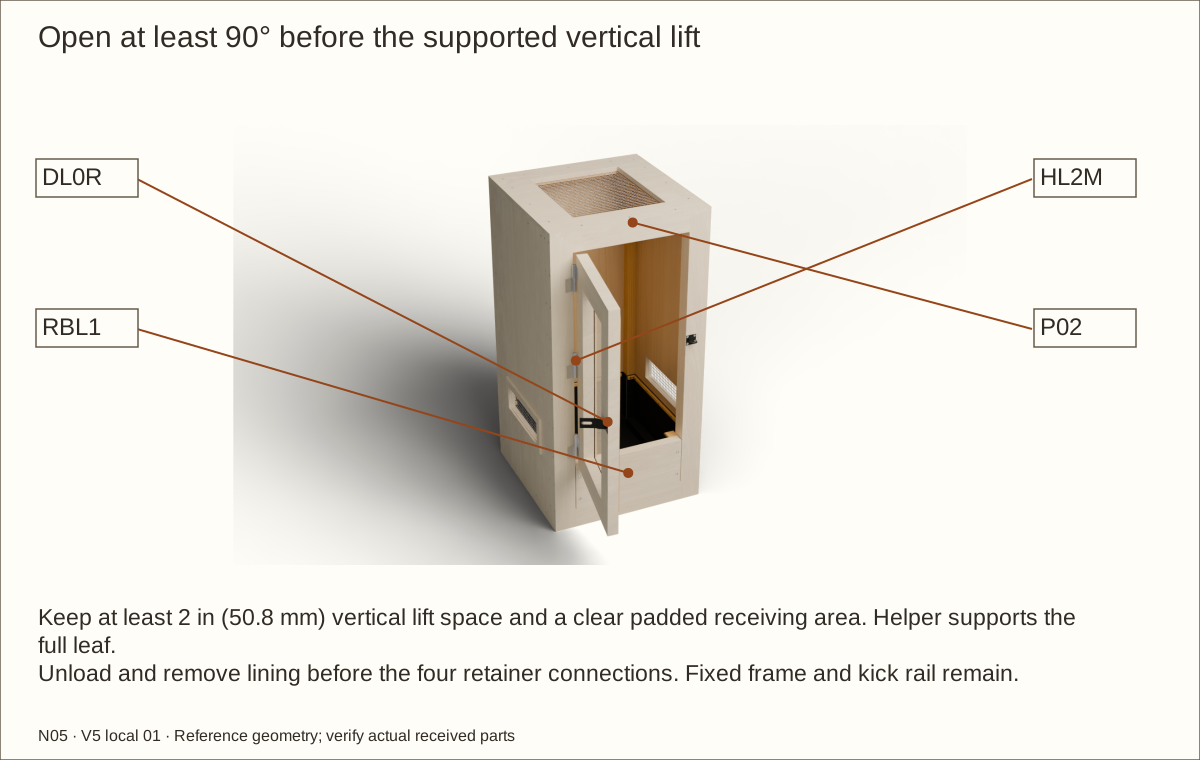
Keep the fixed pin pointing up below the moving socket. Prove a 100° outward swing and 2 in (50.8 mm) lift after opening at least 90°. Measure the actual pin engagement; the published about 1 3/4 in (44.45 mm) projection is a reference.
Check before continuing: The accepted hinge trial proves bearing, head seating, supported swing and lift-off access.
Tools / setup: Measuring tape, square, pencil and the tools named below
Before you begin: Unresolved hardware/material holds stop the dependent operation.
Prove the received hardware on offcuts — 2
Make a removable glazing trial with frame, actual acrylic, two dry uncompressed face pads, spacer and rear bead. Include cured films on the opposing wood contacts. Plane the spacer from 3/8 in (9.53 mm) rough stock until the installed bead bears on wood and just contacts the pads without bowing or trapping the pane. Leave the edge movement gap open.
Trial a complete flush retainer connection through two actual plywood offcuts and one 1 1/2 in (38.1 mm) square receiver. Use Bolt Depot 9787 1/4-20 × 2 3/4 in (69.85 mm) Phillips flat-head screw, 16019 washer and 16008 nylon locknut. The length includes the head. Confirm the received 82° head, #3 Phillips drive, washer no thicker than 1/16 in (1.59 mm) and 0.298 in (7.57 mm)–0.328 in (8.33 mm) nut before drilling real parts.
Check before continuing: Glazing and complete retainer samples fit received parts with the required bearing and tip cover.
Tools / setup: Measuring tape, square, pencil and the tools named below
Before you begin: Unresolved hardware/material holds stop the dependent operation.
Prove the received hardware on offcuts — 3
Transfer the TK-400 furniture bracket to an offcut matching the solid rear rail. Trial its received short screws; confirm they remain within the rail and both clevis/keeper assemblies engage the cable eyes.
Check before continuing: Hardware, glazing and restraint trials fit the actual supplied products.
Tools / setup: Measuring tape, square, pencil and the tools named below
Attach the bottom wood supports — 1
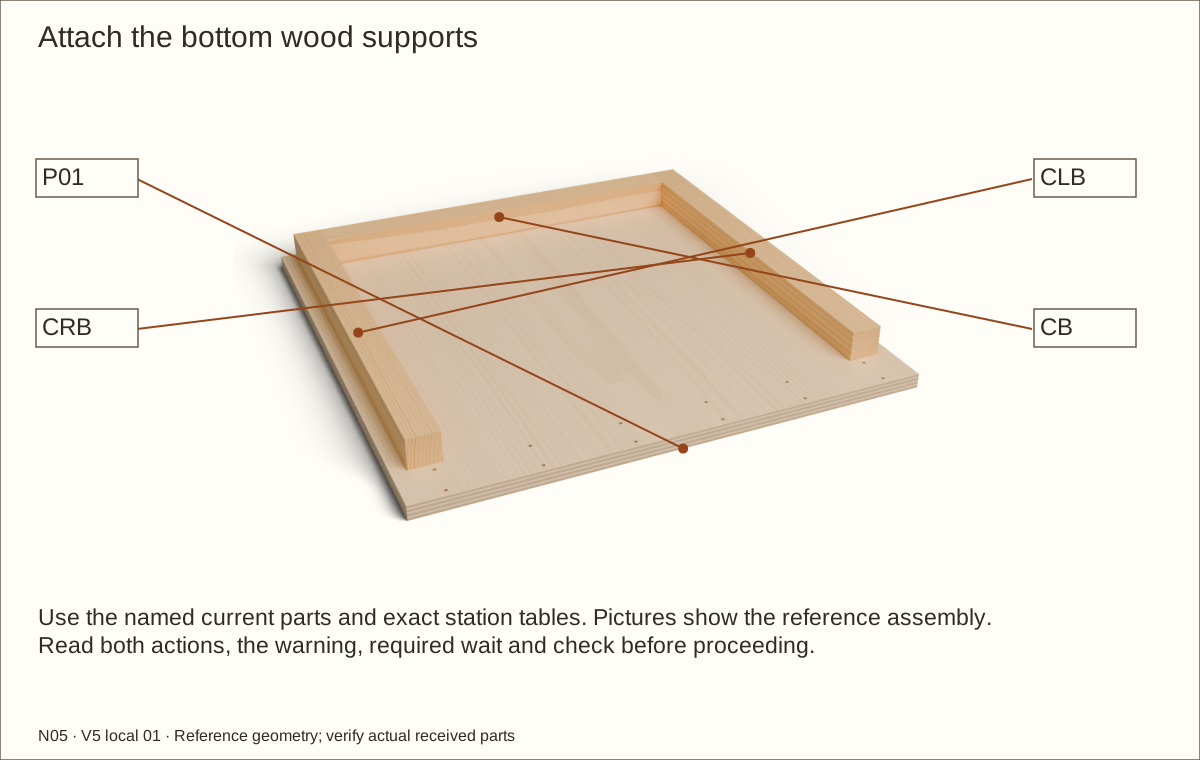
Place P01 on a sacrificial support. Locate CLB and CRB one plywood thickness from the side edges, beginning 2 1/4 in (57.15 mm) behind the front for the fixed frame. Fit CB between them at the back-panel position.
Transfer the matching named-part stations from the current workshop table. Drill 11/64 in (4.37 mm) clearance through the plywood only and stopped 7/64 in (2.78 mm) pilot holes into pine, adjusted after an offcut trial.
Check before continuing: Bottom supports sit on the correct side of P01 and the planned clearance and pilot stations match.
Tools / setup: Measuring tape, square, pencil and the tools named below
Attach the bottom wood supports — 2
Glue these three bare floor-wood support interfaces, clamp and drive #8 × 1 1/4 in (31.75 mm) screws from underneath. Seat heads flush so the floor has continuous bearing.
Check the front and rear recesses, clean squeeze-out and leave the floor flat and unstressed through the glue cure.
Check before continuing: The wood supports are square and the floor underside bears fully on its support.
Tools / setup: Measuring tape, square, pencil and the tools named below
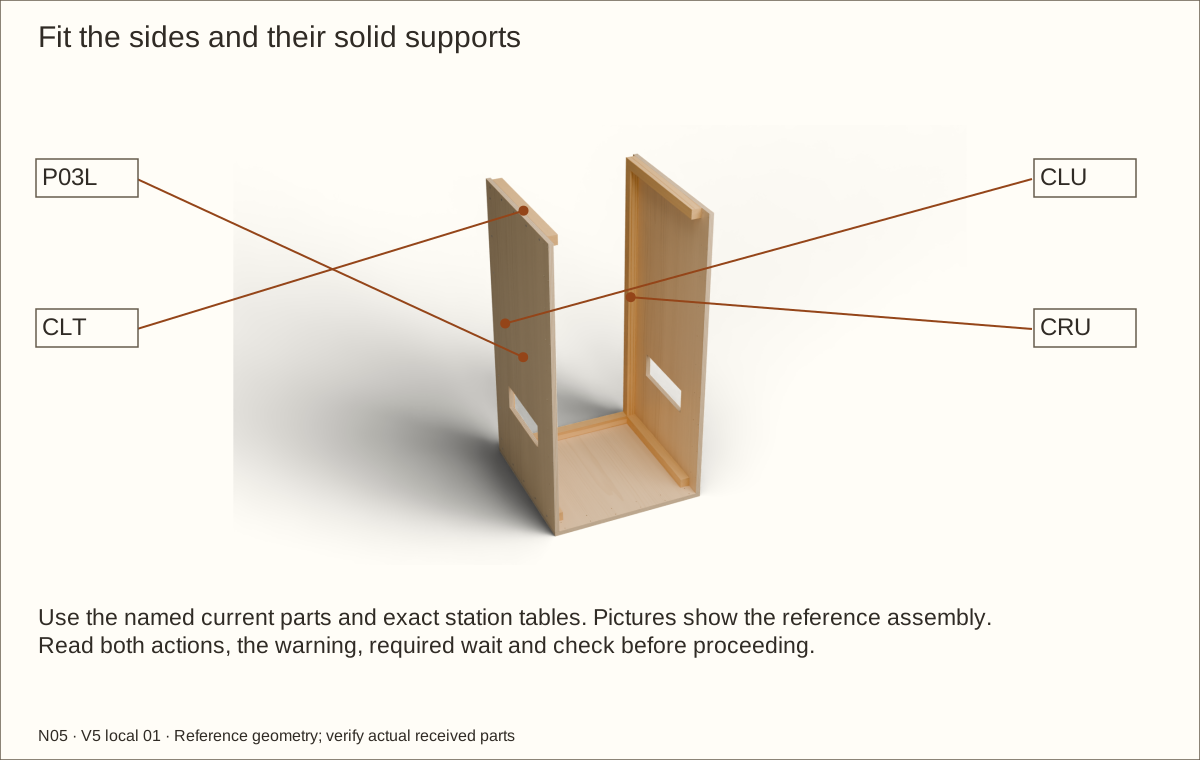
Fit the sides and their solid supports — 1
Clamp each rear upright between its lower and upper wood supports. Upper wood supports begin 2 1/4 in (57.15 mm) behind the front and stop at the inner back-panel face.
With a helper, stand each wall on P01, flush at the outer side and front edges. Clamp it to its bottom wood support and maintain temporary bracing; do not leave a tall wall unsupported.
Check before continuing: Both tall walls are square, supported and temporarily braced before further fastening.
Tools / setup: Measuring tape, square, pencil and the tools named below
Fit the sides and their solid supports — 2
Transfer the scheduled stations through each wall. Clearance-drill the plywood and make stopped pilots into the named solid receiver. Preserve the offsets from the future back screws.
Install #8 × 1 1/4 in (31.75 mm) screws and finish tightening by hand. Keep these trial joints dry so they can be opened for finishing.
Check before continuing: Both walls are parallel and securely held, with covered screw tips.
Tools / setup: Measuring tape, square, pencil and the tools named below
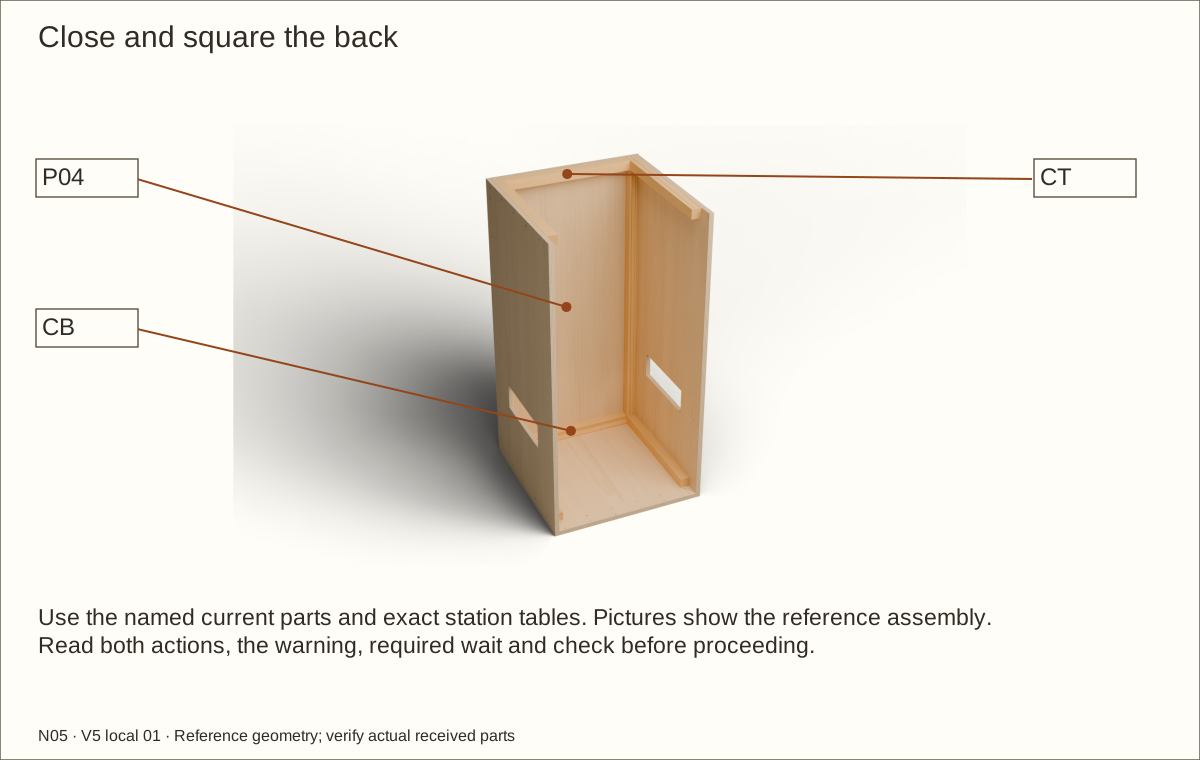
Close and square the back — 1
Set P04 between the sides, on the floor and flush with their rear edges. Clamp it to CB, CT and both rear uprights.
Compare front and rear diagonals, making each pair equal within 1/16 in (1.59 mm). Correct the support if it twists the shell; screws must not force a distorted assembly square.
Check before continuing: Front and rear diagonal pairs agree before final tightening of the back.
Tools / setup: Measuring tape, square, pencil and the tools named below
Close and square the back — 2
Transfer the back stations, clearance-drill P04 and make stopped pilots into the receivers. The side/back offsets in the schedule keep screw shafts separate.
Fit #8 × 1 1/4 in (31.75 mm) screws, release the clamps and recheck diagonals, bearing and temporary stability. Keep the shell supported until the restraint is complete.
Check before continuing: The back braces a square shell with full floor bearing.
Tools / setup: Measuring tape, square, pencil and the tools named below
Before you begin: Keep the tall shell safely braced and supported until the complete furniture-to-wall restraint is installed and checked. The kit rating does not rate this wood assembly or wall.
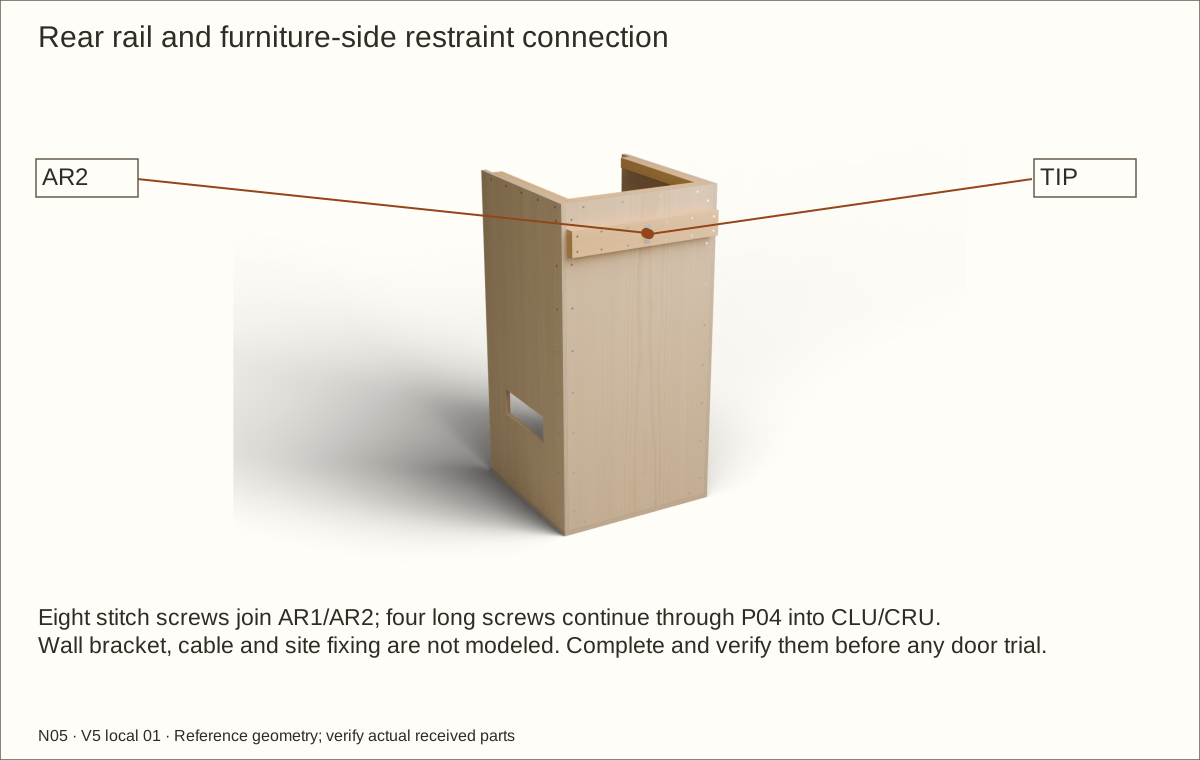
Fit the rear rail and wall restraint — 1
Dry-stack AR1 and AR2 to make a 1 1/2 in (38.1 mm) thick solid-pine rail. Transfer the eight rear-entry stitch positions, clearance-drill the outer layer and pilot the inner. Glue, clamp and install the eight #8 × 1 1/4 in (31.75 mm) stitches; allow at least 24 hours unstressed cure.
Place the rail outside the back, between the side-panel edges, with its lower edge 40 1/2 in (1028.7 mm) above the floor underside. At the four scheduled rail-to-post stations, drill clearance through both rail layers and P04, then stopped pilots into CLU and CRU. Fit four #8 × 3 in (76.2 mm) screws. No rail attachment relies on plywood alone.
Check before continuing: The cured rear rail is securely fastened through the back into both solid rear posts.
Required wait: Rail glue: at least 24 hours unstressed before attaching the rail or loading its connection.
Tools / setup: Measuring tape, square, pencil and the tools named below
Before you begin: Keep the tall shell safely braced and supported until the complete furniture-to-wall restraint is installed and checked. The kit rating does not rate this wood assembly or wall.
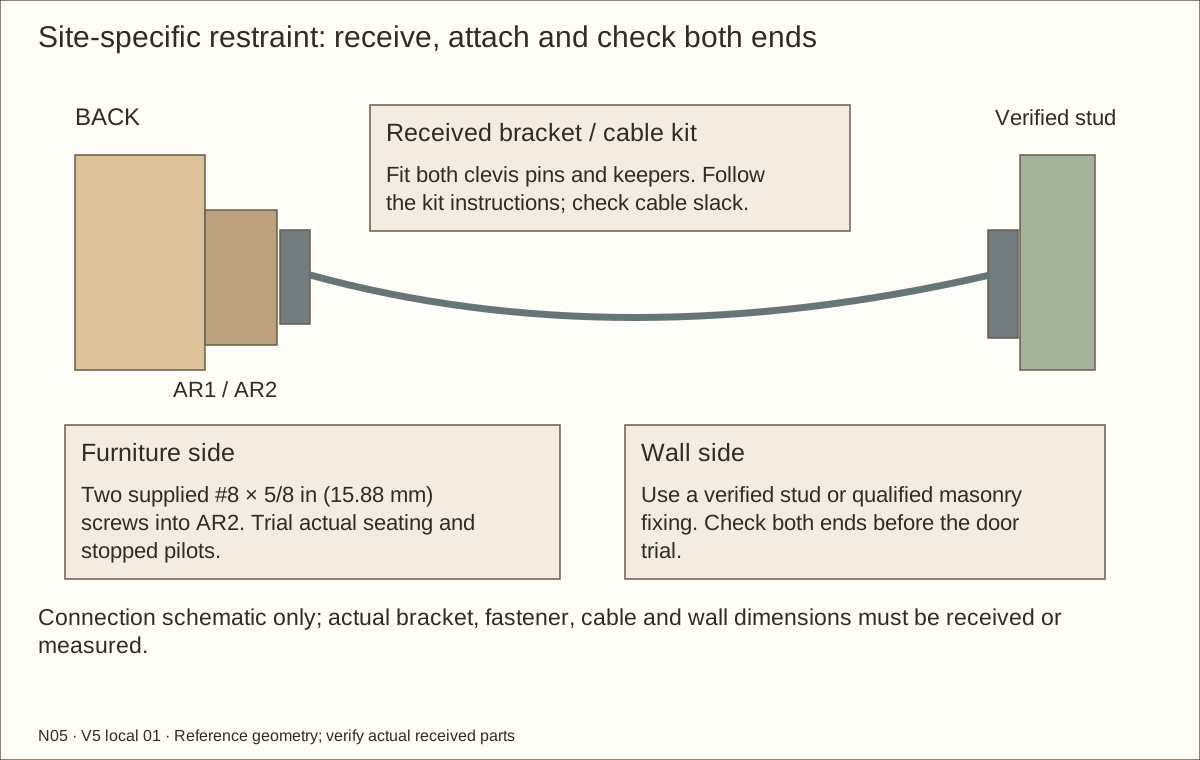
Fit the rear rail and wall restraint — 2
Centre the received furniture bracket on the rail, within its full 3 1/2 in (88.9 mm) height. Transfer its actual holes, trial the short screws and fit both supplied #8 × 5/8 in (15.88 mm) furniture screws into solid wood. The nominal model locations are not a drilling template.
At the final supported position, locate the centre of a verified sound wall stud and check the path for hidden services. Position the wall bracket to suit the received 6 in (152.4 mm) cable without excessive slack or a forced bend. Follow the supplied pilot and mounting instructions, using both longer kit screws into the stud. Have a qualified installer resolve masonry or an unsuitable wall; do not fasten to drywall alone.
Check before continuing: Both restraint brackets are securely fixed to accepted wood and wall structure before cable assembly.
Tools / setup: Measuring tape, square, pencil and the tools named below
Before you begin: Keep the tall shell safely braced and supported until the complete furniture-to-wall restraint is installed and checked. The kit rating does not rate this wood assembly or wall.
Fit the rear rail and wall restraint — 3
Connect the cable eyes to both brackets with the supplied clevis pins and fully engage both keeper pins. Pull-check each connection and verify the shell remains fully supported. Record the actual wall fixing and bracket fit. The restraint prevents tipping; it is not a lifting, suspension or load-rating device.
Check before continuing: The rail reaches both solid rear posts and the complete wall restraint is engaged before door trials.
Required wait: Rail glue: at least 24 hours unstressed
Tools / setup: Measuring tape, square, pencil and the tools named below
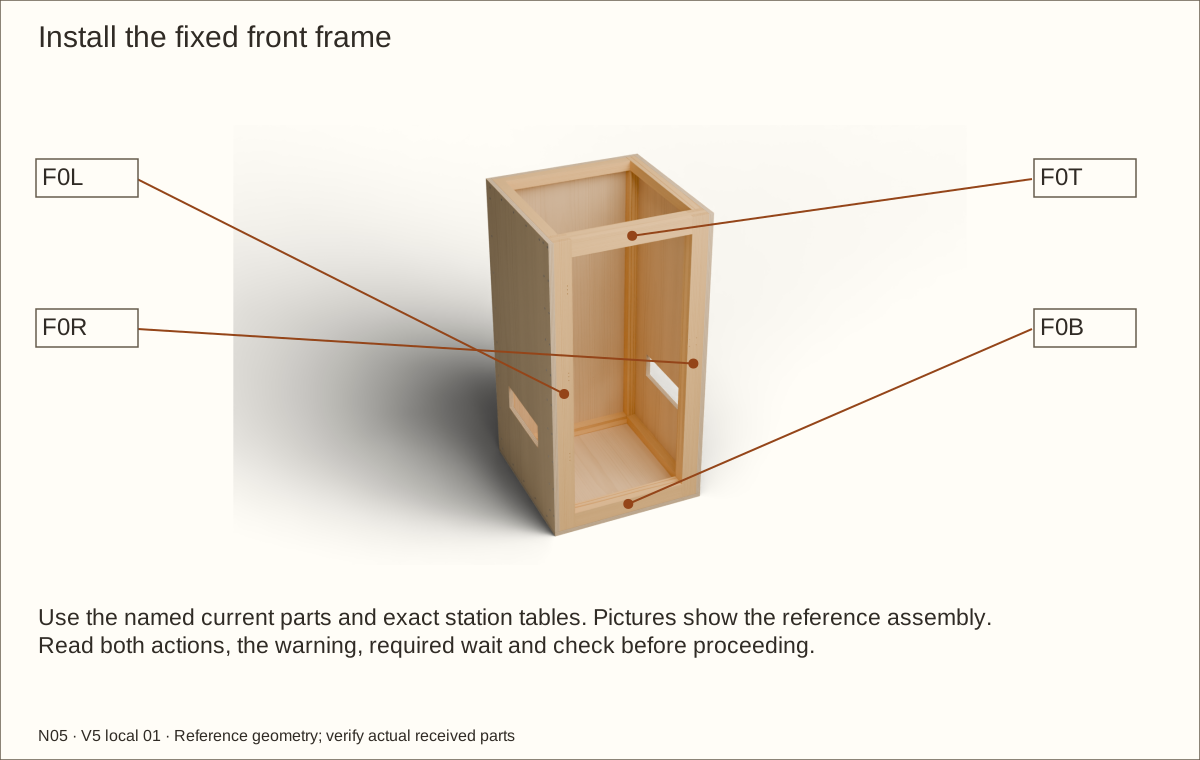
Install the fixed front frame — 1
With a helper, set the cured three-layer frame into its 2 1/4 in (57.15 mm) front recess on P01. Keep its front flush with the sides and clamp it square.
Check the single bay width, diagonals and top bearing plane. The side panels overlap the jamb ends. Keep the frame-to-shell joint dry during this trial.
Check before continuing: The cured fixed front sits square and flush with its measured bay and top bearing plane.
Tools / setup: Measuring tape, square, pencil and the tools named below
Install the fixed front frame — 2
Use the scheduled side stations: clearance through P03L/P03R, stopped pilots into the jambs and #8 × 2 in (50.8 mm) screws. Their vertical offsets avoid the layer stitches; do not replace them with a uniform improvised grid.
With the empty shell safely supported and restrained, access the floor stations from underneath and fasten the bottom rail with #8 × 2 in (50.8 mm) screws. Arrange bench access before positioning; if relocation is necessary, remove the unglazed door, keep the empty shell supported and reconnect the restraint before further trials.
Check before continuing: The single opening is square and the permanent frame has all side and floor attachments.
Tools / setup: Measuring tape, square, pencil and the tools named below
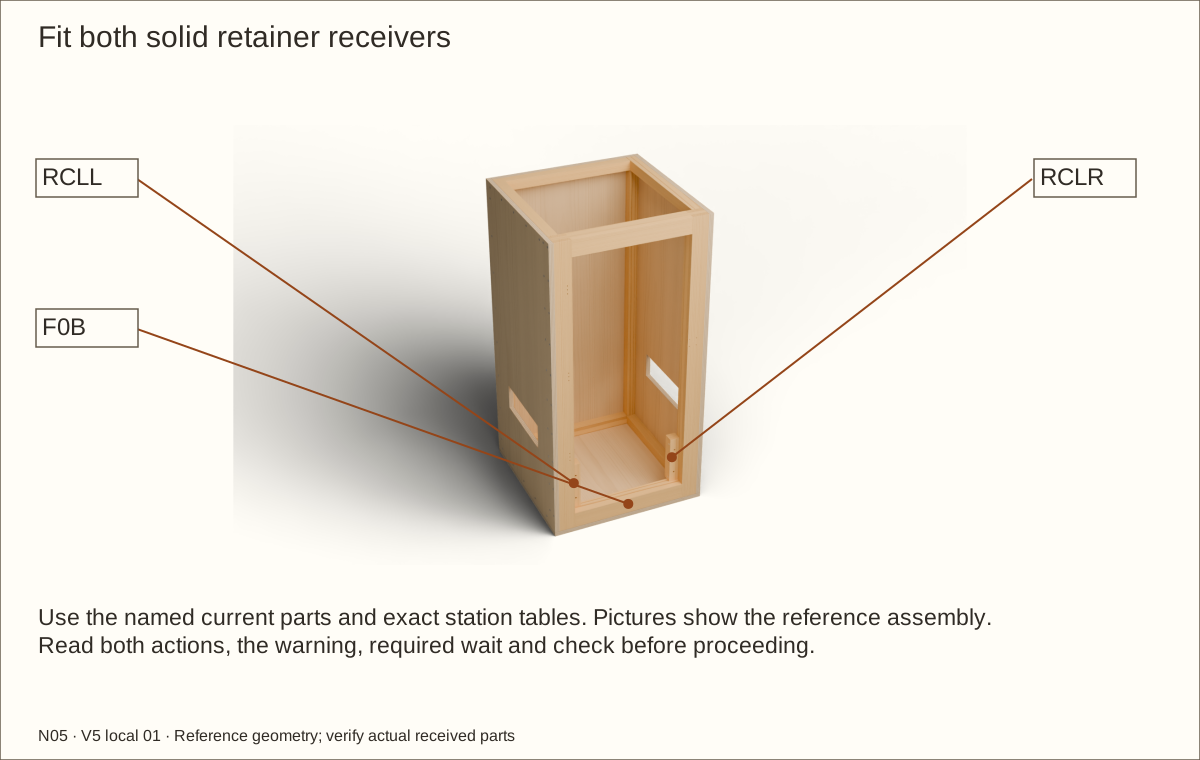
Fit both solid retainer receivers — 1
Fit RCLL/RCLR behind the panel bay on the fixed bottom rail, against the laminated jambs. Their fronts begin 1 13/32 in (35.72 mm) behind FRONT, directly behind the two retainer layers. Keep the hidden contact faces sealed and free of veneer.
Mark the three sideways screw centres per receiver at +3 in (76.2 mm), +6 in (152.4 mm) and +9 in (228.6 mm) above the finished floor. Transfer the exact depth line from the station schedule.
Check before continuing: Both receivers bear on the kick rail and their sideways screw and bolt routes are unobstructed.
Tools / setup: Measuring tape, square, pencil and the tools named below
Fit both solid retainer receivers — 2
Clearance-drill the receivers, make stopped pilots into the three-layer jamb and fit six #8 × 3 in (76.2 mm) screws. Each traverses the 1 1/2 in (38.1 mm) receiver and engages the jamb; do not substitute shorter shell screws.
Check the receivers are straight and immobile. Keep the future +4 in (101.6 mm) and +8 in (203.2 mm) bolt paths free and ease sharp edges beneath the lining.
Check before continuing: Each receiver has three screws and two unobstructed future bolt routes.
Tools / setup: Measuring tape, square, pencil and the tools named below
Before you begin: Never remove any connection when the bed or any water remains. Keep recess depth and washer bearing as specified.
Through-bolt the removable retainer — 1
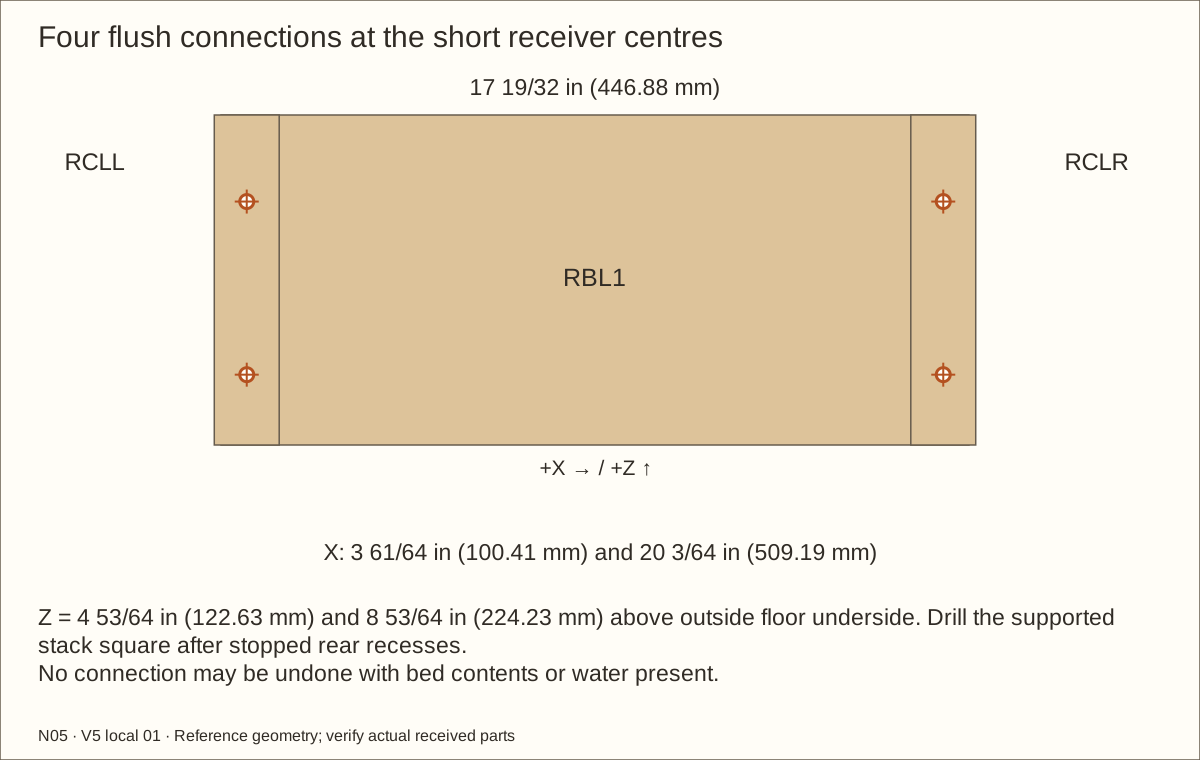
Set the cured retainer on the kick rail with its front flush and top 10 in (254 mm) above the finished-floor mark. Clamp it flat against both receivers with 5/32 in (3.97 mm) bare side gaps. Four connection centres are X = 3 61/64 in (100.41 mm) and 20 3/64 in (509.19 mm), at each of Z = 4 53/64 in (122.63 mm) and 8 53/64 in (224.23 mm) from the floor underside. These are 4 in (101.6 mm) and 8 in (203.2 mm) above the reference finished floor.
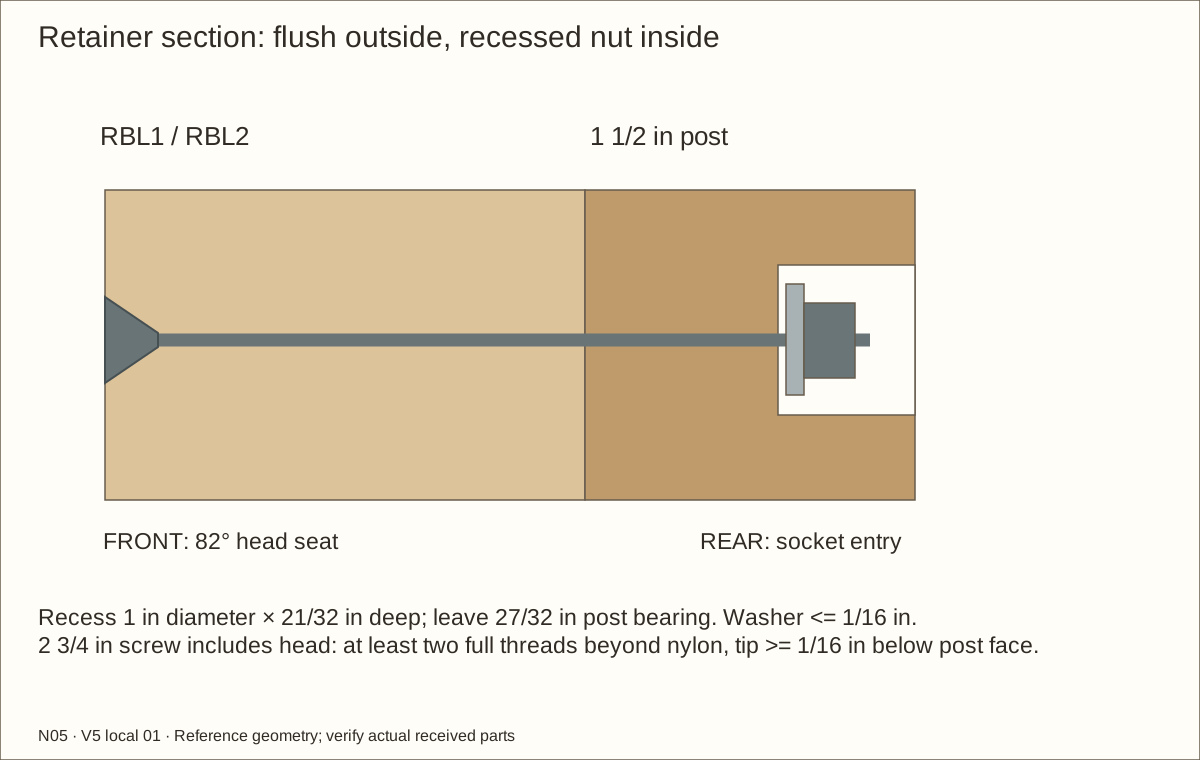
With each loose receiver squarely clamped under a stopped flat-bottom bit, make two 1 in (25.4 mm)-diameter recesses from its rear face, 21/32 in (16.67 mm) deep. Leave 27/32 in (21.43 mm) of receiver bearing thickness. Reassemble and clamp the matched stack; drill backed 9/32 in (7.14 mm) through bores. Never hand-hold a short piece under the bit.
Check before continuing: The matched recesses and through bores are square; both receivers retain the scheduled bearing wood.
Tools / setup: Measuring tape, square, pencil and the tools named below
Before you begin: Never remove any connection when the bed or any water remains. Keep recess depth and washer bearing as specified.
Through-bolt the removable retainer — 2
Countersink only the front plywood for the actual 82° flat head. The head finishes flush with bare wood, beneath the veneer face; preserve a 1/2 in (12.7 mm) circular service opening in the veneer. Insert each 2 3/4 in (69.85 mm) machine screw from the front, then fit its washer and nylon locknut inside the rear recess. Use the #3 Phillips drive and actual 7/16 in (11.11 mm) socket; socket outside diameter must not exceed 7/8 in (22.23 mm) for this reference recess.
Support the panel and hand-tighten evenly without crushing wood or forcing stainless threads that begin to seize. Require two complete threads beyond the nylon ring and at least 1/16 in (1.59 mm) between the screw tip and receiver rear face. Trial access before lining. Do not deepen a recess, omit a washer or cut an incorrect screw to make the stack fit. All four complete connections remain installed whenever contents or liquid are present.
Check before continuing: All four flush heads are accessible; complete recessed nut stacks have two exposed threads and covered rear tips.
Tools / setup: Measuring tape, square, pencil and the tools named below
Fit the unglazed leaf to its opening — 1
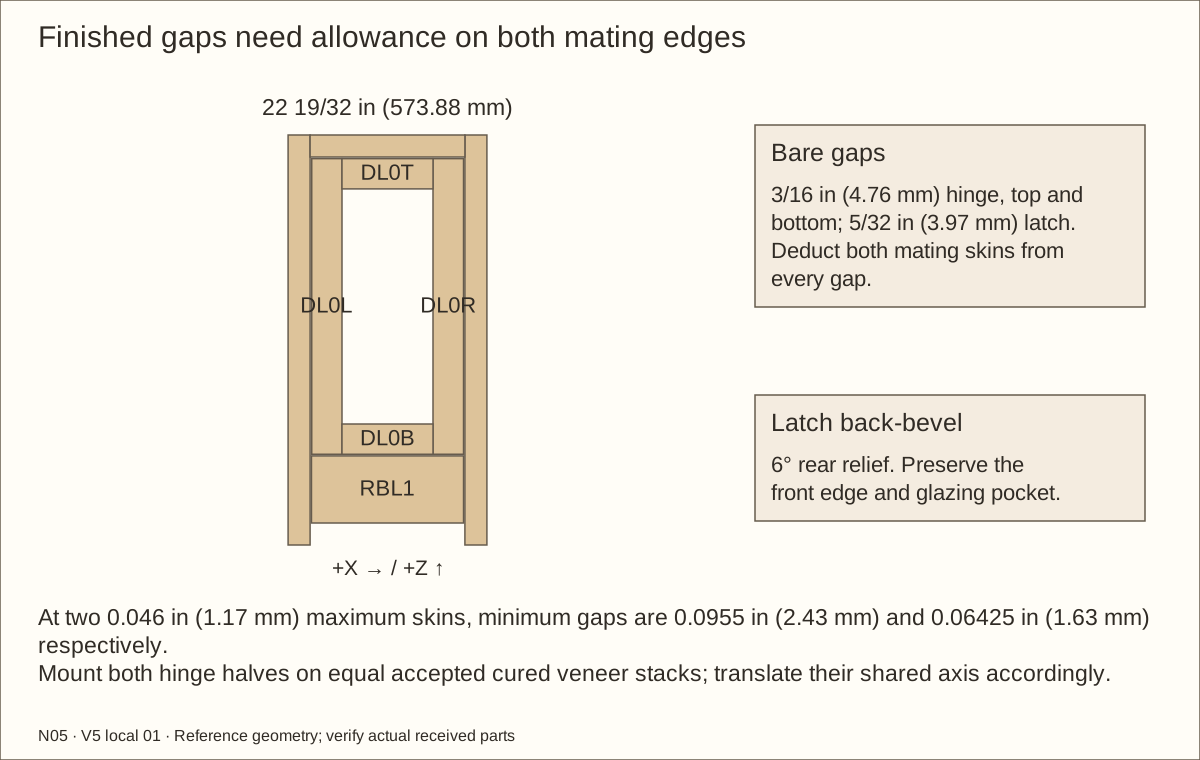
After the fixed frame and retainer are secure, fit the cured door at 3/16 in (4.76 mm) bare hinge/top/bottom gaps and 5/32 in (3.97 mm) bare latch gap. Keep its front face flush. Reference 0.0305 in (0.77 mm) layers on both mating edges leave about 0.1265 in (3.21 mm) and 0.09525 in (2.42 mm) gaps; maximum 0.046 in (1.17 mm) layers leave 0.0955 in (2.43 mm) and 0.06425 in (1.63 mm). Recalculate actual measured layers.
Compare door and bay diagonals before trimming. Use a supported jig to back-bevel only the latch edge 6° away from the fixed jamb, keeping the front edge at its scheduled position. A back-bevel means the rear edge is slightly narrower than the front, providing swing clearance. Preserve the full glazing pocket and all receiving wood.
Check before continuing: The reference and actual finished gaps are recorded; the viewing opening and rear pocket remain unchanged.
Tools / setup: Supported router jig, depth stop, actual wire and cured film sample
Before you begin: Qualify the actual cut wire edges and coating before assembly.
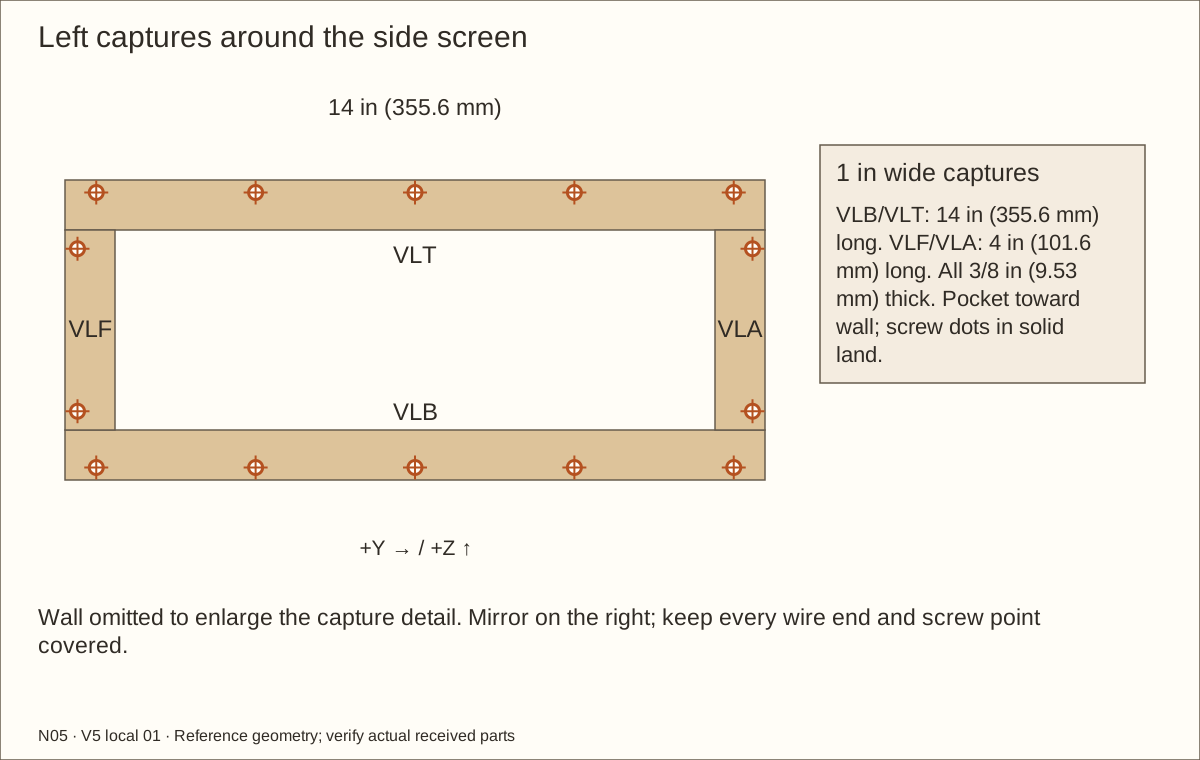
Route the side-capture wire pockets
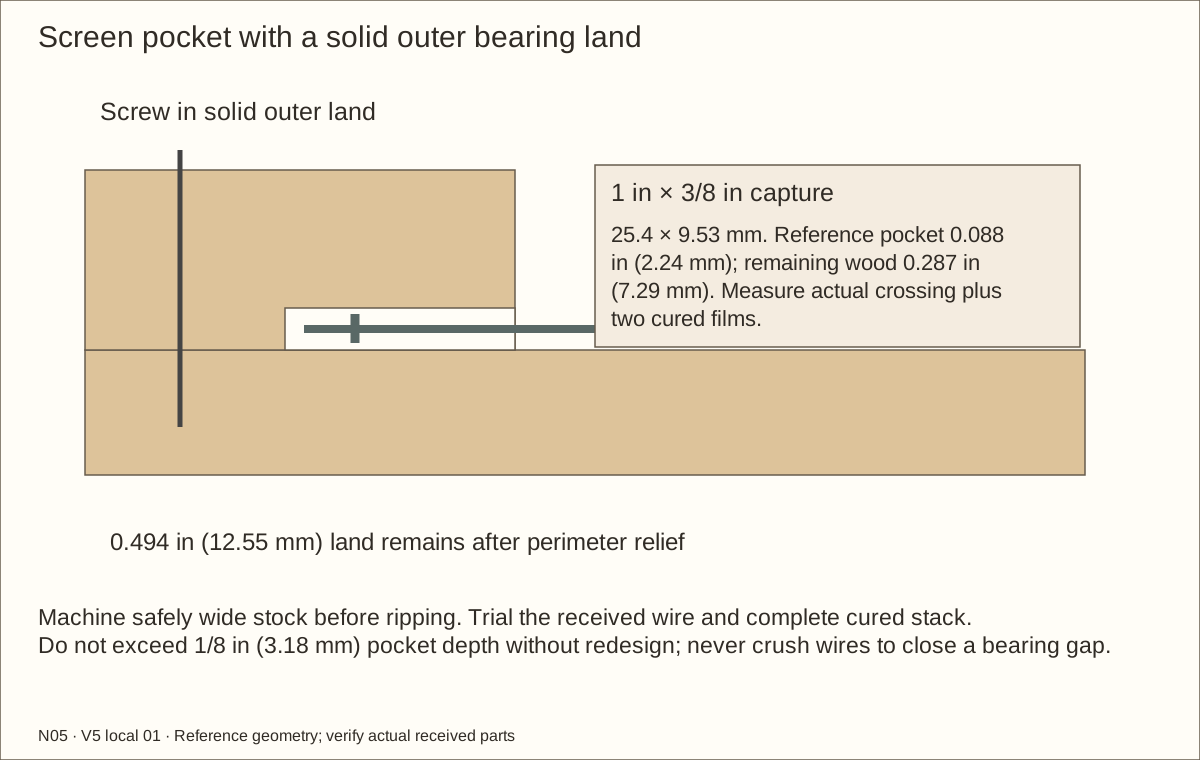
On the broad 3/8 in (9.53 mm) capture stock, lay out the pocket and separate outside bearing land. Route the wall-facing rebate with a supported guide and depth stop; do not hand-hold a loose narrow piece. Reference depth is 0.088 in (2.24 mm) for 0.082 in (2.08 mm) crossing wire plus 0.006 in (0.15 mm) cured films.
Trial the actual wire and film. Each widened 1 in (25.4 mm) capture must lie flat on its solid 0.494 in (12.55 mm) reference outer land, enclosing every cut wire end. The rebate cannot exceed 1/8 in (3.18 mm) without redesign. Drill screws through the separate land, never through wire.
Check before continuing: Capture bears flat; wire and screw paths are separate.
Tools / setup: Measuring tape, square, pencil and the tools named below
Capture both side-vent meshes — 1
Cut two 13 in (330.2 mm) × 5 in (127 mm) mesh blanks. Flatten their edges and remove loose wire ends with appropriate hand and eye protection.
Centre each 13 in (330.2 mm) × 5 in (127 mm) blank from outside for 1/2 in (12.7 mm) overlap beyond the original opening. Dry-seat the four widened 1 in (25.4 mm) captures with their wire pockets facing the wall; the 0.494 in (12.55 mm) reference outer land must touch solid wood. Keep all cut wire ends inside the pocket and no veneer beneath this bearing.
Check before continuing: Every cut wire edge stays inside its capture pocket and the solid outer lands bear on wood.
Tools / setup: Measuring tape, square, pencil and the tools named below
Capture both side-vent meshes — 2
Use the revised outer-land stations, clear of all wire. Clearance-drill the capture, make stopped #6 pilots into the wall, then fit #6 × 1 in (25.4 mm) screws flush at the bare wood face. Keep the head drive accessible through the veneer and at least 1/16 in (1.59 mm) interior tip cover. Do not force a strip over a wire crossing.
Check the complete captured perimeter for loose or accessible sharp wire. A later finer containment screen needs its own retained mounting and ventilation review.
Check before continuing: Both meshes are securely captured and the inner reveals remain smooth.
Tools / setup: Supported router jig, depth stop and sample
Route the roof-capture wire pockets
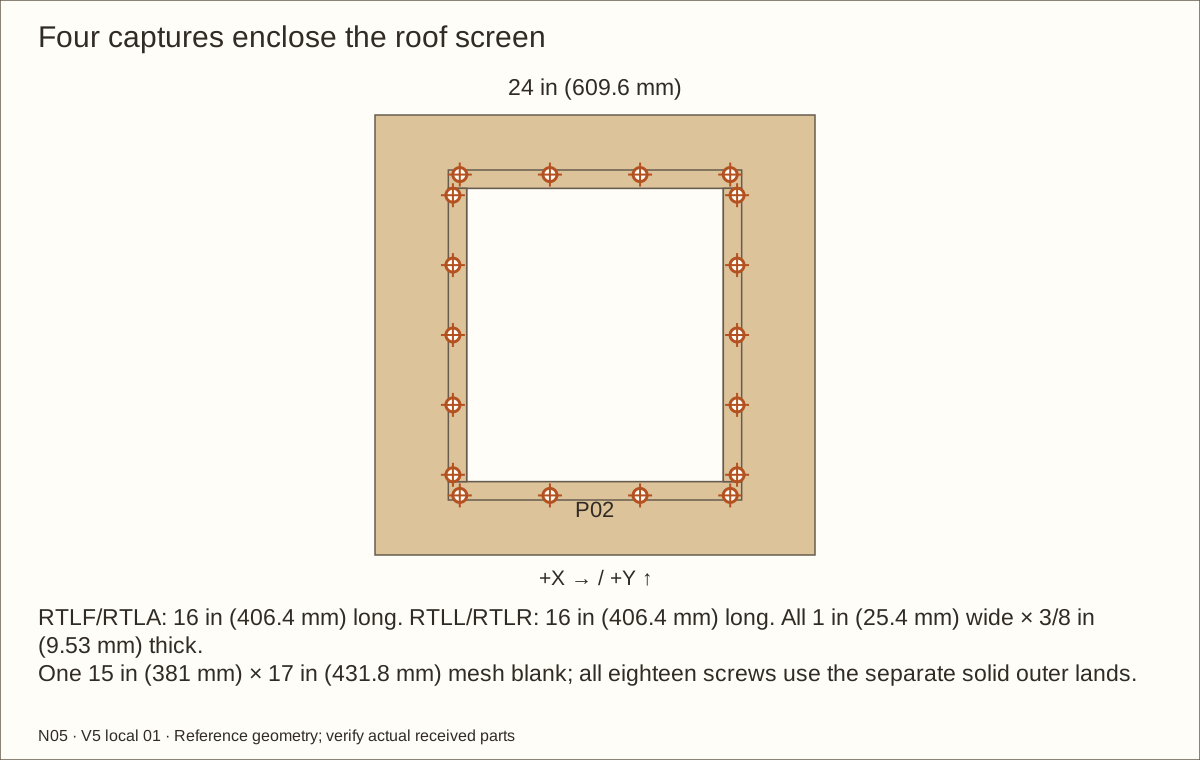
Use the same accepted wire/cured-film sample to fit the four roof captures. Cut a 0.088 in (2.24 mm) reference roof-facing rebate, preserving the 0.494 in (12.55 mm) outer bearing land and at least 1/4 in (6.35 mm) wood beneath the pocket.
Machine with broad stock and safe supported stops before cutting narrow final lengths. Dry-seat the complete 15 in (381 mm) × 17 in (431.8 mm) wire blank and verify all four captures bear on roof wood without rocking.
Check before continuing: Entire wire perimeter is enclosed and the solid outer lands touch P02.
Tools / setup: Measuring tape, square, pencil and the tools named below
Build the removable screened roof — 1
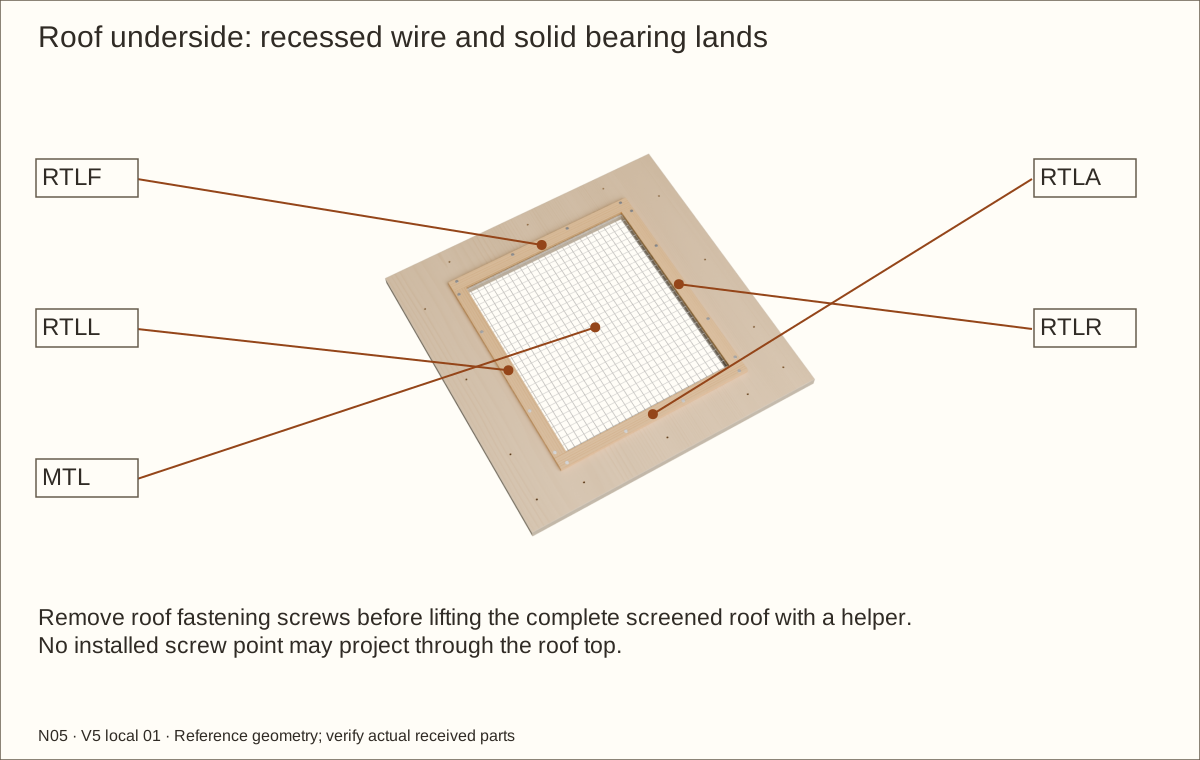
Place P02 upside down on a padded bench. Centre the 15 in (381 mm) × 17 in (431.8 mm) mesh over its opening with 1/2 in (12.7 mm) overlap.
Use the four widened captures RTLF/RTLA/RTLL/RTLR. Fit the 0.088 in (2.24 mm) reference rebate to the received two-wire crossing and cured film, leaving at least 1/4 in (6.35 mm) strip thickness without redesign. Solid outer lands bear on P02. Fit eighteen #6 × 1 in (25.4 mm) screws at the scheduled outer-land stations, with no tip through the roof top.
Check before continuing: All four roof captures fit flat and their eighteen screws retain covered tips.
Tools / setup: Measuring tape, square, pencil and the tools named below
Build the removable screened roof — 2
Inspect every wire edge and screw tip. This roof has one opening and no separate web ribs; its solid borders bear on the front, side and back supports.
Trial the roof and transfer its final attachment stations, then set it aside for finishing. Screens carry no fixture, climbing or lifting load.
Check before continuing: All screen edges are captured and the roof fits its continuous perimeter supports.
Tools / setup: Measuring tape, square, pencil and the tools named below
Before you begin: Support the leaf with a helper whenever a hinge is being fitted or released.
Hang the leaf on three lift-off hinges — 1
Check the complete wall restraint and support. Support the unglazed leaf at its finished-fit trial gaps. Retain hinge join centres Z = 14 29/64 in (367.11 mm), 27 13/16 in (706.44 mm) and 41 11/64 in (1045.77 mm) from the floor underside. These absolute datums stay fixed after perimeter trimming. Align all three received hinge axes. For this bare-case trial, place removable fully cured matching veneer coupons beneath both hinge leaves. Use coupons of the accepted final face thickness, cut from the allocated trial sheet; do not attach the permanent face skins yet.
Use each received LSX-100R as the template. Its fixed lower pin half mounts on the left jamb, pointing up; its upper socket mounts on the leaf. Transfer all six holes and make stopped pilots after the offcut trial.
Check before continuing: All three marked axes align; equal accepted cured coupons reproduce the intended final mounting plane.
Tools / setup: Measuring tape, square, pencil and the tools named below
Before you begin: Support the leaf with a helper whenever a hinge is being fitted or released.
Hang the leaf on three lift-off hinges — 2
During this trial, trace both leaves on the equal cured coupons. At final reassembly replace the coupons with continuous accepted face veneer beneath both leaves; the reference hinge axis is 0.30609055 in (7.77 mm) ahead of bare FRONT. Transfer all six holes per hinge, drill accepted stopped #6 pilots and fit #6 × 1 1/4 in (31.75 mm) screws. The complete hinge is translated forward by the measured face stack, without deforming its profile. Verify screw seating, veneer bond/compression and full flat bearing with the accepted trial before proceeding.
Support the leaf and slowly swing to 100°, checking the jamb, retaining top and rear beads. Open at least 90°, lift 2 in (50.8 mm) and move the supported leaf clear, then lower all three sockets onto the pins together. Correct binding or misalignment before proceeding.
Check before continuing: All three axes align; supported full swing and two-inch lift-off work without binding.
Parts: Complete enclosure, support and received inventory, as described below
Tools / setup: Measuring tape, square, pencil and the tools named below
Rehearse the empty cleaning route — 1
Keep the shell restrained, lift off the empty door and put it on a padded support. Remove the roof without pulling on its mesh.
With the entire bed empty, remove the lining clamps and fold liner and underlay clear of both receivers. Support the retainer, hold each front Phillips drive and remove the recessed interior nut and washer. Withdraw all four machine screws outward and draw the panel forward. Keep the permanent frame and kick rail attached.
Check before continuing: The supported door, empty lining and retainer can be removed while the permanent shell stays restrained.
Parts: Complete enclosure, support and received inventory, as described below
Tools / setup: Measuring tape, square, pencil and the tools named below
Rehearse the empty cleaning route — 2
The bare service bay is 17 19/32 in (446.88 mm) wide; maximum opposing veneer leaves 17.50175 in (444.54 mm). Its fixed kick rail is 2 3/8 in (60.33 mm) above the finished floor. Trial actual cleaning containers through this route and around both rear corners, with the shell restrained.
Dry-fold the full liner and underlay blanks around both front receivers and both rear uprights. Verify slack at every turn and a route for complete empty-basin removal. Refit the panel and all four bolt sets afterward.
Check before continuing: The whole empty base is accessible without removing the fixed frame or moving the loaded shell.
Parts: Complete enclosure, support and received inventory, as described below
Tools / setup: Measuring tape, square, pencil and the tools named below
Finish every exposed wood surface — 1
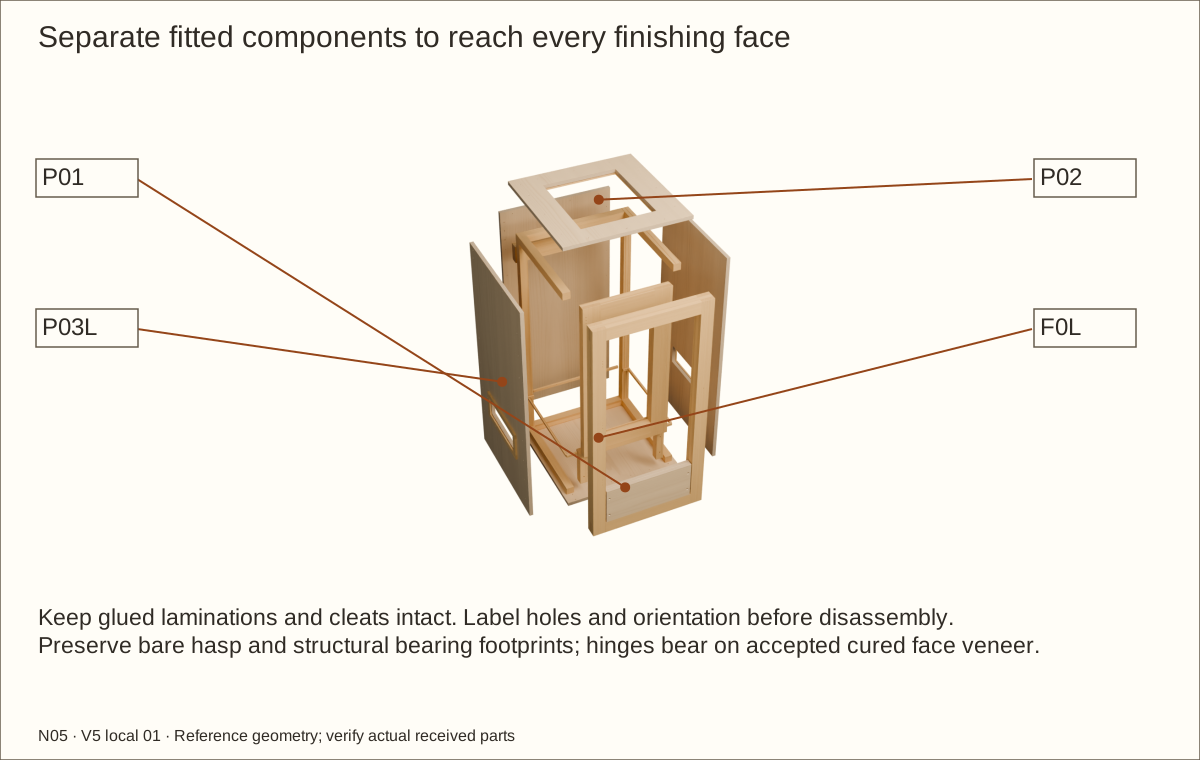
Label and remove the door, retainer, roof, hardware, meshes and lining. Disassemble dry joints as needed to reach every face, keeping all cured laminated and glued assemblies intact. Photograph orientation and protect the matched hole locations. Keep this tall shell fully supported. Disconnect its wall restraint only while safely supported for disassembly; never leave it free-standing with an open door.
Ease sharp edges, repair splits and stripped receivers, sand and remove dust. Prepare accepted veneer/finish samples before the enclosure. Keep bare glue and hardware-bearing footprints masked, including the retainer underside and its receiver contact. Do not fill the service drives or stopped nut recesses. Preserve the sealed bare AR1-to-back structural contact and bare furniture-bracket footprint. Finish only the rail’s exposed faces and edges; the received bracket and screws must bear as designed.
Check before continuing: Removed parts are labeled, surfaces repaired and cleaned, and protected bearings and drives marked.
Parts: Complete enclosure, support and received inventory, as described below
Tools / setup: Measuring tape, square, pencil and the tools named below
Finish every exposed wood surface — 2
Apply the current Varathane Triple Thick satin label to the exposed wood and the supplier-approved presealed veneer substrate. The one-coat upper planning area is 186.91 sq ft (17.36 m²), including rectangular wood, veneer topcoat, trial and contingency. Buy 2 two-can packs; each can is one US quart (0.946 L). Extra coats or balancing layers need revised quantities.
Allow the full seven-day cure at the stated 70°F (21°C) and 50% relative humidity reference conditions, longer if the label or actual conditions require. Follow permitted handling and recoat times; odor and surface dryness do not replace full cure.
Check before continuing: All exposed wood and below-liner surfaces are smooth, covered and fully cured.
Required wait: Finish: seven days full cure at reference conditions; extend as required
Parts: Complete enclosure, support and received inventory, as described below
Tools / setup: Measuring tape, square, pencil and the tools named below
Before you begin: Do not substitute an unapproved adhesive or balancing system.
Approve and label the full exterior veneer
Choose one species for the entire enclosure: maple, white oak or walnut. Obtain written supplier acceptance for the backing/PSA, balance of each panel, actual cured substrate, service temperature/humidity and cleaners. The preview textures are appearance references, not a delivered grain sample.
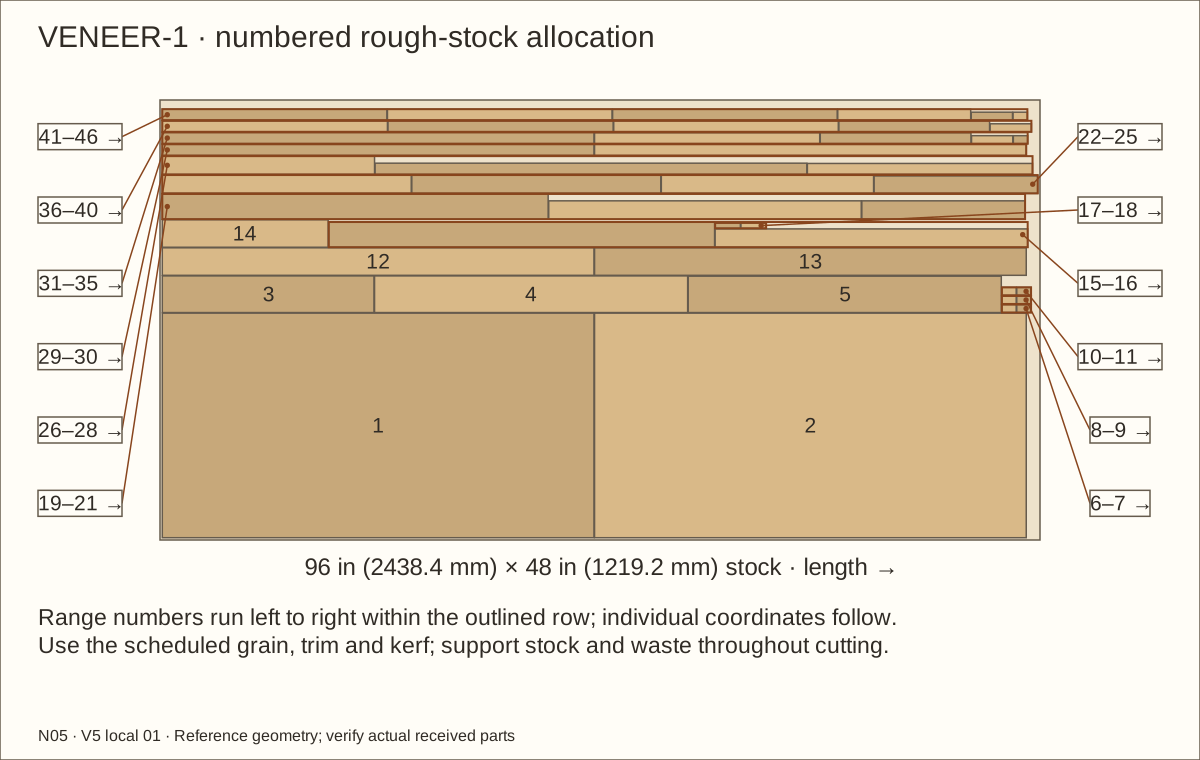
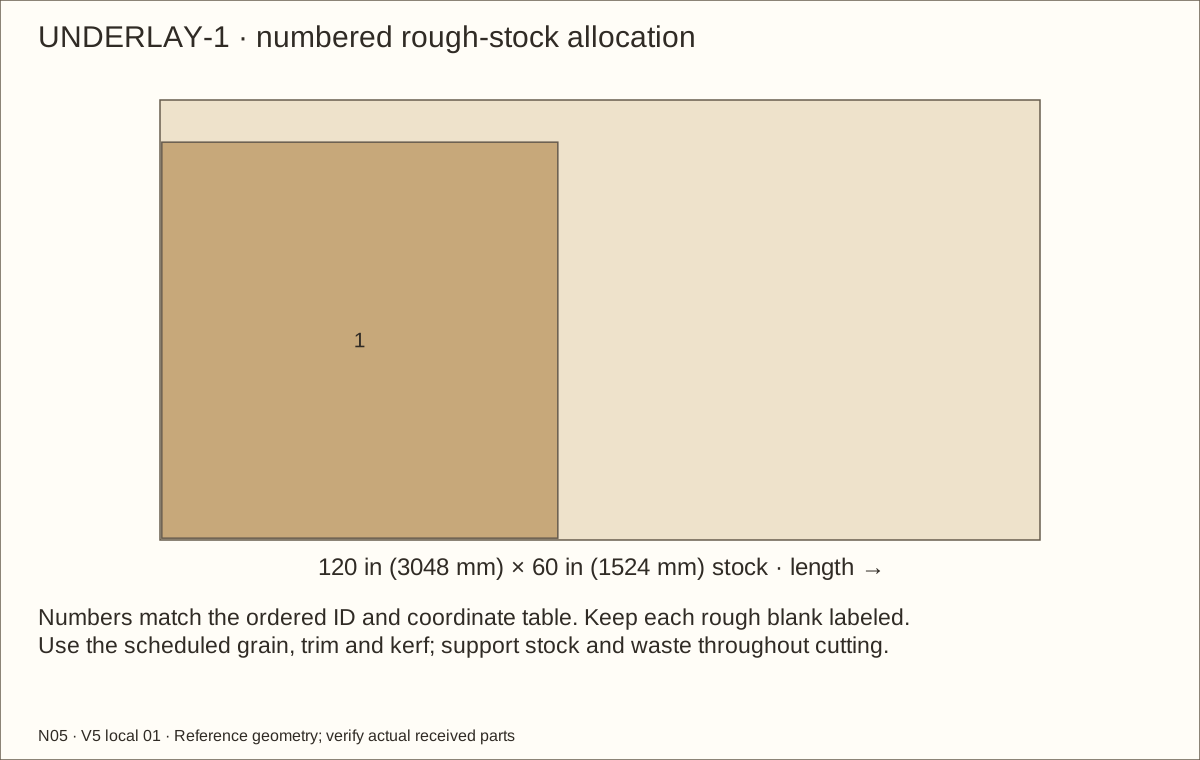
Use the veneer layouts to rough-cut labeled faces and edge/reveal strips with grain in their scheduled direction. The reference whole skin is 0.0305 in (0.77 mm) and the maximum coordinated skin is 0.046 in (1.17 mm). Measure actual cured samples; a thicker system requires new dimensions and motion checks.
Check before continuing: The selected whole system and actual thickness are accepted before sticking any full sheet.
50. Apply the skins without bridging removable parts
Parts: Complete enclosure, support and received inventory, as described below
Tools / setup: Measuring tape, square, pencil and the tools named below
Apply the skins without bridging removable parts
Acclimate and prepare the veneer and sealed substrate for the supplier’s written conditions. Follow its pressure tool, application sequence and full bond-development wait. Retain that required duration in the receiving record; this guide does not invent one. Start with a matching offcut sample and inspect bond and balance first.
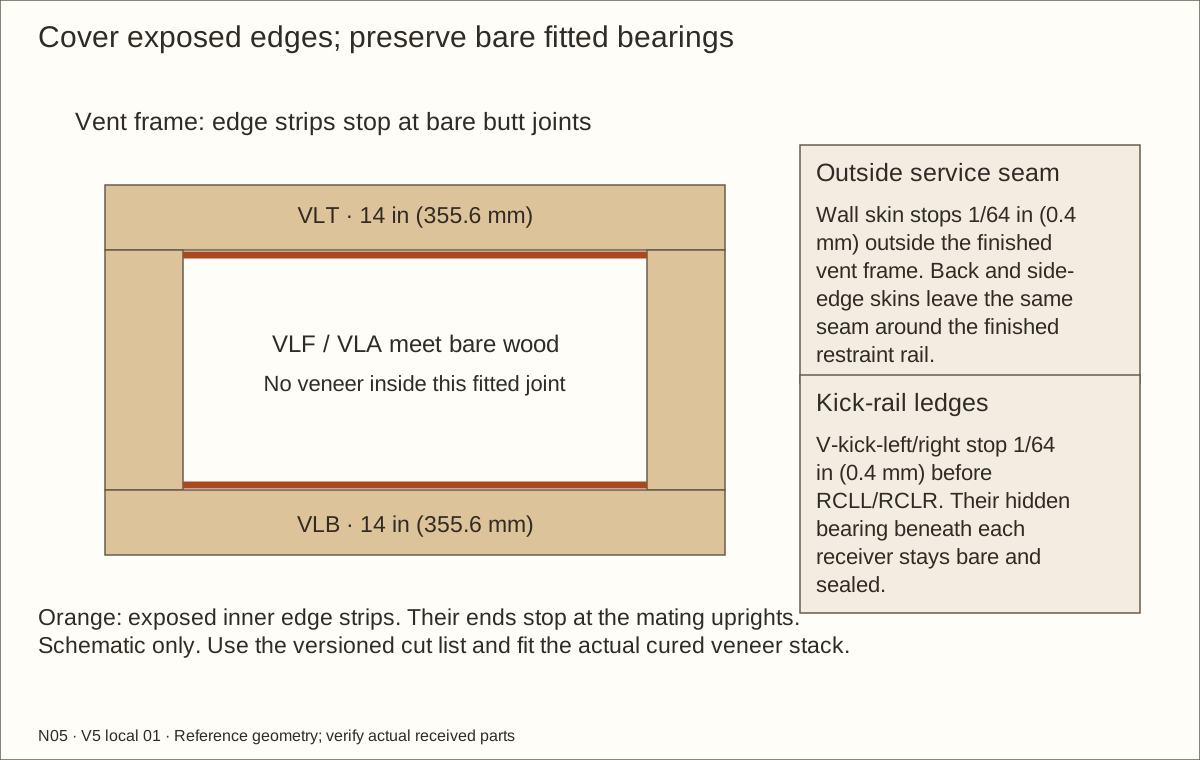
Apply each scheduled exterior face, roof surface, exposed edge and reveal separately. Stop vent edge bands at bare butt joints; fit the wall skin 1/64 in (0.4 mm) outside the finished vent-frame perimeter. Stop the two kick-rail ledge skins 1/64 in (0.4 mm) before the receivers, leaving their hidden bearings bare. Keep the retainer underside and receiver-contact faces bare and sealed; preserve all service seams, traced bare hasp footprints and 1/2 in (12.7 mm) retainer-drive openings. Trim with a supported straightedge and sharp tool without rounding the reference mating edge. Leave bare receiver contact within the opening reveals. Fit the back and side-edge skins 1/64 in (0.4 mm) outside the complete finished outline of the rear restraint rail; never bridge its service seam.
Check before continuing: All exposed plywood edges are covered, while joints, bearing seats and drives stay accessible.
Required wait: Supplier-specified acclimation, pressure and full bond-development wait; unresolved H03 must be closed first.
Parts: Complete enclosure, support and received inventory, as described below
Tools / setup: Measuring tape, square, pencil and the tools named below
Topcoat and fully cure the completed veneer
Apply only the supplier-accepted clear finish to the completed veneer, exposed edges and reveals. Keep bare hasp seats, drives and future bond faces masked; hinge bearing faces retain the accepted continuous cured veneer. Follow the actual label temperature, humidity, recoat and handling limits.
Allow the Varathane full seven-day cure at 70°F (21°C) and 50% relative humidity, or longer if the label/conditions require, before renewed assembly tests. Surface dryness or lack of smell is not proof of cure. Check the sample bond, panel flatness and actual completed skin again.
Check before continuing: All finishes are fully cured and the accepted actual veneer stack remains within the coordinated allowance.
Required wait: At least seven days full finish cure at stated reference conditions; extend as required.
Parts: Complete enclosure, support and received inventory, as described below
Tools / setup: Measuring tape, square, pencil and the tools named below
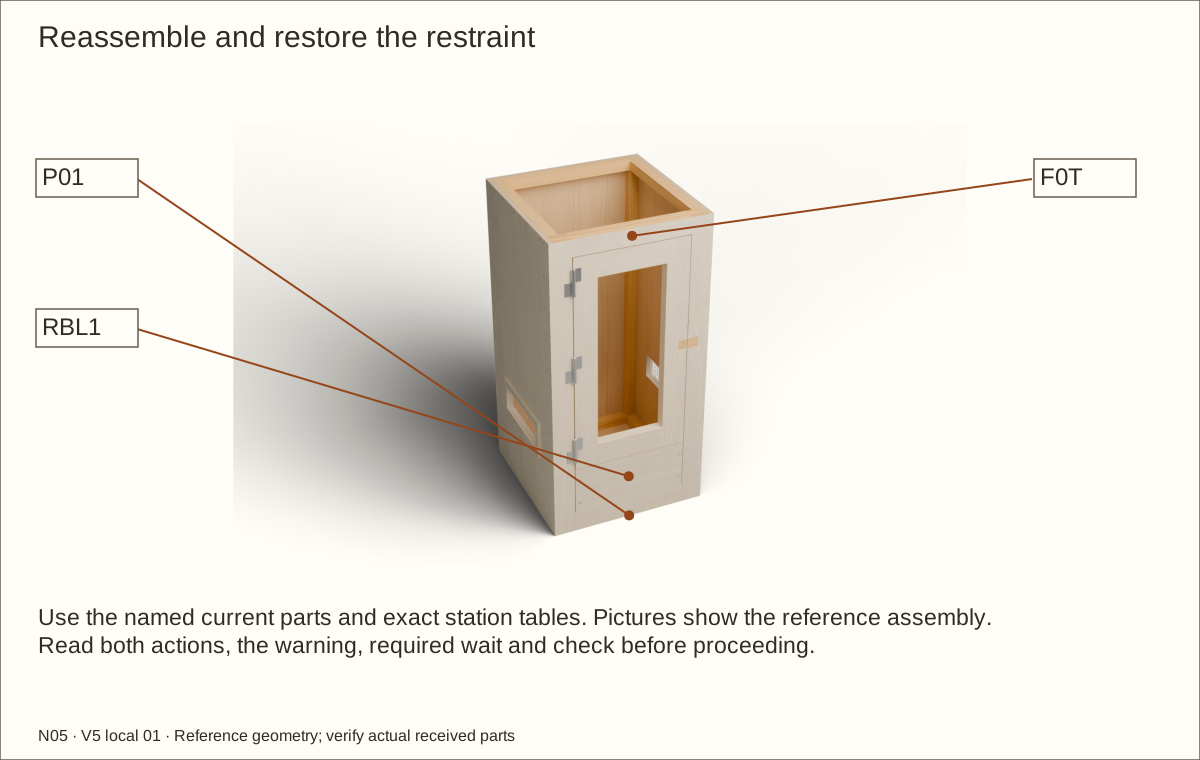
Reassemble and restore the restraint — 1
Refit the floor, sides, back, fixed front frame and exterior rail to their labeled holes. Hand-tighten the scheduled screws and check their cover and seating. Repair a damaged receiver properly, without substituting a longer screw.
Refit both receivers and the retainer with their complete flush screw/washer/recessed-nut stacks. Confirm two full exposed threads, recessed tip cover, square frame and continuous floor bearing without crushing the cured wood. Leave veneer drives accessible. Add loose protective underlay over all four stopped rear pockets before placing the basin.
Check before continuing: The reassembled shell and four retainer connections are square and accessible without crushing wood.
Parts: Complete enclosure, support and received inventory, as described below
Tools / setup: Measuring tape, square, pencil and the tools named below
Reassemble and restore the restraint — 2
Reconnect the furniture bracket, cable, wall bracket and both clevis/keeper sets and pull-check the full restraint before rehanging the door. Refit screens and repeat the full supported swing/lift trial with the cured veneer, latch bevel and retainer-top clearance. Reseal and fully recure any later exposed wood.
Remove the supported door and roof for lining while keeping the shell restrained. Protect all four recessed washer/nut connections and every hard corner with loose underlay. Keep the backing smooth and all four complete fastener sets installed.
Check before continuing: The cured shell is square, restrained and mechanically complete with clear door motion.
Tools / setup: Measuring tape, square, pencil and the tools named below
Before you begin: Never cut, drill or staple below the upper dry clamping band. The shallow observation is not a load test.
Fit and test the continuous basin — 1
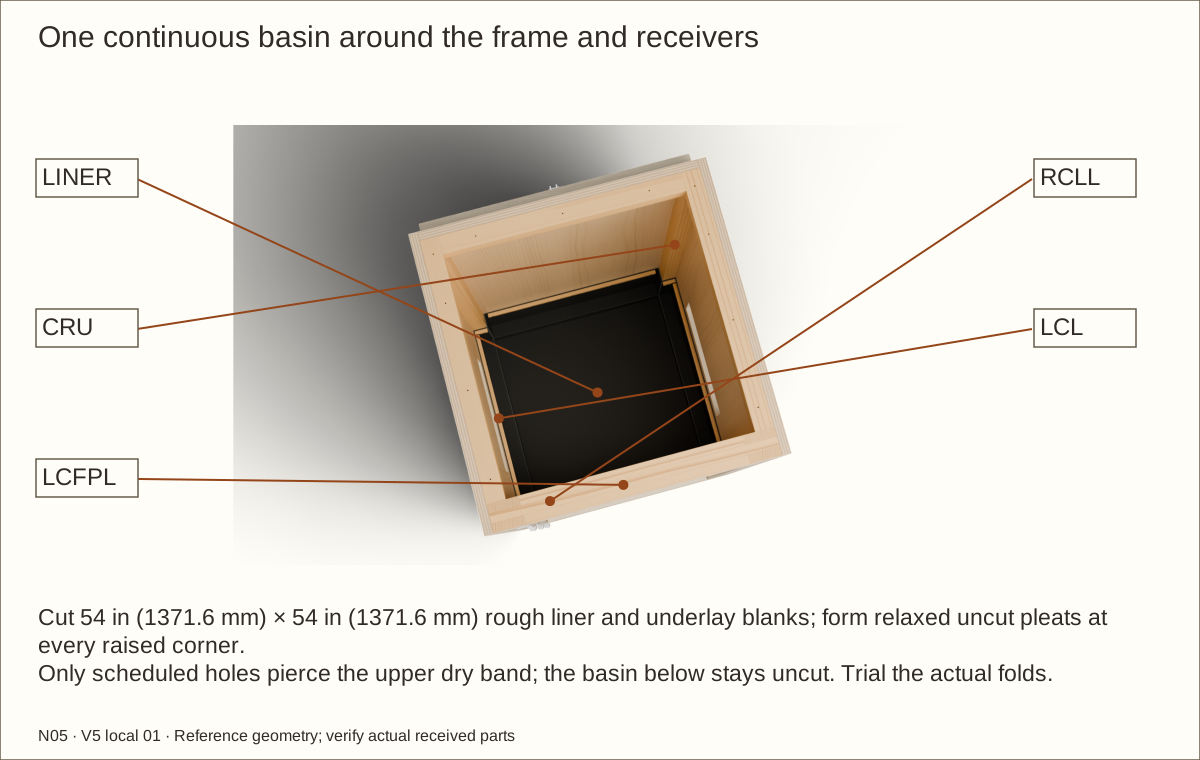
Remove the roof with a helper and lift off the supported door onto a padded bench to expose the empty basin area. Cut one 54 in (1371.6 mm) × 54 in (1371.6 mm) blank each of underlay and liner. Fit the underlay against the floor, bottom cleats, fixed frame, both front receivers and both rear uprights. Add loose pads over the four recessed nuts; never bridge a hard edge or leave unsupported membrane.
Drape the uncut membrane over the underlay with relaxed pleats and slack at every turn. Do not slit, splice, drill or staple the wet zone. The reference top is 9 3/4 in (247.65 mm) above the finished central floor; actual compressed materials and folded bulk control fit.
Check before continuing: Underlay covers every hard contact; the relaxed uncut basin fits all corners without unsupported folds.
Tools / setup: Measuring tape, square, pencil and the tools named below
Before you begin: Never cut, drill or staple below the upper dry clamping band. The shallow observation is not a load test.
Fit and test the continuous basin — 2
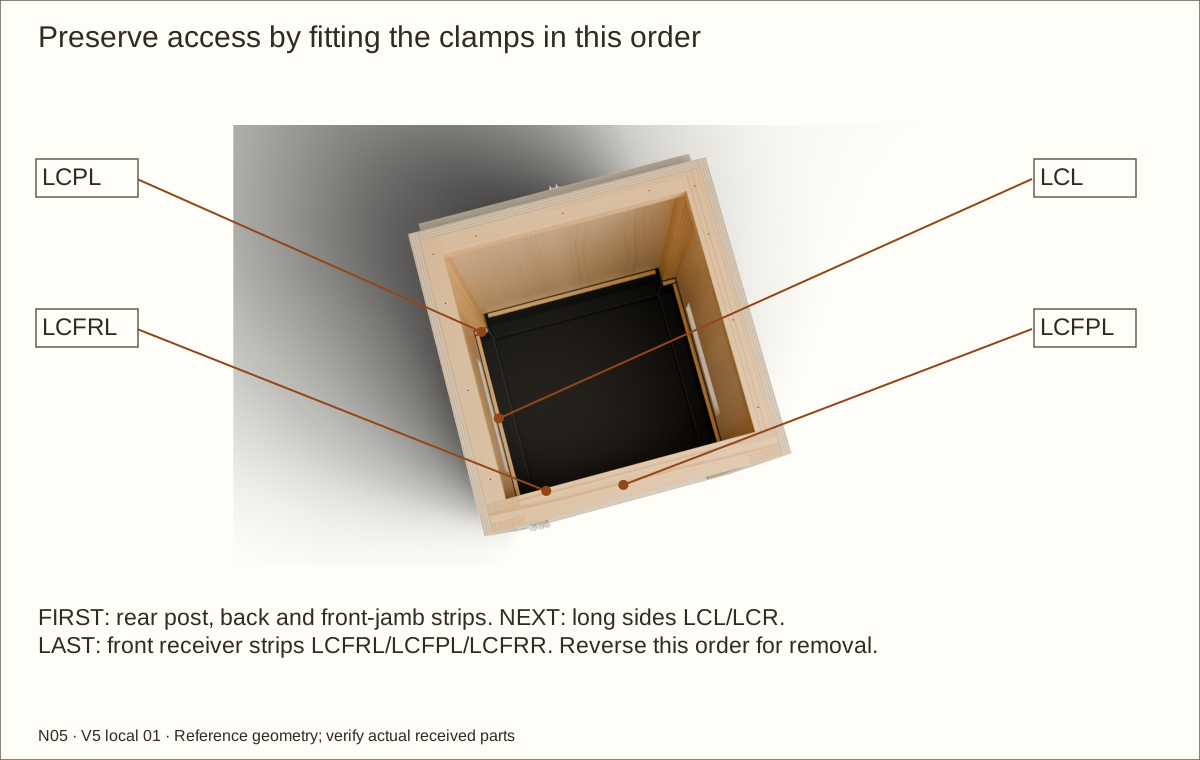
Dry-fit ten rounded clamps at the scheduled 9 3/8 in (238.13 mm) centre line above the central liner floor, clear of the 8 in (203.2 mm) total bed. Fit LCPL/LCPR, LCB1 and LCFJ1/LCFJ2 first; LCL/LCR next; LCFRL/LCFPL/LCFRR last. Only the 31 scheduled screws may pierce the dry band from 9 1/8 in (231.78 mm) to 9 5/8 in (244.48 mm) above that floor. Predrill and deburr wood with the membrane removed. Refit relaxed folds, press screws through the planned membrane stations by hand, and tighten without crushing the clamps. Never wind loose rubber around a drill bit. Reverse the order for removal; trim only above the final top line.
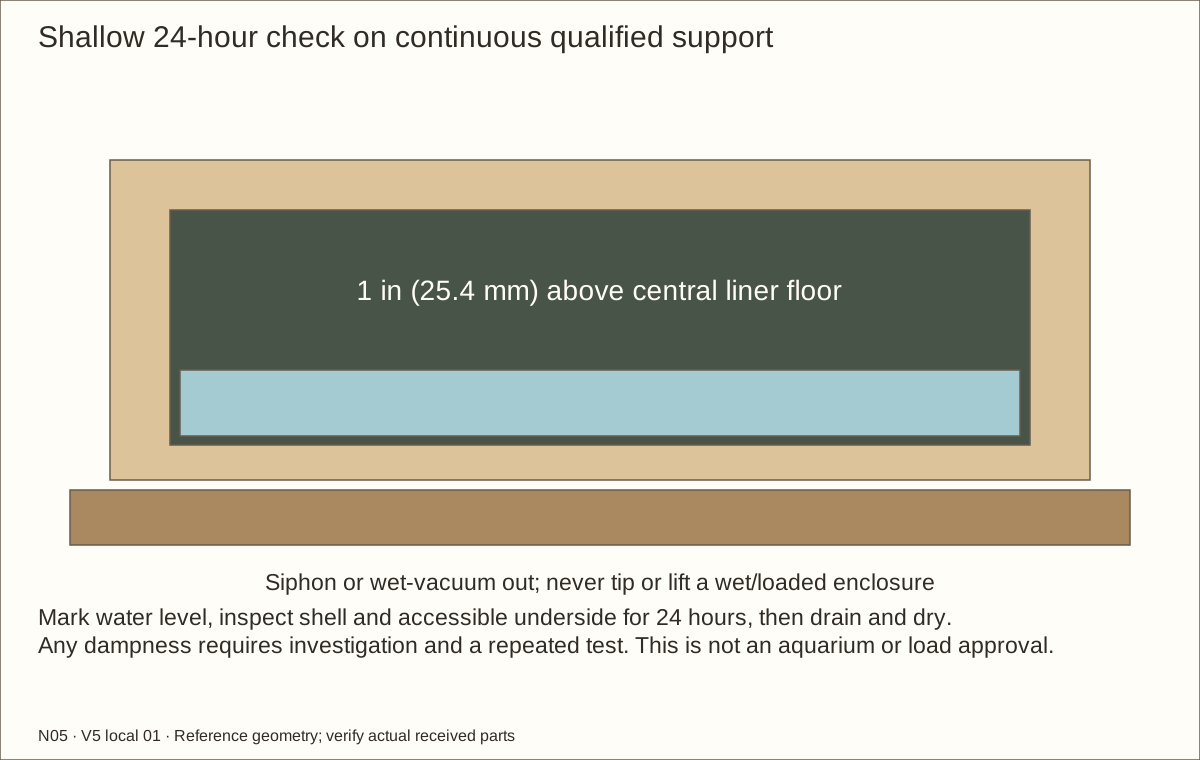
With every clamp and all four retainer connections fully installed and qualified continuous support in place, add only 1 in (25.4 mm) clean water and observe for 24 hours. Mark the level, account for evaporation and inspect the underside, folds and wood for leakage. Remove all water afterward. This is a shallow leak observation, not a full-depth or structural test.
Check before continuing: All thirty-one clamp screws are installed only in the dry band; the shallow observation is complete without visible leakage.
Required wait: Shallow observation: 24 hours on qualified continuous support, followed by complete draining and drying.
Tools / setup: Measuring tape, square, pencil and the tools named below
Before you begin: Never cut, drill or staple below the upper dry clamping band. The shallow observation is not a load test.
Fit and test the continuous basin — 3
After draining and drying, inspect the wood, underside and every fold again. Correct any leakage and repeat the shallow observation before adding contents. Confirm all 31 dry-band screws remain secure, clamps can be removed in reverse order, and the membrane is slack and protected. The basin below the dry band must remain uncut and unpunctured.
Check before continuing: The basin is empty and dry, clamps remain removable, and slack and coverage have been rechecked.
Required wait: Wait until the enclosure and lining are completely dry before continuing.
Tools / setup: Measuring tape, square, pencil and the tools named below
Before you begin: Do not drill, glue, squeeze or rigidly trap the acrylic.
Float the acrylic in its finished pocket — 1
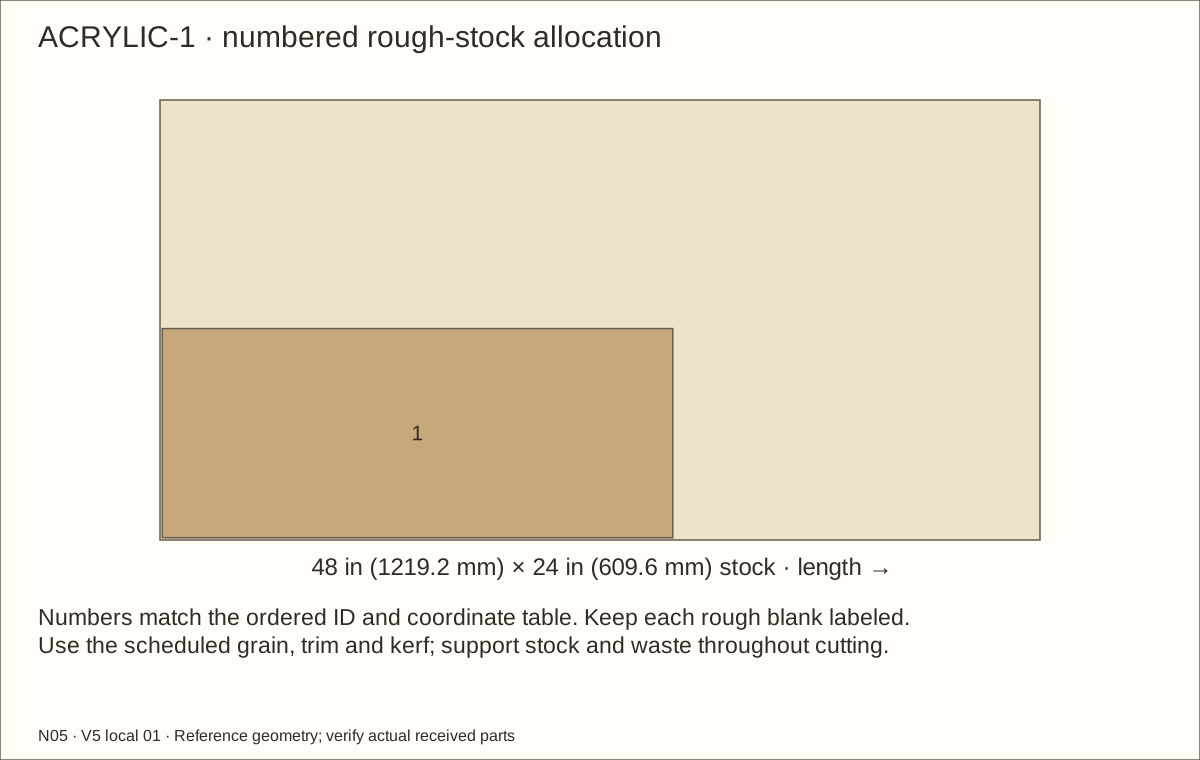
Measure the fully cured pocket and actual acrylic. The reference pane is 11 11/32 in (288.13 mm) wide × 27 23/32 in (704.06 mm) high × 0.22 in (5.59 mm) thick, from one 24 in (609.6 mm) × 48 in (1219.2 mm) sheet. Retain the masking, support the complete sheet on a clean sacrificial surface and use the acrylic maker’s accepted cutting/edge-finishing method. The actual pocket and movement allowance govern the final cut.
On a padded bench, fit spacers to the actual pane, two uncompressed face pads and cured films. The reference pocket is pane width/height plus 1/4 in (6.35 mm); retain a 1/8 in (3.18 mm) edge movement allowance. Spacer wood carries the bead pressure; acrylic must not carry it.
Check before continuing: Actual pane and pads are measured and fitted to the cured pocket with open edge allowance.
Tools / setup: Measuring tape, square, pencil and the tools named below
Before you begin: Do not drill, glue, squeeze or rigidly trap the acrylic.
Float the acrylic in its finished pocket — 2
Set the pane on two lower pads at the scheduled quarter-width positions. Each lower setting pad consists of two loose 1/16 in (1.59 mm) neoprene layers for 1/8 in (3.18 mm) total height. Fit separate dry front and rear face pads without adhesive. Leave the side and top gaps clear; do not bond or drill the pane.
Fit the removable rear beads through their spacers into the laminated door outside the pane and its movement pocket. Use scheduled #8 × 1 1/4 in (31.75 mm) screws, bead/spacer clearance holes and stopped pilots. Tighten the beads onto spacer wood with light pad contact, never enough to bow or rigidly squeeze acrylic.
Check before continuing: The pane floats with edge clearance and beads seat on wood without squeezing it.
Tools / setup: Measuring tape, square, pencil and the tools named below
Before you begin: Do not drill, glue, squeeze or rigidly trap the acrylic.
Float the acrylic in its finished pocket — 3
Weigh the complete finished glazed door. The revised rectangular-volume planning estimate is 16.58 lb (7.52 kg), including reference veneer and a hardware/pad/coating allowance. Rehang with a helper and repeat all swing, sag, secure-closure and lift-off checks. Hinge catalogue capacity does not certify this wooden assembly.
Check before continuing: The finished leaf is weighed and passes supported operation and removal checks.
Tools / setup: Measuring tape, square, pencil and the tools named below
Fit and check the independent hasp — 1
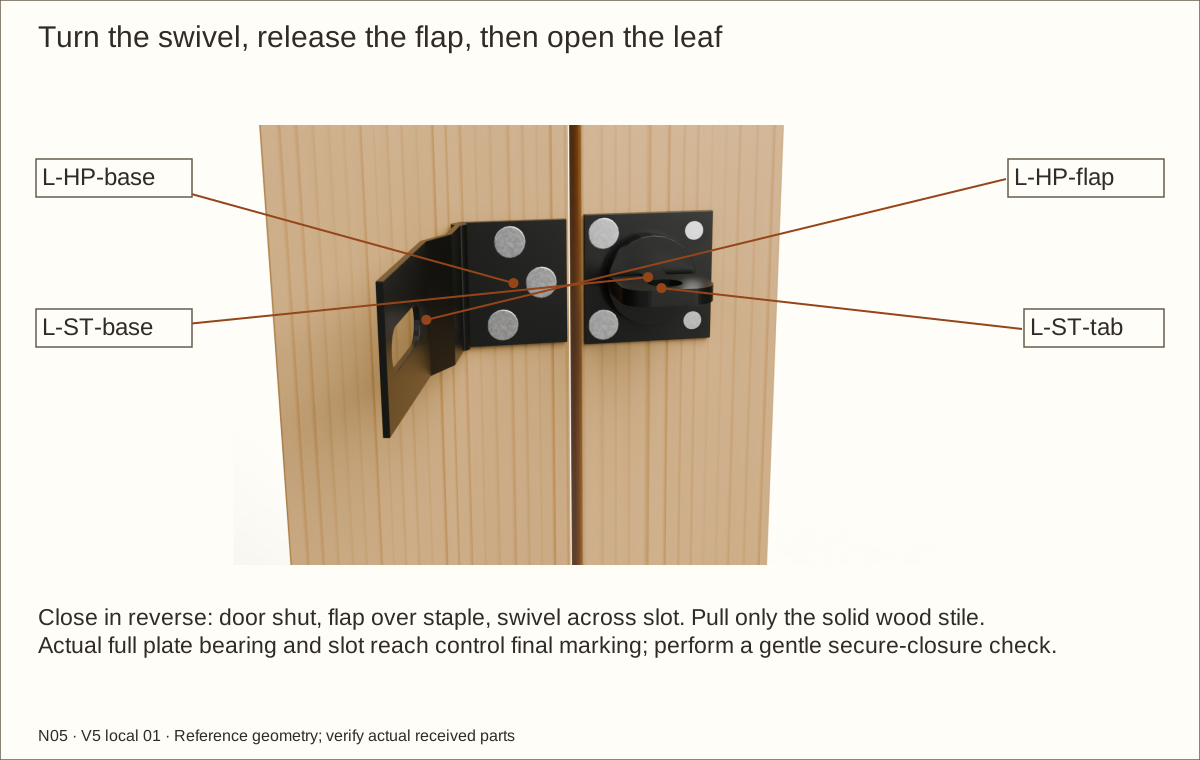
With the glazed leaf supported and closed, fit the complete N305-979 hasp at the original mid-height Z = 27 13/16 in (706.44 mm). Its base bears on the door’s right stile and swivel plate on the fixed right jamb. The reference complete assembly moves 5/32 in (3.97 mm) toward the hinge to fit the trimmed leaf; actual plate bearing and slot reach control marking.
Align the flap slot and swivel without forcing the door. Transfer all seven actual mounting holes, make stopped pilots and install the seven #10 × 5/8 in (15.88 mm) screws. The model shows nominal received-profile geometry, not a substitute template.
Check before continuing: The actual hasp has full bearing, accepted screw seating and free slot engagement.
Tools / setup: Measuring tape, square, pencil and the tools named below
Fit and check the independent hasp — 2
Close the flap over the aligned swivel and turn the swivel across the slot to secure. To release, align the swivel with the slot and lift the flap clear before swinging the leaf. Check the open flap clears the frame through the full motion.
To open, turn the swivel in line with the slot, swing the hasp clear, then pull the solid door stile and open the leaf. To secure, close the leaf, fit the flap over the staple and turn the swivel across the slot. Do not pull on glazing. The one closure must resist a gentle pull when secured; optional padlocks are not included.
Check before continuing: The hasp secures without distorting the leaf and releases fully before swinging.
Tools / setup: Measuring tape, square, pencil and the tools named below
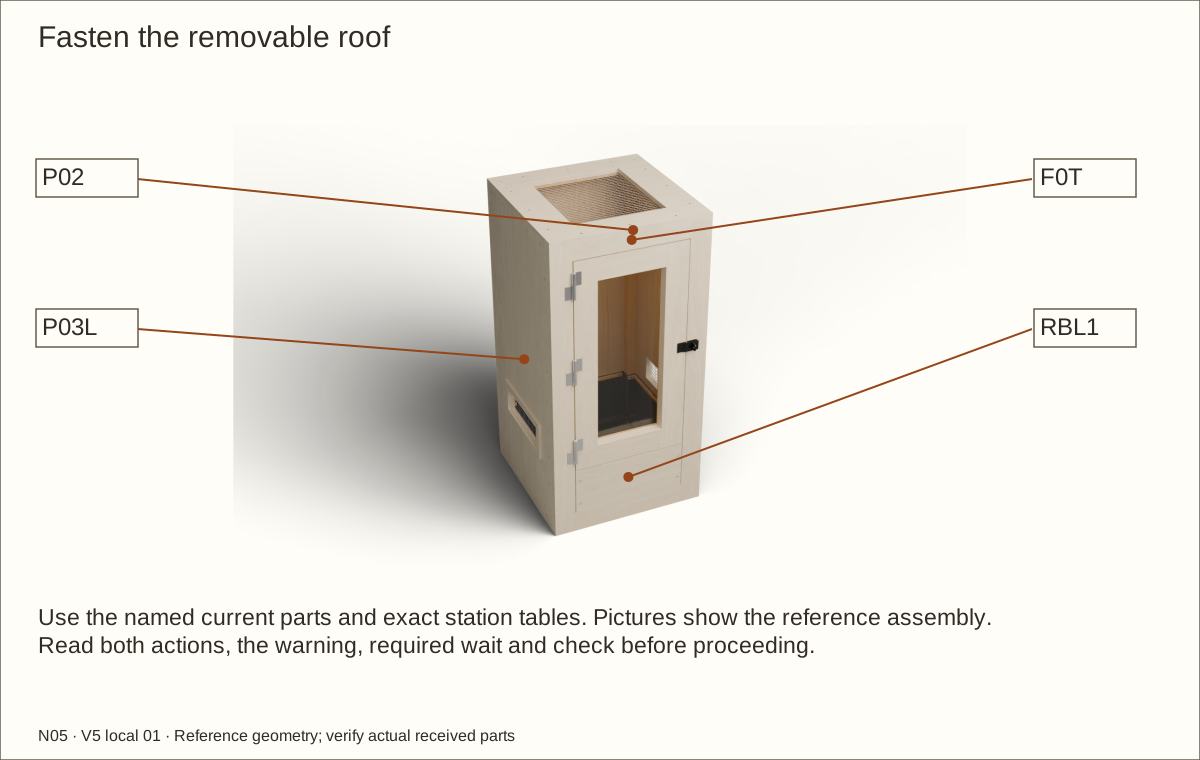
Fasten the removable roof — 1
Seat the cured screened roof on the side upper wood supports, back wood support and front header. Check flush edges and bearing before tightening.
Transfer the fourteen scheduled roof stations: four per side, three across the front and three across the back. Clearance-drill the plywood and make stopped pilots into the receiving supports.
Check before continuing: All fourteen roof clearance and stopped pilot stations align with the receiving supports.
Tools / setup: Measuring tape, square, pencil and the tools named below
Fasten the removable roof — 2
Install #8 × 1 1/4 in (31.75 mm) screws and finish by hand. Confirm the roof cannot shift or lift and the door still swings without binding.
Keep screw heads accessible after equipment installation. Disconnect and independently support equipment before roof removal; never use the screen as a lifting handle or fixture support.
Check before continuing: All fourteen roof attachments are installed and future removal remains practical.
Parts: Complete enclosure, support and received inventory, as described below
Tools / setup: Measuring tape, square, pencil and the tools named below
Complete the construction inspection — 1
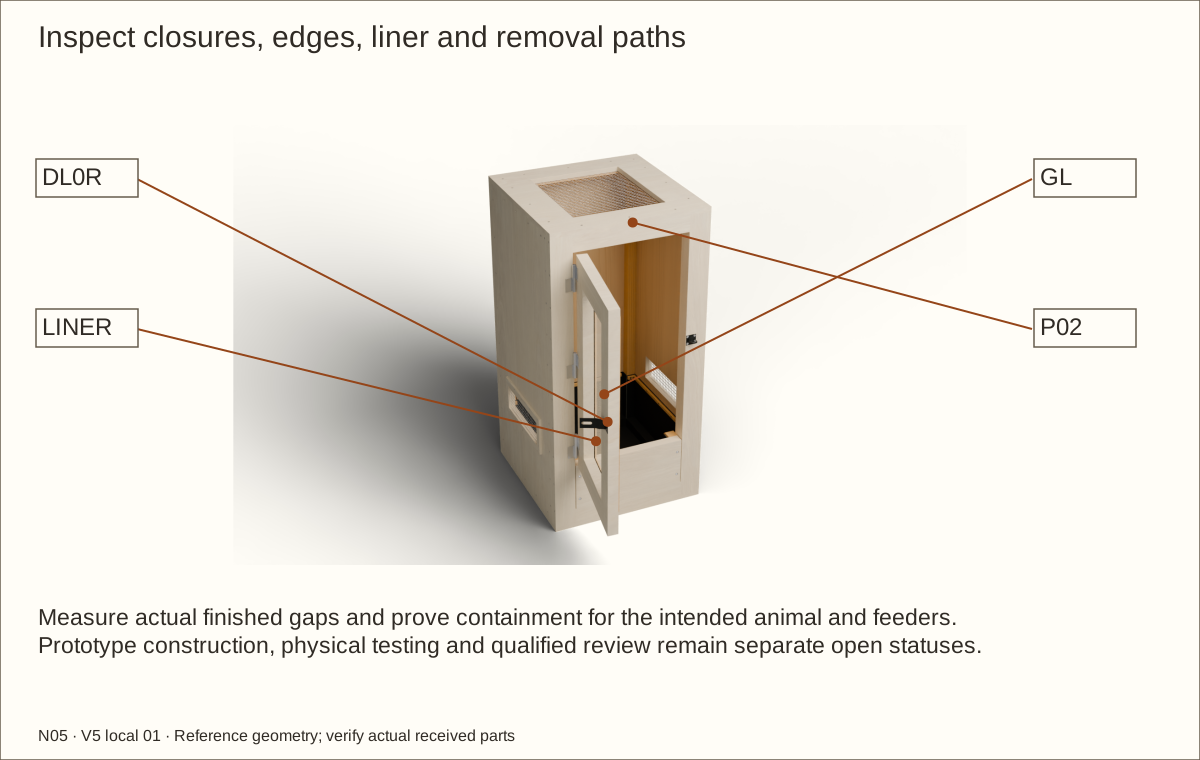
Check all screw stations, four retainer bolt stacks, three hinges, one hasp, glazing beads, ten liner clamps, mesh edges and the complete wall restraint. Repair splits, loose joints, stripped receivers and exposed tips.
Measure the actual cured gaps around the door, retainer, roof and every opening. Scheduled clearances and 1/2 in (12.7 mm) mesh are construction references, not animal- or feeder-containment approval. Recheck after the roof is secured and after controlled loading on approved support.
Check before continuing: Fasteners, restraint, screens and actual cured gaps have been inspected and recorded.
Parts: Complete enclosure, support and received inventory, as described below
Tools / setup: Measuring tape, square, pencil and the tools named below
Complete the construction inspection — 2
Verify full finish cure and dry wood beneath the shallow-tested liner. Check every wet-zone surface is continuous and every clamp and bolt can be accessed for empty service.
Rehearse supported removal and refitting of the single glazed door. Record its weight and actual finished clearances. For basin service: animals/equipment out, all contents and water removed, clamps off, empty liner/underlay folded clear, then all four complete retainer fasteners removed and panel drawn forward. Never undo a retaining connection against loaded substrate or water. Retain and inspect the complete wall restraint throughout service; record the wall fixing separately from the furniture connection.
Check before continuing: The construction record has no unresolved defect; animal commissioning remains separate.
Tools / setup: Measuring tape, square, pencil and the tools named below
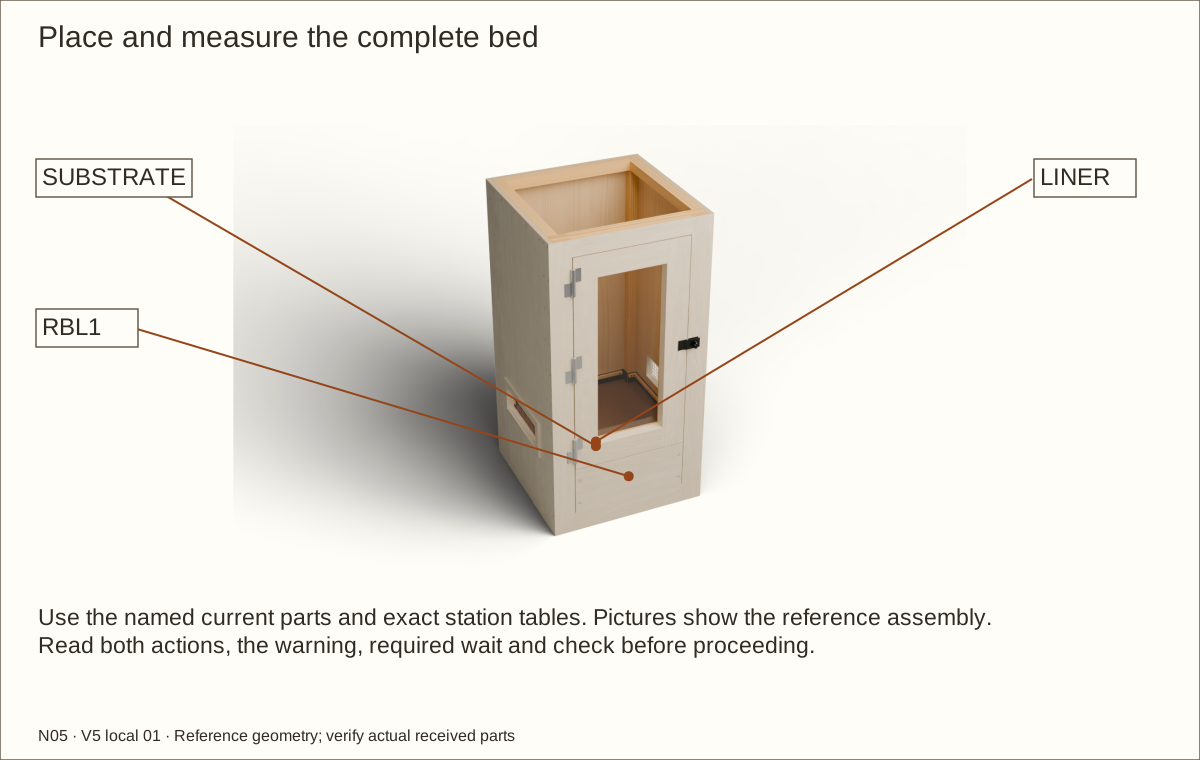
Place and measure the complete bed — 1
Confirm support and restraint before loading. Protect the membrane beneath hard furnishings with smooth load-spreading pads and never drag sharp materials across it.
Measure from the finished central liner floor. Drainage, separators and substrate together must stay within 8 in (203.2 mm). For example, 2 in (50.8 mm) of drainage leaves at most 6 in (152.4 mm) for the remaining layers.
Check before continuing: The combined bed stays within its marked eight-inch limit; support, restraint and furnishings are secure.
Tools / setup: Measuring tape, square, pencil and the tools named below
Place and measure the complete bed — 2
The conservative clear central rectangle is 19 11/32 in (491.33 mm) × 18 41/64 in (473.47 mm), or 2.50 sq ft (0.23 m²). Above the 8 in (203.2 mm) total bed, 36 31/32 in (939.01 mm) remains below the upper supports before equipment and furnishings; measure the completed interior.
Weigh the actual wet mixture and record total installed load. Watch for changing door gaps, support deflection, joint movement or liner damage during filling. Stop and unload if anything shifts; calculated density scenarios are not certified capacities.
Check before continuing: The total bed stays below its line with 2 in (50.8 mm) freeboard and recorded usable space.
Parts: Complete enclosure, support and received inventory, as described below
Tools / setup: Measuring tape, square, pencil and the tools named below
Before you begin: No animal suitability or equipment support rating is assigned by this construction guide.
Commission before animal entry — 1
Choose species, life stage and occupancy against current care requirements using measured usable internal dimensions. This 24 in (609.6 mm) × 24 in (609.6 mm) × 48 in (1219.2 mm) shell is generic construction and assigns no species suitability.
Qualify every mesh opening, access gap and latch for the occupant and feeders. Mechanically retain any required finer barrier, then reassess ventilation and cleaning.
Check before continuing: The intended species and life stage are recorded, with any finer containment barrier securely fitted.
Parts: Complete enclosure, support and received inventory, as described below
Tools / setup: Measuring tape, square, pencil and the tools named below
Before you begin: No animal suitability or equipment support rating is assigned by this construction guide.
Commission before animal entry — 2
Select heat, light, ultraviolet and control equipment for the actual habitat. Follow fixture mounting and combustible-clearance instructions, using independent supports and guards. Keep hot components away from wood, acrylic, liner and animals; never rest fixture weight on construction mesh.
Plan cable routing for the real connector and strain relief before cutting. Keep any penetration above the liner, finish exposed wood and fit a retained closure. Never trap a cord in the roof joint or pierce the wet basin for an improvised drain.
Check before continuing: Selected equipment has independent safe support and any cable routes are finished and secured before commissioning.
Parts: Complete enclosure, support and received inventory, as described below
Tools / setup: Measuring tape, square, pencil and the tools named below
Before you begin: No animal suitability or equipment support rating is assigned by this construction guide.
Commission before animal entry — 3
Run the configured enclosure unoccupied through its intended day/night and wet/dry cycles. Record temperature, humidity, ventilation, light exposure, thermostat control, safe surfaces, secure access and cleaning practicality before animal entry.
Check before continuing: Animal entry follows documented species and equipment checks after construction is complete.
Choose ONE veneer species: two 48 × 96 in (1219.2 × 2438.4 mm) sheets. Trial stock is included. Resolve receiving holds before dependent work. Product identity checks do not guarantee destination stock or physical fit.
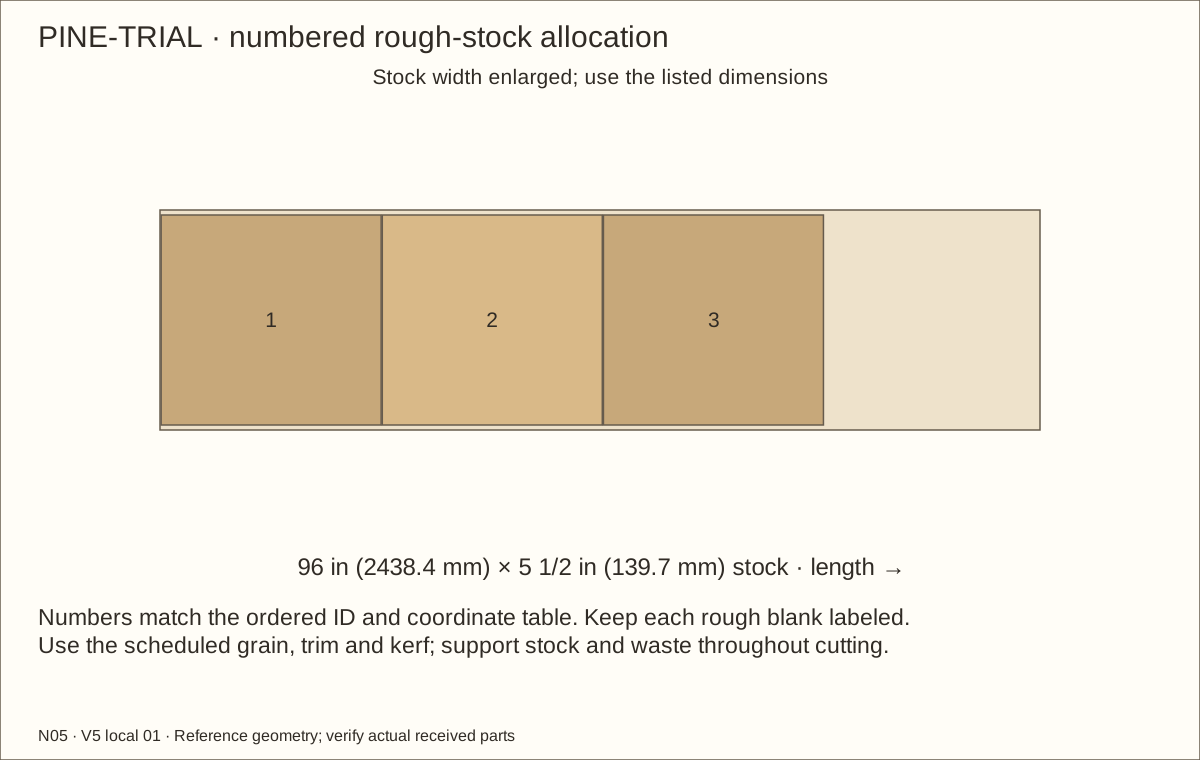
Exact allocation in current cutting layouts, including one trial board. Plane supported broad stock before ripping; glazing spacer rough 3/8 in (9.53 mm), fit to actual 0.351 in (8.92 mm) reference bare depth.
Three full 1 1/2 in (38.1 mm) square × 96 in (2438.4 mm) boards. Keep the full solid section; do not laminate substitutes.
Materials and hardware · continued
Choose ONE veneer species: two 48 × 96 in (1219.2 × 2438.4 mm) sheets. Trial stock is included. Resolve receiving holds before dependent work. Product identity checks do not guarantee destination stock or physical fit.
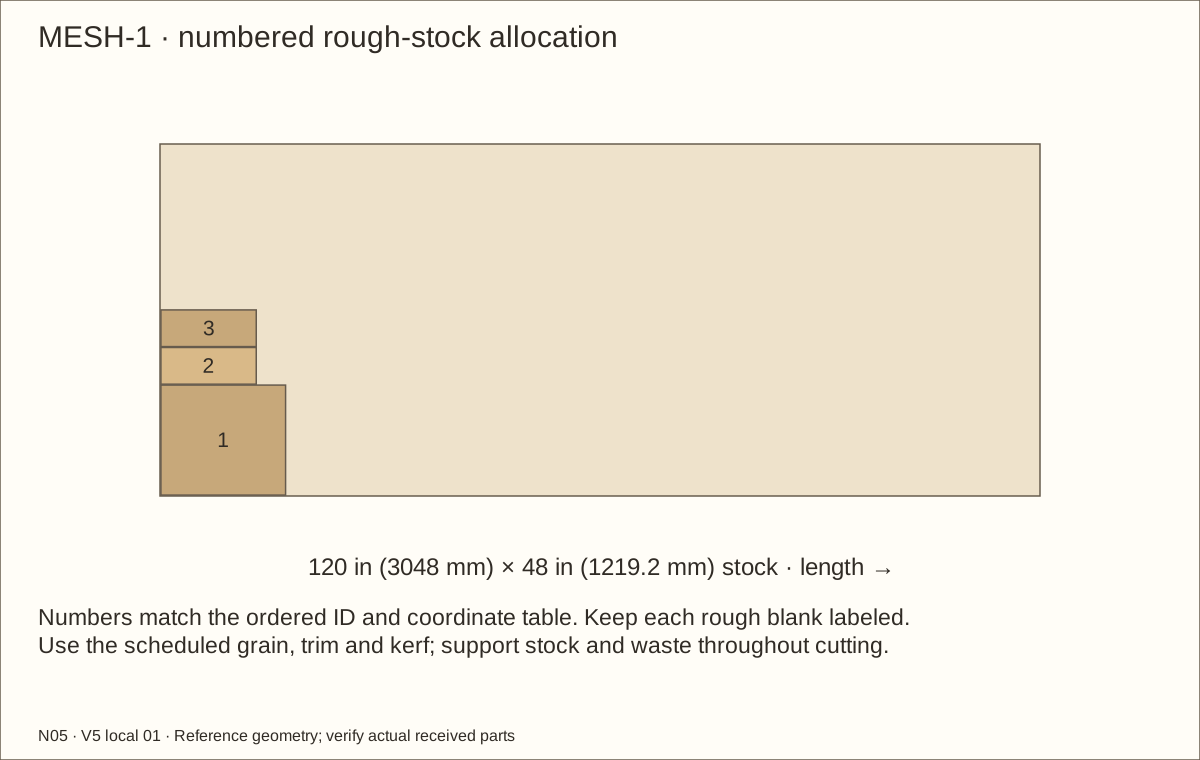
One 15 in (381 mm) × 17 in (431.8 mm) roof blank and two 13 in (330.2 mm) × 5 in (127 mm) side blanks; two-wire reference crossing 0.082 in (2.08 mm), not a 0.025 in (0.64 mm) slab. Occupant-specific containment review remains required.
One 16-fluid-ounce (473 mL) bottle covers 8.7 sq ft (0.8 m²) of bond area plus 25% working reserve. The manufacturer excludes structural/load-bearing applications. All laminations have mechanical stitches; do not infer a glue-only rating.
Materials and hardware · continued
Choose ONE veneer species: two 48 × 96 in (1219.2 × 2438.4 mm) sheets. Trial stock is included. Resolve receiving holds before dependent work. Product identity checks do not guarantee destination stock or physical fit.
Installed quantity is the exact source-station count; buy whole packs with spare screws.
Materials and hardware · continued
Choose ONE veneer species: two 48 × 96 in (1219.2 × 2438.4 mm) sheets. Trial stock is included. Resolve receiving holds before dependent work. Product identity checks do not guarantee destination stock or physical fit.
801782 Needed 18; 100 per package; buy 1 package(s)
Eighteen installed, six per LSX-100R. Confirm received hole/head seating and supplier approval before use; do not machine proprietary hinge holes from the model.
Materials and hardware · continued
Choose ONE veneer species: two 48 × 96 in (1219.2 × 2438.4 mm) sheets. Trial stock is included. Resolve receiving holds before dependent work. Product identity checks do not guarantee destination stock or physical fit.
LSX-100R Needed 3; 1 per package; buy 3 package(s)
Three LSX-100R hinges on the left jamb: fixed lower pin points upward, moving upper socket mounts on the door. Sold individually without screws. Confirm hand from the received hinge. The 66 lb (30 kg) pair figure is not a rating of the wood mounting.
N305-979 Needed 1; 1 per package; buy 1 package(s)
One independent swivel-staple closure on the right jamb. Turn the swivel across the closed flap slot to secure. An optional padlock is not included or required for the illustrated operation.
Materials and hardware · continued
Choose ONE veneer species: two 48 × 96 in (1219.2 × 2438.4 mm) sheets. Trial stock is included. Resolve receiving holds before dependent work. Product identity checks do not guarantee destination stock or physical fit.
21232102 Needed 1; 1 per package; buy 1 package(s)
One 11 11/32 in (288.13 mm) × 27 23/32 in (704.06 mm) pane from the 0.22 in (5.59 mm) thick 24 in (609.6 mm) × 48 in (1219.2 mm) sheet. Verify the finished pocket before cutting; leave the pane unpierced.
One 54 in (1371.6 mm) × 54 in (1371.6 mm) blank from 5 × 10-foot stock; reference compressed 0.08 in (2.03 mm) is not a measured material gauge. Add loose protection over recessed hardware.
Materials and hardware · continued
Choose ONE veneer species: two 48 × 96 in (1219.2 × 2438.4 mm) sheets. Trial stock is included. Resolve receiving holds before dependent work. Product identity checks do not guarantee destination stock or physical fit.
Product
Model and quantities
Fit / purchase condition
BOLT · 18-8 stainless Phillips flat-head screw, 1/4-20 x 2-3/4 inch Direct product listing
9787 Needed 4; 1 per package; buy 4 package(s)
Two exterior flush screws per retainer post; #3 Phillips drive, 82-degree seat. Length includes flat head.
One inside each recessed post under locknut. 5/8 in (15.88 mm) outside and 9/32 in (7.14 mm) inside diameters; receive thickness at most 1/16 in (1.59 mm) for this reference stack.
One inside each recessed post. Listed height 0.298 in (7.57 mm)–0.328 in (8.33 mm); two full threads beyond nylon, entire tail below post face. Hand-tighten to avoid stainless galling; never force seized threads.
Materials and hardware · continued
Choose ONE veneer species: two 48 × 96 in (1219.2 × 2438.4 mm) sheets. Trial stock is included. Resolve receiving holds before dependent work. Product identity checks do not guarantee destination stock or physical fit.
Select one individual kit: two brackets, one 6 in (152.4 mm) cable, two clevis pins, two keeper pins, two #8 × 5/8 in (15.88 mm) furniture screws and two #8 × 1 1/2 in (38.1 mm) wall screws. Received hardware controls holes. Secure the wall bracket to a verified stud; masonry requires a qualified fixing choice. No drywall-only fixing or enclosure rating is implied. The two short furniture screws are included, not a separate purchase. Retain site-specific wall anchorage and cable acceptance as an open hold.
4 × 8 ft selected species / 3M PSA; configuration to confirm Needed 2; 1 per package; buy 2 package(s) Choose one species
Full exterior, edges/reveals and trial; supplier balance/backer/adhesive and cured-finish acceptance required
Materials and hardware · continued
Choose ONE veneer species: two 48 × 96 in (1219.2 × 2438.4 mm) sheets. Trial stock is included. Resolve receiving holds before dependent work. Product identity checks do not guarantee destination stock or physical fit.
4 × 8 ft selected species / 3M PSA; configuration to confirm Needed 2; 1 per package; buy 2 package(s) Choose one species
Full exterior, edges/reveals and trial; supplier balance/backer/adhesive and cured-finish acceptance required
Cut list
Cut list
One of each named ID. Rough blanks include scheduled trimming. Thickness is the prepared blank. Screen captures and liner clamps use 3/4-inch (19.05 mm) pine planed to 3/8 inch (9.53 mm) before ripping. Other parts use their listed prepared gauges; fit glazing spacers to the accepted installed stack. Reference finished sizes need actual-material fitting. V-parts represent the complete cured veneer stack. Cut the one acrylic pane only after the cured pocket, actual thickness and movement clearance are measured. SETL layer IDs are individual dry layers; two form each lower setting support.
Part
Rough length × width × prepared thickness
Reference finished size
P01 · Floor
24 1/8 in (612.78 mm) × 24 1/16 in (611.19 mm) × 45/64 in (17.86 mm)
24 in (609.6 mm) × 24 in (609.6 mm) × 45/64 in (17.86 mm)
P02 · Removable roof
24 1/8 in (612.78 mm) × 24 1/16 in (611.19 mm) × 45/64 in (17.86 mm)
24 in (609.6 mm) × 24 in (609.6 mm) × 45/64 in (17.86 mm)
P03L · L wall
46 23/32 in (1186.66 mm) × 24 1/16 in (611.19 mm) × 45/64 in (17.86 mm)
46 19/32 in (1183.48 mm) × 24 in (609.6 mm) × 45/64 in (17.86 mm)
P03R · R wall
46 23/32 in (1186.66 mm) × 24 1/16 in (611.19 mm) × 45/64 in (17.86 mm)
46 19/32 in (1183.48 mm) × 24 in (609.6 mm) × 45/64 in (17.86 mm)
P04 · Back
22 23/32 in (577.06 mm) × 46 21/32 in (1185.07 mm) × 45/64 in (17.86 mm)
22 19/32 in (573.88 mm) × 46 19/32 in (1183.48 mm) × 45/64 in (17.86 mm)
CLB · L bottom cleat
21 11/64 in (537.77 mm) × 1 1/2 in (38.1 mm) × 1 1/2 in (38.1 mm)
21 3/64 in (534.59 mm) × 1 1/2 in (38.1 mm) × 1 1/2 in (38.1 mm)
CLU · L rear upright
43 23/32 in (1110.46 mm) × 1 1/2 in (38.1 mm) × 1 1/2 in (38.1 mm)
43 19/32 in (1107.28 mm) × 1 1/2 in (38.1 mm) × 1 1/2 in (38.1 mm)
CLT · L upper cleat
21 11/64 in (537.77 mm) × 1 1/2 in (38.1 mm) × 1 1/2 in (38.1 mm)
21 3/64 in (534.59 mm) × 1 1/2 in (38.1 mm) × 1 1/2 in (38.1 mm)
CRB · R bottom cleat
21 11/64 in (537.77 mm) × 1 1/2 in (38.1 mm) × 1 1/2 in (38.1 mm)
21 3/64 in (534.59 mm) × 1 1/2 in (38.1 mm) × 1 1/2 in (38.1 mm)
CRU · R rear upright
43 23/32 in (1110.46 mm) × 1 1/2 in (38.1 mm) × 1 1/2 in (38.1 mm)
43 19/32 in (1107.28 mm) × 1 1/2 in (38.1 mm) × 1 1/2 in (38.1 mm)
Cut list · continued
One of each named ID. Rough blanks include scheduled trimming. Thickness is the prepared blank. Screen captures and liner clamps use 3/4-inch (19.05 mm) pine planed to 3/8 inch (9.53 mm) before ripping. Other parts use their listed prepared gauges; fit glazing spacers to the accepted installed stack. Reference finished sizes need actual-material fitting. V-parts represent the complete cured veneer stack. Cut the one acrylic pane only after the cured pocket, actual thickness and movement clearance are measured. SETL layer IDs are individual dry layers; two form each lower setting support.
Part
Rough length × width × prepared thickness
Reference finished size
CRT · R upper cleat
21 11/64 in (537.77 mm) × 1 1/2 in (38.1 mm) × 1 1/2 in (38.1 mm)
21 3/64 in (534.59 mm) × 1 1/2 in (38.1 mm) × 1 1/2 in (38.1 mm)
CB · Back floor cleat
19 23/32 in (500.86 mm) × 1 1/2 in (38.1 mm) × 1 1/2 in (38.1 mm)
19 19/32 in (497.68 mm) × 1 1/2 in (38.1 mm) × 1 1/2 in (38.1 mm)
CT · Back upper cleat
19 23/32 in (500.86 mm) × 1 1/2 in (38.1 mm) × 1 1/2 in (38.1 mm)
19 19/32 in (497.68 mm) × 1 1/2 in (38.1 mm) × 1 1/2 in (38.1 mm)
AR1 · Solid-pine restraint rail layer
22 23/32 in (577.06 mm) × 3 9/16 in (90.49 mm) × 3/4 in (19.05 mm)
22 19/32 in (573.88 mm) × 3 1/2 in (88.9 mm) × 3/4 in (19.05 mm)
AR2 · Solid-pine restraint rail layer
22 23/32 in (577.06 mm) × 3 9/16 in (90.49 mm) × 3/4 in (19.05 mm)
22 19/32 in (573.88 mm) × 3 1/2 in (88.9 mm) × 3/4 in (19.05 mm)
F0L · Fixed front upright layer
46 23/32 in (1186.66 mm) × 2 9/16 in (65.09 mm) × 3/4 in (19.05 mm)
46 19/32 in (1183.48 mm) × 2 1/2 in (63.5 mm) × 3/4 in (19.05 mm)
F0R · Fixed front upright layer
46 23/32 in (1186.66 mm) × 2 9/16 in (65.09 mm) × 3/4 in (19.05 mm)
46 19/32 in (1183.48 mm) × 2 1/2 in (63.5 mm) × 3/4 in (19.05 mm)
F0B · Fixed front rail layer
17 23/32 in (450.06 mm) × 2 9/16 in (65.09 mm) × 3/4 in (19.05 mm)
17 19/32 in (446.88 mm) × 2 1/2 in (63.5 mm) × 3/4 in (19.05 mm)
F0T · Fixed front rail layer
17 23/32 in (450.06 mm) × 2 9/16 in (65.09 mm) × 3/4 in (19.05 mm)
17 19/32 in (446.88 mm) × 2 1/2 in (63.5 mm) × 3/4 in (19.05 mm)
F1L · Fixed front upright layer
41 23/32 in (1059.66 mm) × 2 9/16 in (65.09 mm) × 3/4 in (19.05 mm)
41 19/32 in (1056.48 mm) × 2 1/2 in (63.5 mm) × 3/4 in (19.05 mm)
Cut list · continued
One of each named ID. Rough blanks include scheduled trimming. Thickness is the prepared blank. Screen captures and liner clamps use 3/4-inch (19.05 mm) pine planed to 3/8 inch (9.53 mm) before ripping. Other parts use their listed prepared gauges; fit glazing spacers to the accepted installed stack. Reference finished sizes need actual-material fitting. V-parts represent the complete cured veneer stack. Cut the one acrylic pane only after the cured pocket, actual thickness and movement clearance are measured. SETL layer IDs are individual dry layers; two form each lower setting support.
Part
Rough length × width × prepared thickness
Reference finished size
F1R · Fixed front upright layer
41 23/32 in (1059.66 mm) × 2 9/16 in (65.09 mm) × 3/4 in (19.05 mm)
41 19/32 in (1056.48 mm) × 2 1/2 in (63.5 mm) × 3/4 in (19.05 mm)
F1B · Fixed front rail layer
22 23/32 in (577.06 mm) × 2 9/16 in (65.09 mm) × 3/4 in (19.05 mm)
22 19/32 in (573.88 mm) × 2 1/2 in (63.5 mm) × 3/4 in (19.05 mm)
F1T · Fixed front rail layer
22 23/32 in (577.06 mm) × 2 9/16 in (65.09 mm) × 3/4 in (19.05 mm)
22 19/32 in (573.88 mm) × 2 1/2 in (63.5 mm) × 3/4 in (19.05 mm)
F2L · Fixed front upright layer
46 23/32 in (1186.66 mm) × 2 9/16 in (65.09 mm) × 3/4 in (19.05 mm)
46 19/32 in (1183.48 mm) × 2 1/2 in (63.5 mm) × 3/4 in (19.05 mm)
F2R · Fixed front upright layer
46 23/32 in (1186.66 mm) × 2 9/16 in (65.09 mm) × 3/4 in (19.05 mm)
46 19/32 in (1183.48 mm) × 2 1/2 in (63.5 mm) × 3/4 in (19.05 mm)
F2B · Fixed front rail layer
17 23/32 in (450.06 mm) × 2 9/16 in (65.09 mm) × 3/4 in (19.05 mm)
17 19/32 in (446.88 mm) × 2 1/2 in (63.5 mm) × 3/4 in (19.05 mm)
F2T · Fixed front rail layer
17 23/32 in (450.06 mm) × 2 9/16 in (65.09 mm) × 3/4 in (19.05 mm)
17 19/32 in (446.88 mm) × 2 1/2 in (63.5 mm) × 3/4 in (19.05 mm)
RBL1 · Removable retainer lamination
17 13/32 in (442.12 mm) × 7 11/16 in (195.26 mm) × 45/64 in (17.86 mm)
17 9/32 in (438.94 mm) × 7 5/8 in (193.68 mm) × 45/64 in (17.86 mm)
RBL2 · Removable retainer lamination
17 13/32 in (442.12 mm) × 7 11/16 in (195.26 mm) × 45/64 in (17.86 mm)
17 9/32 in (438.94 mm) × 7 5/8 in (193.68 mm) × 45/64 in (17.86 mm)
RCLL · Retainer bolt receiver
7 3/4 in (196.85 mm) × 1 1/2 in (38.1 mm) × 1 1/2 in (38.1 mm)
7 5/8 in (193.68 mm) × 1 1/2 in (38.1 mm) × 1 1/2 in (38.1 mm)
Cut list · continued
One of each named ID. Rough blanks include scheduled trimming. Thickness is the prepared blank. Screen captures and liner clamps use 3/4-inch (19.05 mm) pine planed to 3/8 inch (9.53 mm) before ripping. Other parts use their listed prepared gauges; fit glazing spacers to the accepted installed stack. Reference finished sizes need actual-material fitting. V-parts represent the complete cured veneer stack. Cut the one acrylic pane only after the cured pocket, actual thickness and movement clearance are measured. SETL layer IDs are individual dry layers; two form each lower setting support.
Part
Rough length × width × prepared thickness
Reference finished size
RCLR · Retainer bolt receiver
7 3/4 in (196.85 mm) × 1 1/2 in (38.1 mm) × 1 1/2 in (38.1 mm)
7 5/8 in (193.68 mm) × 1 1/2 in (38.1 mm) × 1 1/2 in (38.1 mm)
ML · L vent mesh
13 in (330.2 mm) × 5 in (127 mm) × 0.082 in (2.08 mm)
13 in (330.2 mm) × 5 in (127 mm) × 0.082 in (2.08 mm)
VLB · Vent capture strip
14 1/8 in (358.78 mm) × 1 1/16 in (26.99 mm) × 3/8 in (9.53 mm)
14 in (355.6 mm) × 1 in (25.4 mm) × 3/8 in (9.53 mm)
VLT · Vent capture strip
14 1/8 in (358.78 mm) × 1 1/16 in (26.99 mm) × 3/8 in (9.53 mm)
14 in (355.6 mm) × 1 in (25.4 mm) × 3/8 in (9.53 mm)
VLF · Vent end strip
4 1/8 in (104.78 mm) × 1 1/16 in (26.99 mm) × 3/8 in (9.53 mm)
4 in (101.6 mm) × 1 in (25.4 mm) × 3/8 in (9.53 mm)
VLA · Vent end strip
4 1/8 in (104.78 mm) × 1 1/16 in (26.99 mm) × 3/8 in (9.53 mm)
4 in (101.6 mm) × 1 in (25.4 mm) × 3/8 in (9.53 mm)
MR · R vent mesh
13 in (330.2 mm) × 5 in (127 mm) × 0.082 in (2.08 mm)
13 in (330.2 mm) × 5 in (127 mm) × 0.082 in (2.08 mm)
VRB · Vent capture strip
14 1/8 in (358.78 mm) × 1 1/16 in (26.99 mm) × 3/8 in (9.53 mm)
14 in (355.6 mm) × 1 in (25.4 mm) × 3/8 in (9.53 mm)
VRT · Vent capture strip
14 1/8 in (358.78 mm) × 1 1/16 in (26.99 mm) × 3/8 in (9.53 mm)
14 in (355.6 mm) × 1 in (25.4 mm) × 3/8 in (9.53 mm)
VRF · Vent end strip
4 1/8 in (104.78 mm) × 1 1/16 in (26.99 mm) × 3/8 in (9.53 mm)
4 in (101.6 mm) × 1 in (25.4 mm) × 3/8 in (9.53 mm)
Cut list · continued
One of each named ID. Rough blanks include scheduled trimming. Thickness is the prepared blank. Screen captures and liner clamps use 3/4-inch (19.05 mm) pine planed to 3/8 inch (9.53 mm) before ripping. Other parts use their listed prepared gauges; fit glazing spacers to the accepted installed stack. Reference finished sizes need actual-material fitting. V-parts represent the complete cured veneer stack. Cut the one acrylic pane only after the cured pocket, actual thickness and movement clearance are measured. SETL layer IDs are individual dry layers; two form each lower setting support.
Part
Rough length × width × prepared thickness
Reference finished size
VRA · Vent end strip
4 1/8 in (104.78 mm) × 1 1/16 in (26.99 mm) × 3/8 in (9.53 mm)
4 in (101.6 mm) × 1 in (25.4 mm) × 3/8 in (9.53 mm)
MTL · Roof mesh
17 in (431.8 mm) × 15 in (381 mm) × 0.082 in (2.08 mm)
17 in (431.8 mm) × 15 in (381 mm) × 0.082 in (2.08 mm)
RTLF · Roof capture strip
16 1/8 in (409.58 mm) × 1 1/16 in (26.99 mm) × 3/8 in (9.53 mm)
16 in (406.4 mm) × 1 in (25.4 mm) × 3/8 in (9.53 mm)
RTLA · Roof capture strip
16 1/8 in (409.58 mm) × 1 1/16 in (26.99 mm) × 3/8 in (9.53 mm)
16 in (406.4 mm) × 1 in (25.4 mm) × 3/8 in (9.53 mm)
RTLL · Roof end capture
16 1/8 in (409.58 mm) × 1 1/16 in (26.99 mm) × 3/8 in (9.53 mm)
16 in (406.4 mm) × 1 in (25.4 mm) × 3/8 in (9.53 mm)
RTLR · Roof end capture
16 1/8 in (409.58 mm) × 1 1/16 in (26.99 mm) × 3/8 in (9.53 mm)
16 in (406.4 mm) × 1 in (25.4 mm) × 3/8 in (9.53 mm)
DL0L · Door stile layer
33 23/32 in (856.46 mm) × 3 1/2 in (88.9 mm) × 3/4 in (19.05 mm)
33 19/32 in (853.28 mm) × 3 7/16 in (87.31 mm) × 3/4 in (19.05 mm)
DL0R · Door stile layer
33 23/32 in (856.46 mm) × 3 17/32 in (89.69 mm) × 3/4 in (19.05 mm)
33 19/32 in (853.28 mm) × 3 15/32 in (88.11 mm) × 3/4 in (19.05 mm)
DL0B · Door rail layer
10 15/32 in (265.91 mm) × 3 1/2 in (88.9 mm) × 3/4 in (19.05 mm)
10 11/32 in (262.73 mm) × 3 7/16 in (87.31 mm) × 3/4 in (19.05 mm)
DL0T · Door rail layer
10 15/32 in (265.91 mm) × 3 1/2 in (88.9 mm) × 3/4 in (19.05 mm)
10 11/32 in (262.73 mm) × 3 7/16 in (87.31 mm) × 3/4 in (19.05 mm)
Cut list · continued
One of each named ID. Rough blanks include scheduled trimming. Thickness is the prepared blank. Screen captures and liner clamps use 3/4-inch (19.05 mm) pine planed to 3/8 inch (9.53 mm) before ripping. Other parts use their listed prepared gauges; fit glazing spacers to the accepted installed stack. Reference finished sizes need actual-material fitting. V-parts represent the complete cured veneer stack. Cut the one acrylic pane only after the cured pocket, actual thickness and movement clearance are measured. SETL layer IDs are individual dry layers; two form each lower setting support.
Part
Rough length × width × prepared thickness
Reference finished size
DL1L · Door stile layer
26 27/32 in (681.83 mm) × 3 1/2 in (88.9 mm) × 3/4 in (19.05 mm)
26 23/32 in (678.66 mm) × 3 7/16 in (87.31 mm) × 3/4 in (19.05 mm)
DL1R · Door stile layer
26 27/32 in (681.83 mm) × 3 17/32 in (89.69 mm) × 3/4 in (19.05 mm)
26 23/32 in (678.66 mm) × 3 15/32 in (88.11 mm) × 3/4 in (19.05 mm)
DL1B · Door rail layer
17 3/8 in (441.33 mm) × 3 1/2 in (88.9 mm) × 3/4 in (19.05 mm)
17 1/4 in (438.15 mm) × 3 7/16 in (87.31 mm) × 3/4 in (19.05 mm)
DL1T · Door rail layer
17 3/8 in (441.33 mm) × 3 1/2 in (88.9 mm) × 3/4 in (19.05 mm)
17 1/4 in (438.15 mm) × 3 7/16 in (87.31 mm) × 3/4 in (19.05 mm)
GL · Unpierced OPTIX acrylic pane
27 27/32 in (707.23 mm) × 11 13/32 in (289.72 mm) × 0.22 in (5.59 mm)
27 23/32 in (704.06 mm) × 11 11/32 in (288.13 mm) × 0.22 in (5.59 mm)
SPLL · Glazing side spacer
29 19/32 in (751.68 mm) × 13/16 in (20.64 mm) × 3/8 in (9.53 mm)
29 15/32 in (748.51 mm) × 3/4 in (19.05 mm) × 0.351 in (8.92 mm)
SPLR · Glazing side spacer
29 19/32 in (751.68 mm) × 13/16 in (20.64 mm) × 3/8 in (9.53 mm)
29 15/32 in (748.51 mm) × 3/4 in (19.05 mm) × 0.351 in (8.92 mm)
SPLB · Glazing end spacer
11 23/32 in (297.66 mm) × 13/16 in (20.64 mm) × 3/8 in (9.53 mm)
11 19/32 in (294.48 mm) × 3/4 in (19.05 mm) × 0.351 in (8.92 mm)
SPLT · Glazing end spacer
11 23/32 in (297.66 mm) × 13/16 in (20.64 mm) × 3/8 in (9.53 mm)
11 19/32 in (294.48 mm) × 3/4 in (19.05 mm) × 0.351 in (8.92 mm)
BELL · Removable glazing side bead
29 19/32 in (751.68 mm) × 1 5/16 in (33.34 mm) × 1/4 in (6.35 mm)
29 15/32 in (748.51 mm) × 1 1/4 in (31.75 mm) × 1/4 in (6.35 mm)
Cut list · continued
One of each named ID. Rough blanks include scheduled trimming. Thickness is the prepared blank. Screen captures and liner clamps use 3/4-inch (19.05 mm) pine planed to 3/8 inch (9.53 mm) before ripping. Other parts use their listed prepared gauges; fit glazing spacers to the accepted installed stack. Reference finished sizes need actual-material fitting. V-parts represent the complete cured veneer stack. Cut the one acrylic pane only after the cured pocket, actual thickness and movement clearance are measured. SETL layer IDs are individual dry layers; two form each lower setting support.
Part
Rough length × width × prepared thickness
Reference finished size
BELR · Removable glazing side bead
29 19/32 in (751.68 mm) × 1 5/16 in (33.34 mm) × 1/4 in (6.35 mm)
29 15/32 in (748.51 mm) × 1 1/4 in (31.75 mm) × 1/4 in (6.35 mm)
BELB · Removable glazing end bead
10 23/32 in (272.26 mm) × 1 5/16 in (33.34 mm) × 1/4 in (6.35 mm)
10 19/32 in (269.08 mm) × 1 1/4 in (31.75 mm) × 1/4 in (6.35 mm)
BELT · Removable glazing end bead
10 23/32 in (272.26 mm) × 1 5/16 in (33.34 mm) × 1/4 in (6.35 mm)
10 19/32 in (269.08 mm) × 1 1/4 in (31.75 mm) × 1/4 in (6.35 mm)
PADLLF · Dry glazing face pad
27 23/32 in (704.06 mm) × 3/8 in (9.53 mm) × 1/16 in (1.59 mm)
27 23/32 in (704.06 mm) × 3/8 in (9.53 mm) × 1/16 in (1.59 mm)
PADLLB · Dry glazing face pad
27 23/32 in (704.06 mm) × 3/8 in (9.53 mm) × 1/16 in (1.59 mm)
27 23/32 in (704.06 mm) × 3/8 in (9.53 mm) × 1/16 in (1.59 mm)
PADLRF · Dry glazing face pad
27 23/32 in (704.06 mm) × 3/8 in (9.53 mm) × 1/16 in (1.59 mm)
27 23/32 in (704.06 mm) × 3/8 in (9.53 mm) × 1/16 in (1.59 mm)
PADLRB · Dry glazing face pad
27 23/32 in (704.06 mm) × 3/8 in (9.53 mm) × 1/16 in (1.59 mm)
27 23/32 in (704.06 mm) × 3/8 in (9.53 mm) × 1/16 in (1.59 mm)
PADLBF · Dry glazing end pad
10 19/32 in (269.08 mm) × 3/8 in (9.53 mm) × 1/16 in (1.59 mm)
10 19/32 in (269.08 mm) × 3/8 in (9.53 mm) × 1/16 in (1.59 mm)
PADLBB · Dry glazing end pad
10 19/32 in (269.08 mm) × 3/8 in (9.53 mm) × 1/16 in (1.59 mm)
10 19/32 in (269.08 mm) × 3/8 in (9.53 mm) × 1/16 in (1.59 mm)
PADLTF · Dry glazing end pad
10 19/32 in (269.08 mm) × 3/8 in (9.53 mm) × 1/16 in (1.59 mm)
10 19/32 in (269.08 mm) × 3/8 in (9.53 mm) × 1/16 in (1.59 mm)
Cut list · continued
One of each named ID. Rough blanks include scheduled trimming. Thickness is the prepared blank. Screen captures and liner clamps use 3/4-inch (19.05 mm) pine planed to 3/8 inch (9.53 mm) before ripping. Other parts use their listed prepared gauges; fit glazing spacers to the accepted installed stack. Reference finished sizes need actual-material fitting. V-parts represent the complete cured veneer stack. Cut the one acrylic pane only after the cured pocket, actual thickness and movement clearance are measured. SETL layer IDs are individual dry layers; two form each lower setting support.
Part
Rough length × width × prepared thickness
Reference finished size
PADLTB · Dry glazing end pad
10 19/32 in (269.08 mm) × 3/8 in (9.53 mm) × 1/16 in (1.59 mm)
10 19/32 in (269.08 mm) × 3/8 in (9.53 mm) × 1/16 in (1.59 mm)
LCL · Side liner clamp
18 35/64 in (471.09 mm) × 9/16 in (14.29 mm) × 3/8 in (9.53 mm)
18 27/64 in (467.92 mm) × 1/2 in (12.7 mm) × 3/8 in (9.53 mm)
LCR · Side liner clamp
18 35/64 in (471.09 mm) × 9/16 in (14.29 mm) × 3/8 in (9.53 mm)
18 27/64 in (467.92 mm) × 1/2 in (12.7 mm) × 3/8 in (9.53 mm)
LCFJ1 · Front liner clamp
2 1/4 in (57.15 mm) × 9/16 in (14.29 mm) × 3/8 in (9.53 mm)
2 1/8 in (53.98 mm) × 1/2 in (12.7 mm) × 3/8 in (9.53 mm)
LCFRL · Front liner clamp
1 3/8 in (34.93 mm) × 9/16 in (14.29 mm) × 3/8 in (9.53 mm)
1 1/4 in (31.75 mm) × 1/2 in (12.7 mm) × 3/8 in (9.53 mm)
LCFPL · Front liner clamp
14 15/32 in (367.51 mm) × 9/16 in (14.29 mm) × 3/8 in (9.53 mm)
14 11/32 in (364.33 mm) × 1/2 in (12.7 mm) × 3/8 in (9.53 mm)
LCFRR · Front liner clamp
1 3/8 in (34.93 mm) × 9/16 in (14.29 mm) × 3/8 in (9.53 mm)
1 1/4 in (31.75 mm) × 1/2 in (12.7 mm) × 3/8 in (9.53 mm)
LCFJ2 · Front liner clamp
2 1/4 in (57.15 mm) × 9/16 in (14.29 mm) × 3/8 in (9.53 mm)
2 1/8 in (53.98 mm) × 1/2 in (12.7 mm) × 3/8 in (9.53 mm)
LCB1 · Back liner clamp
18.80875 in (477.74 mm) × 9/16 in (14.29 mm) × 3/8 in (9.53 mm)
18.68375 in (474.57 mm) × 1/2 in (12.7 mm) × 3/8 in (9.53 mm)
LCPL · Rear post liner clamp
1 1/2 in (38.1 mm) × 9/16 in (14.29 mm) × 3/8 in (9.53 mm)
1 3/8 in (34.93 mm) × 1/2 in (12.7 mm) × 3/8 in (9.53 mm)
Cut list · continued
One of each named ID. Rough blanks include scheduled trimming. Thickness is the prepared blank. Screen captures and liner clamps use 3/4-inch (19.05 mm) pine planed to 3/8 inch (9.53 mm) before ripping. Other parts use their listed prepared gauges; fit glazing spacers to the accepted installed stack. Reference finished sizes need actual-material fitting. V-parts represent the complete cured veneer stack. Cut the one acrylic pane only after the cured pocket, actual thickness and movement clearance are measured. SETL layer IDs are individual dry layers; two form each lower setting support.
Part
Rough length × width × prepared thickness
Reference finished size
LCPR · Rear post liner clamp
1 1/2 in (38.1 mm) × 9/16 in (14.29 mm) × 3/8 in (9.53 mm)
1 3/8 in (34.93 mm) × 1/2 in (12.7 mm) × 3/8 in (9.53 mm)
SETL0-layer-1 · Dry lower setting-pad layer 1
1 in (25.4 mm) × 0.22 in (5.59 mm) × 1/16 in (1.59 mm)
1 in (25.4 mm) × 0.22 in (5.59 mm) × 1/16 in (1.59 mm)
SETL0-layer-2 · Dry lower setting-pad layer 2
1 in (25.4 mm) × 0.22 in (5.59 mm) × 1/16 in (1.59 mm)
1 in (25.4 mm) × 0.22 in (5.59 mm) × 1/16 in (1.59 mm)
SETL1-layer-1 · Dry lower setting-pad layer 1
1 in (25.4 mm) × 0.22 in (5.59 mm) × 1/16 in (1.59 mm)
1 in (25.4 mm) × 0.22 in (5.59 mm) × 1/16 in (1.59 mm)
SETL1-layer-2 · Dry lower setting-pad layer 2
1 in (25.4 mm) × 0.22 in (5.59 mm) × 1/16 in (1.59 mm)
1 in (25.4 mm) × 0.22 in (5.59 mm) × 1/16 in (1.59 mm)
V-floor-under · Veneer · floor-under
24.561 in (623.85 mm) × 24.561 in (623.85 mm) × 0.0305 in (0.77 mm)
24.061 in (611.15 mm) × 24.061 in (611.15 mm) × 0.0305 in (0.77 mm)
V-roof-top · Veneer · roof-top
24.561 in (623.85 mm) × 24.561 in (623.85 mm) × 0.0305 in (0.77 mm)
24.061 in (611.15 mm) × 24.061 in (611.15 mm) × 0.0305 in (0.77 mm)
V-P01-front · Veneer · P01-front
24.561 in (623.85 mm) × 1 13/64 in (30.56 mm) × 0.0305 in (0.77 mm)
24.061 in (611.15 mm) × 45/64 in (17.86 mm) × 0.0305 in (0.77 mm)
V-P01-back · Veneer · P01-back
24.561 in (623.85 mm) × 1 13/64 in (30.56 mm) × 0.0305 in (0.77 mm)
24.061 in (611.15 mm) × 45/64 in (17.86 mm) × 0.0305 in (0.77 mm)
V-P01-left · Veneer · P01-left
24 1/2 in (622.3 mm) × 1 13/64 in (30.56 mm) × 0.0305 in (0.77 mm)
24 in (609.6 mm) × 45/64 in (17.86 mm) × 0.0305 in (0.77 mm)
Cut list · continued
One of each named ID. Rough blanks include scheduled trimming. Thickness is the prepared blank. Screen captures and liner clamps use 3/4-inch (19.05 mm) pine planed to 3/8 inch (9.53 mm) before ripping. Other parts use their listed prepared gauges; fit glazing spacers to the accepted installed stack. Reference finished sizes need actual-material fitting. V-parts represent the complete cured veneer stack. Cut the one acrylic pane only after the cured pocket, actual thickness and movement clearance are measured. SETL layer IDs are individual dry layers; two form each lower setting support.
Part
Rough length × width × prepared thickness
Reference finished size
V-P01-right · Veneer · P01-right
24 1/2 in (622.3 mm) × 1 13/64 in (30.56 mm) × 0.0305 in (0.77 mm)
24 in (609.6 mm) × 45/64 in (17.86 mm) × 0.0305 in (0.77 mm)
V-P02-front · Veneer · P02-front
24.561 in (623.85 mm) × 1 13/64 in (30.56 mm) × 0.0305 in (0.77 mm)
24.061 in (611.15 mm) × 45/64 in (17.86 mm) × 0.0305 in (0.77 mm)
V-P02-back · Veneer · P02-back
24.561 in (623.85 mm) × 1 13/64 in (30.56 mm) × 0.0305 in (0.77 mm)
24.061 in (611.15 mm) × 45/64 in (17.86 mm) × 0.0305 in (0.77 mm)
V-P02-left · Veneer · P02-left
24 1/2 in (622.3 mm) × 1 13/64 in (30.56 mm) × 0.0305 in (0.77 mm)
24 in (609.6 mm) × 45/64 in (17.86 mm) × 0.0305 in (0.77 mm)
V-P02-right · Veneer · P02-right
24 1/2 in (622.3 mm) × 1 13/64 in (30.56 mm) × 0.0305 in (0.77 mm)
24 in (609.6 mm) × 45/64 in (17.86 mm) × 0.0305 in (0.77 mm)
V-P03L-face · Veneer · P03L-face
47 3/32 in (1196.18 mm) × 24 1/2 in (622.3 mm) × 0.0305 in (0.77 mm)
46 19/32 in (1183.48 mm) × 24 in (609.6 mm) × 0.0305 in (0.77 mm)
V-P03L-front · Veneer · P03L-front
47 3/32 in (1196.18 mm) × 1.233625 in (31.33 mm) × 0.0305 in (0.77 mm)
46 19/32 in (1183.48 mm) × 0.733625 in (18.63 mm) × 0.0305 in (0.77 mm)
V-P03L-back · Veneer · P03L-back
47 3/32 in (1196.18 mm) × 1.233625 in (31.33 mm) × 0.0305 in (0.77 mm)
46 19/32 in (1183.48 mm) × 0.733625 in (18.63 mm) × 0.0305 in (0.77 mm)
V-P03L-vent-near · Veneer · P03L-vent-near
4.439 in (112.75 mm) × 1 13/64 in (30.56 mm) × 0.0305 in (0.77 mm)
3.939 in (100.05 mm) × 45/64 in (17.86 mm) × 0.0305 in (0.77 mm)
V-P03L-vent-far · Veneer · P03L-vent-far
4.439 in (112.75 mm) × 1 13/64 in (30.56 mm) × 0.0305 in (0.77 mm)
3.939 in (100.05 mm) × 45/64 in (17.86 mm) × 0.0305 in (0.77 mm)
Cut list · continued
One of each named ID. Rough blanks include scheduled trimming. Thickness is the prepared blank. Screen captures and liner clamps use 3/4-inch (19.05 mm) pine planed to 3/8 inch (9.53 mm) before ripping. Other parts use their listed prepared gauges; fit glazing spacers to the accepted installed stack. Reference finished sizes need actual-material fitting. V-parts represent the complete cured veneer stack. Cut the one acrylic pane only after the cured pocket, actual thickness and movement clearance are measured. SETL layer IDs are individual dry layers; two form each lower setting support.
Part
Rough length × width × prepared thickness
Reference finished size
V-P03L-vent-bottom · Veneer · P03L-vent-bottom
12 1/2 in (317.5 mm) × 1 13/64 in (30.56 mm) × 0.0305 in (0.77 mm)
12 in (304.8 mm) × 45/64 in (17.86 mm) × 0.0305 in (0.77 mm)
V-P03L-vent-top · Veneer · P03L-vent-top
12 1/2 in (317.5 mm) × 1 13/64 in (30.56 mm) × 0.0305 in (0.77 mm)
12 in (304.8 mm) × 45/64 in (17.86 mm) × 0.0305 in (0.77 mm)
V-P03R-face · Veneer · P03R-face
47 3/32 in (1196.18 mm) × 24 1/2 in (622.3 mm) × 0.0305 in (0.77 mm)
46 19/32 in (1183.48 mm) × 24 in (609.6 mm) × 0.0305 in (0.77 mm)
V-P03R-front · Veneer · P03R-front
47 3/32 in (1196.18 mm) × 1.233625 in (31.33 mm) × 0.0305 in (0.77 mm)
46 19/32 in (1183.48 mm) × 0.733625 in (18.63 mm) × 0.0305 in (0.77 mm)
V-P03R-back · Veneer · P03R-back
47 3/32 in (1196.18 mm) × 1.233625 in (31.33 mm) × 0.0305 in (0.77 mm)
46 19/32 in (1183.48 mm) × 0.733625 in (18.63 mm) × 0.0305 in (0.77 mm)
V-P03R-vent-near · Veneer · P03R-vent-near
4.439 in (112.75 mm) × 1 13/64 in (30.56 mm) × 0.0305 in (0.77 mm)
3.939 in (100.05 mm) × 45/64 in (17.86 mm) × 0.0305 in (0.77 mm)
V-P03R-vent-far · Veneer · P03R-vent-far
4.439 in (112.75 mm) × 1 13/64 in (30.56 mm) × 0.0305 in (0.77 mm)
3.939 in (100.05 mm) × 45/64 in (17.86 mm) × 0.0305 in (0.77 mm)
V-P03R-vent-bottom · Veneer · P03R-vent-bottom
12 1/2 in (317.5 mm) × 1 13/64 in (30.56 mm) × 0.0305 in (0.77 mm)
12 in (304.8 mm) × 45/64 in (17.86 mm) × 0.0305 in (0.77 mm)
V-P03R-vent-top · Veneer · P03R-vent-top
12 1/2 in (317.5 mm) × 1 13/64 in (30.56 mm) × 0.0305 in (0.77 mm)
12 in (304.8 mm) × 45/64 in (17.86 mm) × 0.0305 in (0.77 mm)
V-back · Veneer · back
23 3/32 in (586.58 mm) × 47 3/32 in (1196.18 mm) × 0.0305 in (0.77 mm)
22 19/32 in (573.88 mm) × 46 19/32 in (1183.48 mm) × 0.0305 in (0.77 mm)
Cut list · continued
One of each named ID. Rough blanks include scheduled trimming. Thickness is the prepared blank. Screen captures and liner clamps use 3/4-inch (19.05 mm) pine planed to 3/8 inch (9.53 mm) before ripping. Other parts use their listed prepared gauges; fit glazing spacers to the accepted installed stack. Reference finished sizes need actual-material fitting. V-parts represent the complete cured veneer stack. Cut the one acrylic pane only after the cured pocket, actual thickness and movement clearance are measured. SETL layer IDs are individual dry layers; two form each lower setting support.
Part
Rough length × width × prepared thickness
Reference finished size
V-restraint-back · Veneer · restraint-back
23 3/32 in (586.58 mm) × 4 in (101.6 mm) × 0.0305 in (0.77 mm)
22 19/32 in (573.88 mm) × 3 1/2 in (88.9 mm) × 0.0305 in (0.77 mm)
V-restraint-left · Veneer · restraint-left
4 in (101.6 mm) × 2 in (50.8 mm) × 0.0305 in (0.77 mm)
3 1/2 in (88.9 mm) × 1 1/2 in (38.1 mm) × 0.0305 in (0.77 mm)
V-restraint-right · Veneer · restraint-right
4 in (101.6 mm) × 2 in (50.8 mm) × 0.0305 in (0.77 mm)
3 1/2 in (88.9 mm) × 1 1/2 in (38.1 mm) × 0.0305 in (0.77 mm)
V-restraint-bottom · Veneer · restraint-bottom
23.15475 in (588.13 mm) × 2 in (50.8 mm) × 0.0305 in (0.77 mm)
22.65475 in (575.43 mm) × 1 1/2 in (38.1 mm) × 0.0305 in (0.77 mm)
V-restraint-top · Veneer · restraint-top
23.15475 in (588.13 mm) × 2 in (50.8 mm) × 0.0305 in (0.77 mm)
22.65475 in (575.43 mm) × 1 1/2 in (38.1 mm) × 0.0305 in (0.77 mm)
V-roof-opening-left · Veneer · roof-opening-left
16.439 in (417.55 mm) × 1 13/64 in (30.56 mm) × 0.0305 in (0.77 mm)
15.939 in (404.85 mm) × 45/64 in (17.86 mm) × 0.0305 in (0.77 mm)
14 1/2 in (368.3 mm) × 1 13/64 in (30.56 mm) × 0.0305 in (0.77 mm)
14 in (355.6 mm) × 45/64 in (17.86 mm) × 0.0305 in (0.77 mm)
V-roof-opening-back · Veneer · roof-opening-back
14 1/2 in (368.3 mm) × 1 13/64 in (30.56 mm) × 0.0305 in (0.77 mm)
14 in (355.6 mm) × 45/64 in (17.86 mm) × 0.0305 in (0.77 mm)
V-F0L-front · Veneer · F0L-front
47 3/32 in (1196.18 mm) × 3 in (76.2 mm) × 0.0305 in (0.77 mm)
46 19/32 in (1183.48 mm) × 2 1/2 in (63.5 mm) × 0.0305 in (0.77 mm)
Cut list · continued
One of each named ID. Rough blanks include scheduled trimming. Thickness is the prepared blank. Screen captures and liner clamps use 3/4-inch (19.05 mm) pine planed to 3/8 inch (9.53 mm) before ripping. Other parts use their listed prepared gauges; fit glazing spacers to the accepted installed stack. Reference finished sizes need actual-material fitting. V-parts represent the complete cured veneer stack. Cut the one acrylic pane only after the cured pocket, actual thickness and movement clearance are measured. SETL layer IDs are individual dry layers; two form each lower setting support.
Part
Rough length × width × prepared thickness
Reference finished size
V-F0R-front · Veneer · F0R-front
47 3/32 in (1196.18 mm) × 3 in (76.2 mm) × 0.0305 in (0.77 mm)
46 19/32 in (1183.48 mm) × 2 1/2 in (63.5 mm) × 0.0305 in (0.77 mm)
V-F0B-front · Veneer · F0B-front
18 3/32 in (459.58 mm) × 3 in (76.2 mm) × 0.0305 in (0.77 mm)
17 19/32 in (446.88 mm) × 2 1/2 in (63.5 mm) × 0.0305 in (0.77 mm)
V-F0T-front · Veneer · F0T-front
18 3/32 in (459.58 mm) × 3 in (76.2 mm) × 0.0305 in (0.77 mm)
17 19/32 in (446.88 mm) × 2 1/2 in (63.5 mm) × 0.0305 in (0.77 mm)
V-opening-left · Veneer · opening-left
42 3/32 in (1069.18 mm) × 2 3/4 in (69.85 mm) × 0.0305 in (0.77 mm)
41 19/32 in (1056.48 mm) × 2 1/4 in (57.15 mm) × 0.0305 in (0.77 mm)
V-opening-right · Veneer · opening-right
42 3/32 in (1069.18 mm) × 2 3/4 in (69.85 mm) × 0.0305 in (0.77 mm)
41 19/32 in (1056.48 mm) × 2 1/4 in (57.15 mm) × 0.0305 in (0.77 mm)
V-opening-head · Veneer · opening-head
18.03275 in (458.03 mm) × 2 3/4 in (69.85 mm) × 0.0305 in (0.77 mm)
17.53275 in (445.33 mm) × 2 1/4 in (57.15 mm) × 0.0305 in (0.77 mm)
V-RBL1-front · Veneer · RBL1-front
17.84225 in (453.19 mm) × 8.1555 in (207.15 mm) × 0.0305 in (0.77 mm)
17.34225 in (440.49 mm) × 7.6555 in (194.45 mm) × 0.0305 in (0.77 mm)
V-retainer-left · Veneer · retainer-left
8 1/8 in (206.38 mm) × 1 29/32 in (48.42 mm) × 0.0305 in (0.77 mm)
7 5/8 in (193.68 mm) × 1 13/32 in (35.72 mm) × 0.0305 in (0.77 mm)
V-retainer-right · Veneer · retainer-right
8 1/8 in (206.38 mm) × 1 29/32 in (48.42 mm) × 0.0305 in (0.77 mm)
7 5/8 in (193.68 mm) × 1 13/32 in (35.72 mm) × 0.0305 in (0.77 mm)
V-retainer-top · Veneer · retainer-top
17.84225 in (453.19 mm) × 1 29/32 in (48.42 mm) × 0.0305 in (0.77 mm)
17.34225 in (440.49 mm) × 1 13/32 in (35.72 mm) × 0.0305 in (0.77 mm)
Cut list · continued
One of each named ID. Rough blanks include scheduled trimming. Thickness is the prepared blank. Screen captures and liner clamps use 3/4-inch (19.05 mm) pine planed to 3/8 inch (9.53 mm) before ripping. Other parts use their listed prepared gauges; fit glazing spacers to the accepted installed stack. Reference finished sizes need actual-material fitting. V-parts represent the complete cured veneer stack. Cut the one acrylic pane only after the cured pocket, actual thickness and movement clearance are measured. SETL layer IDs are individual dry layers; two form each lower setting support.
Part
Rough length × width × prepared thickness
Reference finished size
V-kick-left · Veneer · kick-left
2 3/4 in (69.85 mm) × 0.59525 in (15.12 mm) × 0.0305 in (0.77 mm)
1 25/64 in (35.32 mm) × 0.09525 in (2.42 mm) × 0.0305 in (0.77 mm)
V-kick-right · Veneer · kick-right
2 3/4 in (69.85 mm) × 0.59525 in (15.12 mm) × 0.0305 in (0.77 mm)
1 25/64 in (35.32 mm) × 0.09525 in (2.42 mm) × 0.0305 in (0.77 mm)
V-DL0L-front · Veneer · DL0L-front
34.15475 in (867.53 mm) × 3.968 in (100.79 mm) × 0.0305 in (0.77 mm)
33.65475 in (854.83 mm) × 3.468 in (88.09 mm) × 0.0305 in (0.77 mm)
V-DL0R-front · Veneer · DL0R-front
34.15475 in (867.53 mm) × 3.99925 in (101.58 mm) × 0.0305 in (0.77 mm)
33.65475 in (854.83 mm) × 3.49925 in (88.88 mm) × 0.0305 in (0.77 mm)
V-DL0B-front · Veneer · DL0B-front
10 27/32 in (275.43 mm) × 3.968 in (100.79 mm) × 0.0305 in (0.77 mm)
10 11/32 in (262.73 mm) × 3.468 in (88.09 mm) × 0.0305 in (0.77 mm)
V-DL0T-front · Veneer · DL0T-front
10 27/32 in (275.43 mm) × 3.968 in (100.79 mm) × 0.0305 in (0.77 mm)
10 11/32 in (262.73 mm) × 3.468 in (88.09 mm) × 0.0305 in (0.77 mm)
V-door-left · Veneer · door-left
34 3/32 in (865.98 mm) × 2 in (50.8 mm) × 0.0305 in (0.77 mm)
33 19/32 in (853.28 mm) × 1 1/2 in (38.1 mm) × 0.0305 in (0.77 mm)
V-door-right · Veneer · door-right
34 3/32 in (865.98 mm) × 2 in (50.8 mm) × 0.0305 in (0.77 mm)
33 19/32 in (853.28 mm) × 1 1/2 in (38.1 mm) × 0.0305 in (0.77 mm)
V-door-bottom · Veneer · door-bottom
17.811 in (452.4 mm) × 2 in (50.8 mm) × 0.0305 in (0.77 mm)
17.311 in (439.7 mm) × 1 1/2 in (38.1 mm) × 0.0305 in (0.77 mm)
V-door-top · Veneer · door-top
17.811 in (452.4 mm) × 2 in (50.8 mm) × 0.0305 in (0.77 mm)
17.311 in (439.7 mm) × 1 1/2 in (38.1 mm) × 0.0305 in (0.77 mm)
Cut list · continued
One of each named ID. Rough blanks include scheduled trimming. Thickness is the prepared blank. Screen captures and liner clamps use 3/4-inch (19.05 mm) pine planed to 3/8 inch (9.53 mm) before ripping. Other parts use their listed prepared gauges; fit glazing spacers to the accepted installed stack. Reference finished sizes need actual-material fitting. V-parts represent the complete cured veneer stack. Cut the one acrylic pane only after the cured pocket, actual thickness and movement clearance are measured. SETL layer IDs are individual dry layers; two form each lower setting support.
Part
Rough length × width × prepared thickness
Reference finished size
V-view-left · Veneer · view-left
27.15775 in (689.81 mm) × 2 in (50.8 mm) × 0.0305 in (0.77 mm)
26.65775 in (677.11 mm) × 1 1/2 in (38.1 mm) × 0.0305 in (0.77 mm)
V-view-right · Veneer · view-right
27.15775 in (689.81 mm) × 2 in (50.8 mm) × 0.0305 in (0.77 mm)
26.65775 in (677.11 mm) × 1 1/2 in (38.1 mm) × 0.0305 in (0.77 mm)
V-view-bottom · Veneer · view-bottom
10 27/32 in (275.43 mm) × 2 in (50.8 mm) × 0.0305 in (0.77 mm)
10 11/32 in (262.73 mm) × 1 1/2 in (38.1 mm) × 0.0305 in (0.77 mm)
V-view-top · Veneer · view-top
10 27/32 in (275.43 mm) × 2 in (50.8 mm) × 0.0305 in (0.77 mm)
10 11/32 in (262.73 mm) × 1 1/2 in (38.1 mm) × 0.0305 in (0.77 mm)
V-VLB-outer · Veneer · VLB-outer
14.561 in (369.85 mm) × 1.561 in (39.65 mm) × 0.0305 in (0.77 mm)
14.061 in (357.15 mm) × 1.061 in (26.95 mm) × 0.0305 in (0.77 mm)
V-VLB-low · Veneer · VLB-low
14 1/2 in (368.3 mm) × 7/8 in (22.23 mm) × 0.0305 in (0.77 mm)
14 in (355.6 mm) × 3/8 in (9.53 mm) × 0.0305 in (0.77 mm)
V-VLB-high · Veneer · VLB-high
14 1/2 in (368.3 mm) × 7/8 in (22.23 mm) × 0.0305 in (0.77 mm)
12 in (304.8 mm) × 3/8 in (9.53 mm) × 0.0305 in (0.77 mm)
V-VLB-near · Veneer · VLB-near
1.561 in (39.65 mm) × 7/8 in (22.23 mm) × 0.0305 in (0.77 mm)
1.061 in (26.95 mm) × 3/8 in (9.53 mm) × 0.0305 in (0.77 mm)
V-VLB-far · Veneer · VLB-far
1.561 in (39.65 mm) × 7/8 in (22.23 mm) × 0.0305 in (0.77 mm)
1.061 in (26.95 mm) × 3/8 in (9.53 mm) × 0.0305 in (0.77 mm)
V-VLT-outer · Veneer · VLT-outer
14.561 in (369.85 mm) × 1.561 in (39.65 mm) × 0.0305 in (0.77 mm)
14.061 in (357.15 mm) × 1.061 in (26.95 mm) × 0.0305 in (0.77 mm)
Cut list · continued
One of each named ID. Rough blanks include scheduled trimming. Thickness is the prepared blank. Screen captures and liner clamps use 3/4-inch (19.05 mm) pine planed to 3/8 inch (9.53 mm) before ripping. Other parts use their listed prepared gauges; fit glazing spacers to the accepted installed stack. Reference finished sizes need actual-material fitting. V-parts represent the complete cured veneer stack. Cut the one acrylic pane only after the cured pocket, actual thickness and movement clearance are measured. SETL layer IDs are individual dry layers; two form each lower setting support.
Part
Rough length × width × prepared thickness
Reference finished size
V-VLT-low · Veneer · VLT-low
14 1/2 in (368.3 mm) × 7/8 in (22.23 mm) × 0.0305 in (0.77 mm)
12 in (304.8 mm) × 3/8 in (9.53 mm) × 0.0305 in (0.77 mm)
V-VLT-high · Veneer · VLT-high
14 1/2 in (368.3 mm) × 7/8 in (22.23 mm) × 0.0305 in (0.77 mm)
14 in (355.6 mm) × 3/8 in (9.53 mm) × 0.0305 in (0.77 mm)
V-VLT-near · Veneer · VLT-near
1.561 in (39.65 mm) × 7/8 in (22.23 mm) × 0.0305 in (0.77 mm)
1.061 in (26.95 mm) × 3/8 in (9.53 mm) × 0.0305 in (0.77 mm)
V-VLT-far · Veneer · VLT-far
1.561 in (39.65 mm) × 7/8 in (22.23 mm) × 0.0305 in (0.77 mm)
1.061 in (26.95 mm) × 3/8 in (9.53 mm) × 0.0305 in (0.77 mm)
V-VLF-outer · Veneer · VLF-outer
4.439 in (112.75 mm) × 1.561 in (39.65 mm) × 0.0305 in (0.77 mm)
3.939 in (100.05 mm) × 1.061 in (26.95 mm) × 0.0305 in (0.77 mm)
V-VLF-near · Veneer · VLF-near
4 1/2 in (114.3 mm) × 7/8 in (22.23 mm) × 0.0305 in (0.77 mm)
3.939 in (100.05 mm) × 3/8 in (9.53 mm) × 0.0305 in (0.77 mm)
V-VLF-far · Veneer · VLF-far
4 1/2 in (114.3 mm) × 7/8 in (22.23 mm) × 0.0305 in (0.77 mm)
3.939 in (100.05 mm) × 3/8 in (9.53 mm) × 0.0305 in (0.77 mm)
V-VLA-outer · Veneer · VLA-outer
4.439 in (112.75 mm) × 1.561 in (39.65 mm) × 0.0305 in (0.77 mm)
3.939 in (100.05 mm) × 1.061 in (26.95 mm) × 0.0305 in (0.77 mm)
V-VLA-near · Veneer · VLA-near
4 1/2 in (114.3 mm) × 7/8 in (22.23 mm) × 0.0305 in (0.77 mm)
3.939 in (100.05 mm) × 3/8 in (9.53 mm) × 0.0305 in (0.77 mm)
V-VLA-far · Veneer · VLA-far
4 1/2 in (114.3 mm) × 7/8 in (22.23 mm) × 0.0305 in (0.77 mm)
3.939 in (100.05 mm) × 3/8 in (9.53 mm) × 0.0305 in (0.77 mm)
Cut list · continued
One of each named ID. Rough blanks include scheduled trimming. Thickness is the prepared blank. Screen captures and liner clamps use 3/4-inch (19.05 mm) pine planed to 3/8 inch (9.53 mm) before ripping. Other parts use their listed prepared gauges; fit glazing spacers to the accepted installed stack. Reference finished sizes need actual-material fitting. V-parts represent the complete cured veneer stack. Cut the one acrylic pane only after the cured pocket, actual thickness and movement clearance are measured. SETL layer IDs are individual dry layers; two form each lower setting support.
Part
Rough length × width × prepared thickness
Reference finished size
V-VRB-outer · Veneer · VRB-outer
14.561 in (369.85 mm) × 1.561 in (39.65 mm) × 0.0305 in (0.77 mm)
14.061 in (357.15 mm) × 1.061 in (26.95 mm) × 0.0305 in (0.77 mm)
V-VRB-low · Veneer · VRB-low
14 1/2 in (368.3 mm) × 7/8 in (22.23 mm) × 0.0305 in (0.77 mm)
14 in (355.6 mm) × 3/8 in (9.53 mm) × 0.0305 in (0.77 mm)
V-VRB-high · Veneer · VRB-high
14 1/2 in (368.3 mm) × 7/8 in (22.23 mm) × 0.0305 in (0.77 mm)
12 in (304.8 mm) × 3/8 in (9.53 mm) × 0.0305 in (0.77 mm)
V-VRB-near · Veneer · VRB-near
1.561 in (39.65 mm) × 7/8 in (22.23 mm) × 0.0305 in (0.77 mm)
1.061 in (26.95 mm) × 3/8 in (9.53 mm) × 0.0305 in (0.77 mm)
V-VRB-far · Veneer · VRB-far
1.561 in (39.65 mm) × 7/8 in (22.23 mm) × 0.0305 in (0.77 mm)
1.061 in (26.95 mm) × 3/8 in (9.53 mm) × 0.0305 in (0.77 mm)
V-VRT-outer · Veneer · VRT-outer
14.561 in (369.85 mm) × 1.561 in (39.65 mm) × 0.0305 in (0.77 mm)
14.061 in (357.15 mm) × 1.061 in (26.95 mm) × 0.0305 in (0.77 mm)
V-VRT-low · Veneer · VRT-low
14 1/2 in (368.3 mm) × 7/8 in (22.23 mm) × 0.0305 in (0.77 mm)
12 in (304.8 mm) × 3/8 in (9.53 mm) × 0.0305 in (0.77 mm)
V-VRT-high · Veneer · VRT-high
14 1/2 in (368.3 mm) × 7/8 in (22.23 mm) × 0.0305 in (0.77 mm)
14 in (355.6 mm) × 3/8 in (9.53 mm) × 0.0305 in (0.77 mm)
V-VRT-near · Veneer · VRT-near
1.561 in (39.65 mm) × 7/8 in (22.23 mm) × 0.0305 in (0.77 mm)
1.061 in (26.95 mm) × 3/8 in (9.53 mm) × 0.0305 in (0.77 mm)
V-VRT-far · Veneer · VRT-far
1.561 in (39.65 mm) × 7/8 in (22.23 mm) × 0.0305 in (0.77 mm)
1.061 in (26.95 mm) × 3/8 in (9.53 mm) × 0.0305 in (0.77 mm)
Cut list · continued
One of each named ID. Rough blanks include scheduled trimming. Thickness is the prepared blank. Screen captures and liner clamps use 3/4-inch (19.05 mm) pine planed to 3/8 inch (9.53 mm) before ripping. Other parts use their listed prepared gauges; fit glazing spacers to the accepted installed stack. Reference finished sizes need actual-material fitting. V-parts represent the complete cured veneer stack. Cut the one acrylic pane only after the cured pocket, actual thickness and movement clearance are measured. SETL layer IDs are individual dry layers; two form each lower setting support.
Part
Rough length × width × prepared thickness
Reference finished size
V-VRF-outer · Veneer · VRF-outer
4.439 in (112.75 mm) × 1.561 in (39.65 mm) × 0.0305 in (0.77 mm)
3.939 in (100.05 mm) × 1.061 in (26.95 mm) × 0.0305 in (0.77 mm)
V-VRF-near · Veneer · VRF-near
4 1/2 in (114.3 mm) × 7/8 in (22.23 mm) × 0.0305 in (0.77 mm)
3.939 in (100.05 mm) × 3/8 in (9.53 mm) × 0.0305 in (0.77 mm)
V-VRF-far · Veneer · VRF-far
4 1/2 in (114.3 mm) × 7/8 in (22.23 mm) × 0.0305 in (0.77 mm)
3.939 in (100.05 mm) × 3/8 in (9.53 mm) × 0.0305 in (0.77 mm)
V-VRA-outer · Veneer · VRA-outer
4.439 in (112.75 mm) × 1.561 in (39.65 mm) × 0.0305 in (0.77 mm)
3.939 in (100.05 mm) × 1.061 in (26.95 mm) × 0.0305 in (0.77 mm)
V-VRA-near · Veneer · VRA-near
4 1/2 in (114.3 mm) × 7/8 in (22.23 mm) × 0.0305 in (0.77 mm)
3.939 in (100.05 mm) × 3/8 in (9.53 mm) × 0.0305 in (0.77 mm)
V-VRA-far · Veneer · VRA-far
4 1/2 in (114.3 mm) × 7/8 in (22.23 mm) × 0.0305 in (0.77 mm)
3.939 in (100.05 mm) × 3/8 in (9.53 mm) × 0.0305 in (0.77 mm)
LINER-BLANK · One-piece basin blank
54 in (1371.6 mm) × 54 in (1371.6 mm) × 0.045 in (1.14 mm)
54 in (1371.6 mm) × 54 in (1371.6 mm) × 0.045 in (1.14 mm)
UNDERLAY-BLANK · Protective underlay blank
54 in (1371.6 mm) × 54 in (1371.6 mm) × 0.08 in (2.03 mm)
54 in (1371.6 mm) × 54 in (1371.6 mm); measure actual compressed thickness
Workshop drawings and measurements
Lining clamp order and later service
Rear post clamps before side strips; front receiver clamps last
Installation order: LCPL, LCPR, LCB1, LCFJ1, LCFJ2, LCL, LCR, LCFRL, LCFPL, LCFRR. Reverse this order for removal. Only the 31 scheduled clamp screws may pierce the dry band, from 9 1/8 in (231.78 mm) to 9 5/8 in (244.48 mm) above the central liner floor, centered at 9 3/8 in (238.13 mm). Pre-drill wood separately. Actual folded bulk and safe tools require the receiving trial. The long side strips otherwise block access to the rear post screws; the front receiver strips can block the side-strip driver route.
Observe the shallow test for 24 hours
One inch of water above the central lined floor on continuous qualified support
After accepted support and material trials, fill only to 1 in (25.4 mm) above the central liner floor. Mark the level, inspect the shell and accessible underside for 24 hours, then siphon or wet-vacuum out and dry. Investigate any dampness and repeat after repair. Never move a loaded or wet enclosure; this observation is not an aquarium or structural load approval.
PLY-1 · exact rough positions
Stock X runs along its length and Y across its width from the lower-left corner. These are stock coordinates, separate from assembly stations. Length follows the allocated grain.
Number / part
Stock X / Y
Rough length × width
1 · P03L
1/8 in (3.18 mm) / 1/8 in (3.18 mm)
46 23/32 in (1186.66 mm) × 24 1/16 in (611.19 mm)
2 · P03R
46 31/32 in (1193.01 mm) / 1/8 in (3.18 mm)
46 23/32 in (1186.66 mm) × 24 1/16 in (611.19 mm)
3 · RBL1
1/8 in (3.18 mm) / 24 5/16 in (617.54 mm)
17 13/32 in (442.12 mm) × 7 11/16 in (195.26 mm)
4 · RBL2
1/8 in (3.18 mm) / 32 1/8 in (815.98 mm)
17 13/32 in (442.12 mm) × 7 11/16 in (195.26 mm)
Stock 96 in (2438.4 mm) × 48 in (1219.2 mm); trim 1/8 in (3.18 mm); kerf/separation 1/8 in (3.18 mm).
PLY-2 · exact rough positions
Stock X runs along its length and Y across its width from the lower-left corner. These are stock coordinates, separate from assembly stations. Length follows the allocated grain.
Number / part
Stock X / Y
Rough length × width
1 · P04
1/8 in (3.18 mm) / 1/8 in (3.18 mm)
22 23/32 in (577.06 mm) × 46 21/32 in (1185.07 mm)
2 · P01
22 31/32 in (583.41 mm) / 1/8 in (3.18 mm)
24 1/8 in (612.78 mm) × 24 1/16 in (611.19 mm)
3 · P02
47 7/32 in (1199.36 mm) / 1/8 in (3.18 mm)
24 1/8 in (612.78 mm) × 24 1/16 in (611.19 mm)
Stock 96 in (2438.4 mm) × 48 in (1219.2 mm); trim 1/8 in (3.18 mm); kerf/separation 1/8 in (3.18 mm).
SOLID-1 · exact rough positions
Stock X runs along its length and Y across its width from the lower-left corner. These are stock coordinates, separate from assembly stations. Length follows the allocated grain.
Number / part
Stock X / Y
Rough length × width
1 · CLU
0 in (0 mm) / 0 in (0 mm)
43 23/32 in (1110.46 mm) × 1 1/2 in (38.1 mm)
2 · CRU
43 27/32 in (1113.63 mm) / 0 in (0 mm)
43 23/32 in (1110.46 mm) × 1 1/2 in (38.1 mm)
3 · RCLL
87 11/16 in (2227.26 mm) / 0 in (0 mm)
7 3/4 in (196.85 mm) × 1 1/2 in (38.1 mm)
Stock 96 in (2438.4 mm) × 1 1/2 in (38.1 mm); trim 0 in (0 mm); kerf/separation 1/8 in (3.18 mm).
SOLID-2 · exact rough positions
Stock X runs along its length and Y across its width from the lower-left corner. These are stock coordinates, separate from assembly stations. Length follows the allocated grain.
Number / part
Stock X / Y
Rough length × width
1 · CLB
0 in (0 mm) / 0 in (0 mm)
21 11/64 in (537.77 mm) × 1 1/2 in (38.1 mm)
2 · CLT
21 19/64 in (540.94 mm) / 0 in (0 mm)
21 11/64 in (537.77 mm) × 1 1/2 in (38.1 mm)
3 · CRB
42 19/32 in (1081.88 mm) / 0 in (0 mm)
21 11/64 in (537.77 mm) × 1 1/2 in (38.1 mm)
4 · CRT
63 57/64 in (1622.82 mm) / 0 in (0 mm)
21 11/64 in (537.77 mm) × 1 1/2 in (38.1 mm)
5 · RCLR
85 3/16 in (2163.76 mm) / 0 in (0 mm)
7 3/4 in (196.85 mm) × 1 1/2 in (38.1 mm)
Stock 96 in (2438.4 mm) × 1 1/2 in (38.1 mm); trim 0 in (0 mm); kerf/separation 1/8 in (3.18 mm).
SOLID-3 · exact rough positions
Stock X runs along its length and Y across its width from the lower-left corner. These are stock coordinates, separate from assembly stations. Length follows the allocated grain.
Number / part
Stock X / Y
Rough length × width
1 · CB
0 in (0 mm) / 0 in (0 mm)
19 23/32 in (500.86 mm) × 1 1/2 in (38.1 mm)
2 · CT
19 27/32 in (504.03 mm) / 0 in (0 mm)
19 23/32 in (500.86 mm) × 1 1/2 in (38.1 mm)
Stock 96 in (2438.4 mm) × 1 1/2 in (38.1 mm); trim 0 in (0 mm); kerf/separation 1/8 in (3.18 mm).
MESH-1 · exact rough positions
Stock X runs along its length and Y across its width from the lower-left corner. These are stock coordinates, separate from assembly stations. Length follows the allocated grain.
Number / part
Stock X / Y
Rough length × width
1 · MTL
1/8 in (3.18 mm) / 1/8 in (3.18 mm)
17 in (431.8 mm) × 15 in (381 mm)
2 · ML
1/8 in (3.18 mm) / 15 1/4 in (387.35 mm)
13 in (330.2 mm) × 5 in (127 mm)
3 · MR
1/8 in (3.18 mm) / 20 3/8 in (517.53 mm)
13 in (330.2 mm) × 5 in (127 mm)
Stock 120 in (3048 mm) × 48 in (1219.2 mm); trim 1/8 in (3.18 mm); kerf/separation 1/8 in (3.18 mm).
ACRYLIC-1 · exact rough positions
Stock X runs along its length and Y across its width from the lower-left corner. These are stock coordinates, separate from assembly stations. Length follows the allocated grain.
Number / part
Stock X / Y
Rough length × width
1 · GL
1/8 in (3.18 mm) / 1/8 in (3.18 mm)
27 27/32 in (707.23 mm) × 11 13/32 in (289.72 mm)
Stock 48 in (1219.2 mm) × 24 in (609.6 mm); trim 1/8 in (3.18 mm); kerf/separation 1/8 in (3.18 mm).
VENEER-1 · exact rough positions
Stock X runs along its length and Y across its width from the lower-left corner. These are stock coordinates, separate from assembly stations. Length follows the allocated grain.
Number / part
Stock X / Y
Rough length × width
1 · V-P03L-face
1/4 in (6.35 mm) / 1/4 in (6.35 mm)
47 3/32 in (1196.18 mm) × 24 1/2 in (622.3 mm)
2 · V-P03R-face
47 13/32 in (1204.12 mm) / 1/4 in (6.35 mm)
47 3/32 in (1196.18 mm) × 24 1/2 in (622.3 mm)
3 · V-restraint-back
1/4 in (6.35 mm) / 24 13/16 in (630.24 mm)
23 3/32 in (586.58 mm) × 4 in (101.6 mm)
4 · V-DL0R-front
23 13/32 in (594.52 mm) / 24 13/16 in (630.24 mm)
34.15475 in (867.53 mm) × 3.99925 in (101.58 mm)
5 · V-DL0L-front
57.6235 in (1463.64 mm) / 24 13/16 in (630.24 mm)
34.15475 in (867.53 mm) × 3.968 in (100.79 mm)
6 · V-VLT-near
91.84075 in (2332.76 mm) / 24 13/16 in (630.24 mm)
1.561 in (39.65 mm) × 7/8 in (22.23 mm)
7 · V-VLT-far
93.46425 in (2373.99 mm) / 24 13/16 in (630.24 mm)
1.561 in (39.65 mm) × 7/8 in (22.23 mm)
8 · V-VRB-near
91.84075 in (2332.76 mm) / 25 3/4 in (654.05 mm)
1.561 in (39.65 mm) × 7/8 in (22.23 mm)
9 · V-VRB-far
93.46425 in (2373.99 mm) / 25 3/4 in (654.05 mm)
1.561 in (39.65 mm) × 7/8 in (22.23 mm)
10 · V-VRT-near
91.84075 in (2332.76 mm) / 26 11/16 in (677.86 mm)
1.561 in (39.65 mm) × 7/8 in (22.23 mm)
11 · V-VRT-far
93.46425 in (2373.99 mm) / 26 11/16 in (677.86 mm)
1.561 in (39.65 mm) × 7/8 in (22.23 mm)
12 · V-F0L-front
1/4 in (6.35 mm) / 28 7/8 in (733.43 mm)
47 3/32 in (1196.18 mm) × 3 in (76.2 mm)
13 · V-F0R-front
47 13/32 in (1204.12 mm) / 28 7/8 in (733.43 mm)
47 3/32 in (1196.18 mm) × 3 in (76.2 mm)
14 · V-F0B-front
1/4 in (6.35 mm) / 31 15/16 in (811.21 mm)
18 3/32 in (459.58 mm) × 3 in (76.2 mm)
15 · V-opening-left
18 13/32 in (467.52 mm) / 31 15/16 in (811.21 mm)
42 3/32 in (1069.18 mm) × 2 3/4 in (69.85 mm)
Stock 96 in (2438.4 mm) × 48 in (1219.2 mm); trim 1/4 in (6.35 mm); kerf/separation 1/16 in (1.59 mm).
VENEER-1 · exact rough positions
Stock X runs along its length and Y across its width from the lower-left corner. These are stock coordinates, separate from assembly stations. Length follows the allocated grain.
Number / part
Stock X / Y
Rough length × width
16 · V-door-left
60 9/16 in (1538.29 mm) / 31 15/16 in (811.21 mm)
34 3/32 in (865.98 mm) × 2 in (50.8 mm)
17 · V-kick-left
60 9/16 in (1538.29 mm) / 34 in (863.6 mm)
2 3/4 in (69.85 mm) × 0.59525 in (15.12 mm)
18 · V-kick-right
63 3/8 in (1609.73 mm) / 34 in (863.6 mm)
2 3/4 in (69.85 mm) × 0.59525 in (15.12 mm)
19 · V-opening-right
1/4 in (6.35 mm) / 35 in (889 mm)
42 3/32 in (1069.18 mm) × 2 3/4 in (69.85 mm)
20 · V-door-right
42 13/32 in (1077.12 mm) / 35 in (889 mm)
34 3/32 in (865.98 mm) × 2 in (50.8 mm)
21 · V-door-bottom
76 9/16 in (1944.69 mm) / 35 in (889 mm)
17.811 in (452.4 mm) × 2 in (50.8 mm)
22 · V-view-left
1/4 in (6.35 mm) / 37 13/16 in (960.44 mm)
27.15775 in (689.81 mm) × 2 in (50.8 mm)
23 · V-view-right
27.47025 in (697.74 mm) / 37 13/16 in (960.44 mm)
27.15775 in (689.81 mm) × 2 in (50.8 mm)
24 · V-restraint-bottom
54.6905 in (1389.14 mm) / 37 13/16 in (960.44 mm)
23.15475 in (588.13 mm) × 2 in (50.8 mm)
25 · V-retainer-top
77.90775 in (1978.86 mm) / 37 13/16 in (960.44 mm)
17.84225 in (453.19 mm) × 1 29/32 in (48.42 mm)
26 · V-restraint-top
1/4 in (6.35 mm) / 39 7/8 in (1012.83 mm)
23.15475 in (588.13 mm) × 2 in (50.8 mm)
27 · V-P03L-front
23.46725 in (596.07 mm) / 39 7/8 in (1012.83 mm)
47 3/32 in (1196.18 mm) × 1.233625 in (31.33 mm)
28 · V-P01-front
70.6235 in (1793.84 mm) / 39 7/8 in (1012.83 mm)
24.561 in (623.85 mm) × 1 13/64 in (30.56 mm)
29 · V-P03L-back
1/4 in (6.35 mm) / 41 15/16 in (1065.21 mm)
47 3/32 in (1196.18 mm) × 1.233625 in (31.33 mm)
30 · V-P03R-front
47 13/32 in (1204.12 mm) / 41 15/16 in (1065.21 mm)
47 3/32 in (1196.18 mm) × 1.233625 in (31.33 mm)
Stock 96 in (2438.4 mm) × 48 in (1219.2 mm); trim 1/4 in (6.35 mm); kerf/separation 1/16 in (1.59 mm).
VENEER-1 · exact rough positions
Stock X runs along its length and Y across its width from the lower-left corner. These are stock coordinates, separate from assembly stations. Length follows the allocated grain.
Number / part
Stock X / Y
Rough length × width
31 · V-P03R-back
1/4 in (6.35 mm) / 43.233625 in (1098.13 mm)
47 3/32 in (1196.18 mm) × 1.233625 in (31.33 mm)
32 · V-P01-back
47 13/32 in (1204.12 mm) / 43.233625 in (1098.13 mm)
24.561 in (623.85 mm) × 1 13/64 in (30.56 mm)
33 · V-roof-opening-left
72.02975 in (1829.56 mm) / 43.233625 in (1098.13 mm)
16.439 in (417.55 mm) × 1 13/64 in (30.56 mm)
34 · V-VLF-near
88 17/32 in (2248.69 mm) / 43.233625 in (1098.13 mm)
4 1/2 in (114.3 mm) × 7/8 in (22.23 mm)
35 · V-VLB-near
93 3/32 in (2364.58 mm) / 43.233625 in (1098.13 mm)
1.561 in (39.65 mm) × 7/8 in (22.23 mm)
36 · V-P02-front
1/4 in (6.35 mm) / 44.52975 in (1131.06 mm)
24.561 in (623.85 mm) × 1 13/64 in (30.56 mm)
37 · V-P02-back
24.8735 in (631.79 mm) / 44.52975 in (1131.06 mm)
24.561 in (623.85 mm) × 1 13/64 in (30.56 mm)
38 · V-P01-left
49.497 in (1257.22 mm) / 44.52975 in (1131.06 mm)
24 1/2 in (622.3 mm) × 1 13/64 in (30.56 mm)
39 · V-roof-opening-right
74.0595 in (1881.11 mm) / 44.52975 in (1131.06 mm)
16.439 in (417.55 mm) × 1 13/64 in (30.56 mm)
40 · V-VLF-far
90.561 in (2300.25 mm) / 44.52975 in (1131.06 mm)
4 1/2 in (114.3 mm) × 7/8 in (22.23 mm)
41 · V-P01-right
1/4 in (6.35 mm) / 45.795375 in (1163.2 mm)
24 1/2 in (622.3 mm) × 1 13/64 in (30.56 mm)
42 · V-P02-left
24 13/16 in (630.24 mm) / 45.795375 in (1163.2 mm)
24 1/2 in (622.3 mm) × 1 13/64 in (30.56 mm)
43 · V-P02-right
49 3/8 in (1254.13 mm) / 45.795375 in (1163.2 mm)
24 1/2 in (622.3 mm) × 1 13/64 in (30.56 mm)
44 · V-roof-opening-front
73 15/16 in (1878.01 mm) / 45.795375 in (1163.2 mm)
14 1/2 in (368.3 mm) × 1 13/64 in (30.56 mm)
45 · V-VLA-near
88 1/2 in (2247.9 mm) / 45.795375 in (1163.2 mm)
4 1/2 in (114.3 mm) × 7/8 in (22.23 mm)
Stock 96 in (2438.4 mm) × 48 in (1219.2 mm); trim 1/4 in (6.35 mm); kerf/separation 1/16 in (1.59 mm).
VENEER-1 · exact rough positions
Stock X runs along its length and Y across its width from the lower-left corner. These are stock coordinates, separate from assembly stations. Length follows the allocated grain.
Number / part
Stock X / Y
Rough length × width
46 · V-VLB-far
93 1/16 in (2363.79 mm) / 45.795375 in (1163.2 mm)
1.561 in (39.65 mm) × 7/8 in (22.23 mm)
Stock 96 in (2438.4 mm) × 48 in (1219.2 mm); trim 1/4 in (6.35 mm); kerf/separation 1/16 in (1.59 mm).
VENEER-2 · exact rough positions
Stock X runs along its length and Y across its width from the lower-left corner. These are stock coordinates, separate from assembly stations. Length follows the allocated grain.
Number / part
Stock X / Y
Rough length × width
1 · V-back
1/4 in (6.35 mm) / 1/4 in (6.35 mm)
23 3/32 in (586.58 mm) × 47 3/32 in (1196.18 mm)
2 · V-floor-under
23 13/32 in (594.52 mm) / 1/4 in (6.35 mm)
24.561 in (623.85 mm) × 24.561 in (623.85 mm)
3 · V-roof-top
48.02975 in (1219.96 mm) / 1/4 in (6.35 mm)
24.561 in (623.85 mm) × 24.561 in (623.85 mm)
4 · V-VRB-outer
72.65325 in (1845.39 mm) / 1/4 in (6.35 mm)
14.561 in (369.85 mm) × 1.561 in (39.65 mm)
5 · V-VLA-outer
87.27675 in (2216.83 mm) / 1/4 in (6.35 mm)
4.439 in (112.75 mm) × 1.561 in (39.65 mm)
6 · V-VRT-outer
72.65325 in (1845.39 mm) / 1.8735 in (47.59 mm)
14.561 in (369.85 mm) × 1.561 in (39.65 mm)
7 · V-VRF-outer
87.27675 in (2216.83 mm) / 1.8735 in (47.59 mm)
4.439 in (112.75 mm) × 1.561 in (39.65 mm)
8 · V-VRT-high
72.65325 in (1845.39 mm) / 3.497 in (88.82 mm)
14 1/2 in (368.3 mm) × 7/8 in (22.23 mm)
9 · V-VRF-near
87.21575 in (2215.28 mm) / 3.497 in (88.82 mm)
4 1/2 in (114.3 mm) × 7/8 in (22.23 mm)
10 · TRIAL-veneer
23 13/32 in (594.52 mm) / 24.8735 in (631.79 mm)
24 in (609.6 mm) × 12 in (304.8 mm)
11 · V-P03R-vent-far
47 15/32 in (1205.71 mm) / 24.8735 in (631.79 mm)
4.439 in (112.75 mm) × 1 13/64 in (30.56 mm)
12 · V-VRB-low
51.97025 in (1320.04 mm) / 24.8735 in (631.79 mm)
14 1/2 in (368.3 mm) × 7/8 in (22.23 mm)
13 · V-VRB-high
66.53275 in (1689.93 mm) / 24.8735 in (631.79 mm)
14 1/2 in (368.3 mm) × 7/8 in (22.23 mm)
14 · V-VRT-low
81.09525 in (2059.82 mm) / 24.8735 in (631.79 mm)
14 1/2 in (368.3 mm) × 7/8 in (22.23 mm)
15 · V-VRF-far
47 15/32 in (1205.71 mm) / 26.139125 in (663.93 mm)
4 1/2 in (114.3 mm) × 7/8 in (22.23 mm)
Stock 96 in (2438.4 mm) × 48 in (1219.2 mm); trim 1/4 in (6.35 mm); kerf/separation 1/16 in (1.59 mm).
VENEER-2 · exact rough positions
Stock X runs along its length and Y across its width from the lower-left corner. These are stock coordinates, separate from assembly stations. Length follows the allocated grain.
Number / part
Stock X / Y
Rough length × width
16 · V-VRA-near
52 1/32 in (1321.59 mm) / 26.139125 in (663.93 mm)
4 1/2 in (114.3 mm) × 7/8 in (22.23 mm)
17 · V-VRA-far
56 19/32 in (1437.48 mm) / 26.139125 in (663.93 mm)
4 1/2 in (114.3 mm) × 7/8 in (22.23 mm)
18 · V-RBL1-front
23 13/32 in (594.52 mm) / 36.936 in (938.17 mm)
17.84225 in (453.19 mm) × 8.1555 in (207.15 mm)
19 · V-DL0B-front
41.311 in (1049.3 mm) / 36.936 in (938.17 mm)
10 27/32 in (275.43 mm) × 3.968 in (100.79 mm)
20 · V-DL0T-front
52.21725 in (1326.32 mm) / 36.936 in (938.17 mm)
10 27/32 in (275.43 mm) × 3.968 in (100.79 mm)
21 · V-F0T-front
63.1235 in (1603.34 mm) / 36.936 in (938.17 mm)
18 3/32 in (459.58 mm) × 3 in (76.2 mm)
22 · V-P03R-vent-top
81.27975 in (2064.51 mm) / 36.936 in (938.17 mm)
12 1/2 in (317.5 mm) × 1 13/64 in (30.56 mm)
23 · V-P03L-vent-near
81.27975 in (2064.51 mm) / 38.201625 in (970.32 mm)
4.439 in (112.75 mm) × 1 13/64 in (30.56 mm)
24 · V-P03L-vent-far
85 25/32 in (2178.84 mm) / 38.201625 in (970.32 mm)
4.439 in (112.75 mm) × 1 13/64 in (30.56 mm)
25 · V-P03R-vent-near
90.28275 in (2293.18 mm) / 38.201625 in (970.32 mm)
4.439 in (112.75 mm) × 1 13/64 in (30.56 mm)
26 · V-VLB-low
63.1235 in (1603.34 mm) / 39.9985 in (1015.96 mm)
14 1/2 in (368.3 mm) × 7/8 in (22.23 mm)
27 · V-VLB-high
77.686 in (1973.22 mm) / 39.9985 in (1015.96 mm)
14 1/2 in (368.3 mm) × 7/8 in (22.23 mm)
28 · V-opening-head
41.311 in (1049.3 mm) / 40.9665 in (1040.55 mm)
18.03275 in (458.03 mm) × 2 3/4 in (69.85 mm)
29 · V-VLB-outer
59 13/32 in (1508.92 mm) / 40.9665 in (1040.55 mm)
14.561 in (369.85 mm) × 1.561 in (39.65 mm)
30 · V-VLT-outer
74.02975 in (1880.36 mm) / 40.9665 in (1040.55 mm)
14.561 in (369.85 mm) × 1.561 in (39.65 mm)
Stock 96 in (2438.4 mm) × 48 in (1219.2 mm); trim 1/4 in (6.35 mm); kerf/separation 1/16 in (1.59 mm).
VENEER-2 · exact rough positions
Stock X runs along its length and Y across its width from the lower-left corner. These are stock coordinates, separate from assembly stations. Length follows the allocated grain.
Number / part
Stock X / Y
Rough length × width
31 · V-VLF-outer
88.65325 in (2251.79 mm) / 40.9665 in (1040.55 mm)
4.439 in (112.75 mm) × 1.561 in (39.65 mm)
32 · V-VLT-low
59 13/32 in (1508.92 mm) / 42.59 in (1081.79 mm)
14 1/2 in (368.3 mm) × 7/8 in (22.23 mm)
33 · V-VLT-high
73 31/32 in (1878.81 mm) / 42.59 in (1081.79 mm)
14 1/2 in (368.3 mm) × 7/8 in (22.23 mm)
34 · V-VLA-far
88 17/32 in (2248.69 mm) / 42.59 in (1081.79 mm)
4 1/2 in (114.3 mm) × 7/8 in (22.23 mm)
35 · V-roof-opening-back
41.311 in (1049.3 mm) / 43.779 in (1111.99 mm)
14 1/2 in (368.3 mm) × 1 13/64 in (30.56 mm)
36 · V-P03L-vent-bottom
55.8735 in (1419.19 mm) / 43.779 in (1111.99 mm)
12 1/2 in (317.5 mm) × 1 13/64 in (30.56 mm)
37 · V-P03L-vent-top
68.436 in (1738.27 mm) / 43.779 in (1111.99 mm)
12 1/2 in (317.5 mm) × 1 13/64 in (30.56 mm)
38 · V-P03R-vent-bottom
80.9985 in (2057.36 mm) / 43.779 in (1111.99 mm)
12 1/2 in (317.5 mm) × 1 13/64 in (30.56 mm)
39 · V-door-top
23 13/32 in (594.52 mm) / 45.154 in (1146.91 mm)
17.811 in (452.4 mm) × 2 in (50.8 mm)
40 · V-view-bottom
41.27975 in (1048.51 mm) / 45.154 in (1146.91 mm)
10 27/32 in (275.43 mm) × 2 in (50.8 mm)
41 · V-view-top
52.186 in (1325.52 mm) / 45.154 in (1146.91 mm)
10 27/32 in (275.43 mm) × 2 in (50.8 mm)
42 · V-restraint-left
63.09225 in (1602.54 mm) / 45.154 in (1146.91 mm)
4 in (101.6 mm) × 2 in (50.8 mm)
43 · V-restraint-right
67.15475 in (1705.73 mm) / 45.154 in (1146.91 mm)
4 in (101.6 mm) × 2 in (50.8 mm)
44 · V-retainer-left
71.21725 in (1808.92 mm) / 45.154 in (1146.91 mm)
8 1/8 in (206.38 mm) × 1 29/32 in (48.42 mm)
45 · V-retainer-right
79.40475 in (2016.88 mm) / 45.154 in (1146.91 mm)
8 1/8 in (206.38 mm) × 1 29/32 in (48.42 mm)
Stock 96 in (2438.4 mm) × 48 in (1219.2 mm); trim 1/4 in (6.35 mm); kerf/separation 1/16 in (1.59 mm).
VENEER-2 · exact rough positions
Stock X runs along its length and Y across its width from the lower-left corner. These are stock coordinates, separate from assembly stations. Length follows the allocated grain.
Number / part
Stock X / Y
Rough length × width
46 · V-VRA-outer
87.59225 in (2224.84 mm) / 45.154 in (1146.91 mm)
4.439 in (112.75 mm) × 1.561 in (39.65 mm)
Stock 96 in (2438.4 mm) × 48 in (1219.2 mm); trim 1/4 in (6.35 mm); kerf/separation 1/16 in (1.59 mm).
PAD-1 · exact rough positions
Stock X runs along its length and Y across its width from the lower-left corner. These are stock coordinates, separate from assembly stations. Length follows the allocated grain.
Number / part
Stock X / Y
Rough length × width
1 · PADLLF
1/8 in (3.18 mm) / 1/8 in (3.18 mm)
27 23/32 in (704.06 mm) × 3/8 in (9.53 mm)
2 · PADLLB
1/8 in (3.18 mm) / 9/16 in (14.29 mm)
27 23/32 in (704.06 mm) × 3/8 in (9.53 mm)
3 · PADLRF
1/8 in (3.18 mm) / 1 in (25.4 mm)
27 23/32 in (704.06 mm) × 3/8 in (9.53 mm)
4 · PADLRB
1/8 in (3.18 mm) / 1 7/16 in (36.51 mm)
27 23/32 in (704.06 mm) × 3/8 in (9.53 mm)
5 · PADLBF
1/8 in (3.18 mm) / 1 7/8 in (47.63 mm)
10 19/32 in (269.08 mm) × 3/8 in (9.53 mm)
6 · PADLBB
1/8 in (3.18 mm) / 2 5/16 in (58.74 mm)
10 19/32 in (269.08 mm) × 3/8 in (9.53 mm)
7 · PADLTF
1/8 in (3.18 mm) / 2 3/4 in (69.85 mm)
10 19/32 in (269.08 mm) × 3/8 in (9.53 mm)
8 · PADLTB
1/8 in (3.18 mm) / 3 3/16 in (80.96 mm)
10 19/32 in (269.08 mm) × 3/8 in (9.53 mm)
9 · SETL0-layer-1
27 29/32 in (708.82 mm) / 1/8 in (3.18 mm)
1 in (25.4 mm) × 0.22 in (5.59 mm)
10 · SETL0-layer-2
27 29/32 in (708.82 mm) / 0.4075 in (10.35 mm)
1 in (25.4 mm) × 0.22 in (5.59 mm)
11 · SETL1-layer-1
27 29/32 in (708.82 mm) / 0.69 in (17.53 mm)
1 in (25.4 mm) × 0.22 in (5.59 mm)
12 · SETL1-layer-2
27 29/32 in (708.82 mm) / 0.9725 in (24.7 mm)
1 in (25.4 mm) × 0.22 in (5.59 mm)
Stock 36 in (914.4 mm) × 12 in (304.8 mm); trim 1/8 in (3.18 mm); kerf/separation 1/16 in (1.59 mm).
PINE-FRAME-1 · exact rough positions
Stock X runs along its length and Y across its width from the lower-left corner. These are stock coordinates, separate from assembly stations. Length follows the allocated grain.
Number / part
Stock X / Y
Rough length × width
1 · F0L
1/8 in (3.18 mm) / 1/8 in (3.18 mm)
46 23/32 in (1186.66 mm) × 2 9/16 in (65.09 mm)
2 · F0R
1/8 in (3.18 mm) / 2 13/16 in (71.44 mm)
46 23/32 in (1186.66 mm) × 2 9/16 in (65.09 mm)
3 · F2L
46 31/32 in (1193.01 mm) / 1/8 in (3.18 mm)
46 23/32 in (1186.66 mm) × 2 9/16 in (65.09 mm)
4 · F2R
46 31/32 in (1193.01 mm) / 2 13/16 in (71.44 mm)
46 23/32 in (1186.66 mm) × 2 9/16 in (65.09 mm)
Stock 96 in (2438.4 mm) × 5 1/2 in (139.7 mm); trim 1/8 in (3.18 mm); kerf/separation 1/8 in (3.18 mm).
PINE-FRAME-2 · exact rough positions
Stock X runs along its length and Y across its width from the lower-left corner. These are stock coordinates, separate from assembly stations. Length follows the allocated grain.
Number / part
Stock X / Y
Rough length × width
1 · DL0R
1/8 in (3.18 mm) / 1/8 in (3.18 mm)
33 23/32 in (856.46 mm) × 3 17/32 in (89.69 mm)
2 · F1L
33 31/32 in (862.81 mm) / 1/8 in (3.18 mm)
41 23/32 in (1059.66 mm) × 2 9/16 in (65.09 mm)
3 · F1R
33 31/32 in (862.81 mm) / 2 13/16 in (71.44 mm)
41 23/32 in (1059.66 mm) × 2 9/16 in (65.09 mm)
4 · F0B
75 13/16 in (1925.64 mm) / 1/8 in (3.18 mm)
17 23/32 in (450.06 mm) × 2 9/16 in (65.09 mm)
5 · F0T
75 13/16 in (1925.64 mm) / 2 13/16 in (71.44 mm)
17 23/32 in (450.06 mm) × 2 9/16 in (65.09 mm)
Stock 96 in (2438.4 mm) × 5 1/2 in (139.7 mm); trim 1/8 in (3.18 mm); kerf/separation 1/8 in (3.18 mm).
PINE-FRAME-3 · exact rough positions
Stock X runs along its length and Y across its width from the lower-left corner. These are stock coordinates, separate from assembly stations. Length follows the allocated grain.
Number / part
Stock X / Y
Rough length × width
1 · DL1R
1/8 in (3.18 mm) / 1/8 in (3.18 mm)
26 27/32 in (681.83 mm) × 3 17/32 in (89.69 mm)
2 · DL0L
27 3/32 in (688.18 mm) / 1/8 in (3.18 mm)
33 23/32 in (856.46 mm) × 3 1/2 in (88.9 mm)
3 · DL1L
60 15/16 in (1547.81 mm) / 1/8 in (3.18 mm)
26 27/32 in (681.83 mm) × 3 1/2 in (88.9 mm)
Stock 96 in (2438.4 mm) × 5 1/2 in (139.7 mm); trim 1/8 in (3.18 mm); kerf/separation 1/8 in (3.18 mm).
PINE-FRAME-4 · exact rough positions
Stock X runs along its length and Y across its width from the lower-left corner. These are stock coordinates, separate from assembly stations. Length follows the allocated grain.
Number / part
Stock X / Y
Rough length × width
1 · AR1
1/8 in (3.18 mm) / 1/8 in (3.18 mm)
22 23/32 in (577.06 mm) × 3 9/16 in (90.49 mm)
2 · AR2
22 31/32 in (583.41 mm) / 1/8 in (3.18 mm)
22 23/32 in (577.06 mm) × 3 9/16 in (90.49 mm)
3 · F1B
45 13/16 in (1163.64 mm) / 1/8 in (3.18 mm)
22 23/32 in (577.06 mm) × 2 9/16 in (65.09 mm)
4 · F1T
45 13/16 in (1163.64 mm) / 2 13/16 in (71.44 mm)
22 23/32 in (577.06 mm) × 2 9/16 in (65.09 mm)
5 · F2B
68 21/32 in (1743.87 mm) / 1/8 in (3.18 mm)
17 23/32 in (450.06 mm) × 2 9/16 in (65.09 mm)
6 · F2T
68 21/32 in (1743.87 mm) / 2 13/16 in (71.44 mm)
17 23/32 in (450.06 mm) × 2 9/16 in (65.09 mm)
Stock 96 in (2438.4 mm) × 5 1/2 in (139.7 mm); trim 1/8 in (3.18 mm); kerf/separation 1/8 in (3.18 mm).
PINE-FRAME-5 · exact rough positions
Stock X runs along its length and Y across its width from the lower-left corner. These are stock coordinates, separate from assembly stations. Length follows the allocated grain.
Number / part
Stock X / Y
Rough length × width
1 · DL1B
1/8 in (3.18 mm) / 1/8 in (3.18 mm)
17 3/8 in (441.33 mm) × 3 1/2 in (88.9 mm)
2 · DL1T
17 5/8 in (447.68 mm) / 1/8 in (3.18 mm)
17 3/8 in (441.33 mm) × 3 1/2 in (88.9 mm)
3 · DL0B
35 1/8 in (892.18 mm) / 1/8 in (3.18 mm)
10 15/32 in (265.91 mm) × 3 1/2 in (88.9 mm)
4 · DL0T
45 23/32 in (1161.26 mm) / 1/8 in (3.18 mm)
10 15/32 in (265.91 mm) × 3 1/2 in (88.9 mm)
Stock 96 in (2438.4 mm) × 5 1/2 in (139.7 mm); trim 1/8 in (3.18 mm); kerf/separation 1/8 in (3.18 mm).
PINE-THIN-1 · exact rough positions
Stock X runs along its length and Y across its width from the lower-left corner. These are stock coordinates, separate from assembly stations. Length follows the allocated grain.
Number / part
Stock X / Y
Rough length × width
1 · RTLF
1/8 in (3.18 mm) / 1/8 in (3.18 mm)
16 1/8 in (409.58 mm) × 1 1/16 in (26.99 mm)
2 · RTLA
1/8 in (3.18 mm) / 1 5/16 in (33.34 mm)
16 1/8 in (409.58 mm) × 1 1/16 in (26.99 mm)
3 · RTLL
1/8 in (3.18 mm) / 2 1/2 in (63.5 mm)
16 1/8 in (409.58 mm) × 1 1/16 in (26.99 mm)
4 · RTLR
1/8 in (3.18 mm) / 3 11/16 in (93.66 mm)
16 1/8 in (409.58 mm) × 1 1/16 in (26.99 mm)
5 · VLB
16 3/8 in (415.93 mm) / 1/8 in (3.18 mm)
14 1/8 in (358.78 mm) × 1 1/16 in (26.99 mm)
6 · VLT
16 3/8 in (415.93 mm) / 1 5/16 in (33.34 mm)
14 1/8 in (358.78 mm) × 1 1/16 in (26.99 mm)
7 · VRB
16 3/8 in (415.93 mm) / 2 1/2 in (63.5 mm)
14 1/8 in (358.78 mm) × 1 1/16 in (26.99 mm)
8 · VRT
16 3/8 in (415.93 mm) / 3 11/16 in (93.66 mm)
14 1/8 in (358.78 mm) × 1 1/16 in (26.99 mm)
9 · VLF
30 5/8 in (777.88 mm) / 1/8 in (3.18 mm)
4 1/8 in (104.78 mm) × 1 1/16 in (26.99 mm)
10 · VLA
30 5/8 in (777.88 mm) / 1 5/16 in (33.34 mm)
4 1/8 in (104.78 mm) × 1 1/16 in (26.99 mm)
11 · VRF
30 5/8 in (777.88 mm) / 2 1/2 in (63.5 mm)
4 1/8 in (104.78 mm) × 1 1/16 in (26.99 mm)
12 · VRA
30 5/8 in (777.88 mm) / 3 11/16 in (93.66 mm)
4 1/8 in (104.78 mm) × 1 1/16 in (26.99 mm)
13 · SPLL
34 7/8 in (885.83 mm) / 1/8 in (3.18 mm)
29 19/32 in (751.68 mm) × 13/16 in (20.64 mm)
14 · SPLR
34 7/8 in (885.83 mm) / 1 1/16 in (26.99 mm)
29 19/32 in (751.68 mm) × 13/16 in (20.64 mm)
15 · SPLB
34 7/8 in (885.83 mm) / 2 in (50.8 mm)
11 23/32 in (297.66 mm) × 13/16 in (20.64 mm)
Stock 96 in (2438.4 mm) × 5 1/2 in (139.7 mm); trim 1/8 in (3.18 mm); kerf/separation 1/8 in (3.18 mm).
PINE-THIN-1 · exact rough positions
Stock X runs along its length and Y across its width from the lower-left corner. These are stock coordinates, separate from assembly stations. Length follows the allocated grain.
Number / part
Stock X / Y
Rough length × width
16 · SPLT
34 7/8 in (885.83 mm) / 2 15/16 in (74.61 mm)
11 23/32 in (297.66 mm) × 13/16 in (20.64 mm)
17 · LCB1
64 19/32 in (1640.68 mm) / 1/8 in (3.18 mm)
18.80875 in (477.74 mm) × 9/16 in (14.29 mm)
18 · LCL
64 19/32 in (1640.68 mm) / 13/16 in (20.64 mm)
18 35/64 in (471.09 mm) × 9/16 in (14.29 mm)
19 · LCR
64 19/32 in (1640.68 mm) / 1 1/2 in (38.1 mm)
18 35/64 in (471.09 mm) × 9/16 in (14.29 mm)
20 · LCFPL
64 19/32 in (1640.68 mm) / 2 3/16 in (55.56 mm)
14 15/32 in (367.51 mm) × 9/16 in (14.29 mm)
21 · LCFJ1
34 7/8 in (885.83 mm) / 3 7/8 in (98.43 mm)
2 1/4 in (57.15 mm) × 9/16 in (14.29 mm)
22 · LCFJ2
34 7/8 in (885.83 mm) / 4 9/16 in (115.89 mm)
2 1/4 in (57.15 mm) × 9/16 in (14.29 mm)
23 · LCPL
37 1/4 in (946.15 mm) / 3 7/8 in (98.43 mm)
1 1/2 in (38.1 mm) × 9/16 in (14.29 mm)
24 · LCPR
37 1/4 in (946.15 mm) / 4 9/16 in (115.89 mm)
1 1/2 in (38.1 mm) × 9/16 in (14.29 mm)
25 · LCFRL
38 7/8 in (987.43 mm) / 3 7/8 in (98.43 mm)
1 3/8 in (34.93 mm) × 9/16 in (14.29 mm)
26 · LCFRR
38 7/8 in (987.43 mm) / 4 9/16 in (115.89 mm)
1 3/8 in (34.93 mm) × 9/16 in (14.29 mm)
Stock 96 in (2438.4 mm) × 5 1/2 in (139.7 mm); trim 1/8 in (3.18 mm); kerf/separation 1/8 in (3.18 mm).
PINE-BEAD-1 · exact rough positions
Stock X runs along its length and Y across its width from the lower-left corner. These are stock coordinates, separate from assembly stations. Length follows the allocated grain.
Number / part
Stock X / Y
Rough length × width
1 · BELL
1/8 in (3.18 mm) / 1/8 in (3.18 mm)
29 19/32 in (751.68 mm) × 1 5/16 in (33.34 mm)
2 · BELR
1/8 in (3.18 mm) / 1 9/16 in (39.69 mm)
29 19/32 in (751.68 mm) × 1 5/16 in (33.34 mm)
3 · BELB
1/8 in (3.18 mm) / 3 in (76.2 mm)
10 23/32 in (272.26 mm) × 1 5/16 in (33.34 mm)
4 · BELT
10 31/32 in (278.61 mm) / 3 in (76.2 mm)
10 23/32 in (272.26 mm) × 1 5/16 in (33.34 mm)
Stock 96 in (2438.4 mm) × 5 1/2 in (139.7 mm); trim 1/8 in (3.18 mm); kerf/separation 1/8 in (3.18 mm).
LINER-1 · exact rough positions
Stock X runs along its length and Y across its width from the lower-left corner. These are stock coordinates, separate from assembly stations. Length follows the allocated grain.
Number / part
Stock X / Y
Rough length × width
1 · LINER-BLANK
1/4 in (6.35 mm) / 1/4 in (6.35 mm)
54 in (1371.6 mm) × 54 in (1371.6 mm)
Stock 120 in (3048 mm) × 96 in (2438.4 mm); trim 1/4 in (6.35 mm); kerf/separation 0 in (0 mm).
UNDERLAY-1 · exact rough positions
Stock X runs along its length and Y across its width from the lower-left corner. These are stock coordinates, separate from assembly stations. Length follows the allocated grain.
Number / part
Stock X / Y
Rough length × width
1 · UNDERLAY-BLANK
1/4 in (6.35 mm) / 1/4 in (6.35 mm)
54 in (1371.6 mm) × 54 in (1371.6 mm)
Stock 120 in (3048 mm) × 60 in (1524 mm); trim 1/4 in (6.35 mm); kerf/separation 0 in (0 mm).
PINE-TRIAL · exact rough positions
Stock X runs along its length and Y across its width from the lower-left corner. These are stock coordinates, separate from assembly stations. Length follows the allocated grain.
Number / part
Stock X / Y
Rough length × width
1 · TRIAL-hinge
1/8 in (3.18 mm) / 1/8 in (3.18 mm)
24 in (609.6 mm) × 5 1/4 in (133.35 mm)
2 · TRIAL-glazing
24 1/4 in (615.95 mm) / 1/8 in (3.18 mm)
24 in (609.6 mm) × 5 1/4 in (133.35 mm)
3 · TRIAL-capture
48 3/8 in (1228.73 mm) / 1/8 in (3.18 mm)
24 in (609.6 mm) × 5 1/4 in (133.35 mm)
Stock 96 in (2438.4 mm) × 5 1/2 in (139.7 mm); trim 1/8 in (3.18 mm); kerf/separation 1/8 in (3.18 mm).
Use exact fastener stations and the assembly order
Assembly X / Y / Z start at outside LEFT / outside FRONT / FLOOR UNDERSIDE. Direction gives the driving axis. IDs are stable labels; numbers inside an ID are not a substitute for coordinates. Transfer through actual clamped mating parts and use depth stops including the drill point.
Build the glued floor and laminated front on the bench. Complete all bore, pocket, hinge and hasp trials before coating. Fit rear post strips, back strips and front-jamb strips first; LCL/LCR next; LCFRL/LCFPL/LCFRR last. Reverse for access during removal. Use the actual safe driver and folded-material trial.
BTLL1/BTLL2 and BTLR1/BTLR2 connect the two-layer retainer to RCLL and RCLR
Connection / post
Centre X / Z from assembly datums
Reference stack
BTLL1 / RCLL
3 61/64 in (100.41 mm) / 4 53/64 in (122.63 mm)
2 3/4 in (69.85 mm) screw; 1 in (25.4 mm) rear recess diameter; 21/32 in (16.67 mm) deep
BTLL2 / RCLL
3 61/64 in (100.41 mm) / 8 53/64 in (224.23 mm)
2 3/4 in (69.85 mm) screw; 1 in (25.4 mm) rear recess diameter; 21/32 in (16.67 mm) deep
BTLR1 / RCLR
20 3/64 in (509.19 mm) / 4 53/64 in (122.63 mm)
2 3/4 in (69.85 mm) screw; 1 in (25.4 mm) rear recess diameter; 21/32 in (16.67 mm) deep
BTLR2 / RCLR
20 3/64 in (509.19 mm) / 8 53/64 in (224.23 mm)
2 3/4 in (69.85 mm) screw; 1 in (25.4 mm) rear recess diameter; 21/32 in (16.67 mm) deep
Drive from outside toward the rear. Fit the nut and washer from inside before lining. The 82-degree head seats in wood, below a separate veneer access opening. Do not fill over the service opening. The rear nut and tip remain recessed and protected by loose underlay beneath the unpunctured liner. Empty and remove the lining before later connection service.
Trial the complete retainer hardware stack
Reference screw, countersink, through bore, rear recess, washer and nylon locknut
The four 1/4-20 × 2 3/4-inch (6.35 mm nominal × 69.85 mm) machine screws are separate from the wood-screw station table. Receive Bolt Depot 9787, 16019 and 16008, measure the actual parts and prove the joint in matching offcuts. Keep at least two full threads beyond the nylon, at least 1/16 inch (1.5875 mm) clearance below the rear post face and 27/32 inch (21.43 mm) reference wood bearing thickness. Do not deepen the recess to make an incompatible part fit.
Fastener stations · 1–12
Use the named assembly datums. Clearance passes through first members; stopped pilots enter the receivers. Received heads and thin metal webs require accepted trials.
ID / type
Through → receiver
Start X / Y / Z
Direction / length
S-ARLAM-0-0 · W125
AR2 → AR1
5 / 25.5 / 41.05 in 127.00 / 647.70 / 1042.67 mm
−Y · 1 1/4 in (31.75 mm)
S-ARLAM-0-1 · W125
AR2 → AR1
5 / 25.5 / 43.45 in 127.00 / 647.70 / 1103.63 mm
−Y · 1 1/4 in (31.75 mm)
S-ARLAM-1-0 · W125
AR2 → AR1
9 / 25.5 / 41.05 in 228.60 / 647.70 / 1042.67 mm
−Y · 1 1/4 in (31.75 mm)
S-ARLAM-1-1 · W125
AR2 → AR1
9 / 25.5 / 43.45 in 228.60 / 647.70 / 1103.63 mm
−Y · 1 1/4 in (31.75 mm)
S-ARLAM-2-0 · W125
AR2 → AR1
15 / 25.5 / 41.05 in 381.00 / 647.70 / 1042.67 mm
−Y · 1 1/4 in (31.75 mm)
S-ARLAM-2-1 · W125
AR2 → AR1
15 / 25.5 / 43.45 in 381.00 / 647.70 / 1103.63 mm
−Y · 1 1/4 in (31.75 mm)
S-ARLAM-3-0 · W125
AR2 → AR1
19 / 25.5 / 41.05 in 482.60 / 647.70 / 1042.67 mm
−Y · 1 1/4 in (31.75 mm)
S-ARLAM-3-1 · W125
AR2 → AR1
19 / 25.5 / 43.45 in 482.60 / 647.70 / 1103.63 mm
−Y · 1 1/4 in (31.75 mm)
S-ARPOST-L-0 · W300
AR2 + AR1 + P04 → CLU
1.453125 / 25.5 / 41.25 in 36.91 / 647.70 / 1047.75 mm
−Y · 3 in (76.2 mm)
S-ARPOST-L-1 · W300
AR2 + AR1 + P04 → CLU
1.453125 / 25.5 / 43.25 in 36.91 / 647.70 / 1098.55 mm
−Y · 3 in (76.2 mm)
S-ARPOST-R-0 · W300
AR2 + AR1 + P04 → CRU
22.546875 / 25.5 / 41.25 in 572.69 / 647.70 / 1047.75 mm
−Y · 3 in (76.2 mm)
S-ARPOST-R-1 · W300
AR2 + AR1 + P04 → CRU
22.546875 / 25.5 / 43.25 in 572.69 / 647.70 / 1098.55 mm
−Y · 3 in (76.2 mm)
Fastener stations · 13–24
Use the named assembly datums. Clearance passes through first members; stopped pilots enter the receivers. Received heads and thin metal webs require accepted trials.
ID / type
Through → receiver
Start X / Y / Z
Direction / length
S-TIP-0 · TIP
TIP → AR2
12 / 25.56 / 41.375 in 304.80 / 649.22 / 1050.92 mm
−Y · 5/8 in (15.88 mm)
S-TIP-1 · TIP
TIP → AR2
12 / 25.56 / 43.125 in 304.80 / 649.22 / 1095.38 mm
−Y · 5/8 in (15.88 mm)
S-RCLL-0 · W300
RCLL → F2L
4.703125 / 1.80625 / 3.828125 in 119.46 / 45.88 / 97.23 mm
−X · 3 in (76.2 mm)
S-RCLL-1 · W300
RCLL → F2L
4.703125 / 1.80625 / 6.828125 in 119.46 / 45.88 / 173.43 mm
−X · 3 in (76.2 mm)
S-RCLL-2 · W300
RCLL → F2L
4.703125 / 1.80625 / 9.828125 in 119.46 / 45.88 / 249.63 mm
−X · 3 in (76.2 mm)
S-RCLR-0 · W300
RCLR → F2R
19.296875 / 1.80625 / 3.828125 in 490.14 / 45.88 / 97.23 mm
+X · 3 in (76.2 mm)
S-RCLR-1 · W300
RCLR → F2R
19.296875 / 1.80625 / 6.828125 in 490.14 / 45.88 / 173.43 mm
+X · 3 in (76.2 mm)
S-RCLR-2 · W300
RCLR → F2R
19.296875 / 1.80625 / 9.828125 in 490.14 / 45.88 / 249.63 mm
+X · 3 in (76.2 mm)
S-HL1F-0 · HINGE
HL1F + F0L → F1L
2.517594 / -0.128925 / 12.878322 in 63.95 / -3.27 / 327.11 mm
+Y · 1 1/4 in (31.75 mm)
S-HL1F-1 · HINGE
HL1F + F0L → F1L
2.517594 / -0.128925 / 13.468873 in 63.95 / -3.27 / 342.11 mm
+Y · 1 1/4 in (31.75 mm)
S-HL1F-2 · HINGE
HL1F + F0L → F1L
2.517594 / -0.128925 / 14.059424 in 63.95 / -3.27 / 357.11 mm
+Y · 1 1/4 in (31.75 mm)
S-HL1M-0 · HINGE
HL1M + DL0L → DL1L
4.013656 / -0.128925 / 14.846826 in 101.95 / -3.27 / 377.11 mm
+Y · 1 1/4 in (31.75 mm)
Fastener stations · 25–36
Use the named assembly datums. Clearance passes through first members; stopped pilots enter the receivers. Received heads and thin metal webs require accepted trials.
ID / type
Through → receiver
Start X / Y / Z
Direction / length
S-HL1M-1 · HINGE
HL1M + DL0L → DL1L
4.013656 / -0.128925 / 15.437377 in 101.95 / -3.27 / 392.11 mm
+Y · 1 1/4 in (31.75 mm)
S-HL1M-2 · HINGE
HL1M + DL0L → DL1L
4.013656 / -0.128925 / 16.027928 in 101.95 / -3.27 / 407.11 mm
+Y · 1 1/4 in (31.75 mm)
S-HL2F-0 · HINGE
HL2F + F0L → F1L
2.517594 / -0.128925 / 26.237697 in 63.95 / -3.27 / 666.44 mm
+Y · 1 1/4 in (31.75 mm)
S-HL2F-1 · HINGE
HL2F + F0L → F1L
2.517594 / -0.128925 / 26.828248 in 63.95 / -3.27 / 681.44 mm
+Y · 1 1/4 in (31.75 mm)
S-HL2F-2 · HINGE
HL2F + F0L → F1L
2.517594 / -0.128925 / 27.418799 in 63.95 / -3.27 / 696.44 mm
+Y · 1 1/4 in (31.75 mm)
S-HL2M-0 · HINGE
HL2M + DL0L → DL1L
4.013656 / -0.128925 / 28.206201 in 101.95 / -3.27 / 716.44 mm
+Y · 1 1/4 in (31.75 mm)
S-HL2M-1 · HINGE
HL2M + DL0L → DL1L
4.013656 / -0.128925 / 28.796752 in 101.95 / -3.27 / 731.44 mm
+Y · 1 1/4 in (31.75 mm)
S-HL2M-2 · HINGE
HL2M + DL0L → DL1L
4.013656 / -0.128925 / 29.387303 in 101.95 / -3.27 / 746.44 mm
+Y · 1 1/4 in (31.75 mm)
S-HL3F-0 · HINGE
HL3F + F0L → F1L
2.517594 / -0.128925 / 39.597072 in 63.95 / -3.27 / 1005.77 mm
+Y · 1 1/4 in (31.75 mm)
S-HL3F-1 · HINGE
HL3F + F0L → F1L
2.517594 / -0.128925 / 40.187623 in 63.95 / -3.27 / 1020.77 mm
+Y · 1 1/4 in (31.75 mm)
S-HL3F-2 · HINGE
HL3F + F0L → F1L
2.517594 / -0.128925 / 40.778174 in 63.95 / -3.27 / 1035.77 mm
+Y · 1 1/4 in (31.75 mm)
S-HL3M-0 · HINGE
HL3M + DL0L → DL1T
4.013656 / -0.128925 / 41.565576 in 101.95 / -3.27 / 1055.77 mm
+Y · 1 1/4 in (31.75 mm)
Fastener stations · 37–48
Use the named assembly datums. Clearance passes through first members; stopped pilots enter the receivers. Received heads and thin metal webs require accepted trials.
ID / type
Through → receiver
Start X / Y / Z
Direction / length
S-HL3M-1 · HINGE
HL3M + DL0L → DL1T
4.013656 / -0.128925 / 42.156127 in 101.95 / -3.27 / 1070.77 mm
+Y · 1 1/4 in (31.75 mm)
S-HL3M-2 · HINGE
HL3M + DL0L → DL1T
4.013656 / -0.128925 / 42.746678 in 101.95 / -3.27 / 1085.77 mm
+Y · 1 1/4 in (31.75 mm)
S-LAM1L-0 · W125
F1B → F0L
1.953125 / 1.5 / 2.503125 in 49.61 / 38.10 / 63.58 mm
−Y · 1 1/4 in (31.75 mm)
S-LAM1L-1 · W125
F1L → F0L
1.953125 / 1.5 / 7.346875 in 49.61 / 38.10 / 186.61 mm
−Y · 1 1/4 in (31.75 mm)
S-LAM1L-2 · W125
F1L → F0L
1.953125 / 1.5 / 12.190625 in 49.61 / 38.10 / 309.64 mm
−Y · 1 1/4 in (31.75 mm)
S-LAM1L-3 · W125
F1L → F0L
1.953125 / 1.5 / 17.034375 in 49.61 / 38.10 / 432.67 mm
−Y · 1 1/4 in (31.75 mm)
S-LAM1L-4 · W125
F1L → F0L
1.953125 / 1.5 / 21.878125 in 49.61 / 38.10 / 555.70 mm
−Y · 1 1/4 in (31.75 mm)
S-LAM1L-5 · W125
F1L → F0L
1.953125 / 1.5 / 26.721875 in 49.61 / 38.10 / 678.74 mm
−Y · 1 1/4 in (31.75 mm)
S-LAM1L-6 · W125
F1L → F0L
1.953125 / 1.5 / 31.565625 in 49.61 / 38.10 / 801.77 mm
−Y · 1 1/4 in (31.75 mm)
S-LAM1L-7 · W125
F1L → F0L
1.953125 / 1.5 / 36.409375 in 49.61 / 38.10 / 924.80 mm
−Y · 1 1/4 in (31.75 mm)
S-LAM1L-8 · W125
F1L → F0L
1.953125 / 1.5 / 41.253125 in 49.61 / 38.10 / 1047.83 mm
−Y · 1 1/4 in (31.75 mm)
S-LAM1L-9 · W125
F1T → F0L
1.953125 / 1.5 / 46.096875 in 49.61 / 38.10 / 1170.86 mm
−Y · 1 1/4 in (31.75 mm)
Fastener stations · 49–60
Use the named assembly datums. Clearance passes through first members; stopped pilots enter the receivers. Received heads and thin metal webs require accepted trials.
ID / type
Through → receiver
Start X / Y / Z
Direction / length
S-LAM1R-0 · W125
F1B → F0R
22.046875 / 1.5 / 2.503125 in 559.99 / 38.10 / 63.58 mm
−Y · 1 1/4 in (31.75 mm)
S-LAM1R-1 · W125
F1R → F0R
22.046875 / 1.5 / 7.346875 in 559.99 / 38.10 / 186.61 mm
−Y · 1 1/4 in (31.75 mm)
S-LAM1R-2 · W125
F1R → F0R
22.046875 / 1.5 / 12.190625 in 559.99 / 38.10 / 309.64 mm
−Y · 1 1/4 in (31.75 mm)
S-LAM1R-3 · W125
F1R → F0R
22.046875 / 1.5 / 17.034375 in 559.99 / 38.10 / 432.67 mm
−Y · 1 1/4 in (31.75 mm)
S-LAM1R-4 · W125
F1R → F0R
22.046875 / 1.5 / 21.878125 in 559.99 / 38.10 / 555.70 mm
−Y · 1 1/4 in (31.75 mm)
S-LAM1R-5 · W125
F1R → F0R
22.046875 / 1.5 / 26.721875 in 559.99 / 38.10 / 678.74 mm
−Y · 1 1/4 in (31.75 mm)
S-LAM1R-6 · W125
F1R → F0R
22.046875 / 1.5 / 31.565625 in 559.99 / 38.10 / 801.77 mm
−Y · 1 1/4 in (31.75 mm)
S-LAM1R-7 · W125
F1R → F0R
22.046875 / 1.5 / 36.409375 in 559.99 / 38.10 / 924.80 mm
−Y · 1 1/4 in (31.75 mm)
S-LAM1R-8 · W125
F1R → F0R
22.046875 / 1.5 / 41.253125 in 559.99 / 38.10 / 1047.83 mm
−Y · 1 1/4 in (31.75 mm)
S-LAM1R-9 · W125
F1T → F0R
22.046875 / 1.5 / 46.096875 in 559.99 / 38.10 / 1170.86 mm
−Y · 1 1/4 in (31.75 mm)
S-LAM1B-0 · W125
F1B → F0B
4.503125 / 1.5 / 1.953125 in 114.38 / 38.10 / 49.61 mm
−Y · 1 1/4 in (31.75 mm)
S-LAM1B-1 · W125
F1B → F0B
9.367708 / 1.5 / 1.953125 in 237.94 / 38.10 / 49.61 mm
−Y · 1 1/4 in (31.75 mm)
Fastener stations · 61–72
Use the named assembly datums. Clearance passes through first members; stopped pilots enter the receivers. Received heads and thin metal webs require accepted trials.
ID / type
Through → receiver
Start X / Y / Z
Direction / length
S-LAM1B-2 · W125
F1B → F0B
14.232292 / 1.5 / 1.953125 in 361.50 / 38.10 / 49.61 mm
−Y · 1 1/4 in (31.75 mm)
S-LAM1B-3 · W125
F1B → F0B
19.096875 / 1.5 / 1.953125 in 485.06 / 38.10 / 49.61 mm
−Y · 1 1/4 in (31.75 mm)
S-LAM1T-0 · W125
F1T → F0T
4.503125 / 1.5 / 46.046875 in 114.38 / 38.10 / 1169.59 mm
−Y · 1 1/4 in (31.75 mm)
S-LAM1T-1 · W125
F1T → F0T
9.367708 / 1.5 / 46.046875 in 237.94 / 38.10 / 1169.59 mm
−Y · 1 1/4 in (31.75 mm)
S-LAM1T-2 · W125
F1T → F0T
14.232292 / 1.5 / 46.046875 in 361.50 / 38.10 / 1169.59 mm
−Y · 1 1/4 in (31.75 mm)
S-LAM1T-3 · W125
F1T → F0T
19.096875 / 1.5 / 46.046875 in 485.06 / 38.10 / 1169.59 mm
−Y · 1 1/4 in (31.75 mm)
S-LAM2L-0 · W125
F2L → F1B
1.953125 / 2.25 / 2.803125 in 49.61 / 57.15 / 71.20 mm
−Y · 1 1/4 in (31.75 mm)
S-LAM2L-1 · W125
F2L → F1L
1.953125 / 2.25 / 7.646875 in 49.61 / 57.15 / 194.23 mm
−Y · 1 1/4 in (31.75 mm)
S-LAM2L-2 · W125
F2L → F1L
1.953125 / 2.25 / 12.490625 in 49.61 / 57.15 / 317.26 mm
−Y · 1 1/4 in (31.75 mm)
S-LAM2L-3 · W125
F2L → F1L
1.953125 / 2.25 / 17.334375 in 49.61 / 57.15 / 440.29 mm
−Y · 1 1/4 in (31.75 mm)
S-LAM2L-4 · W125
F2L → F1L
1.953125 / 2.25 / 22.178125 in 49.61 / 57.15 / 563.32 mm
−Y · 1 1/4 in (31.75 mm)
S-LAM2L-5 · W125
F2L → F1L
1.953125 / 2.25 / 27.021875 in 49.61 / 57.15 / 686.36 mm
−Y · 1 1/4 in (31.75 mm)
Fastener stations · 73–84
Use the named assembly datums. Clearance passes through first members; stopped pilots enter the receivers. Received heads and thin metal webs require accepted trials.
ID / type
Through → receiver
Start X / Y / Z
Direction / length
S-LAM2L-6 · W125
F2L → F1L
1.953125 / 2.25 / 31.865625 in 49.61 / 57.15 / 809.39 mm
−Y · 1 1/4 in (31.75 mm)
S-LAM2L-7 · W125
F2L → F1L
1.953125 / 2.25 / 36.709375 in 49.61 / 57.15 / 932.42 mm
−Y · 1 1/4 in (31.75 mm)
S-LAM2L-8 · W125
F2L → F1L
1.953125 / 2.25 / 41.553125 in 49.61 / 57.15 / 1055.45 mm
−Y · 1 1/4 in (31.75 mm)
S-LAM2L-9 · W125
F2L → F1T
1.953125 / 2.25 / 46.396875 in 49.61 / 57.15 / 1178.48 mm
−Y · 1 1/4 in (31.75 mm)
S-LAM2R-0 · W125
F2R → F1B
22.046875 / 2.25 / 2.803125 in 559.99 / 57.15 / 71.20 mm
−Y · 1 1/4 in (31.75 mm)
S-LAM2R-1 · W125
F2R → F1R
22.046875 / 2.25 / 7.646875 in 559.99 / 57.15 / 194.23 mm
−Y · 1 1/4 in (31.75 mm)
S-LAM2R-2 · W125
F2R → F1R
22.046875 / 2.25 / 12.490625 in 559.99 / 57.15 / 317.26 mm
−Y · 1 1/4 in (31.75 mm)
S-LAM2R-3 · W125
F2R → F1R
22.046875 / 2.25 / 17.334375 in 559.99 / 57.15 / 440.29 mm
−Y · 1 1/4 in (31.75 mm)
S-LAM2R-4 · W125
F2R → F1R
22.046875 / 2.25 / 22.178125 in 559.99 / 57.15 / 563.32 mm
−Y · 1 1/4 in (31.75 mm)
S-LAM2R-5 · W125
F2R → F1R
22.046875 / 2.25 / 27.021875 in 559.99 / 57.15 / 686.36 mm
−Y · 1 1/4 in (31.75 mm)
S-LAM2R-6 · W125
F2R → F1R
22.046875 / 2.25 / 31.865625 in 559.99 / 57.15 / 809.39 mm
−Y · 1 1/4 in (31.75 mm)
S-LAM2R-7 · W125
F2R → F1R
22.046875 / 2.25 / 36.709375 in 559.99 / 57.15 / 932.42 mm
−Y · 1 1/4 in (31.75 mm)
Fastener stations · 85–96
Use the named assembly datums. Clearance passes through first members; stopped pilots enter the receivers. Received heads and thin metal webs require accepted trials.
ID / type
Through → receiver
Start X / Y / Z
Direction / length
S-LAM2R-8 · W125
F2R → F1R
22.046875 / 2.25 / 41.553125 in 559.99 / 57.15 / 1055.45 mm
−Y · 1 1/4 in (31.75 mm)
S-LAM2R-9 · W125
F2R → F1T
22.046875 / 2.25 / 46.396875 in 559.99 / 57.15 / 1178.48 mm
−Y · 1 1/4 in (31.75 mm)
S-LAM2B-0 · W125
F2B → F1B
4.803125 / 2.25 / 1.953125 in 122.00 / 57.15 / 49.61 mm
−Y · 1 1/4 in (31.75 mm)
S-LAM2B-1 · W125
F2B → F1B
9.667708 / 2.25 / 1.953125 in 245.56 / 57.15 / 49.61 mm
−Y · 1 1/4 in (31.75 mm)
S-LAM2B-2 · W125
F2B → F1B
14.532292 / 2.25 / 1.953125 in 369.12 / 57.15 / 49.61 mm
−Y · 1 1/4 in (31.75 mm)
S-LAM2B-3 · W125
F2B → F1B
19.396875 / 2.25 / 1.953125 in 492.68 / 57.15 / 49.61 mm
−Y · 1 1/4 in (31.75 mm)
S-LAM2T-0 · W125
F2T → F1T
4.803125 / 2.25 / 46.046875 in 122.00 / 57.15 / 1169.59 mm
−Y · 1 1/4 in (31.75 mm)
S-LAM2T-1 · W125
F2T → F1T
9.667708 / 2.25 / 46.046875 in 245.56 / 57.15 / 1169.59 mm
−Y · 1 1/4 in (31.75 mm)
S-LAM2T-2 · W125
F2T → F1T
14.532292 / 2.25 / 46.046875 in 369.12 / 57.15 / 1169.59 mm
−Y · 1 1/4 in (31.75 mm)
S-LAM2T-3 · W125
F2T → F1T
19.396875 / 2.25 / 46.046875 in 492.68 / 57.15 / 1169.59 mm
−Y · 1 1/4 in (31.75 mm)
S-DLAMLL-0 · W125
DL1B → DL0L
5.078125 / 1.5 / 12.703125 in 128.98 / 38.10 / 322.66 mm
−Y · 1 1/4 in (31.75 mm)
S-DLAMLL-1 · W125
DL1L → DL0L
5.078125 / 1.5 / 17.020089 in 128.98 / 38.10 / 432.31 mm
−Y · 1 1/4 in (31.75 mm)
Fastener stations · 97–108
Use the named assembly datums. Clearance passes through first members; stopped pilots enter the receivers. Received heads and thin metal webs require accepted trials.
ID / type
Through → receiver
Start X / Y / Z
Direction / length
S-DLAMLL-2 · W125
DL1L → DL0L
5.078125 / 1.5 / 21.337054 in 128.98 / 38.10 / 541.96 mm
−Y · 1 1/4 in (31.75 mm)
S-DLAMLL-3 · W125
DL1L → DL0L
5.078125 / 1.5 / 25.654018 in 128.98 / 38.10 / 651.61 mm
−Y · 1 1/4 in (31.75 mm)
S-DLAMLL-4 · W125
DL1L → DL0L
5.078125 / 1.5 / 29.970982 in 128.98 / 38.10 / 761.26 mm
−Y · 1 1/4 in (31.75 mm)
S-DLAMLL-5 · W125
DL1L → DL0L
5.078125 / 1.5 / 34.287946 in 128.98 / 38.10 / 870.91 mm
−Y · 1 1/4 in (31.75 mm)
S-DLAMLL-6 · W125
DL1L → DL0L
5.078125 / 1.5 / 38.604911 in 128.98 / 38.10 / 980.56 mm
−Y · 1 1/4 in (31.75 mm)
S-DLAMLL-7 · W125
DL1T → DL0L
5.078125 / 1.5 / 42.921875 in 128.98 / 38.10 / 1090.22 mm
−Y · 1 1/4 in (31.75 mm)
S-DLAMLR-0 · W125
DL1B → DL0R
18.921875 / 1.5 / 12.703125 in 480.62 / 38.10 / 322.66 mm
−Y · 1 1/4 in (31.75 mm)
S-DLAMLR-1 · W125
DL1R → DL0R
18.921875 / 1.5 / 17.020089 in 480.62 / 38.10 / 432.31 mm
−Y · 1 1/4 in (31.75 mm)
S-DLAMLR-2 · W125
DL1R → DL0R
18.921875 / 1.5 / 21.337054 in 480.62 / 38.10 / 541.96 mm
−Y · 1 1/4 in (31.75 mm)
S-DLAMLR-3 · W125
DL1R → DL0R
18.921875 / 1.5 / 25.654018 in 480.62 / 38.10 / 651.61 mm
−Y · 1 1/4 in (31.75 mm)
S-DLAMLR-4 · W125
DL1R → DL0R
18.921875 / 1.5 / 29.970982 in 480.62 / 38.10 / 761.26 mm
−Y · 1 1/4 in (31.75 mm)
S-DLAMLR-5 · W125
DL1R → DL0R
18.921875 / 1.5 / 34.287946 in 480.62 / 38.10 / 870.91 mm
−Y · 1 1/4 in (31.75 mm)
Fastener stations · 109–120
Use the named assembly datums. Clearance passes through first members; stopped pilots enter the receivers. Received heads and thin metal webs require accepted trials.
ID / type
Through → receiver
Start X / Y / Z
Direction / length
S-DLAMLR-6 · W125
DL1R → DL0R
18.921875 / 1.5 / 38.604911 in 480.62 / 38.10 / 980.56 mm
−Y · 1 1/4 in (31.75 mm)
S-DLAMLR-7 · W125
DL1T → DL0R
18.921875 / 1.5 / 42.921875 in 480.62 / 38.10 / 1090.22 mm
−Y · 1 1/4 in (31.75 mm)
S-RLAML-0-0 · W125
RBL2 → RBL1
5.703125 / 1.40625 / 4.453125 in 144.86 / 35.72 / 113.11 mm
−Y · 1 1/4 in (31.75 mm)
S-RLAML-0-1 · W125
RBL2 → RBL1
5.703125 / 1.40625 / 9.578125 in 144.86 / 35.72 / 243.28 mm
−Y · 1 1/4 in (31.75 mm)
S-RLAML-1-0 · W125
RBL2 → RBL1
9.901042 / 1.40625 / 4.453125 in 251.49 / 35.72 / 113.11 mm
−Y · 1 1/4 in (31.75 mm)
S-RLAML-1-1 · W125
RBL2 → RBL1
9.901042 / 1.40625 / 9.578125 in 251.49 / 35.72 / 243.28 mm
−Y · 1 1/4 in (31.75 mm)
S-RLAML-2-0 · W125
RBL2 → RBL1
14.098958 / 1.40625 / 4.453125 in 358.11 / 35.72 / 113.11 mm
−Y · 1 1/4 in (31.75 mm)
S-RLAML-2-1 · W125
RBL2 → RBL1
14.098958 / 1.40625 / 9.578125 in 358.11 / 35.72 / 243.28 mm
−Y · 1 1/4 in (31.75 mm)
S-RLAML-3-0 · W125
RBL2 → RBL1
18.296875 / 1.40625 / 4.453125 in 464.74 / 35.72 / 113.11 mm
−Y · 1 1/4 in (31.75 mm)
S-RLAML-3-1 · W125
RBL2 → RBL1
18.296875 / 1.40625 / 9.578125 in 464.74 / 35.72 / 243.28 mm
−Y · 1 1/4 in (31.75 mm)
S-CLB-0 · W125
P01 → CLB
1.453125 / 3.25 / 0 in 36.91 / 82.55 / 0.00 mm
+Z · 1 1/4 in (31.75 mm)
S-CLB-1 · W125
P01 → CLB
1.453125 / 8.011719 / 0 in 36.91 / 203.50 / 0.00 mm
+Z · 1 1/4 in (31.75 mm)
Fastener stations · 121–132
Use the named assembly datums. Clearance passes through first members; stopped pilots enter the receivers. Received heads and thin metal webs require accepted trials.
ID / type
Through → receiver
Start X / Y / Z
Direction / length
S-CLB-2 · W125
P01 → CLB
1.453125 / 12.773438 / 0 in 36.91 / 324.45 / 0.00 mm
+Z · 1 1/4 in (31.75 mm)
S-CLB-3 · W125
P01 → CLB
1.453125 / 17.535156 / 0 in 36.91 / 445.39 / 0.00 mm
+Z · 1 1/4 in (31.75 mm)
S-CLB-4 · W125
P01 → CLB
1.453125 / 22.296875 / 0 in 36.91 / 566.34 / 0.00 mm
+Z · 1 1/4 in (31.75 mm)
S-CRB-0 · W125
P01 → CRB
22.546875 / 3.25 / 0 in 572.69 / 82.55 / 0.00 mm
+Z · 1 1/4 in (31.75 mm)
S-CRB-1 · W125
P01 → CRB
22.546875 / 8.011719 / 0 in 572.69 / 203.50 / 0.00 mm
+Z · 1 1/4 in (31.75 mm)
S-CRB-2 · W125
P01 → CRB
22.546875 / 12.773438 / 0 in 572.69 / 324.45 / 0.00 mm
+Z · 1 1/4 in (31.75 mm)
S-CRB-3 · W125
P01 → CRB
22.546875 / 17.535156 / 0 in 572.69 / 445.39 / 0.00 mm
+Z · 1 1/4 in (31.75 mm)
S-CRB-4 · W125
P01 → CRB
22.546875 / 22.296875 / 0 in 572.69 / 566.34 / 0.00 mm
+Z · 1 1/4 in (31.75 mm)
S-CB-0 · W125
P01 → CB
3.203125 / 22.546875 / 0 in 81.36 / 572.69 / 0.00 mm
+Z · 1 1/4 in (31.75 mm)
S-CB-1 · W125
P01 → CB
9.067708 / 22.546875 / 0 in 230.32 / 572.69 / 0.00 mm
+Z · 1 1/4 in (31.75 mm)
S-CB-2 · W125
P01 → CB
14.932292 / 22.546875 / 0 in 379.28 / 572.69 / 0.00 mm
+Z · 1 1/4 in (31.75 mm)
S-CB-3 · W125
P01 → CB
20.796875 / 22.546875 / 0 in 528.24 / 572.69 / 0.00 mm
+Z · 1 1/4 in (31.75 mm)
Fastener stations · 133–144
Use the named assembly datums. Clearance passes through first members; stopped pilots enter the receivers. Received heads and thin metal webs require accepted trials.
ID / type
Through → receiver
Start X / Y / Z
Direction / length
S-WL-CLB-0 · W125
P03L → CLB
0 / 3.25 / 1.453125 in 0.00 / 82.55 / 36.91 mm
+X · 1 1/4 in (31.75 mm)
S-WL-CLB-1 · W125
P03L → CLB
0 / 8.011719 / 1.453125 in 0.00 / 203.50 / 36.91 mm
+X · 1 1/4 in (31.75 mm)
S-WL-CLB-2 · W125
P03L → CLB
0 / 12.773438 / 1.453125 in 0.00 / 324.45 / 36.91 mm
+X · 1 1/4 in (31.75 mm)
S-WL-CLB-3 · W125
P03L → CLB
0 / 17.535156 / 1.453125 in 0.00 / 445.39 / 36.91 mm
+X · 1 1/4 in (31.75 mm)
S-WL-CLB-4 · W125
P03L → CLB
0 / 22.296875 / 1.453125 in 0.00 / 566.34 / 36.91 mm
+X · 1 1/4 in (31.75 mm)
S-WL-CLT-0 · W125
P03L → CLT
0 / 3.25 / 46.546875 in 0.00 / 82.55 / 1182.29 mm
+X · 1 1/4 in (31.75 mm)
S-WL-CLT-1 · W125
P03L → CLT
0 / 8.011719 / 46.546875 in 0.00 / 203.50 / 1182.29 mm
+X · 1 1/4 in (31.75 mm)
S-WL-CLT-2 · W125
P03L → CLT
0 / 12.773438 / 46.546875 in 0.00 / 324.45 / 1182.29 mm
+X · 1 1/4 in (31.75 mm)
S-WL-CLT-3 · W125
P03L → CLT
0 / 17.535156 / 46.546875 in 0.00 / 445.39 / 1182.29 mm
+X · 1 1/4 in (31.75 mm)
S-WL-CLT-4 · W125
P03L → CLT
0 / 22.296875 / 46.546875 in 0.00 / 566.34 / 1182.29 mm
+X · 1 1/4 in (31.75 mm)
S-WL-CLU-0 · W125
P03L → CLU
0 / 22.546875 / 3.203125 in 0.00 / 572.69 / 81.36 mm
+X · 1 1/4 in (31.75 mm)
S-WL-CLU-1 · W125
P03L → CLU
0 / 22.546875 / 9.145089 in 0.00 / 572.69 / 232.29 mm
+X · 1 1/4 in (31.75 mm)
Fastener stations · 145–156
Use the named assembly datums. Clearance passes through first members; stopped pilots enter the receivers. Received heads and thin metal webs require accepted trials.
ID / type
Through → receiver
Start X / Y / Z
Direction / length
S-WL-CLU-2 · W125
P03L → CLU
0 / 22.546875 / 15.087054 in 0.00 / 572.69 / 383.21 mm
+X · 1 1/4 in (31.75 mm)
S-WL-CLU-3 · W125
P03L → CLU
0 / 22.546875 / 21.029018 in 0.00 / 572.69 / 534.14 mm
+X · 1 1/4 in (31.75 mm)
S-WL-CLU-4 · W125
P03L → CLU
0 / 22.546875 / 26.970982 in 0.00 / 572.69 / 685.06 mm
+X · 1 1/4 in (31.75 mm)
S-WL-CLU-5 · W125
P03L → CLU
0 / 22.546875 / 32.912946 in 0.00 / 572.69 / 835.99 mm
+X · 1 1/4 in (31.75 mm)
S-WL-CLU-6 · W125
P03L → CLU
0 / 22.546875 / 38.854911 in 0.00 / 572.69 / 986.91 mm
+X · 1 1/4 in (31.75 mm)
S-WL-CLU-7 · W125
P03L → CLU
0 / 22.546875 / 44.796875 in 0.00 / 572.69 / 1137.84 mm
+X · 1 1/4 in (31.75 mm)
S-WR-CRB-0 · W125
P03R → CRB
24 / 3.25 / 1.453125 in 609.60 / 82.55 / 36.91 mm
−X · 1 1/4 in (31.75 mm)
S-WR-CRB-1 · W125
P03R → CRB
24 / 8.011719 / 1.453125 in 609.60 / 203.50 / 36.91 mm
−X · 1 1/4 in (31.75 mm)
S-WR-CRB-2 · W125
P03R → CRB
24 / 12.773438 / 1.453125 in 609.60 / 324.45 / 36.91 mm
−X · 1 1/4 in (31.75 mm)
S-WR-CRB-3 · W125
P03R → CRB
24 / 17.535156 / 1.453125 in 609.60 / 445.39 / 36.91 mm
−X · 1 1/4 in (31.75 mm)
S-WR-CRB-4 · W125
P03R → CRB
24 / 22.296875 / 1.453125 in 609.60 / 566.34 / 36.91 mm
−X · 1 1/4 in (31.75 mm)
S-WR-CRT-0 · W125
P03R → CRT
24 / 3.25 / 46.546875 in 609.60 / 82.55 / 1182.29 mm
−X · 1 1/4 in (31.75 mm)
Fastener stations · 157–168
Use the named assembly datums. Clearance passes through first members; stopped pilots enter the receivers. Received heads and thin metal webs require accepted trials.
ID / type
Through → receiver
Start X / Y / Z
Direction / length
S-WR-CRT-1 · W125
P03R → CRT
24 / 8.011719 / 46.546875 in 609.60 / 203.50 / 1182.29 mm
−X · 1 1/4 in (31.75 mm)
S-WR-CRT-2 · W125
P03R → CRT
24 / 12.773438 / 46.546875 in 609.60 / 324.45 / 1182.29 mm
−X · 1 1/4 in (31.75 mm)
S-WR-CRT-3 · W125
P03R → CRT
24 / 17.535156 / 46.546875 in 609.60 / 445.39 / 1182.29 mm
−X · 1 1/4 in (31.75 mm)
S-WR-CRT-4 · W125
P03R → CRT
24 / 22.296875 / 46.546875 in 609.60 / 566.34 / 1182.29 mm
−X · 1 1/4 in (31.75 mm)
S-WR-CRU-0 · W125
P03R → CRU
24 / 22.546875 / 3.203125 in 609.60 / 572.69 / 81.36 mm
−X · 1 1/4 in (31.75 mm)
S-WR-CRU-1 · W125
P03R → CRU
24 / 22.546875 / 9.145089 in 609.60 / 572.69 / 232.29 mm
−X · 1 1/4 in (31.75 mm)
S-WR-CRU-2 · W125
P03R → CRU
24 / 22.546875 / 15.087054 in 609.60 / 572.69 / 383.21 mm
−X · 1 1/4 in (31.75 mm)
S-WR-CRU-3 · W125
P03R → CRU
24 / 22.546875 / 21.029018 in 609.60 / 572.69 / 534.14 mm
−X · 1 1/4 in (31.75 mm)
S-WR-CRU-4 · W125
P03R → CRU
24 / 22.546875 / 26.970982 in 609.60 / 572.69 / 685.06 mm
−X · 1 1/4 in (31.75 mm)
S-WR-CRU-5 · W125
P03R → CRU
24 / 22.546875 / 32.912946 in 609.60 / 572.69 / 835.99 mm
−X · 1 1/4 in (31.75 mm)
S-WR-CRU-6 · W125
P03R → CRU
24 / 22.546875 / 38.854911 in 609.60 / 572.69 / 986.91 mm
−X · 1 1/4 in (31.75 mm)
S-WR-CRU-7 · W125
P03R → CRU
24 / 22.546875 / 44.796875 in 609.60 / 572.69 / 1137.84 mm
−X · 1 1/4 in (31.75 mm)
Fastener stations · 169–180
Use the named assembly datums. Clearance passes through first members; stopped pilots enter the receivers. Received heads and thin metal webs require accepted trials.
ID / type
Through → receiver
Start X / Y / Z
Direction / length
S-B-CB-0 · W125
P04 → CB
3.203125 / 24 / 1.453125 in 81.36 / 609.60 / 36.91 mm
−Y · 1 1/4 in (31.75 mm)
S-B-CB-1 · W125
P04 → CB
9.067708 / 24 / 1.453125 in 230.32 / 609.60 / 36.91 mm
−Y · 1 1/4 in (31.75 mm)
S-B-CB-2 · W125
P04 → CB
14.932292 / 24 / 1.453125 in 379.28 / 609.60 / 36.91 mm
−Y · 1 1/4 in (31.75 mm)
S-B-CB-3 · W125
P04 → CB
20.796875 / 24 / 1.453125 in 528.24 / 609.60 / 36.91 mm
−Y · 1 1/4 in (31.75 mm)
S-B-CT-0 · W125
P04 → CT
3.203125 / 24 / 46.546875 in 81.36 / 609.60 / 1182.29 mm
−Y · 1 1/4 in (31.75 mm)
S-B-CT-1 · W125
P04 → CT
9.067708 / 24 / 46.546875 in 230.32 / 609.60 / 1182.29 mm
−Y · 1 1/4 in (31.75 mm)
S-B-CT-2 · W125
P04 → CT
14.932292 / 24 / 46.546875 in 379.28 / 609.60 / 1182.29 mm
−Y · 1 1/4 in (31.75 mm)
S-B-CT-3 · W125
P04 → CT
20.796875 / 24 / 46.546875 in 528.24 / 609.60 / 1182.29 mm
−Y · 1 1/4 in (31.75 mm)
S-B-CLU-0 · W125
P04 → CLU
1.453125 / 24 / 3.503125 in 36.91 / 609.60 / 88.98 mm
−Y · 1 1/4 in (31.75 mm)
S-B-CLU-1 · W125
P04 → CLU
1.453125 / 24 / 9.445089 in 36.91 / 609.60 / 239.91 mm
−Y · 1 1/4 in (31.75 mm)
S-B-CLU-2 · W125
P04 → CLU
1.453125 / 24 / 15.387054 in 36.91 / 609.60 / 390.83 mm
−Y · 1 1/4 in (31.75 mm)
S-B-CLU-3 · W125
P04 → CLU
1.453125 / 24 / 21.329018 in 36.91 / 609.60 / 541.76 mm
−Y · 1 1/4 in (31.75 mm)
Fastener stations · 181–192
Use the named assembly datums. Clearance passes through first members; stopped pilots enter the receivers. Received heads and thin metal webs require accepted trials.
ID / type
Through → receiver
Start X / Y / Z
Direction / length
S-B-CLU-4 · W125
P04 → CLU
1.453125 / 24 / 27.270982 in 36.91 / 609.60 / 692.68 mm
−Y · 1 1/4 in (31.75 mm)
S-B-CLU-5 · W125
P04 → CLU
1.453125 / 24 / 33.212946 in 36.91 / 609.60 / 843.61 mm
−Y · 1 1/4 in (31.75 mm)
S-B-CLU-6 · W125
P04 → CLU
1.453125 / 24 / 39.154911 in 36.91 / 609.60 / 994.53 mm
−Y · 1 1/4 in (31.75 mm)
S-B-CLU-7 · W125
P04 → CLU
1.453125 / 24 / 45.096875 in 36.91 / 609.60 / 1145.46 mm
−Y · 1 1/4 in (31.75 mm)
S-B-CRU-0 · W125
P04 → CRU
22.546875 / 24 / 3.503125 in 572.69 / 609.60 / 88.98 mm
−Y · 1 1/4 in (31.75 mm)
S-B-CRU-1 · W125
P04 → CRU
22.546875 / 24 / 9.445089 in 572.69 / 609.60 / 239.91 mm
−Y · 1 1/4 in (31.75 mm)
S-B-CRU-2 · W125
P04 → CRU
22.546875 / 24 / 15.387054 in 572.69 / 609.60 / 390.83 mm
−Y · 1 1/4 in (31.75 mm)
S-B-CRU-3 · W125
P04 → CRU
22.546875 / 24 / 21.329018 in 572.69 / 609.60 / 541.76 mm
−Y · 1 1/4 in (31.75 mm)
S-B-CRU-4 · W125
P04 → CRU
22.546875 / 24 / 27.270982 in 572.69 / 609.60 / 692.68 mm
−Y · 1 1/4 in (31.75 mm)
S-B-CRU-5 · W125
P04 → CRU
22.546875 / 24 / 33.212946 in 572.69 / 609.60 / 843.61 mm
−Y · 1 1/4 in (31.75 mm)
S-B-CRU-6 · W125
P04 → CRU
22.546875 / 24 / 39.154911 in 572.69 / 609.60 / 994.53 mm
−Y · 1 1/4 in (31.75 mm)
S-B-CRU-7 · W125
P04 → CRU
22.546875 / 24 / 45.096875 in 572.69 / 609.60 / 1145.46 mm
−Y · 1 1/4 in (31.75 mm)
Fastener stations · 193–204
Use the named assembly datums. Clearance passes through first members; stopped pilots enter the receivers. Received heads and thin metal webs require accepted trials.
ID / type
Through → receiver
Start X / Y / Z
Direction / length
S-FL-0-0 · W200
P03L → F0L
0 / 0.375 / 3.503125 in 0.00 / 9.52 / 88.98 mm
+X · 2 in (50.8 mm)
S-FL-0-1 · W200
P03L → F2L
0 / 1.875 / 3.503125 in 0.00 / 47.62 / 88.98 mm
+X · 2 in (50.8 mm)
S-FL-1-0 · W200
P03L → F0L
0 / 0.375 / 8.302431 in 0.00 / 9.52 / 210.88 mm
+X · 2 in (50.8 mm)
S-FL-1-1 · W200
P03L → F2L
0 / 1.875 / 8.302431 in 0.00 / 47.62 / 210.88 mm
+X · 2 in (50.8 mm)
S-FL-2-0 · W200
P03L → F0L
0 / 0.375 / 13.101736 in 0.00 / 9.52 / 332.78 mm
+X · 2 in (50.8 mm)
S-FL-2-1 · W200
P03L → F2L
0 / 1.875 / 13.101736 in 0.00 / 47.62 / 332.78 mm
+X · 2 in (50.8 mm)
S-FL-3-0 · W200
P03L → F0L
0 / 0.375 / 17.901042 in 0.00 / 9.52 / 454.69 mm
+X · 2 in (50.8 mm)
S-FL-3-1 · W200
P03L → F2L
0 / 1.875 / 17.901042 in 0.00 / 47.62 / 454.69 mm
+X · 2 in (50.8 mm)
S-FL-4-0 · W200
P03L → F0L
0 / 0.375 / 22.700347 in 0.00 / 9.52 / 576.59 mm
+X · 2 in (50.8 mm)
S-FL-4-1 · W200
P03L → F2L
0 / 1.875 / 22.700347 in 0.00 / 47.62 / 576.59 mm
+X · 2 in (50.8 mm)
S-FL-5-0 · W200
P03L → F0L
0 / 0.375 / 27.499653 in 0.00 / 9.52 / 698.49 mm
+X · 2 in (50.8 mm)
S-FL-5-1 · W200
P03L → F2L
0 / 1.875 / 27.499653 in 0.00 / 47.62 / 698.49 mm
+X · 2 in (50.8 mm)
Fastener stations · 205–216
Use the named assembly datums. Clearance passes through first members; stopped pilots enter the receivers. Received heads and thin metal webs require accepted trials.
ID / type
Through → receiver
Start X / Y / Z
Direction / length
S-FL-6-0 · W200
P03L → F0L
0 / 0.375 / 32.298958 in 0.00 / 9.52 / 820.39 mm
+X · 2 in (50.8 mm)
S-FL-6-1 · W200
P03L → F2L
0 / 1.875 / 32.298958 in 0.00 / 47.62 / 820.39 mm
+X · 2 in (50.8 mm)
S-FL-7-0 · W200
P03L → F0L
0 / 0.375 / 37.098264 in 0.00 / 9.52 / 942.30 mm
+X · 2 in (50.8 mm)
S-FL-7-1 · W200
P03L → F2L
0 / 1.875 / 37.098264 in 0.00 / 47.62 / 942.30 mm
+X · 2 in (50.8 mm)
S-FL-8-0 · W200
P03L → F0L
0 / 0.375 / 41.897569 in 0.00 / 9.52 / 1064.20 mm
+X · 2 in (50.8 mm)
S-FL-8-1 · W200
P03L → F2L
0 / 1.875 / 41.897569 in 0.00 / 47.62 / 1064.20 mm
+X · 2 in (50.8 mm)
S-FL-9-0 · W200
P03L → F0L
0 / 0.375 / 46.696875 in 0.00 / 9.52 / 1186.10 mm
+X · 2 in (50.8 mm)
S-FL-9-1 · W200
P03L → F2L
0 / 1.875 / 46.696875 in 0.00 / 47.62 / 1186.10 mm
+X · 2 in (50.8 mm)
S-FR-0-0 · W200
P03R → F0R
24 / 0.375 / 3.503125 in 609.60 / 9.52 / 88.98 mm
−X · 2 in (50.8 mm)
S-FR-0-1 · W200
P03R → F2R
24 / 1.875 / 3.503125 in 609.60 / 47.62 / 88.98 mm
−X · 2 in (50.8 mm)
S-FR-1-0 · W200
P03R → F0R
24 / 0.375 / 8.302431 in 609.60 / 9.52 / 210.88 mm
−X · 2 in (50.8 mm)
S-FR-1-1 · W200
P03R → F2R
24 / 1.875 / 8.302431 in 609.60 / 47.62 / 210.88 mm
−X · 2 in (50.8 mm)
Fastener stations · 217–228
Use the named assembly datums. Clearance passes through first members; stopped pilots enter the receivers. Received heads and thin metal webs require accepted trials.
ID / type
Through → receiver
Start X / Y / Z
Direction / length
S-FR-2-0 · W200
P03R → F0R
24 / 0.375 / 13.101736 in 609.60 / 9.52 / 332.78 mm
−X · 2 in (50.8 mm)
S-FR-2-1 · W200
P03R → F2R
24 / 1.875 / 13.101736 in 609.60 / 47.62 / 332.78 mm
−X · 2 in (50.8 mm)
S-FR-3-0 · W200
P03R → F0R
24 / 0.375 / 17.901042 in 609.60 / 9.52 / 454.69 mm
−X · 2 in (50.8 mm)
S-FR-3-1 · W200
P03R → F2R
24 / 1.875 / 17.901042 in 609.60 / 47.62 / 454.69 mm
−X · 2 in (50.8 mm)
S-FR-4-0 · W200
P03R → F0R
24 / 0.375 / 22.700347 in 609.60 / 9.52 / 576.59 mm
−X · 2 in (50.8 mm)
S-FR-4-1 · W200
P03R → F2R
24 / 1.875 / 22.700347 in 609.60 / 47.62 / 576.59 mm
−X · 2 in (50.8 mm)
S-FR-5-0 · W200
P03R → F0R
24 / 0.375 / 27.499653 in 609.60 / 9.52 / 698.49 mm
−X · 2 in (50.8 mm)
S-FR-5-1 · W200
P03R → F2R
24 / 1.875 / 27.499653 in 609.60 / 47.62 / 698.49 mm
−X · 2 in (50.8 mm)
S-FR-6-0 · W200
P03R → F0R
24 / 0.375 / 32.298958 in 609.60 / 9.52 / 820.39 mm
−X · 2 in (50.8 mm)
S-FR-6-1 · W200
P03R → F2R
24 / 1.875 / 32.298958 in 609.60 / 47.62 / 820.39 mm
−X · 2 in (50.8 mm)
S-FR-7-0 · W200
P03R → F0R
24 / 0.375 / 37.098264 in 609.60 / 9.52 / 942.30 mm
−X · 2 in (50.8 mm)
S-FR-7-1 · W200
P03R → F2R
24 / 1.875 / 37.098264 in 609.60 / 47.62 / 942.30 mm
−X · 2 in (50.8 mm)
Fastener stations · 229–240
Use the named assembly datums. Clearance passes through first members; stopped pilots enter the receivers. Received heads and thin metal webs require accepted trials.
ID / type
Through → receiver
Start X / Y / Z
Direction / length
S-FR-8-0 · W200
P03R → F0R
24 / 0.375 / 41.897569 in 609.60 / 9.52 / 1064.20 mm
−X · 2 in (50.8 mm)
S-FR-8-1 · W200
P03R → F2R
24 / 1.875 / 41.897569 in 609.60 / 47.62 / 1064.20 mm
−X · 2 in (50.8 mm)
S-FR-9-0 · W200
P03R → F0R
24 / 0.375 / 46.696875 in 609.60 / 9.52 / 1186.10 mm
−X · 2 in (50.8 mm)
S-FR-9-1 · W200
P03R → F2R
24 / 1.875 / 46.696875 in 609.60 / 47.62 / 1186.10 mm
−X · 2 in (50.8 mm)
S-FLOORFR-0-0 · W200
P01 → F0L
1.703125 / 0.375 / 0 in 43.26 / 9.52 / 0.00 mm
+Z · 2 in (50.8 mm)
S-FLOORFR-0-1 · W200
P01 → F2L
1.703125 / 1.875 / 0 in 43.26 / 47.62 / 0.00 mm
+Z · 2 in (50.8 mm)
S-FLOORFR-1-0 · W200
P01 → F0B
5.821875 / 0.375 / 0 in 147.88 / 9.52 / 0.00 mm
+Z · 2 in (50.8 mm)
S-FLOORFR-1-1 · W200
P01 → F2B
5.821875 / 1.875 / 0 in 147.88 / 47.62 / 0.00 mm
+Z · 2 in (50.8 mm)
S-FLOORFR-2-0 · W200
P01 → F0B
9.940625 / 0.375 / 0 in 252.49 / 9.52 / 0.00 mm
+Z · 2 in (50.8 mm)
S-FLOORFR-2-1 · W200
P01 → F2B
9.940625 / 1.875 / 0 in 252.49 / 47.62 / 0.00 mm
+Z · 2 in (50.8 mm)
S-FLOORFR-3-0 · W200
P01 → F0B
14.059375 / 0.375 / 0 in 357.11 / 9.52 / 0.00 mm
+Z · 2 in (50.8 mm)
S-FLOORFR-3-1 · W200
P01 → F2B
14.059375 / 1.875 / 0 in 357.11 / 47.62 / 0.00 mm
+Z · 2 in (50.8 mm)
Fastener stations · 241–252
Use the named assembly datums. Clearance passes through first members; stopped pilots enter the receivers. Received heads and thin metal webs require accepted trials.
ID / type
Through → receiver
Start X / Y / Z
Direction / length
S-FLOORFR-4-0 · W200
P01 → F0B
18.178125 / 0.375 / 0 in 461.72 / 9.52 / 0.00 mm
+Z · 2 in (50.8 mm)
S-FLOORFR-4-1 · W200
P01 → F2B
18.178125 / 1.875 / 0 in 461.72 / 47.62 / 0.00 mm
+Z · 2 in (50.8 mm)
S-FLOORFR-5-0 · W200
P01 → F0R
22.296875 / 0.375 / 0 in 566.34 / 9.52 / 0.00 mm
+Z · 2 in (50.8 mm)
S-FLOORFR-5-1 · W200
P01 → F2R
22.296875 / 1.875 / 0 in 566.34 / 47.62 / 0.00 mm
+Z · 2 in (50.8 mm)
S-VLB-0 · W100
VLB → P03L
-0.375 / 5.625 / 11.078125 in -9.52 / 142.88 / 281.38 mm
+X · 1 in (25.4 mm)
S-VLB-1 · W100
VLB → P03L
-0.375 / 8.8125 / 11.078125 in -9.52 / 223.84 / 281.38 mm
+X · 1 in (25.4 mm)
S-VLB-2 · W100
VLB → P03L
-0.375 / 12 / 11.078125 in -9.52 / 304.80 / 281.38 mm
+X · 1 in (25.4 mm)
S-VLB-3 · W100
VLB → P03L
-0.375 / 15.1875 / 11.078125 in -9.52 / 385.76 / 281.38 mm
+X · 1 in (25.4 mm)
S-VLB-4 · W100
VLB → P03L
-0.375 / 18.375 / 11.078125 in -9.52 / 466.72 / 281.38 mm
+X · 1 in (25.4 mm)
S-VLT-0 · W100
VLT → P03L
-0.375 / 5.625 / 16.578125 in -9.52 / 142.88 / 421.08 mm
+X · 1 in (25.4 mm)
S-VLT-1 · W100
VLT → P03L
-0.375 / 8.8125 / 16.578125 in -9.52 / 223.84 / 421.08 mm
+X · 1 in (25.4 mm)
S-VLT-2 · W100
VLT → P03L
-0.375 / 12 / 16.578125 in -9.52 / 304.80 / 421.08 mm
+X · 1 in (25.4 mm)
Fastener stations · 253–264
Use the named assembly datums. Clearance passes through first members; stopped pilots enter the receivers. Received heads and thin metal webs require accepted trials.
ID / type
Through → receiver
Start X / Y / Z
Direction / length
S-VLT-3 · W100
VLT → P03L
-0.375 / 15.1875 / 16.578125 in -9.52 / 385.76 / 421.08 mm
+X · 1 in (25.4 mm)
S-VLT-4 · W100
VLT → P03L
-0.375 / 18.375 / 16.578125 in -9.52 / 466.72 / 421.08 mm
+X · 1 in (25.4 mm)
S-VLF-0 · W100
VLF → P03L
-0.375 / 5.25 / 12.203125 in -9.52 / 133.35 / 309.96 mm
+X · 1 in (25.4 mm)
S-VLF-1 · W100
VLF → P03L
-0.375 / 5.25 / 15.453125 in -9.52 / 133.35 / 392.51 mm
+X · 1 in (25.4 mm)
S-VLA-0 · W100
VLA → P03L
-0.375 / 18.75 / 12.203125 in -9.52 / 476.25 / 309.96 mm
+X · 1 in (25.4 mm)
S-VLA-1 · W100
VLA → P03L
-0.375 / 18.75 / 15.453125 in -9.52 / 476.25 / 392.51 mm
+X · 1 in (25.4 mm)
S-VRB-0 · W100
VRB → P03R
24.375 / 5.625 / 11.078125 in 619.12 / 142.88 / 281.38 mm
−X · 1 in (25.4 mm)
S-VRB-1 · W100
VRB → P03R
24.375 / 8.8125 / 11.078125 in 619.12 / 223.84 / 281.38 mm
−X · 1 in (25.4 mm)
S-VRB-2 · W100
VRB → P03R
24.375 / 12 / 11.078125 in 619.12 / 304.80 / 281.38 mm
−X · 1 in (25.4 mm)
S-VRB-3 · W100
VRB → P03R
24.375 / 15.1875 / 11.078125 in 619.12 / 385.76 / 281.38 mm
−X · 1 in (25.4 mm)
S-VRB-4 · W100
VRB → P03R
24.375 / 18.375 / 11.078125 in 619.12 / 466.72 / 281.38 mm
−X · 1 in (25.4 mm)
S-VRT-0 · W100
VRT → P03R
24.375 / 5.625 / 16.578125 in 619.12 / 142.88 / 421.08 mm
−X · 1 in (25.4 mm)
Fastener stations · 265–276
Use the named assembly datums. Clearance passes through first members; stopped pilots enter the receivers. Received heads and thin metal webs require accepted trials.
ID / type
Through → receiver
Start X / Y / Z
Direction / length
S-VRT-1 · W100
VRT → P03R
24.375 / 8.8125 / 16.578125 in 619.12 / 223.84 / 421.08 mm
−X · 1 in (25.4 mm)
S-VRT-2 · W100
VRT → P03R
24.375 / 12 / 16.578125 in 619.12 / 304.80 / 421.08 mm
−X · 1 in (25.4 mm)
S-VRT-3 · W100
VRT → P03R
24.375 / 15.1875 / 16.578125 in 619.12 / 385.76 / 421.08 mm
−X · 1 in (25.4 mm)
S-VRT-4 · W100
VRT → P03R
24.375 / 18.375 / 16.578125 in 619.12 / 466.72 / 421.08 mm
−X · 1 in (25.4 mm)
S-VRF-0 · W100
VRF → P03R
24.375 / 5.25 / 12.203125 in 619.12 / 133.35 / 309.96 mm
−X · 1 in (25.4 mm)
S-VRF-1 · W100
VRF → P03R
24.375 / 5.25 / 15.453125 in 619.12 / 133.35 / 392.51 mm
−X · 1 in (25.4 mm)
S-VRA-0 · W100
VRA → P03R
24.375 / 18.75 / 12.203125 in 619.12 / 476.25 / 309.96 mm
−X · 1 in (25.4 mm)
S-VRA-1 · W100
VRA → P03R
24.375 / 18.75 / 15.453125 in 619.12 / 476.25 / 392.51 mm
−X · 1 in (25.4 mm)
S-RTLF-0 · W100
RTLF → P02
4.625 / 3.25 / 46.921875 in 117.47 / 82.55 / 1191.82 mm
+Z · 1 in (25.4 mm)
S-RTLF-1 · W100
RTLF → P02
9.541667 / 3.25 / 46.921875 in 242.36 / 82.55 / 1191.82 mm
+Z · 1 in (25.4 mm)
S-RTLF-2 · W100
RTLF → P02
14.458333 / 3.25 / 46.921875 in 367.24 / 82.55 / 1191.82 mm
+Z · 1 in (25.4 mm)
S-RTLF-3 · W100
RTLF → P02
19.375 / 3.25 / 46.921875 in 492.12 / 82.55 / 1191.82 mm
+Z · 1 in (25.4 mm)
Fastener stations · 277–288
Use the named assembly datums. Clearance passes through first members; stopped pilots enter the receivers. Received heads and thin metal webs require accepted trials.
ID / type
Through → receiver
Start X / Y / Z
Direction / length
S-RTLA-0 · W100
RTLA → P02
4.625 / 20.75 / 46.921875 in 117.47 / 527.05 / 1191.82 mm
+Z · 1 in (25.4 mm)
S-RTLA-1 · W100
RTLA → P02
9.541667 / 20.75 / 46.921875 in 242.36 / 527.05 / 1191.82 mm
+Z · 1 in (25.4 mm)
S-RTLA-2 · W100
RTLA → P02
14.458333 / 20.75 / 46.921875 in 367.24 / 527.05 / 1191.82 mm
+Z · 1 in (25.4 mm)
S-RTLA-3 · W100
RTLA → P02
19.375 / 20.75 / 46.921875 in 492.12 / 527.05 / 1191.82 mm
+Z · 1 in (25.4 mm)
S-RTLL-0 · W100
RTLL → P02
4.25 / 4.375 / 46.921875 in 107.95 / 111.12 / 1191.82 mm
+Z · 1 in (25.4 mm)
S-RTLL-1 · W100
RTLL → P02
4.25 / 8.1875 / 46.921875 in 107.95 / 207.96 / 1191.82 mm
+Z · 1 in (25.4 mm)
S-RTLL-2 · W100
RTLL → P02
4.25 / 12 / 46.921875 in 107.95 / 304.80 / 1191.82 mm
+Z · 1 in (25.4 mm)
S-RTLL-3 · W100
RTLL → P02
4.25 / 15.8125 / 46.921875 in 107.95 / 401.64 / 1191.82 mm
+Z · 1 in (25.4 mm)
S-RTLL-4 · W100
RTLL → P02
4.25 / 19.625 / 46.921875 in 107.95 / 498.47 / 1191.82 mm
+Z · 1 in (25.4 mm)
S-RTLR-0 · W100
RTLR → P02
19.75 / 4.375 / 46.921875 in 501.65 / 111.12 / 1191.82 mm
+Z · 1 in (25.4 mm)
S-RTLR-1 · W100
RTLR → P02
19.75 / 8.1875 / 46.921875 in 501.65 / 207.96 / 1191.82 mm
+Z · 1 in (25.4 mm)
S-RTLR-2 · W100
RTLR → P02
19.75 / 12 / 46.921875 in 501.65 / 304.80 / 1191.82 mm
+Z · 1 in (25.4 mm)
Fastener stations · 289–300
Use the named assembly datums. Clearance passes through first members; stopped pilots enter the receivers. Received heads and thin metal webs require accepted trials.
ID / type
Through → receiver
Start X / Y / Z
Direction / length
S-RTLR-3 · W100
RTLR → P02
19.75 / 15.8125 / 46.921875 in 501.65 / 401.64 / 1191.82 mm
+Z · 1 in (25.4 mm)
S-RTLR-4 · W100
RTLR → P02
19.75 / 19.625 / 46.921875 in 501.65 / 498.47 / 1191.82 mm
+Z · 1 in (25.4 mm)
S-BELL-0 · W125
BELL + SPLL → DL1B
5.828125 / 2.101 / 13.578125 in 148.03 / 53.37 / 344.88 mm
−Y · 1 1/4 in (31.75 mm)
S-BELL-1 · W125
BELL + SPLL → DL1L
5.828125 / 2.101 / 18.322917 in 148.03 / 53.37 / 465.40 mm
−Y · 1 1/4 in (31.75 mm)
S-BELL-2 · W125
BELL + SPLL → DL1L
5.828125 / 2.101 / 23.067708 in 148.03 / 53.37 / 585.92 mm
−Y · 1 1/4 in (31.75 mm)
S-BELL-3 · W125
BELL + SPLL → DL1L
5.828125 / 2.101 / 27.8125 in 148.03 / 53.37 / 706.44 mm
−Y · 1 1/4 in (31.75 mm)
S-BELL-4 · W125
BELL + SPLL → DL1L
5.828125 / 2.101 / 32.557292 in 148.03 / 53.37 / 826.96 mm
−Y · 1 1/4 in (31.75 mm)
S-BELL-5 · W125
BELL + SPLL → DL1L
5.828125 / 2.101 / 37.302083 in 148.03 / 53.37 / 947.47 mm
−Y · 1 1/4 in (31.75 mm)
S-BELL-6 · W125
BELL + SPLL → DL1T
5.828125 / 2.101 / 42.046875 in 148.03 / 53.37 / 1067.99 mm
−Y · 1 1/4 in (31.75 mm)
S-BELR-0 · W125
BELR + SPLR → DL1B
18.171875 / 2.101 / 13.578125 in 461.57 / 53.37 / 344.88 mm
−Y · 1 1/4 in (31.75 mm)
S-BELR-1 · W125
BELR + SPLR → DL1R
18.171875 / 2.101 / 18.322917 in 461.57 / 53.37 / 465.40 mm
−Y · 1 1/4 in (31.75 mm)
S-BELR-2 · W125
BELR + SPLR → DL1R
18.171875 / 2.101 / 23.067708 in 461.57 / 53.37 / 585.92 mm
−Y · 1 1/4 in (31.75 mm)
Fastener stations · 301–312
Use the named assembly datums. Clearance passes through first members; stopped pilots enter the receivers. Received heads and thin metal webs require accepted trials.
ID / type
Through → receiver
Start X / Y / Z
Direction / length
S-BELR-3 · W125
BELR + SPLR → DL1R
18.171875 / 2.101 / 27.8125 in 461.57 / 53.37 / 706.44 mm
−Y · 1 1/4 in (31.75 mm)
S-BELR-4 · W125
BELR + SPLR → DL1R
18.171875 / 2.101 / 32.557292 in 461.57 / 53.37 / 826.96 mm
−Y · 1 1/4 in (31.75 mm)
S-BELR-5 · W125
BELR + SPLR → DL1R
18.171875 / 2.101 / 37.302083 in 461.57 / 53.37 / 947.47 mm
−Y · 1 1/4 in (31.75 mm)
S-BELR-6 · W125
BELR + SPLR → DL1T
18.171875 / 2.101 / 42.046875 in 461.57 / 53.37 / 1067.99 mm
−Y · 1 1/4 in (31.75 mm)
S-BELB-0 · W125
BELB + SPLB → DL1B
7.203125 / 2.101 / 13.453125 in 182.96 / 53.37 / 341.71 mm
−Y · 1 1/4 in (31.75 mm)
S-BELB-1 · W125
BELB + SPLB → DL1B
12 / 2.101 / 13.453125 in 304.80 / 53.37 / 341.71 mm
−Y · 1 1/4 in (31.75 mm)
S-BELB-2 · W125
BELB + SPLB → DL1B
16.796875 / 2.101 / 13.453125 in 426.64 / 53.37 / 341.71 mm
−Y · 1 1/4 in (31.75 mm)
S-BELT-0 · W125
BELT + SPLT → DL1T
7.203125 / 2.101 / 42.171875 in 182.96 / 53.37 / 1071.17 mm
−Y · 1 1/4 in (31.75 mm)
S-BELT-1 · W125
BELT + SPLT → DL1T
12 / 2.101 / 42.171875 in 304.80 / 53.37 / 1071.17 mm
−Y · 1 1/4 in (31.75 mm)
S-BELT-2 · W125
BELT + SPLT → DL1T
16.796875 / 2.101 / 42.171875 in 426.64 / 53.37 / 1071.17 mm
−Y · 1 1/4 in (31.75 mm)
S-LCL-0 · W100
LCL → P03L
1.203125 / 3.25 / 10.203125 in 30.56 / 82.55 / 259.16 mm
−X · 1 in (25.4 mm)
S-LCL-1 · W100
LCL → P03L
1.203125 / 7.605469 / 10.203125 in 30.56 / 193.18 / 259.16 mm
−X · 1 in (25.4 mm)
Fastener stations · 313–324
Use the named assembly datums. Clearance passes through first members; stopped pilots enter the receivers. Received heads and thin metal webs require accepted trials.
ID / type
Through → receiver
Start X / Y / Z
Direction / length
S-LCL-2 · W100
LCL → P03L
1.203125 / 11.960938 / 10.203125 in 30.56 / 303.81 / 259.16 mm
−X · 1 in (25.4 mm)
S-LCL-3 · W100
LCL → P03L
1.203125 / 16.316406 / 10.203125 in 30.56 / 414.44 / 259.16 mm
−X · 1 in (25.4 mm)
S-LCL-4 · W100
LCL → P03L
1.203125 / 20.671875 / 10.203125 in 30.56 / 525.07 / 259.16 mm
−X · 1 in (25.4 mm)
S-LCR-0 · W100
LCR → P03R
22.796875 / 3.25 / 10.203125 in 579.04 / 82.55 / 259.16 mm
+X · 1 in (25.4 mm)
S-LCR-1 · W100
LCR → P03R
22.796875 / 7.605469 / 10.203125 in 579.04 / 193.18 / 259.16 mm
+X · 1 in (25.4 mm)
S-LCR-2 · W100
LCR → P03R
22.796875 / 11.960938 / 10.203125 in 579.04 / 303.81 / 259.16 mm
+X · 1 in (25.4 mm)
S-LCR-3 · W100
LCR → P03R
22.796875 / 16.316406 / 10.203125 in 579.04 / 414.44 / 259.16 mm
+X · 1 in (25.4 mm)
S-LCR-4 · W100
LCR → P03R
22.796875 / 20.671875 / 10.203125 in 579.04 / 525.07 / 259.16 mm
+X · 1 in (25.4 mm)
S-LCFJ1-0 · W100
LCFJ1 → F2L
1.453125 / 2.75 / 10.203125 in 36.91 / 69.85 / 259.16 mm
−Y · 1 in (25.4 mm)
S-LCFJ1-1 · W100
LCFJ1 → F2L
2.578125 / 2.75 / 10.203125 in 65.48 / 69.85 / 259.16 mm
−Y · 1 in (25.4 mm)
S-LCFRL-0 · W100
LCFRL → RCLL
3.744792 / 3.40625 / 10.203125 in 95.12 / 86.52 / 259.16 mm
−Y · 1 in (25.4 mm)
S-LCFRL-1 · W100
LCFRL → RCLL
4.161458 / 3.40625 / 10.203125 in 105.70 / 86.52 / 259.16 mm
−Y · 1 in (25.4 mm)
Fastener stations · 325–336
Use the named assembly datums. Clearance passes through first members; stopped pilots enter the receivers. Received heads and thin metal webs require accepted trials.
ID / type
Through → receiver
Start X / Y / Z
Direction / length
S-LCFPL-0 · W100
LCFPL → RBL2
5.328125 / 1.90625 / 10.203125 in 135.33 / 48.42 / 259.16 mm
−Y · 1 in (25.4 mm)
S-LCFPL-1 · W100
LCFPL → RBL2
9.776042 / 1.90625 / 10.203125 in 248.31 / 48.42 / 259.16 mm
−Y · 1 in (25.4 mm)
S-LCFPL-2 · W100
LCFPL → RBL2
14.223958 / 1.90625 / 10.203125 in 361.29 / 48.42 / 259.16 mm
−Y · 1 in (25.4 mm)
S-LCFPL-3 · W100
LCFPL → RBL2
18.671875 / 1.90625 / 10.203125 in 474.27 / 48.42 / 259.16 mm
−Y · 1 in (25.4 mm)
S-LCFRR-0 · W100
LCFRR → RCLR
19.838542 / 3.40625 / 10.203125 in 503.90 / 86.52 / 259.16 mm
−Y · 1 in (25.4 mm)
S-LCFRR-1 · W100
LCFRR → RCLR
20.255208 / 3.40625 / 10.203125 in 514.48 / 86.52 / 259.16 mm
−Y · 1 in (25.4 mm)
S-LCFJ2-0 · W100
LCFJ2 → F2R
21.421875 / 2.75 / 10.203125 in 544.12 / 69.85 / 259.16 mm
−Y · 1 in (25.4 mm)
S-LCFJ2-1 · W100
LCFJ2 → F2R
22.546875 / 2.75 / 10.203125 in 572.69 / 69.85 / 259.16 mm
−Y · 1 in (25.4 mm)
S-LCB1-0 · W100
LCB1 → P04
3.158125 / 22.796875 / 10.203125 in 80.22 / 579.04 / 259.16 mm
+Y · 1 in (25.4 mm)
S-LCB1-1 · W100
LCB1 → P04
7.579063 / 22.796875 / 10.203125 in 192.51 / 579.04 / 259.16 mm
+Y · 1 in (25.4 mm)
S-LCB1-2 · W100
LCB1 → P04
12 / 22.796875 / 10.203125 in 304.80 / 579.04 / 259.16 mm
+Y · 1 in (25.4 mm)
S-LCB1-3 · W100
LCB1 → P04
16.420938 / 22.796875 / 10.203125 in 417.09 / 579.04 / 259.16 mm
+Y · 1 in (25.4 mm)
Fastener stations · 337–348
Use the named assembly datums. Clearance passes through first members; stopped pilots enter the receivers. Received heads and thin metal webs require accepted trials.
ID / type
Through → receiver
Start X / Y / Z
Direction / length
S-LCB1-4 · W100
LCB1 → P04
20.841875 / 22.796875 / 10.203125 in 529.38 / 579.04 / 259.16 mm
+Y · 1 in (25.4 mm)
S-LCPL-0 · W100
LCPL → CLU
1.286458 / 21.296875 / 10.203125 in 32.68 / 540.94 / 259.16 mm
+Y · 1 in (25.4 mm)
S-LCPL-1 · W100
LCPL → CLU
1.744792 / 21.296875 / 10.203125 in 44.32 / 540.94 / 259.16 mm
+Y · 1 in (25.4 mm)
S-LCPR-0 · W100
LCPR → CRU
22.255208 / 21.296875 / 10.203125 in 565.28 / 540.94 / 259.16 mm
+Y · 1 in (25.4 mm)
S-LCPR-1 · W100
LCPR → CRU
22.713542 / 21.296875 / 10.203125 in 576.92 / 540.94 / 259.16 mm
+Y · 1 in (25.4 mm)
S-ROOFL-0 · W125
P02 → CLT
1.453125 / 4 / 48 in 36.91 / 101.60 / 1219.20 mm
−Z · 1 1/4 in (31.75 mm)
S-ROOFL-1 · W125
P02 → CLT
1.453125 / 11 / 48 in 36.91 / 279.40 / 1219.20 mm
−Z · 1 1/4 in (31.75 mm)
S-ROOFL-2 · W125
P02 → CLT
1.453125 / 18 / 48 in 36.91 / 457.20 / 1219.20 mm
−Z · 1 1/4 in (31.75 mm)
S-ROOFL-3 · W125
P02 → CLT
1.453125 / 22 / 48 in 36.91 / 558.80 / 1219.20 mm
−Z · 1 1/4 in (31.75 mm)
S-ROOFR-0 · W125
P02 → CRT
22.546875 / 4 / 48 in 572.69 / 101.60 / 1219.20 mm
−Z · 1 1/4 in (31.75 mm)
S-ROOFR-1 · W125
P02 → CRT
22.546875 / 11 / 48 in 572.69 / 279.40 / 1219.20 mm
−Z · 1 1/4 in (31.75 mm)
S-ROOFR-2 · W125
P02 → CRT
22.546875 / 18 / 48 in 572.69 / 457.20 / 1219.20 mm
−Z · 1 1/4 in (31.75 mm)
Fastener stations · 349–360
Use the named assembly datums. Clearance passes through first members; stopped pilots enter the receivers. Received heads and thin metal webs require accepted trials.
ID / type
Through → receiver
Start X / Y / Z
Direction / length
S-ROOFR-3 · W125
P02 → CRT
22.546875 / 22 / 48 in 572.69 / 558.80 / 1219.20 mm
−Z · 1 1/4 in (31.75 mm)
S-ROOFF-0 · W125
P02 → F1T
5 / 1.125 / 48 in 127.00 / 28.57 / 1219.20 mm
−Z · 1 1/4 in (31.75 mm)
S-ROOFF-1 · W125
P02 → F1T
12 / 1.125 / 48 in 304.80 / 28.57 / 1219.20 mm
−Z · 1 1/4 in (31.75 mm)
S-ROOFF-2 · W125
P02 → F1T
19 / 1.125 / 48 in 482.60 / 28.57 / 1219.20 mm
−Z · 1 1/4 in (31.75 mm)
S-ROOFB-0 · W125
P02 → CT
5 / 22.546875 / 48 in 127.00 / 572.69 / 1219.20 mm
−Z · 1 1/4 in (31.75 mm)
S-ROOFB-1 · W125
P02 → CT
12 / 22.546875 / 48 in 304.80 / 572.69 / 1219.20 mm
−Z · 1 1/4 in (31.75 mm)
S-ROOFB-2 · W125
P02 → CT
19 / 22.546875 / 48 in 482.60 / 572.69 / 1219.20 mm
−Z · 1 1/4 in (31.75 mm)
S-L-HP1 · HASP
L-HP-base → DL0R
20.295625 / -0.07 / 27.8125 in 515.51 / -1.78 / 706.44 mm
+Y · 5/8 in (15.88 mm)
S-L-HP2 · HASP
L-HP-base → DL0R
19.925625 / -0.07 / 28.3125 in 506.11 / -1.78 / 719.14 mm
+Y · 5/8 in (15.88 mm)
S-L-HP3 · HASP
L-HP-base → DL0R
19.825625 / -0.07 / 27.3125 in 503.57 / -1.78 / 693.74 mm
+Y · 5/8 in (15.88 mm)
S-L-ST1 · HASP
L-ST-base → F0R
22.175625 / -0.07 / 27.2525 in 563.26 / -1.78 / 692.21 mm
+Y · 5/8 in (15.88 mm)
S-L-ST2 · HASP
L-ST-base → F0R
21.055625 / -0.07 / 27.2525 in 534.81 / -1.78 / 692.21 mm
+Y · 5/8 in (15.88 mm)
Fastener stations · 361–362
Use the named assembly datums. Clearance passes through first members; stopped pilots enter the receivers. Received heads and thin metal webs require accepted trials.
ID / type
Through → receiver
Start X / Y / Z
Direction / length
S-L-ST3 · HASP
L-ST-base → F0R
22.175625 / -0.07 / 28.3725 in 563.26 / -1.78 / 720.66 mm
+Y · 5/8 in (15.88 mm)
S-L-ST4 · HASP
L-ST-base → F0R
21.055625 / -0.07 / 28.3725 in 534.81 / -1.78 / 720.66 mm
+Y · 5/8 in (15.88 mm)
Machining removals
Local X / Y / Z begin at the named part’s minimum assembled-coordinate corner. Reference cut volumes can extend beyond the wood; remove only their intersection with the named part. Read orientation pictures; never use a schematic as a full-size template.
Cut / part
Local X / Y / Z
Removal size
Operation
POCKET-VLB / VLB
0.287 in (7.29 mm) / 0.494 in (12.55 mm) / 0.494 in (12.55 mm)
0.088 in (2.24 mm) × 13.012 in (330.5 mm) × 5.012 in (127.3 mm)
Wall-facing wire rebate; preserve outer wood bearing land
POCKET-VLT / VLT
0.287 in (7.29 mm) / 0.494 in (12.55 mm) / -4.506 in (-114.45 mm)
0.088 in (2.24 mm) × 13.012 in (330.5 mm) × 5.012 in (127.3 mm)
Wall-facing wire rebate; preserve outer wood bearing land
POCKET-VLF / VLF
0.287 in (7.29 mm) / 0.494 in (12.55 mm) / -0.506 in (-12.85 mm)
0.088 in (2.24 mm) × 13.012 in (330.5 mm) × 5.012 in (127.3 mm)
Wall-facing wire rebate; preserve outer wood bearing land
POCKET-VLA / VLA
0.287 in (7.29 mm) / -12.506 in (-317.65 mm) / -0.506 in (-12.85 mm)
0.088 in (2.24 mm) × 13.012 in (330.5 mm) × 5.012 in (127.3 mm)
Wall-facing wire rebate; preserve outer wood bearing land
POCKET-VRB / VRB
0 in (0 mm) / 0.494 in (12.55 mm) / 0.494 in (12.55 mm)
0.088 in (2.24 mm) × 13.012 in (330.5 mm) × 5.012 in (127.3 mm)
Wall-facing wire rebate; preserve outer wood bearing land
POCKET-VRT / VRT
0 in (0 mm) / 0.494 in (12.55 mm) / -4.506 in (-114.45 mm)
0.088 in (2.24 mm) × 13.012 in (330.5 mm) × 5.012 in (127.3 mm)
Wall-facing wire rebate; preserve outer wood bearing land
POCKET-VRF / VRF
0 in (0 mm) / 0.494 in (12.55 mm) / -0.506 in (-12.85 mm)
0.088 in (2.24 mm) × 13.012 in (330.5 mm) × 5.012 in (127.3 mm)
Wall-facing wire rebate; preserve outer wood bearing land
Machining removals · continued
Local X / Y / Z begin at the named part’s minimum assembled-coordinate corner. Reference cut volumes can extend beyond the wood; remove only their intersection with the named part. Read orientation pictures; never use a schematic as a full-size template.
Cut / part
Local X / Y / Z
Removal size
Operation
POCKET-VRA / VRA
0 in (0 mm) / -12.506 in (-317.65 mm) / -0.506 in (-12.85 mm)
0.088 in (2.24 mm) × 13.012 in (330.5 mm) × 5.012 in (127.3 mm)
Wall-facing wire rebate; preserve outer wood bearing land
POCKET-RTLF / RTLF
0.494 in (12.55 mm) / 0.494 in (12.55 mm) / 0.287 in (7.29 mm)
15.012 in (381.3 mm) × 17.012 in (432.1 mm) × 0.088 in (2.24 mm)
Roof-facing wire rebate; retained solid bearing land
POCKET-RTLA / RTLA
0.494 in (12.55 mm) / -16.506 in (-419.25 mm) / 0.287 in (7.29 mm)
15.012 in (381.3 mm) × 17.012 in (432.1 mm) × 0.088 in (2.24 mm)
Roof-facing wire rebate; retained solid bearing land
POCKET-RTLL / RTLL
0.494 in (12.55 mm) / -0.506 in (-12.85 mm) / 0.287 in (7.29 mm)
15.012 in (381.3 mm) × 17.012 in (432.1 mm) × 0.088 in (2.24 mm)
Roof-facing wire rebate; retained solid bearing land
POCKET-RTLR / RTLR
-14.506 in (-368.45 mm) / -0.506 in (-12.85 mm) / 0.287 in (7.29 mm)
15.012 in (381.3 mm) × 17.012 in (432.1 mm) × 0.088 in (2.24 mm)
Roof-facing wire rebate; retained solid bearing land
ROOF-OPEN-P02-0 / P02
5 in (127 mm) / 4 in (101.6 mm) / -0.1 in (-2.54 mm)
14 in (355.6 mm) × 16 in (406.4 mm) × 0.903125 in (22.94 mm)
Supported through-cut; preserve original N05 opening coordinates
VENT-P03L-0 / P03L
-0.1 in (-2.54 mm) / 6 in (152.4 mm) / 11 1/8 in (282.58 mm)
0.903125 in (22.94 mm) × 12 in (304.8 mm) × 4 in (101.6 mm)
Supported through-cut; preserve original N05 opening coordinates
Machining removals · continued
Local X / Y / Z begin at the named part’s minimum assembled-coordinate corner. Reference cut volumes can extend beyond the wood; remove only their intersection with the named part. Read orientation pictures; never use a schematic as a full-size template.
Cut / part
Local X / Y / Z
Removal size
Operation
VENT-P03R-0 / P03R
-0.1 in (-2.54 mm) / 6 in (152.4 mm) / 11 1/8 in (282.58 mm)
0.903125 in (22.94 mm) × 12 in (304.8 mm) × 4 in (101.6 mm)
Supported through-cut; preserve original N05 opening coordinates
NUT-RECESS-BTLL1 / RCLL
1/4 in (6.35 mm) / 27/32 in (21.43 mm) / 1 1/8 in (28.58 mm)
Cylindrical removal; bounding extent 1 in (25.4 mm) × 21/32 in (16.67 mm) × 1 in (25.4 mm) (use the stated diameter and depth, not a rectangular pocket)
Stopped 1-inch flat-bottom recess from rear post face, 21/32-inch deep; remaining wood 27/32 inch. Rehearse the actual socket before final drilling.
NUT-RECESS-BTLL2 / RCLL
1/4 in (6.35 mm) / 27/32 in (21.43 mm) / 5 1/8 in (130.18 mm)
Cylindrical removal; bounding extent 1 in (25.4 mm) × 21/32 in (16.67 mm) × 1 in (25.4 mm) (use the stated diameter and depth, not a rectangular pocket)
Stopped 1-inch flat-bottom recess from rear post face, 21/32-inch deep; remaining wood 27/32 inch. Rehearse the actual socket before final drilling.
NUT-RECESS-BTLR1 / RCLR
1/4 in (6.35 mm) / 27/32 in (21.43 mm) / 1 1/8 in (28.58 mm)
Cylindrical removal; bounding extent 1 in (25.4 mm) × 21/32 in (16.67 mm) × 1 in (25.4 mm) (use the stated diameter and depth, not a rectangular pocket)
Stopped 1-inch flat-bottom recess from rear post face, 21/32-inch deep; remaining wood 27/32 inch. Rehearse the actual socket before final drilling.
NUT-RECESS-BTLR2 / RCLR
1/4 in (6.35 mm) / 27/32 in (21.43 mm) / 5 1/8 in (130.18 mm)
Cylindrical removal; bounding extent 1 in (25.4 mm) × 21/32 in (16.67 mm) × 1 in (25.4 mm) (use the stated diameter and depth, not a rectangular pocket)
Stopped 1-inch flat-bottom recess from rear post face, 21/32-inch deep; remaining wood 27/32 inch. Rehearse the actual socket before final drilling.
Cutting diagrams
PLY-1 · numbered stock allocation
Numbers match the ordered ID and exact stock-coordinate table
Numbers match the ordered ID and exact stock-coordinate table
Dedicated full-width trial board; form thickness before ripping narrow parts
Inspection records
Receiving and physical acceptance record
Leave actual results blank until measured or performed. Calculations and renders do not complete a physical record.
Checkpoint
Actual result / date / reviewer
H01 · before hardware drilling Receive three same-hand LSX-100R hinges, exact screws and N305-979 hasp. Verify maker drawing, hole/head seating, full bearing on equal cured veneer faces, aligned axes, head and rear-tip cover, full swing and 2 in (50.8 mm) lift-off. No supplier approval or physical trial received.
___________________
___________________
___________________
H02 · before wood cutting Measure plywood gauge, straight square solid wood, stock dimensions and kerf. Refit door perimeter and retainer sides while retaining glazing pocket and hidden structural bearing. No dimensions are received measurements.
___________________
___________________
___________________
Glue applied: __________ · Coating/repair time: __________ Temperature / humidity: __________ · Full cure due: __________ PSA supplier dwell: __________ · Liner test dates: __________
Receiving and physical acceptance record
Leave actual results blank until measured or performed. Calculations and renders do not complete a physical record.
Checkpoint
Actual result / date / reviewer
H03 · before veneer purchase Confirm chosen species, PSA/backer, panel balance, cured Varathane compatibility, acclimation, pressure, dwell, temperature/humidity and cleaner exposure. Prove bond and compression stability beneath the hinge leaves. Recalculate for every changed layer.
___________________
___________________
___________________
H04 · before capture routing Measure actual welded crossing and cured film. Trial 0.088 in (2.24 mm) reference rebate, at most 1/8 in (3.18 mm) without redesign, with full solid bearing and covered cut wires.
___________________
___________________
___________________
Glue applied: __________ · Coating/repair time: __________ Temperature / humidity: __________ · Full cure due: __________ PSA supplier dwell: __________ · Liner test dates: __________
Receiving and physical acceptance record
Leave actual results blank until measured or performed. Calculations and renders do not complete a physical record.
Checkpoint
Actual result / date / reviewer
H05 · before finish and lining Complete all drilling, head seats and driver/socket access trials before coating. Flush retainer connection, stopped nut recess and liner protection require received-stack acceptance. Reseal and fully recure any later exposed wood. For revised retainer: received 2 3/4 in (69.85 mm) flat-head screw, washer <=1/16 in (1.59 mm) and locknut 0.298 in (7.57 mm)–0.328 in (8.33 mm). Trial 1 in (25.4 mm) diameter x 21/32 in (16.67 mm) stopped rear recess, socket access, two complete exposed threads and tail >=1/16 in (1.59 mm) below post face. Retain 27/32 in (21.43 mm) post thickness at the washer seat. No torque or connection capacity inferred.
___________________
___________________
___________________
H06 · before glazing cutting Measure actual 0.22 in (5.59 mm) acrylic, uncompressed neoprene pads and cured films; fit spacer from 3/8 in (9.53 mm) rough stock. Preserve expansion and supported lower edge; no rigid squeeze or drilled pane. Weigh finished door and repeat supported swing/lift trial.
___________________
___________________
___________________
Glue applied: __________ · Coating/repair time: __________ Temperature / humidity: __________ · Full cure due: __________ PSA supplier dwell: __________ · Liner test dates: __________
Receiving and physical acceptance record
Leave actual results blank until measured or performed. Calculations and renders do not complete a physical record.
Checkpoint
Actual result / date / reviewer
H07 · before loading Qualified review of wood connections, door support, retainer and continuous base/furniture/building floor under weighed wet contents. No capacity derives from the hinge catalogue or bed arithmetic. Qualified connection review must include the countersunk front bearing and recessed interior post bearing, not the previous carriage-bolt geometry.
___________________
___________________
___________________
H08 · before animal entry Full finish cure; construction, secure closure, pinch/edge/escape/mesh, maintenance and stability tests. Separate species/equipment heat/light/humidity commissioning; no animal suitability assigned.
___________________
___________________
___________________
Glue applied: __________ · Coating/repair time: __________ Temperature / humidity: __________ · Full cure due: __________ PSA supplier dwell: __________ · Liner test dates: __________
Receiving and physical acceptance record
Leave actual results blank until measured or performed. Calculations and renders do not complete a physical record.
Checkpoint
Actual result / date / reviewer
H10 · before any door trial Receive TK-400 kit instructions and screws; verify rail-to-post connection, furniture-side screw bearing, building wall and correct anchors, cable reach and restraint stability. Wall/cable is not represented in the model; no kit rating is a rating of this assembly.
___________________
___________________
___________________
H09 · before liner installation Material suitability and compressed underlay/fold bulk trial around fixed frame, two receivers and two rear posts; uncut wet-zone folds. One-inch water observation for 24 hours only after qualified support; no aquarium approval.
___________________
___________________
___________________
Glue applied: __________ · Coating/repair time: __________ Temperature / humidity: __________ · Full cure due: __________ PSA supplier dwell: __________ · Liner test dates: __________
Sources, separate statuses and maintenance
Current product identity and source evidence are in the construction review packet. Quantities, geometry and instructions belong only to N05.
Separate statuses: research, reference dimensions, calculations and digital validation each have their own evidence. No prototype has been built. Physical testing and qualified review have not been performed. Publication does not replace these construction checks.
For maintenance, relocate occupants, isolate equipment and remove all water and contents. Release the hasp and open at least 90 degrees before the helper-supported 2-inch (50.8 mm) vertical lift. Remove the front receiver clamp strips, then long side strips, then rear post and remaining short strips. Fold the empty basin clear before releasing all four retainer nuts and screws. Keep the wall restraint engaged throughout service. Refit in the reverse accepted order and repeat affected cure, shallow leak, door, mesh and containment checks.
Veneer scans by Jenelle van Heerden via Poly Haven illustrate maple, white oak and walnut appearance. Delivered grain and colour vary. The full exterior veneer system, including hinge bearing, remains subject to supplier/qualified bond, balance and actual-stack acceptance.