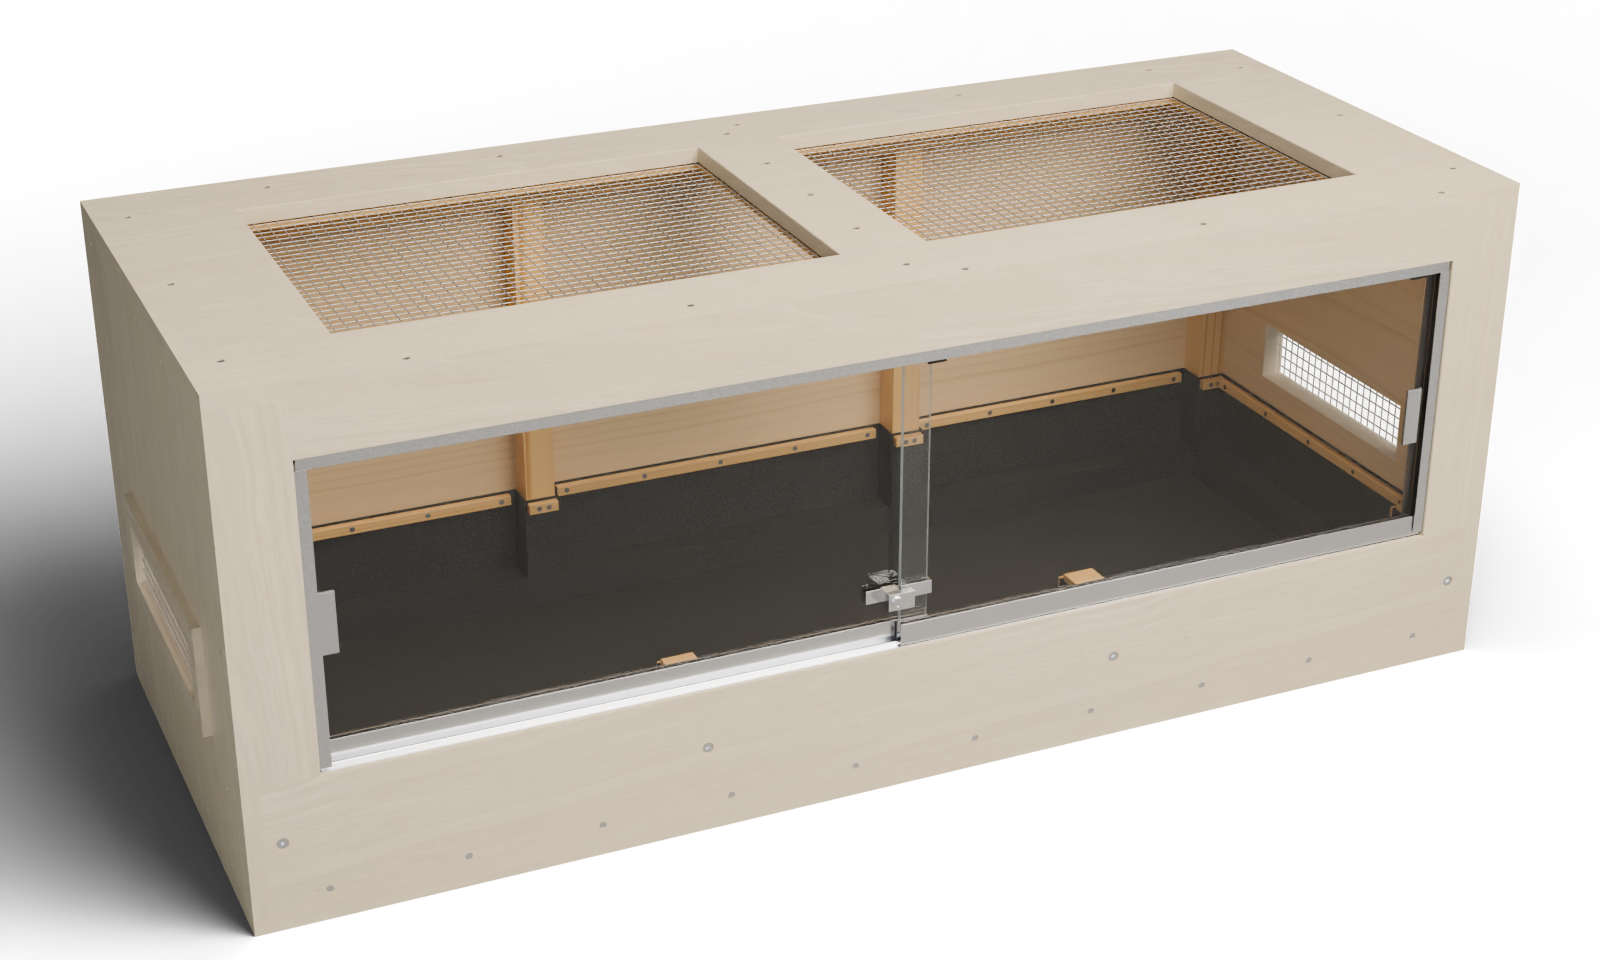
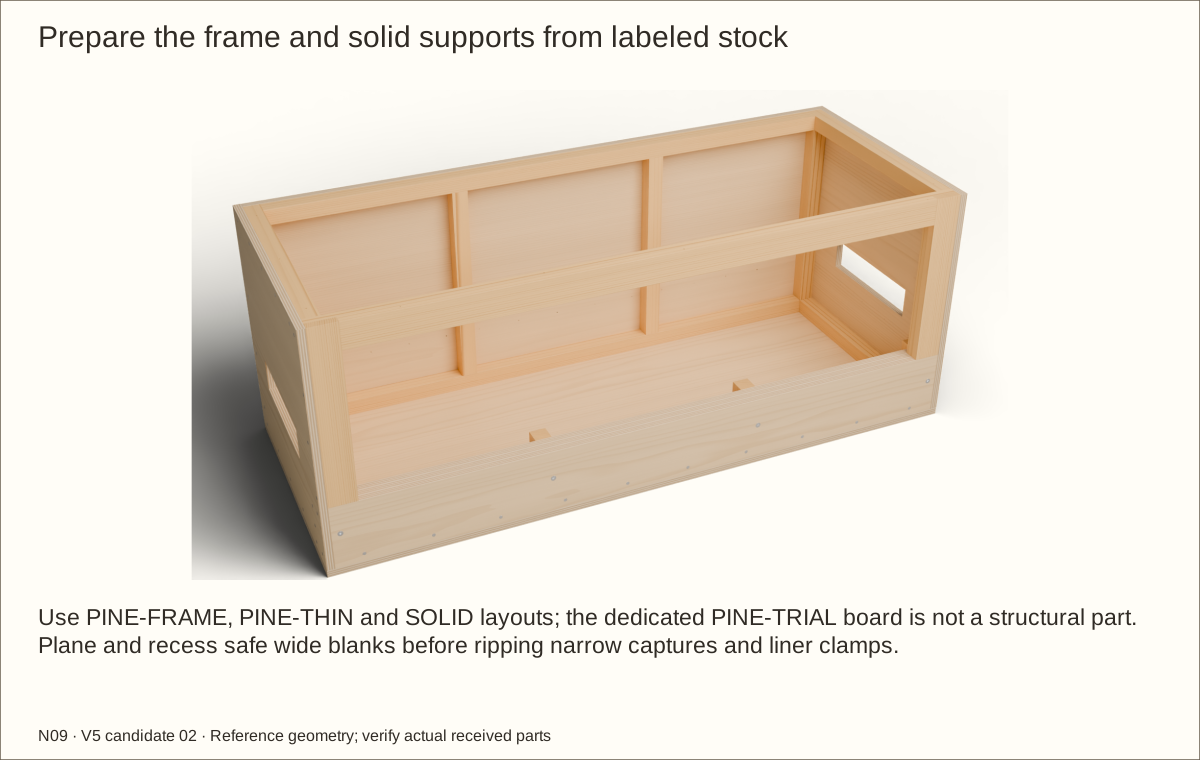
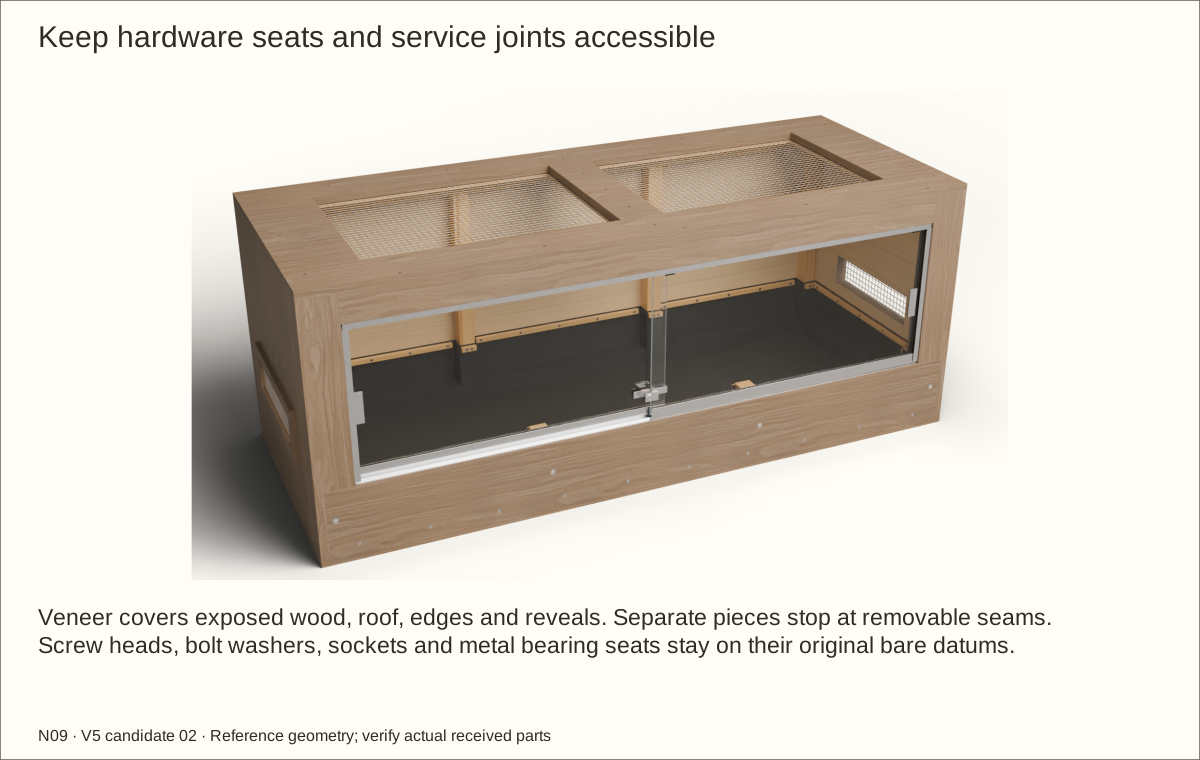
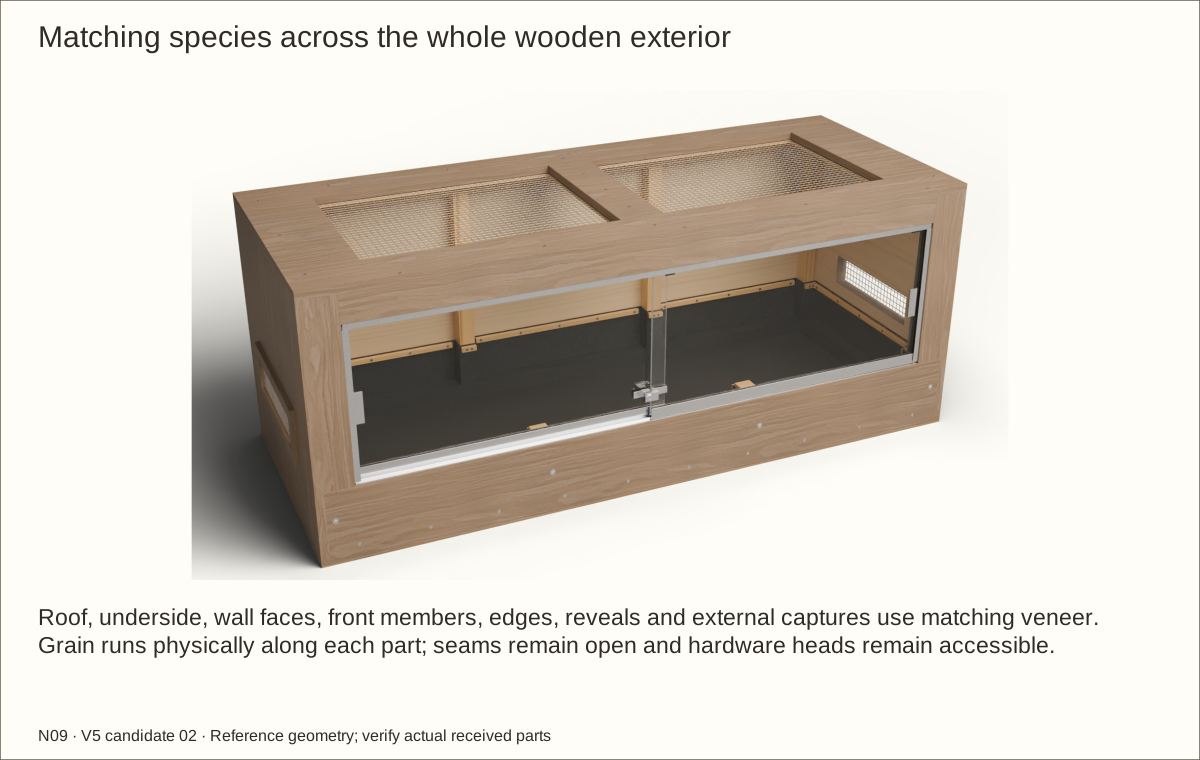
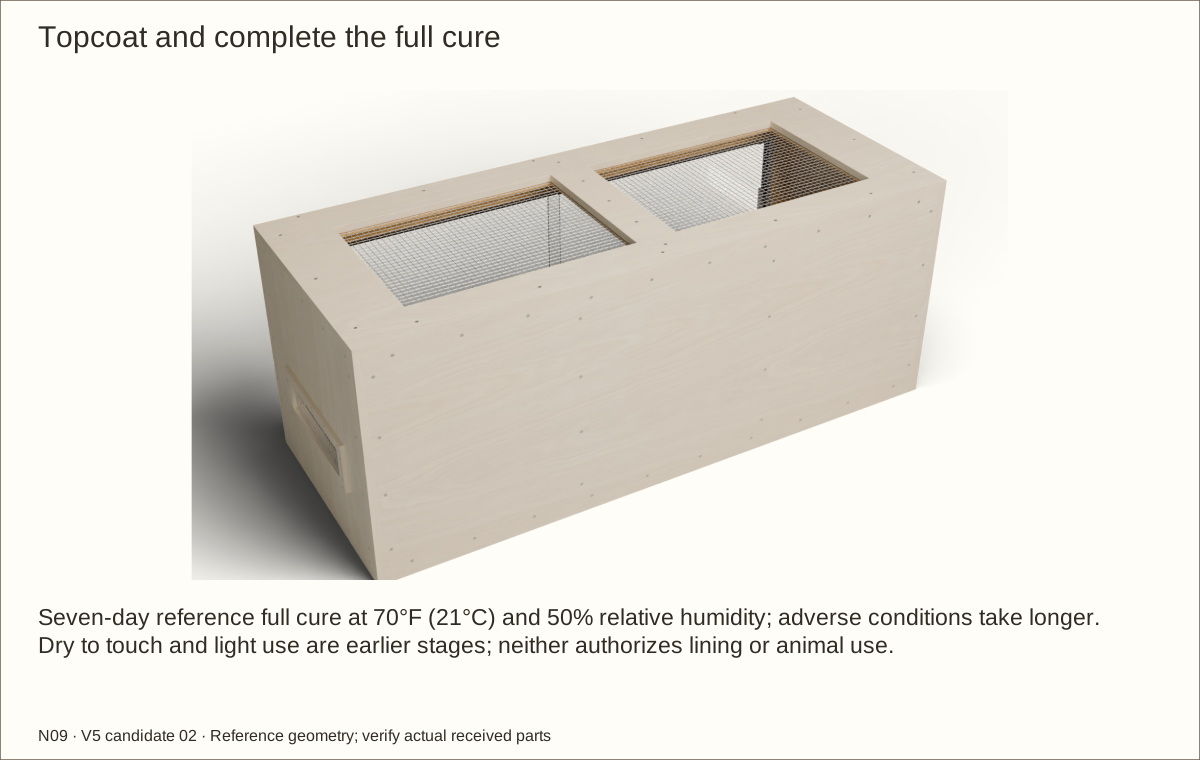
Full exterior veneer: the roof, faces, edges and reveals are included in this guide’s coordinated veneer schedule and geometry. Supplier balance, bond and actual-stack acceptance remain required. Natural grain and color vary.
About these previews
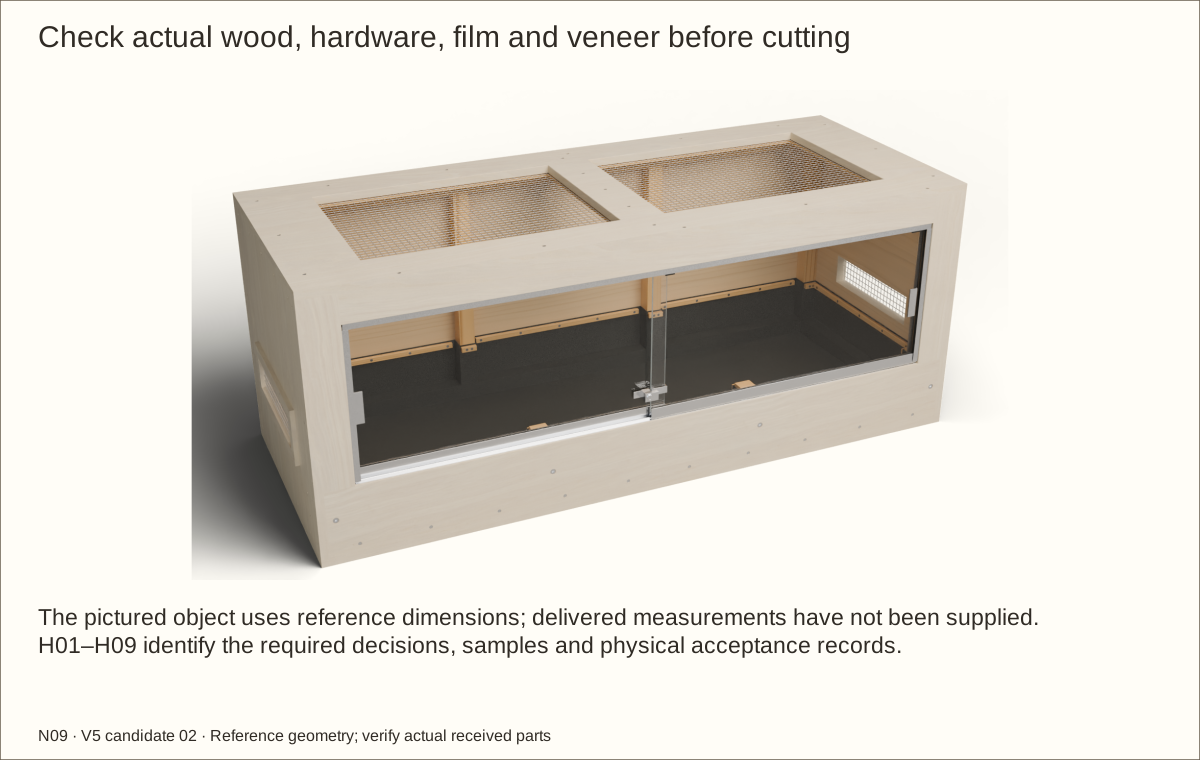
Rendered from this enclosure’s actual reference geometry. Veneer layers preserve service seams and bare hardware seats. The 3D viewer shows maple; these choices change the main picture. Texture scans by Jenelle van Heerden via Poly Haven, CC0 illustrate appearance and are not delivered veneer samples.
A lined four-inch bed, two removable rolling glass doors and a removable screened roof. Follow 70 pictured operations, with named parts and checks before continuing.
Before construction: track/vinyl specification approval, received-product trials, veneer balance/bond approval, prototype construction, physical testing and qualified review remain open. Publication approved; construction holds remain.
Receive, measure and trial the actual components before dependent final cuts. This is an individual lined design. A changed gauge, track profile, liner allowance or veneer system requires synchronized recalculation.
Measurement
Reference
Bare exterior
60 × 24 × 24 in (1524 × 609.6 × 609.6 mm)
Reference covered body
60.061 in (1525.55 mm) × 24.061 in (611.15 mm) × 24.061 in (611.15 mm)
Maximum covered body
60.092 in (1526.34 mm) × 24.092 in (611.94 mm) × 24.092 in (611.94 mm)
External vent captures
Width 60.811 in (1544.6 mm) at reference stack; retainer heads remain inside the veneer envelope
Bed / finished floor
Bed 4 in (101.6 mm); finished floor 53/64 in (21.03 mm) above outside floor underside
Clear rectangle above bed
55 11/32 in (1405.73 mm) × 17 15/16 in (455.61 mm) × 16 31/32 in (431.01 mm); equipment reduces this further
Door opening
53 19/32 in (1361.28 mm) × 13 31/32 in (354.81 mm)
Single-leaf access
Reference 25.367875 in (644.34 mm) × 13.16375 in (334.36 mm); plan 24 in (609.6 mm) width for service
Veneer / track seats
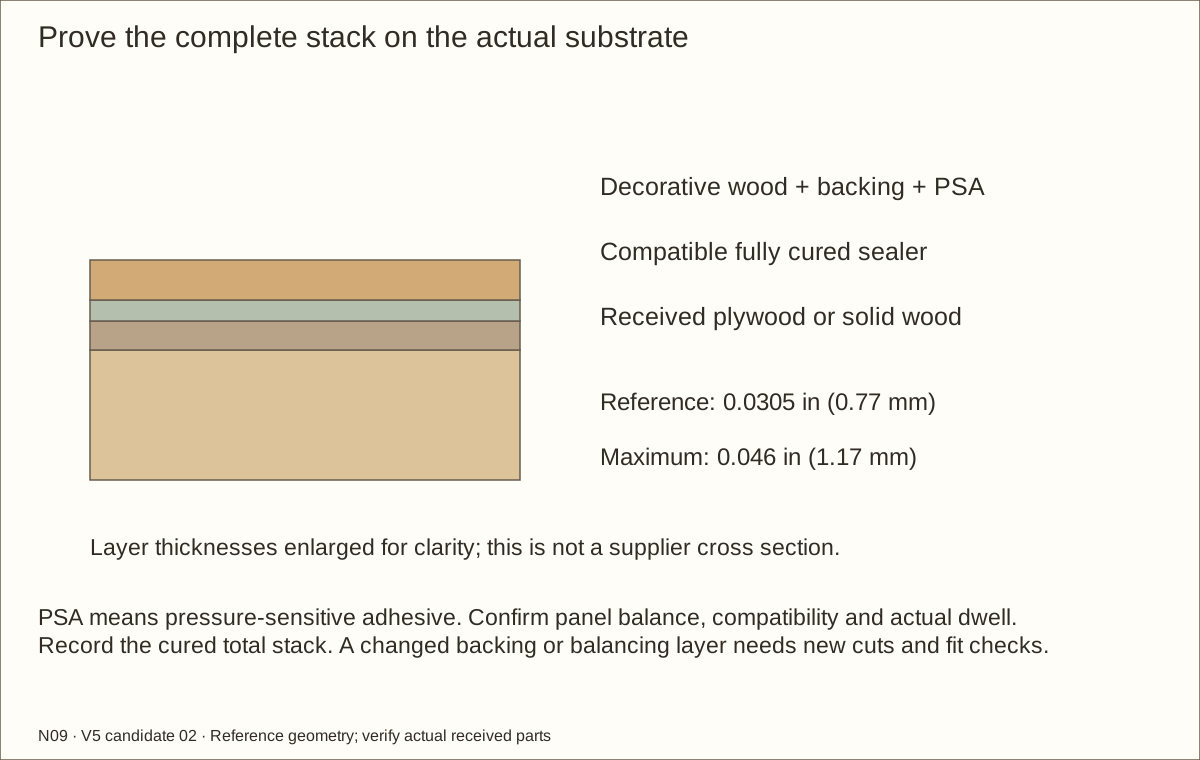
Reference 0.0305 in (0.77 mm); maximum 0.046 in (1.17 mm). Bare metal bearing and bond datums remain unchanged.
Measurement language: in means inches; mm means millimetres. Exact mating decimals are intentionally retained. Use shared marked strips and actual product gauges. X is from outside LEFT; Y from outside FRONT; Z from FLOOR UNDERSIDE unless a drawing explicitly names a local edge.
Tools, terms and workholding
Use a flat supporting bench, helpers for long assemblies and glass, clamps, tape, square, straightedge, caliper, depth stops, a marking knife and shared measuring strip. Cutting requires supported saw and jigsaw/router setups. Plane wide stock before ripping small strips; follow machine guards and minimum feed lengths.
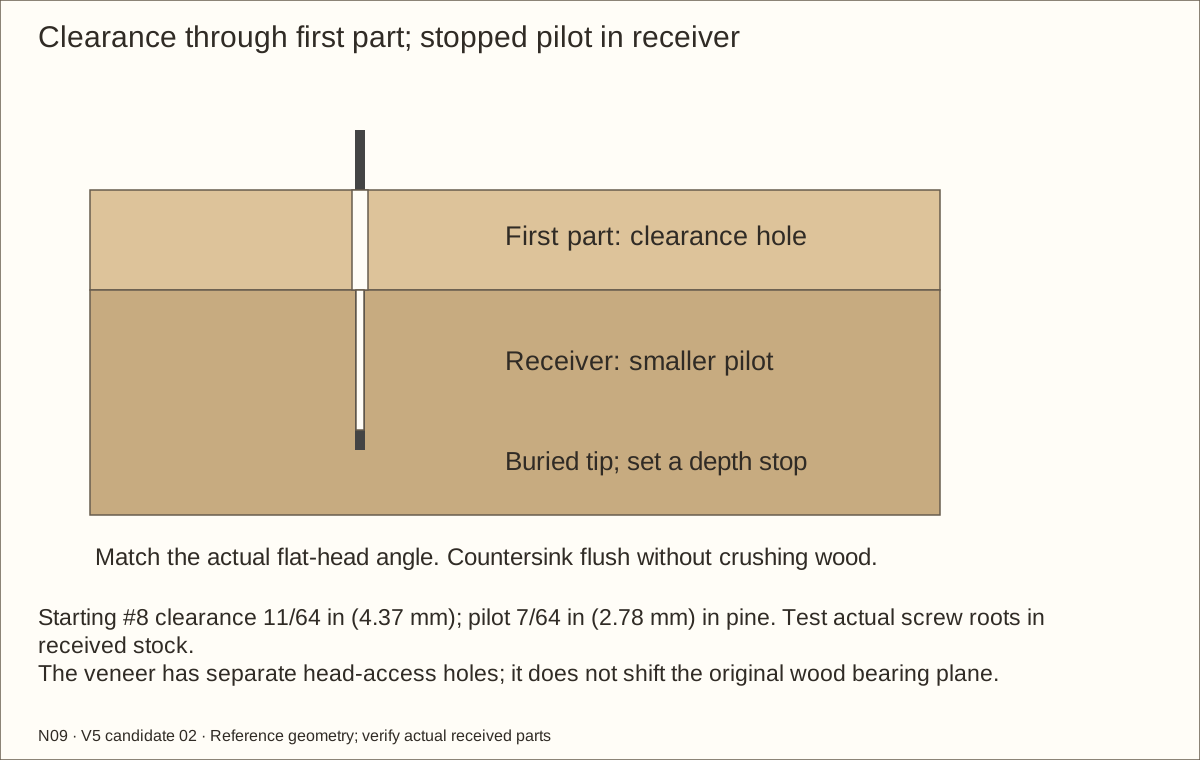
Prepare drill/driver and countersink, 11/64 in (4.37 mm) #8 clearance and starting 7/64 in (2.78 mm) pine pilot, smaller actual-root-matched pilots, metal bits, backing boards, mesh snips, hacksaw and files. Glass comes finished from the fabricator; tempered glass cannot be cut or drilled afterward. Veneer needs a firm scraper, straightedge, sharp knife and sacrificial cutting board.
Wear eye/hearing protection, control dust and ventilate coatings. Protect hands when handling cut wire and sheet metal. Keep hands, gloves and loose clothing away from rotating machinery. Secure work and waste; never handhold a short part while drilling.
Term
Plain meaning
Cleat / lamination
A wood strip receiving screws / layers glued together
Pilot / clearance
Small thread-guiding hole in receiver / larger passage through first part
Countersink
Cone-shaped head seat that lets a flat-head screw sit flush
Datum / kerf
Named measuring surface / material removed by a saw cut
Rebate / bearing land
Shallow edge pocket / solid flat wood that carries the clamp pressure
Parts: Continuous supporting surface, empty-case template and full wet-load record
Tools / setup: Tape, square, caliper, pencil and receiving/support record; helper for the full-size template
Plan full support and the wet load
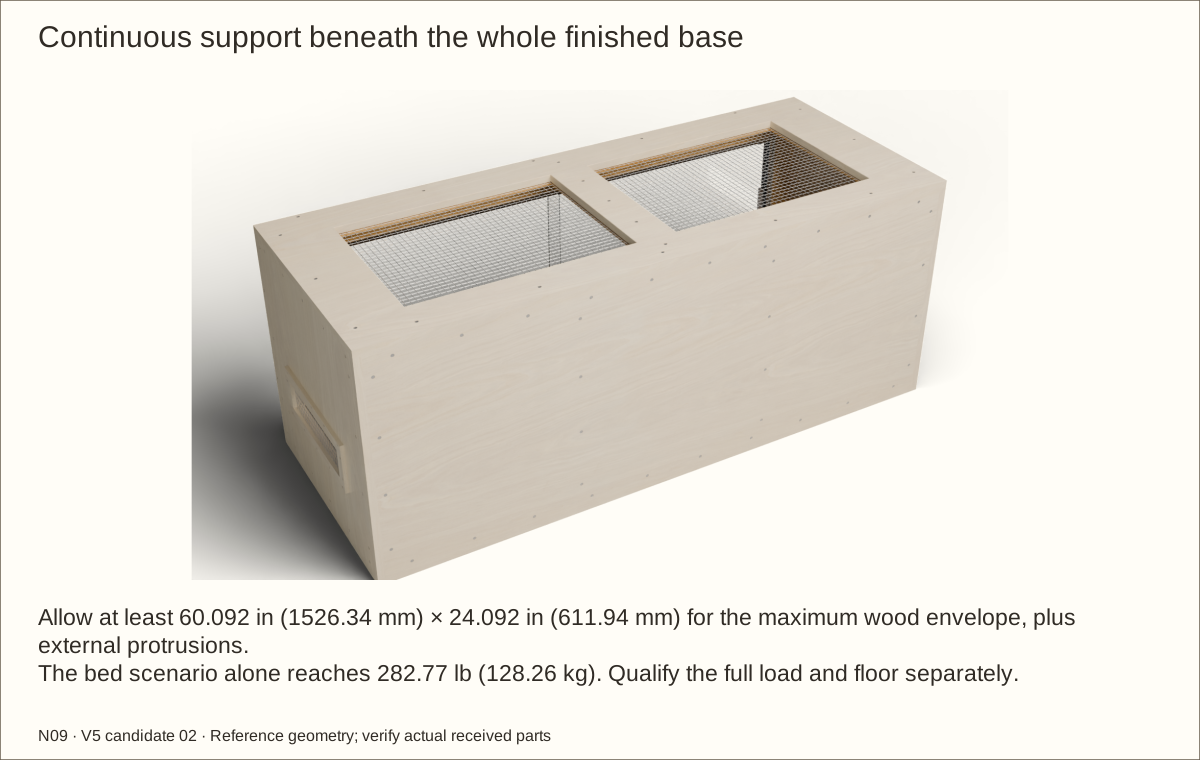
Choose a level, rigid surface at least 60.092 in (1526.34 mm) wide × 24.092 in (611.94 mm) deep for the maximum veneer envelope. It must bear continuously beneath the entire floor, including every edge. Qualify the actual support and building floor for the weighed full load.
The conservative bed-volume envelope is 2.83 cubic feet (80 L), before wood support displacement. At an assumed wet bulk density of 100 lb/ft³ (1602 kg/m³), the bed alone is 283 lb (128 kg). Weigh the actual wet mix; add the shell, water, furnishings and equipment when qualifying the furniture and floor.
Check before continuing: The empty enclosure has a continuous support plan and a clear route for removing both glass leaves and the roof.
Parts: Full-size empty-case template, roof and glass handling templates
Tools / setup: Tape, square, caliper, pencil and receiving/support record; helper for the full-size template
Plan transport and maintenance access
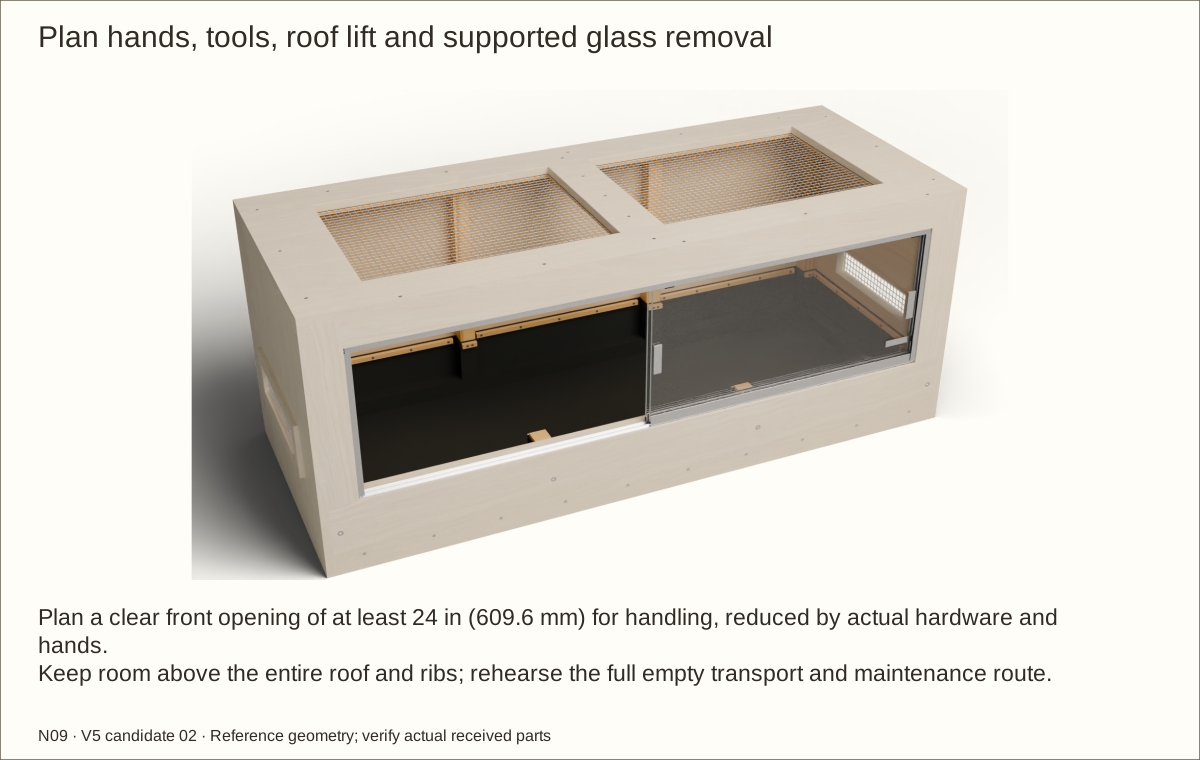
Allow overhead clearance for the complete roof and its rib, front space for a helper to support both panes, and access beside both vents. At the reference veneer stack, external vent captures make the fixed width 60.811 in (1544.6 mm). Retainer screw heads sit flush with front wood, below the veneer; no retainer nuts or tails project outside. Add actual hand, tool and handling space. Rehearse transport and removal with full-size light templates before cutting.
Do not stack enclosures, hang this box, climb on it or move it loaded. Plan separate furniture restraint to the actual wall structure if tipping is possible; this guide does not rate a stand or wall anchorage.
Check before continuing: The empty enclosure has a continuous support plan and a clear route for removing both glass leaves and the roof.
Parts: Matched hardware, wood, veneer and coating samples
Tools / setup: Supplier correspondence, actual product samples and receiving record
Before you begin: These are design/product holds before purchase, not tasks that a later leak test can approve.
Resolve the hardware and veneer purchase holds
Read H01 and H03 before ordering. Ask CRL to resolve H01 and H06: matched components, differing published sections, thin-web fastening, uncapped shoe ends, vinyl selection and the right-jamb relief. Save the response; revise any rejected detail.
Choose maple, white oak or walnut. Confirm 48 in (1219.2 mm) × 120 in (3048 mm) PSA sheets, the complete cured thickness, one-sided panel balance and compatibility with the selected sealer and intended exterior environment. A PSA backing is a pressure-sensitive adhesive; it bonds when correctly prepared and firmly pressed.
Obtain the supplier’s acclimation and pressure/dwell instructions. No numeric adhesive dwell has been invented. Prepare a full stack trial and wait the confirmed time before cutting final veneer or treating the bond as accepted.
Check before continuing: The named supplier questions have written answers; unaccepted substitutions remain quarantined.
Parts: Received wood, matching tracks, glass-thickness gauge, liner and underlay samples
Tools / setup: Tape, square, caliper, pencil and receiving/support record; helper for the full-size template
Receive, label and measure the stock
Measure the nominal plywood at several points; the digital reference is 45/64 in (17.86 mm), not an observed delivery. Reject delamination, twist and insufficient usable stock. Confirm solid supports are 1 1/2 in (38.1 mm) square and frame pine is 3/4 in (19.05 mm) thick. Update every dependent cut if a gauge changes.
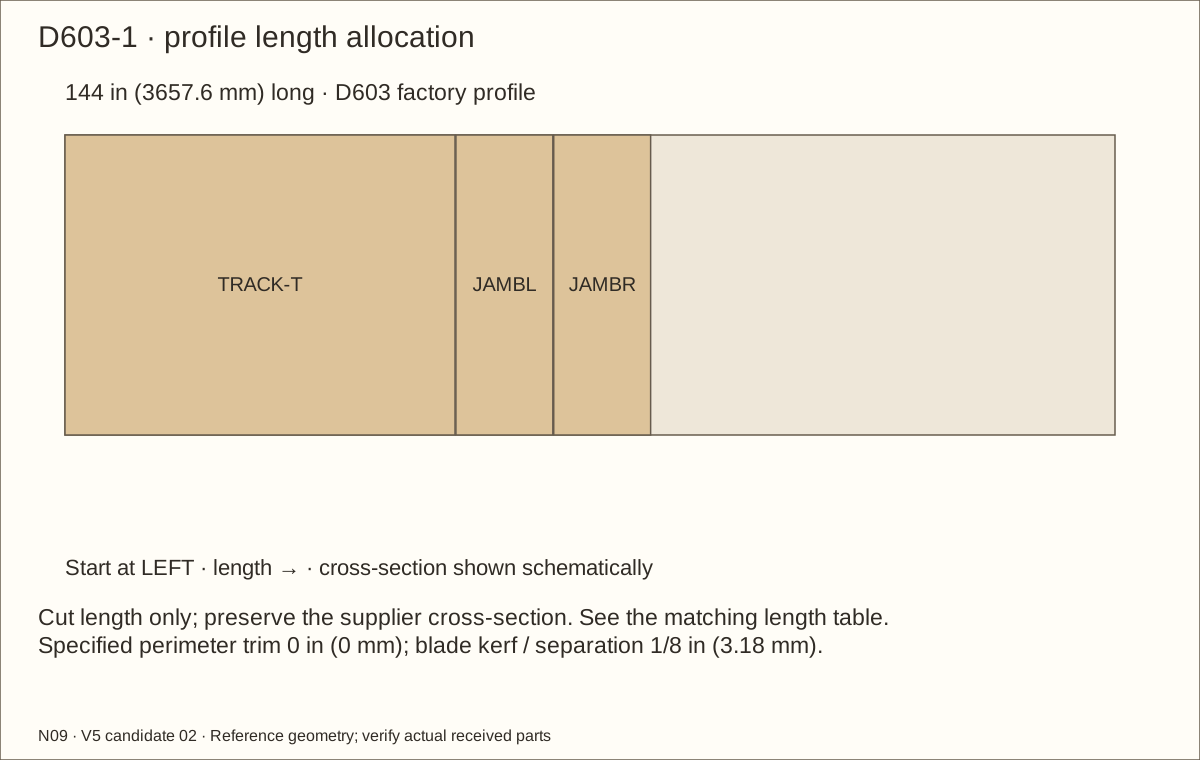
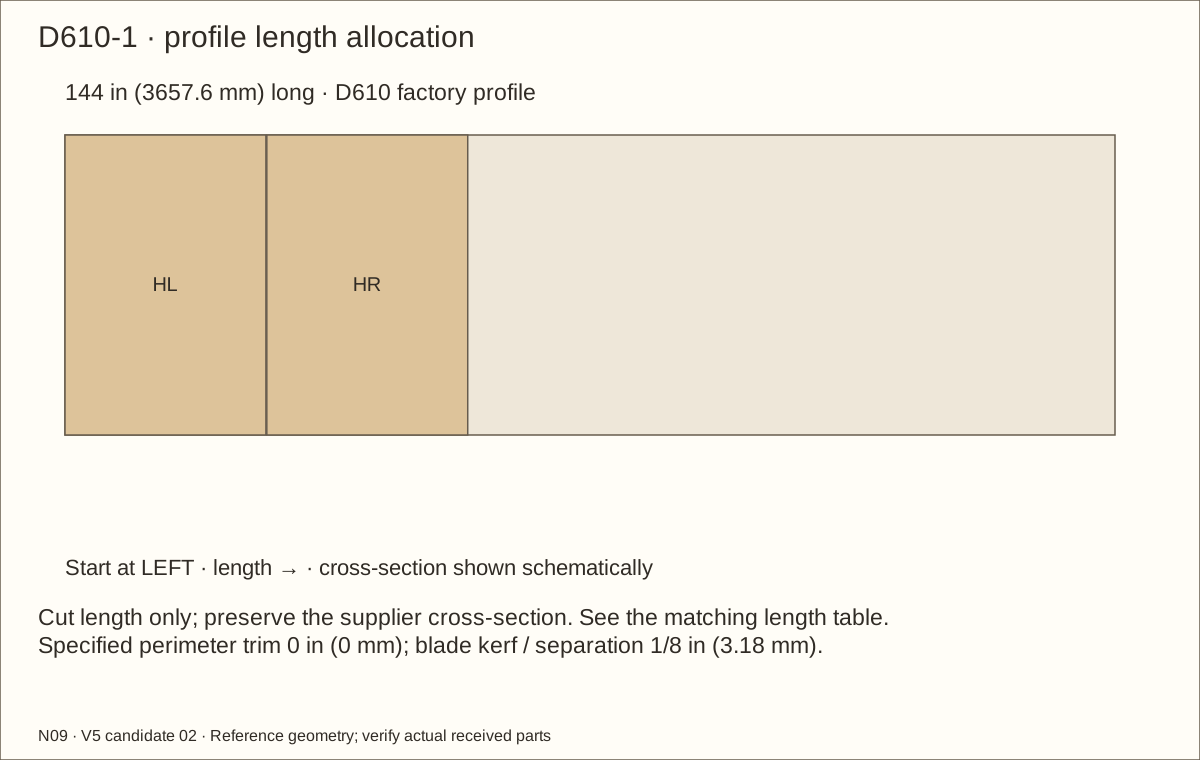
After H01 and H06 supplier resolution, receive CRL D2203ABB, the confirmed glazing vinyl, 963L lock and D652 guides. Inventory the actual kit: one 144 in (3657.6 mm) section each of D602, D603 and D610, with at least eight D649 wheels and four guides for installation. Catalogue and web kit counts conflict. D332A cosmetic end caps are omitted in this candidate; shoe ends must be deburred, snag-free and accepted in the gauge trial.
Place the underlay and 45 mil ethylene propylene diene monomer (EPDM) liner together on a smooth plywood offcut. Measure their compressed thickness without a corner fold. The starting allowance is 1/8 in (3.18 mm); record the actual thickness on a marked measuring strip.
On the measuring strip, mark the floor underside. Above it, mark the actual plywood thickness plus compressed lining to locate the finished floor. From that mark, measure up 4 in (101.6 mm) for the maximum total bed, 6 in (152.4 mm) for the retaining-panel top and 7 in (177.8 mm) for the vent bottom. Transfer these marks to the build.
Check before continuing: All labels and measured thicknesses agree with the fitting worksheet. No glass has been ordered.
Tools / setup: Tape, square, straightedge, clamps and fully supported cutting setup; drill and guided jigsaw/router for openings
Cut and label the two plywood sheets
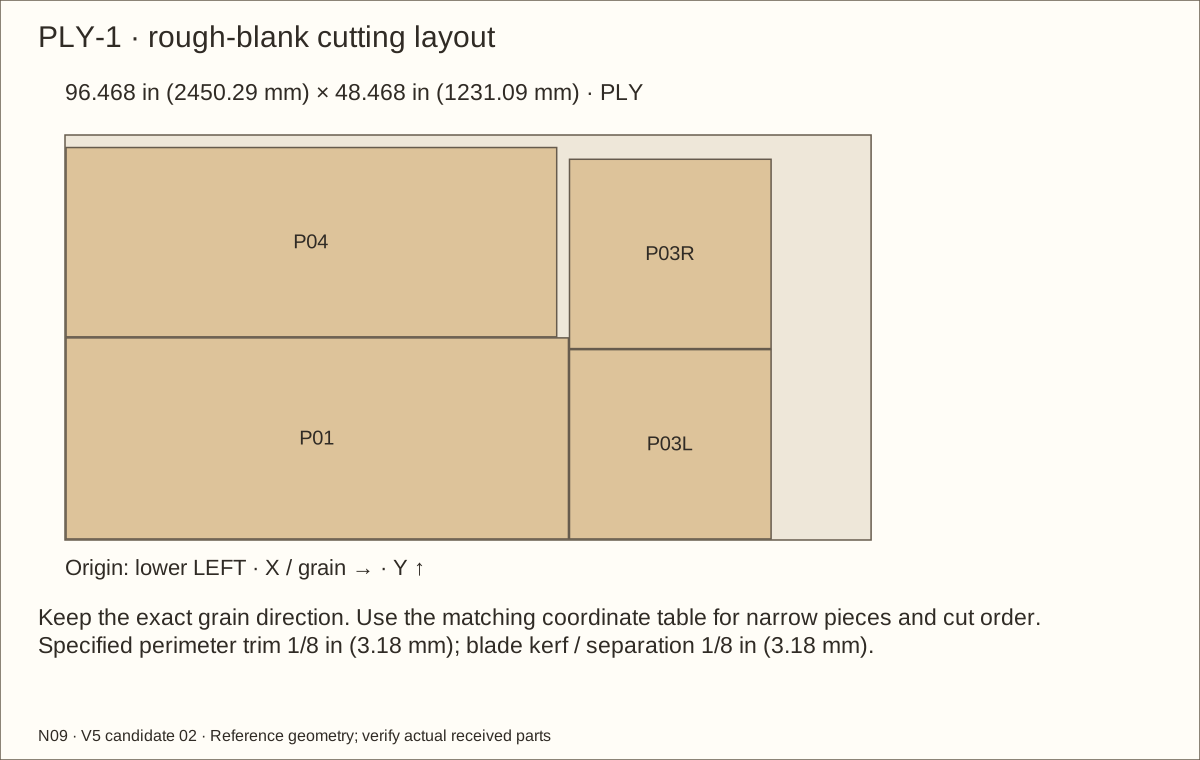
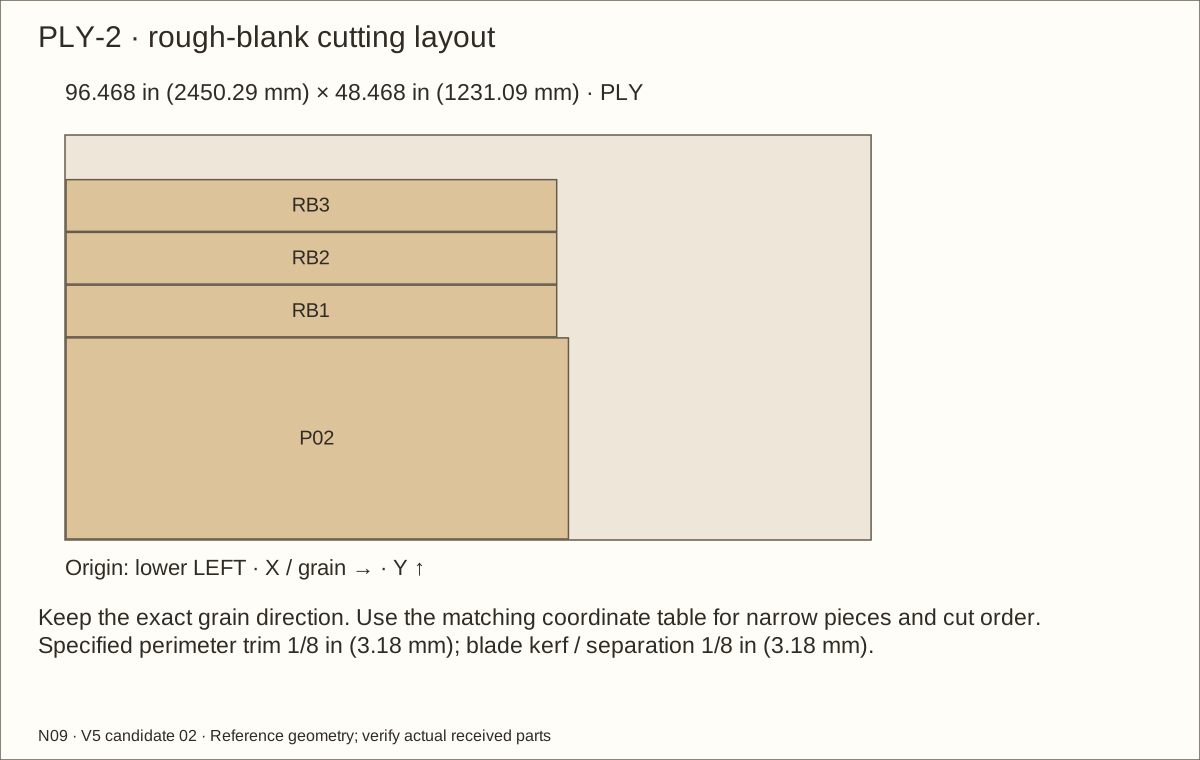
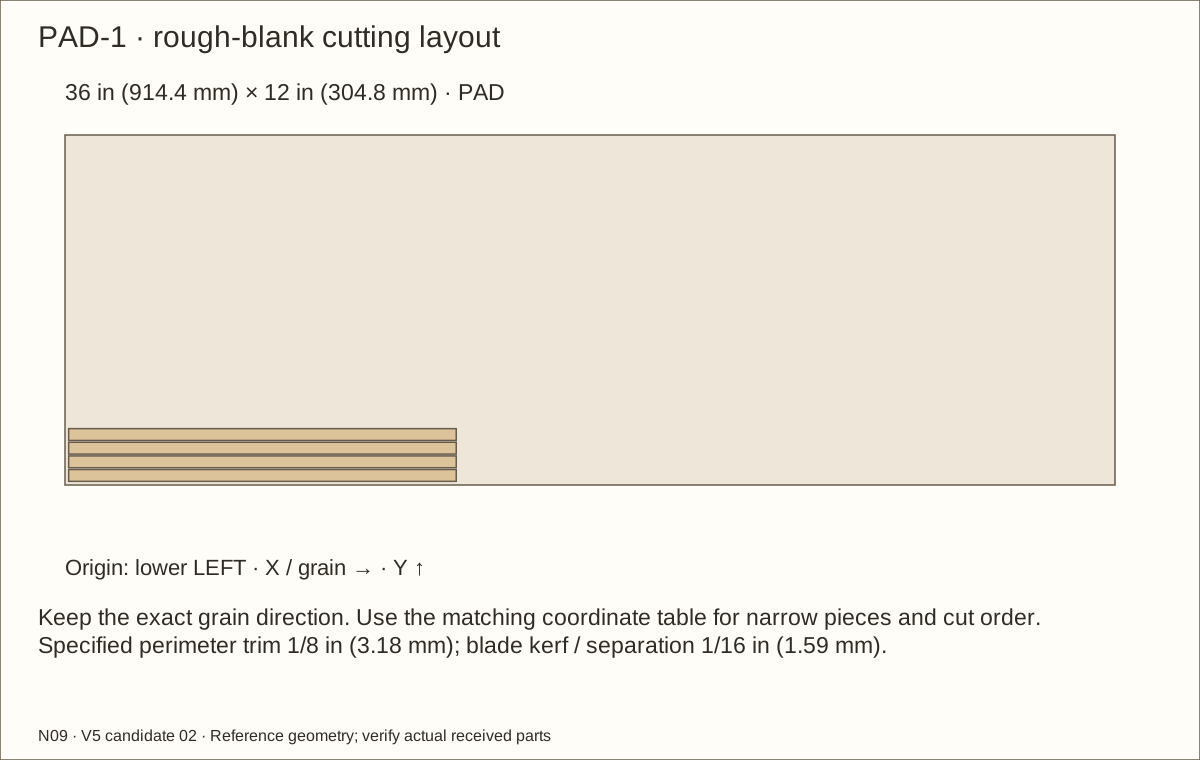
Use PLY-1 and PLY-2. Confirm each received sheet contains all rough blanks, edge trims and 1/8 in (3.18 mm) saw kerfs shown. Support both the kept piece and waste throughout each cut. Cut rough floor and roof blanks before finishing them to the 60 in (1524 mm) × 24 in (609.6 mm) reference core size.
Reference finished sides are 24 in (609.6 mm) × 22 19/32 in (573.88 mm), the back is 58 19/32 in (1488.28 mm) × 22 19/32 in (573.88 mm), and each of the three retaining layers is 58 19/32 in (1488.28 mm) × 6 1/8 in (155.58 mm). Start with the larger rough blanks. Fit actual sides between floor and roof within the 24 in (609.6 mm) core height, the back between sides and the retaining top 6 in (152.4 mm) above the measured finished floor.
Mark every part ID, front edge, inside face and grain direction in pencil. Keep the long grain across the back and retainer span. Stack matching parts and check them with a straightedge; correct discrepancies before holes.
Inches are the setting-out units; metric values are rounded equivalents. Use exact schedule values and actual mating gauges. Do not independently round mating cuts or mix an older approximate dimension with this revision.
Check before continuing: Opposite sides match; all three retainer boards have the same height and square edges.
Tools / setup: Tape, square, straightedge, clamps and fully supported cutting setup; drill and guided jigsaw/router for openings
Mark the two roof openings
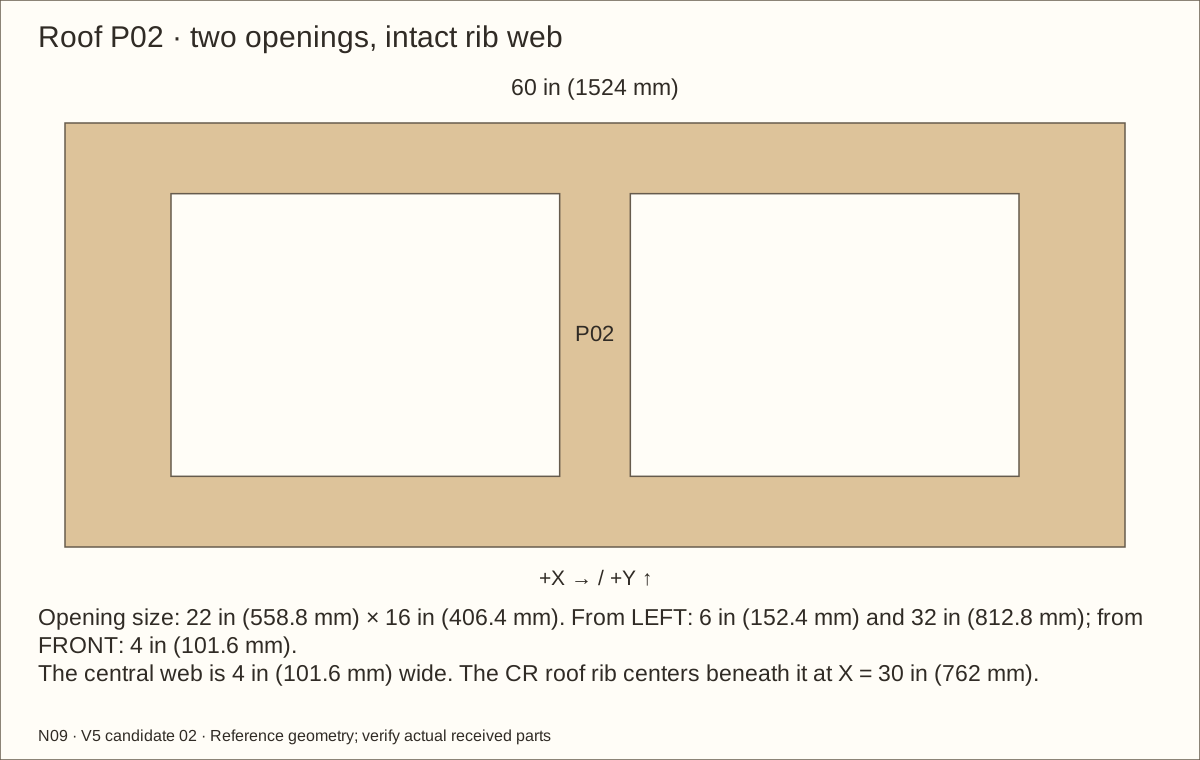
Mark two 22 in (558.8 mm) × 16 in (406.4 mm) roof openings. Their front edges lie 4 in (101.6 mm) behind the front, and left edges at 6 in (152.4 mm) and 32 in (812.8 mm) from outside LEFT. Preserve the 4 in (101.6 mm)-wide central web for the single CR roof rib.
Check before continuing: Each rectangle lies in the scheduled solid roof; the intact central web receives the CR roof rib.
Tools / setup: Tape, square, straightedge, clamps and fully supported cutting setup; drill and guided jigsaw/router for openings
Mark both raised wall vents
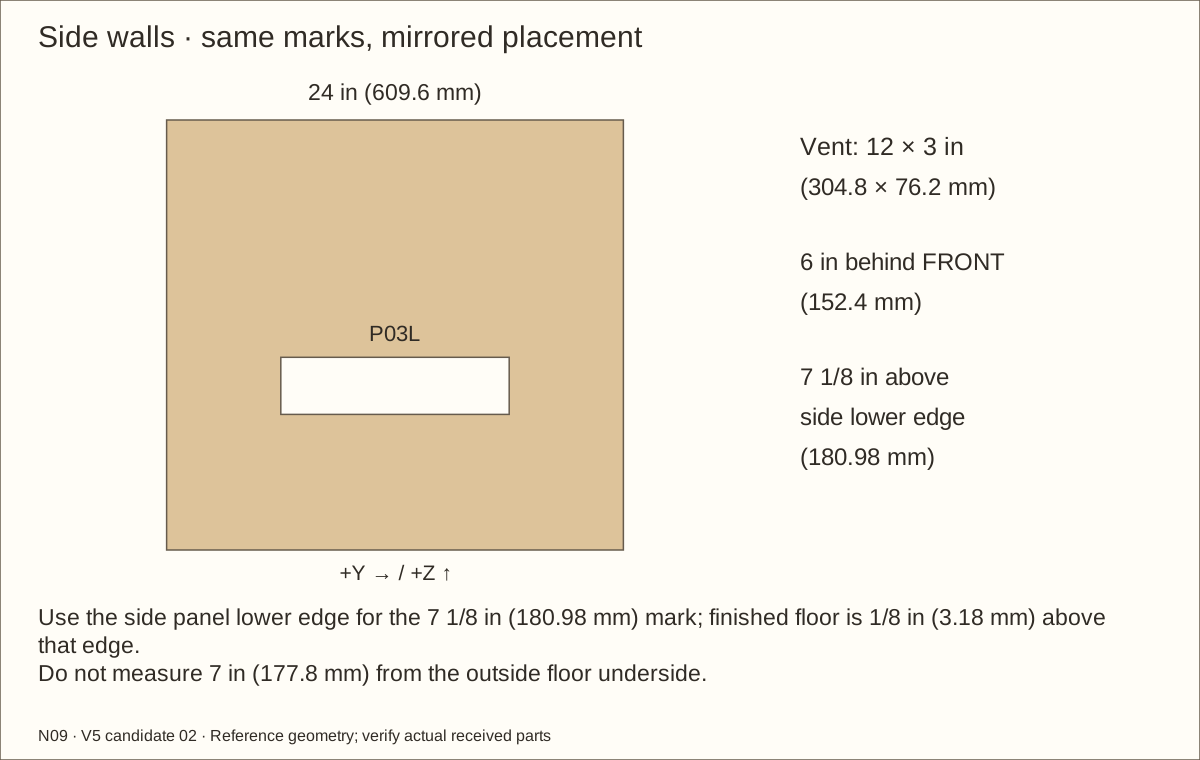
On each side, mark a 12 in (304.8 mm) × 3 in (76.2 mm) opening starting 6 in (152.4 mm) behind the front edge. Its lower edge is 7 in (177.8 mm) above the finished-floor mark, not the floor underside.
Check before continuing: Both lower vent lines are 7 in (177.8 mm) above the finished floor, or 7 1/8 in (180.98 mm) above the side panel lower edge.
Parts: P02 — Removable roof; P03L — L wall; P03R — R wall
Tools / setup: Tape, square, straightedge, clamps and fully supported cutting setup; drill and guided jigsaw/router for openings
Cut and check all four ventilation openings
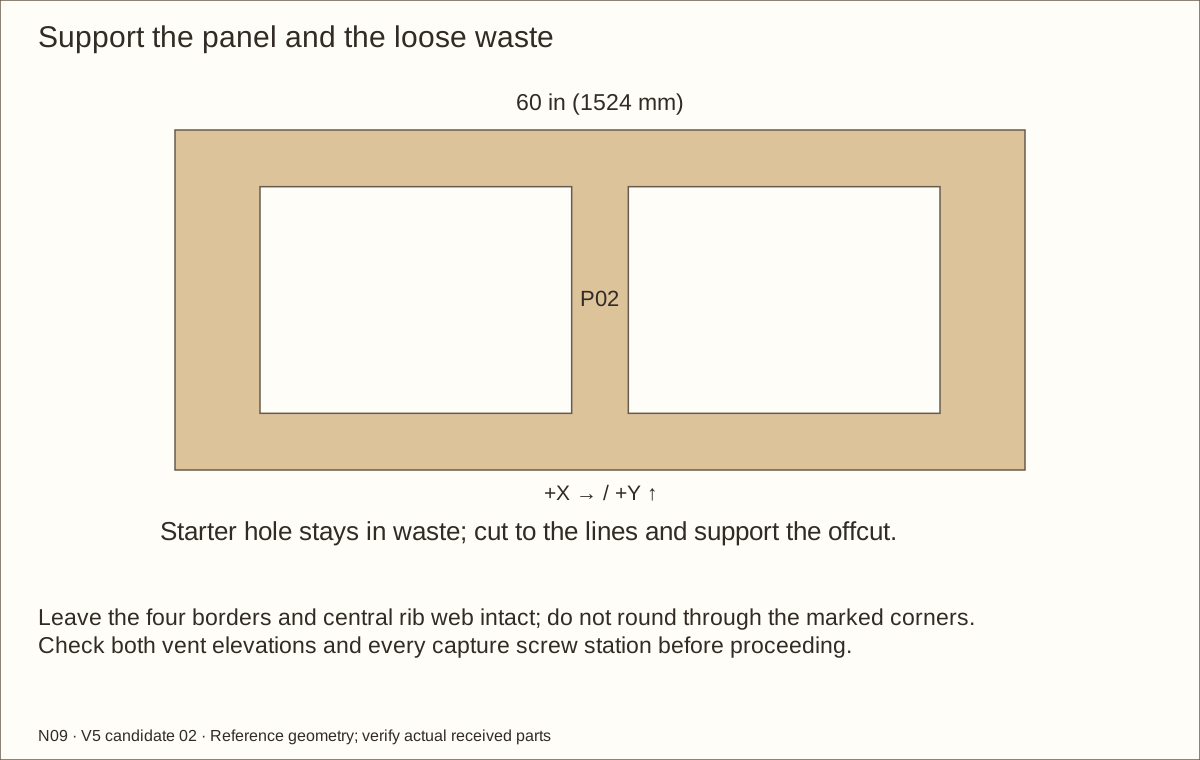
Drill starter holes entirely inside the waste. Cut with a guided router or supported jigsaw; do not cross the marked corner lines. Ease sharp reveals and remove every splinter.
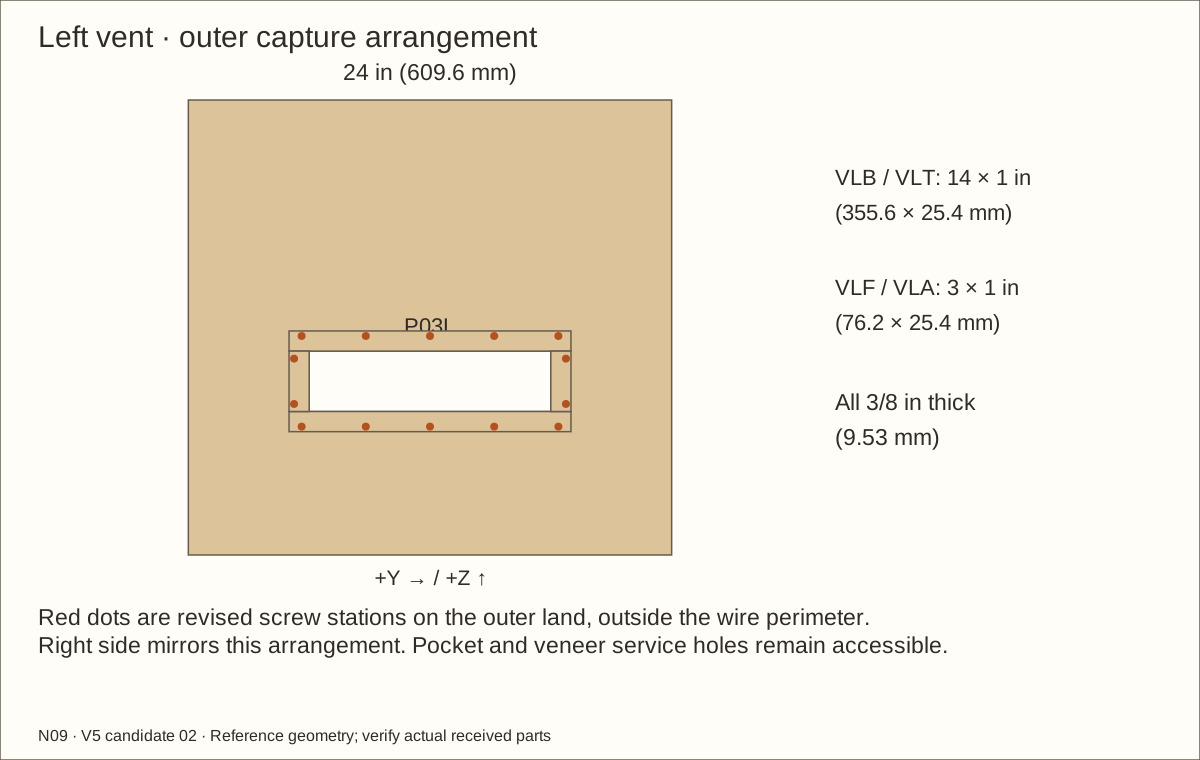
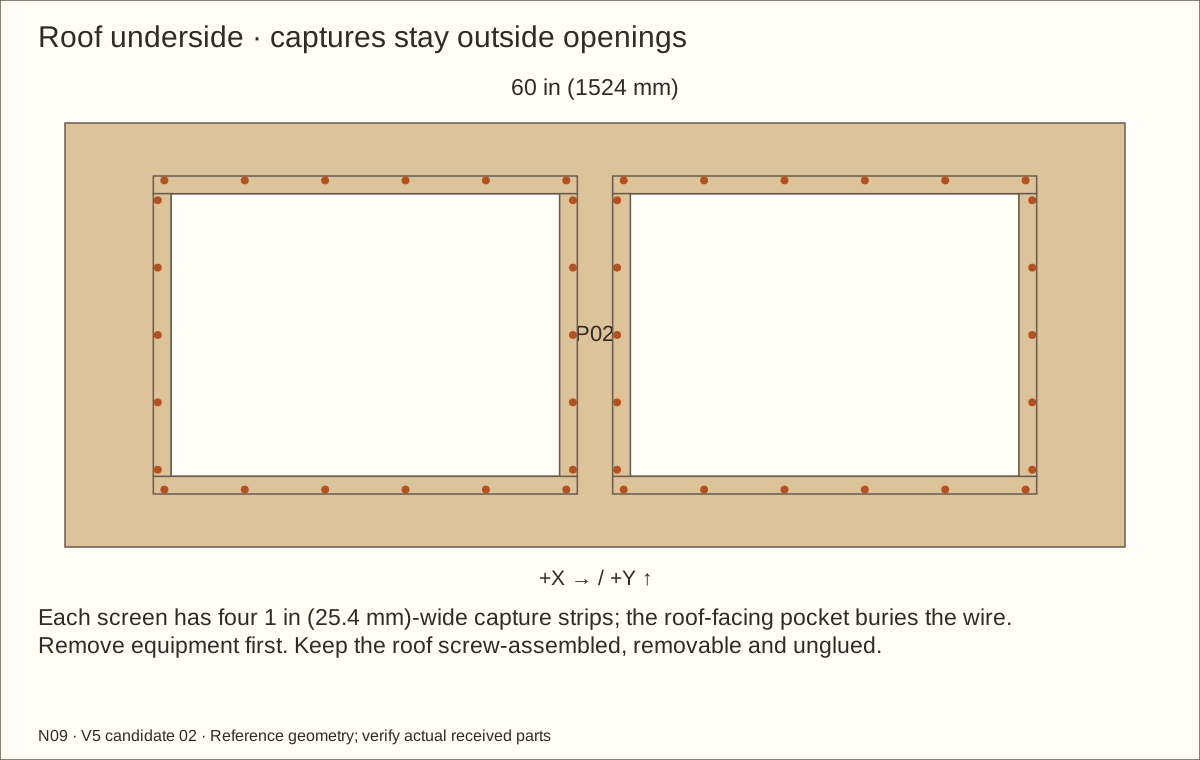
Dry-place the capture strips over the waste-side margins. Each mesh edge must sit beneath a strip, and no fastener station may land in an opening. Leave the rest of the roof solid; equipment penetrations are a later, separately fitted operation.
Check before continuing: Both vents start 3 in (76.2 mm) above the maximum total bed; all roof borders and the rib web remains intact.
Parts: F0/F1 frame; C solid supports; V/RT screen captures; LC liner clamps. Exact named IDs appear in the cut and stock drawings.
Tools / setup: Tape, square, straightedge, clamps and fully supported cutting setup; drill and guided jigsaw/router for openings
Prepare frame, supports and thin-strip stock
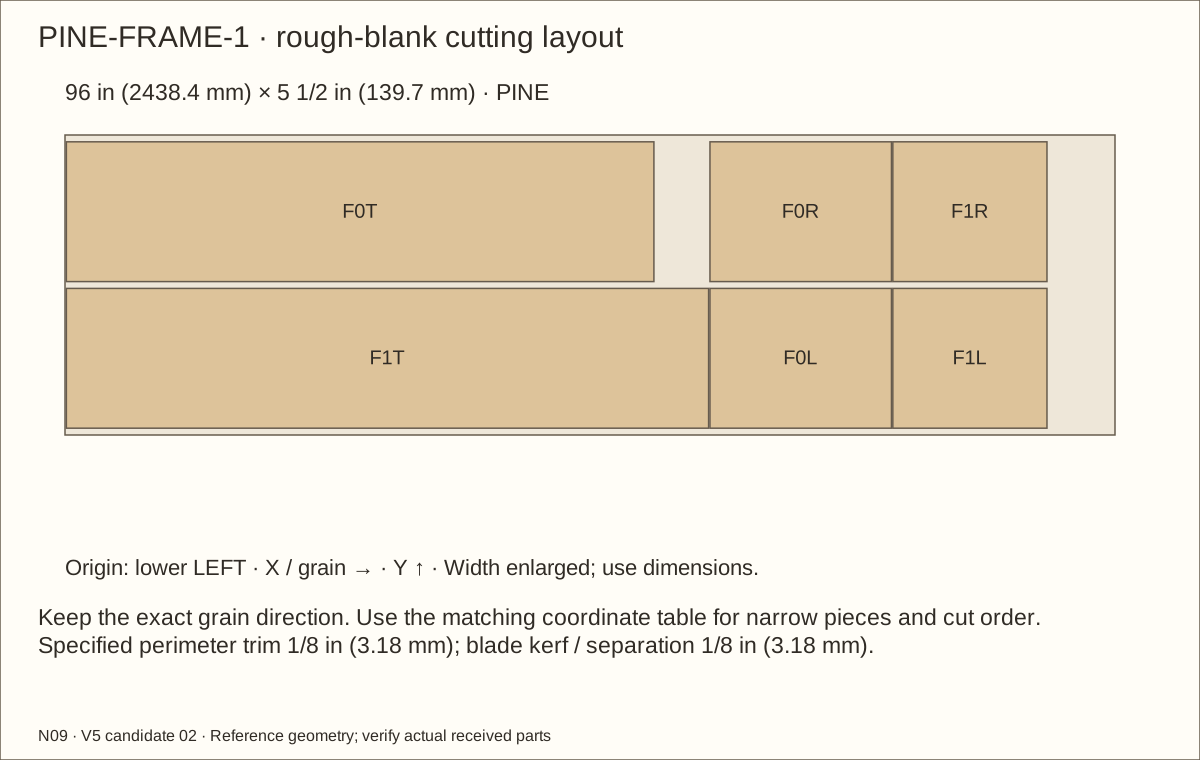
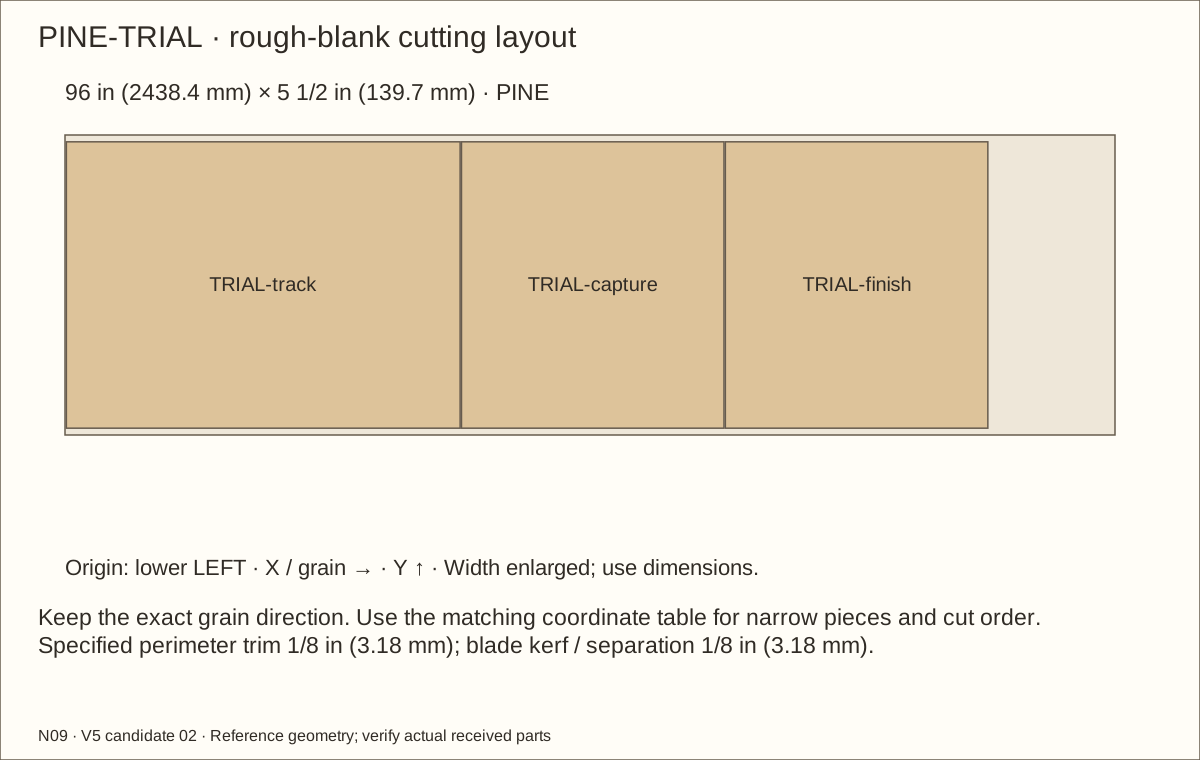
Use the PINE-FRAME layouts for the exact F0/F1 members. Maintain 3/4 in (19.05 mm) actual thickness, scheduled grain, guards, support and push sticks. Cut rough blanks first, then pair and finish the mating parts.
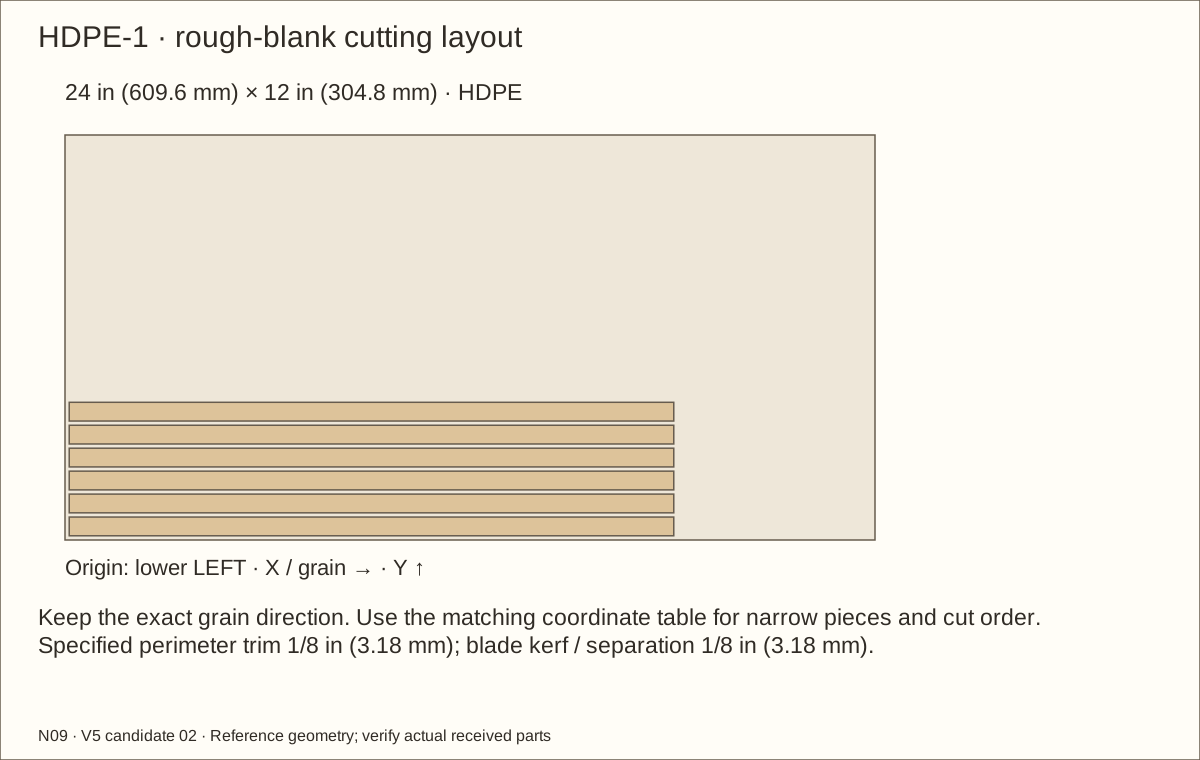
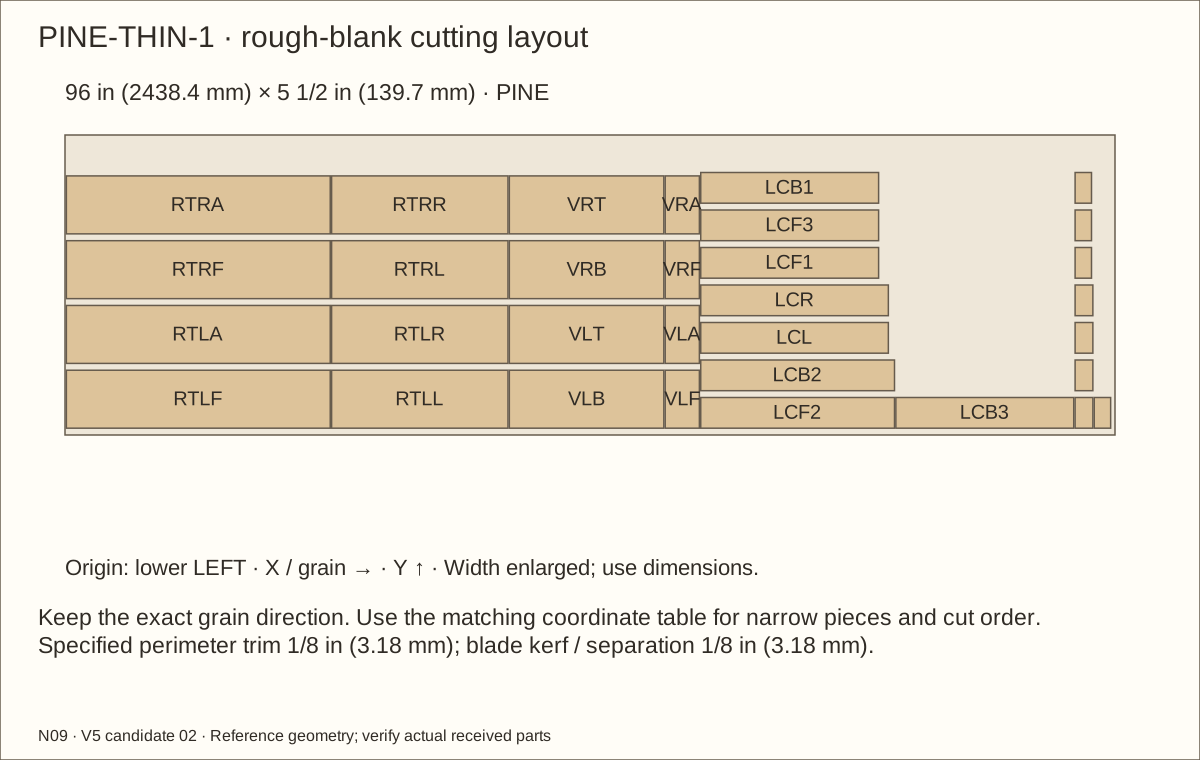
Have the PINE-THIN stock planed to 3/8 in (9.53 mm) while still full width. Route the capture recesses after the sample trial and before final rip cuts. The revised captures are 1 in (25.4 mm) wide; liner clamps remain 1/2 in (12.7 mm) wide. Follow the new layouts, not old board numbers. Never put loose finished narrow strips through a planer.
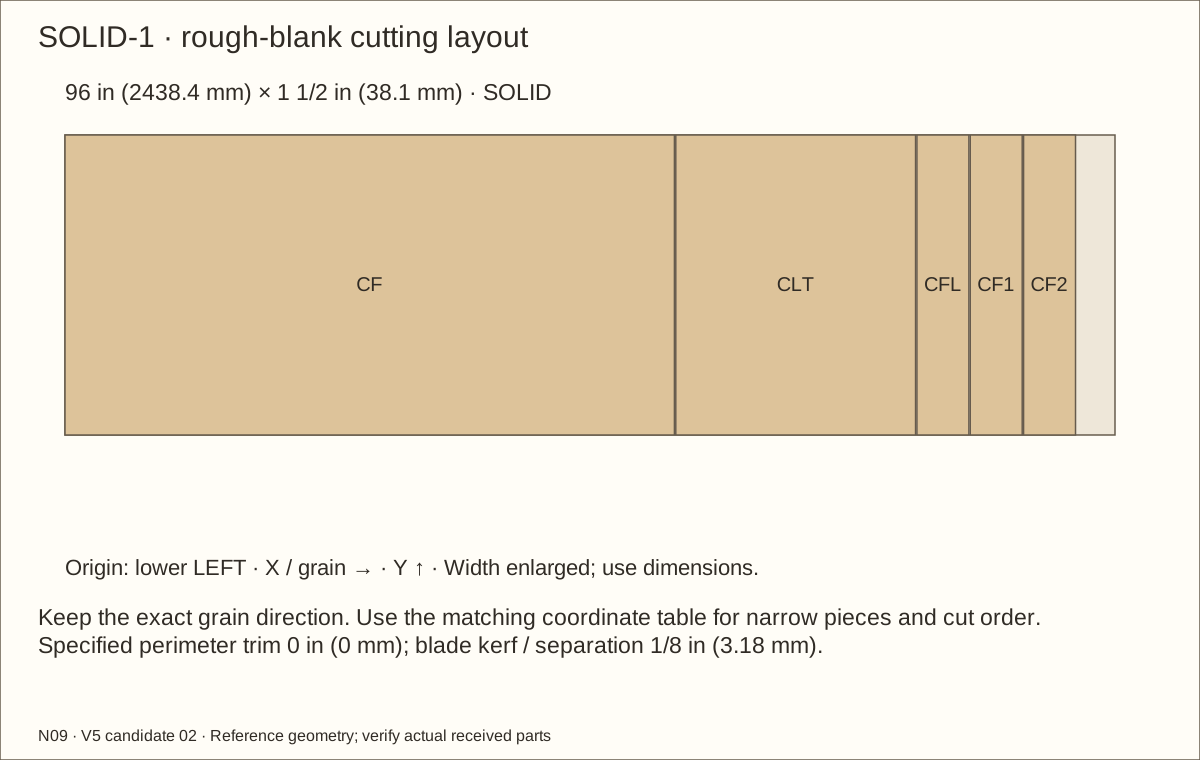
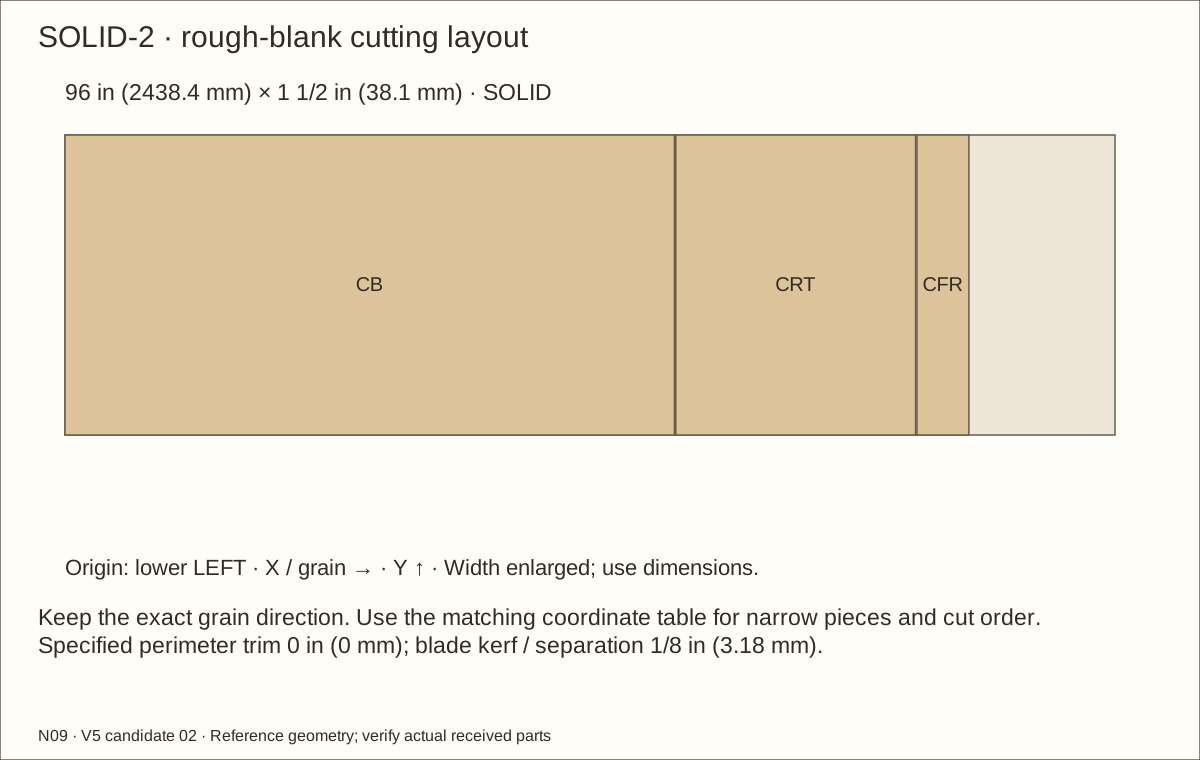
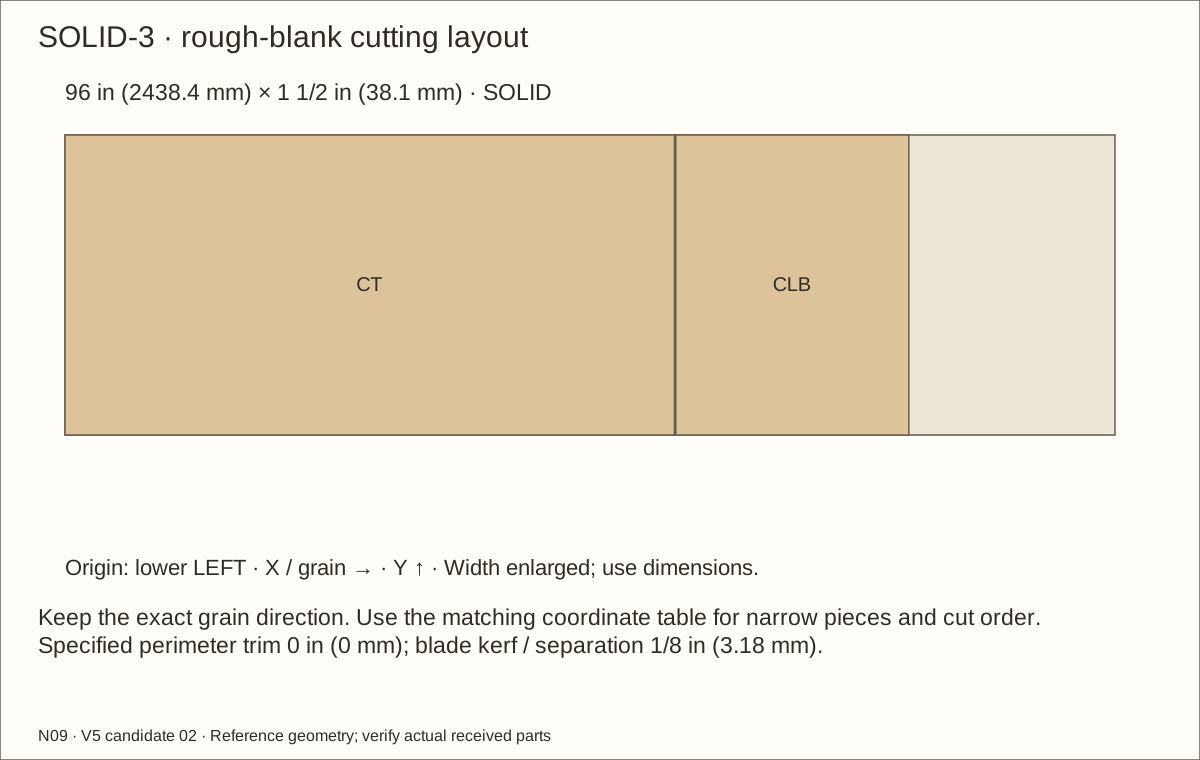
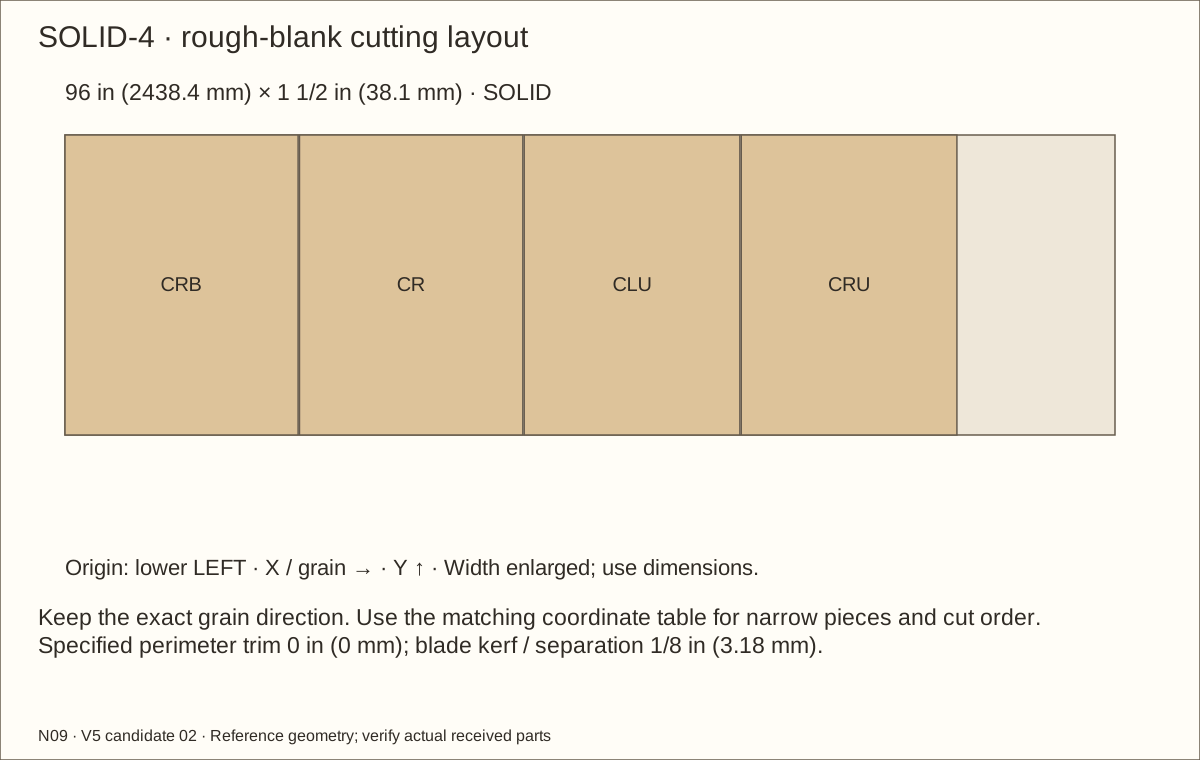
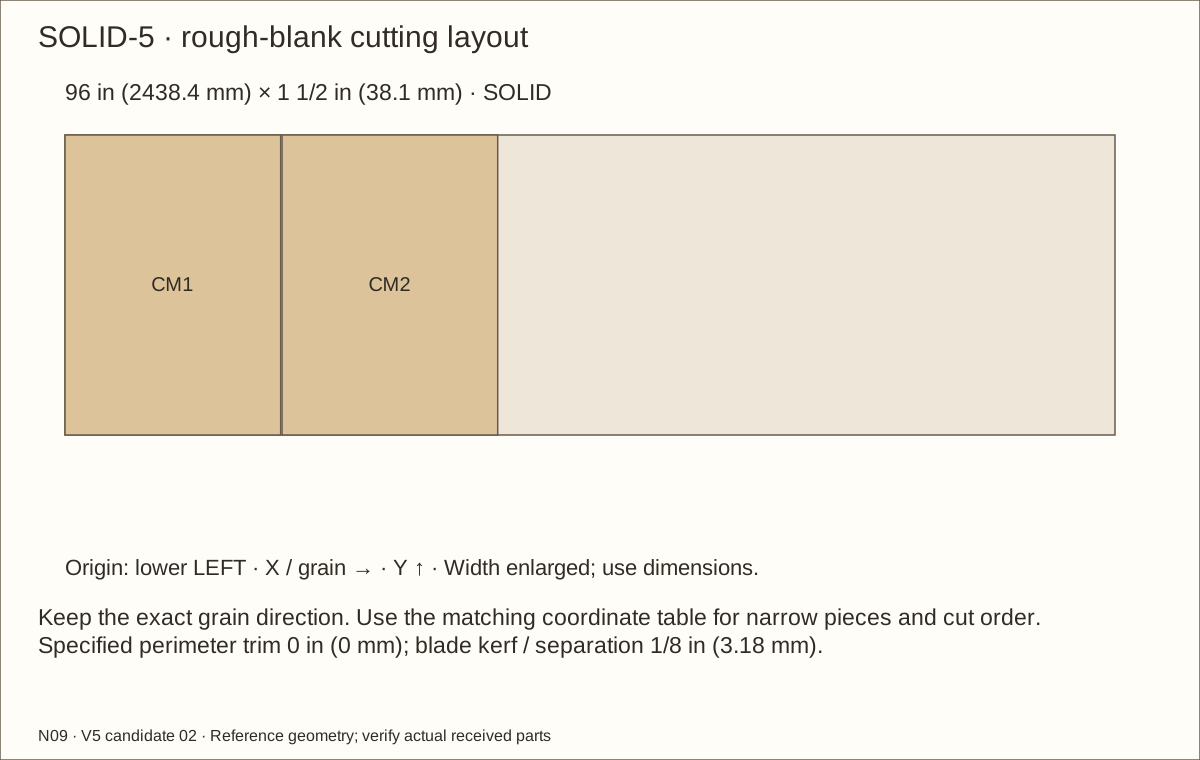
Cut to length five solid 2 × 2 boards for four bottom wood supports, four rear uprights, four front posts, three upper wood supports and one roof rib. Use their actual full section; these are not laminated strips. The SOLID layouts have no end-trim allowance. Accept only full-length, straight, sound stock with square usable ends, or obtain longer stock and revise the layout.
Lightly ease exposed corners and especially the wood supports beneath the liner. Keep joint faces square and bare. Label the underside of each roof capture so it returns to its own holes.
Check before continuing: Each solid member and thin strip is identified; no cracked or knot-weakened wood support is used.
10. Make a screen-capture trial before the final strips
Parts: Dedicated trial board, mesh offcut, all V/RT capture strips
Tools / setup: Caliper, router with fixed guide and depth stop, clamps, sacrificial wide blank, eye/hearing/dust protection
Make a screen-capture trial before the final strips
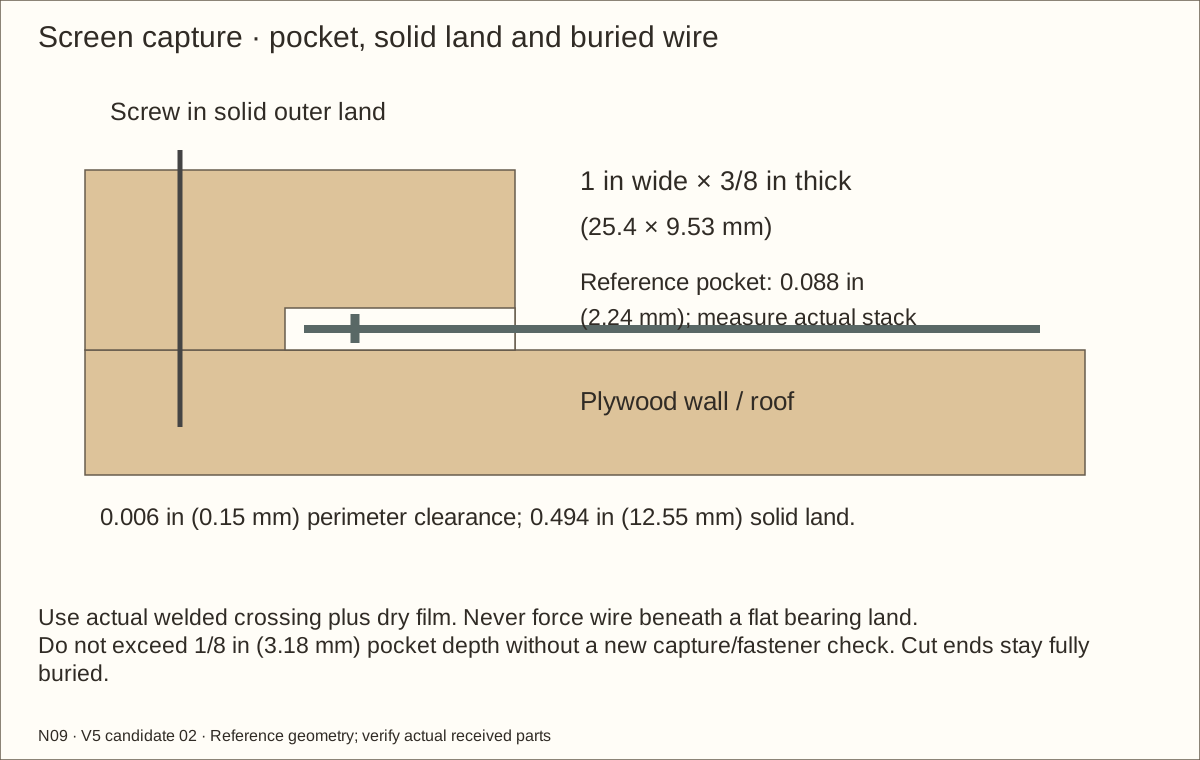
Measure the maximum welded-wire crossing with a caliper. Add the dry coating on both bearing faces. The digital reference uses 0.041 in (1.04 mm) wire, a 0.082 in (2.08 mm) crossing and 0.003 in (0.08 mm) film on each face, giving a 0.088 in (2.24 mm) recess. These are reference inputs, not delivered measurements.
On a wide sacrificial blank, clamp a router guide and use repeated shallow passes to form a shallow edge recess, often called a rebate. The nominal 1/2 in (12.7 mm) outer land has 0.006 in (0.15 mm) perimeter relief for film and fit, leaving 0.494 in (12.55 mm) reference solid land. Follow the pocket schedule. Test the wire and coated sample: the land must sit flat, cut ends stay buried and the mesh cannot rattle or peel from under the lip.
Do not exceed 1/8 in (3.18 mm) recess depth without revising the strips and screw checks. Machine the safe wide blank first, then rip and crosscut final pieces using the tool maker’s guards, support and minimum feed lengths. Never handhold a short strip at a spinning cutter.
Check before continuing: The received stack is measured and the trial shows flat lands, buried wire and secure capture.
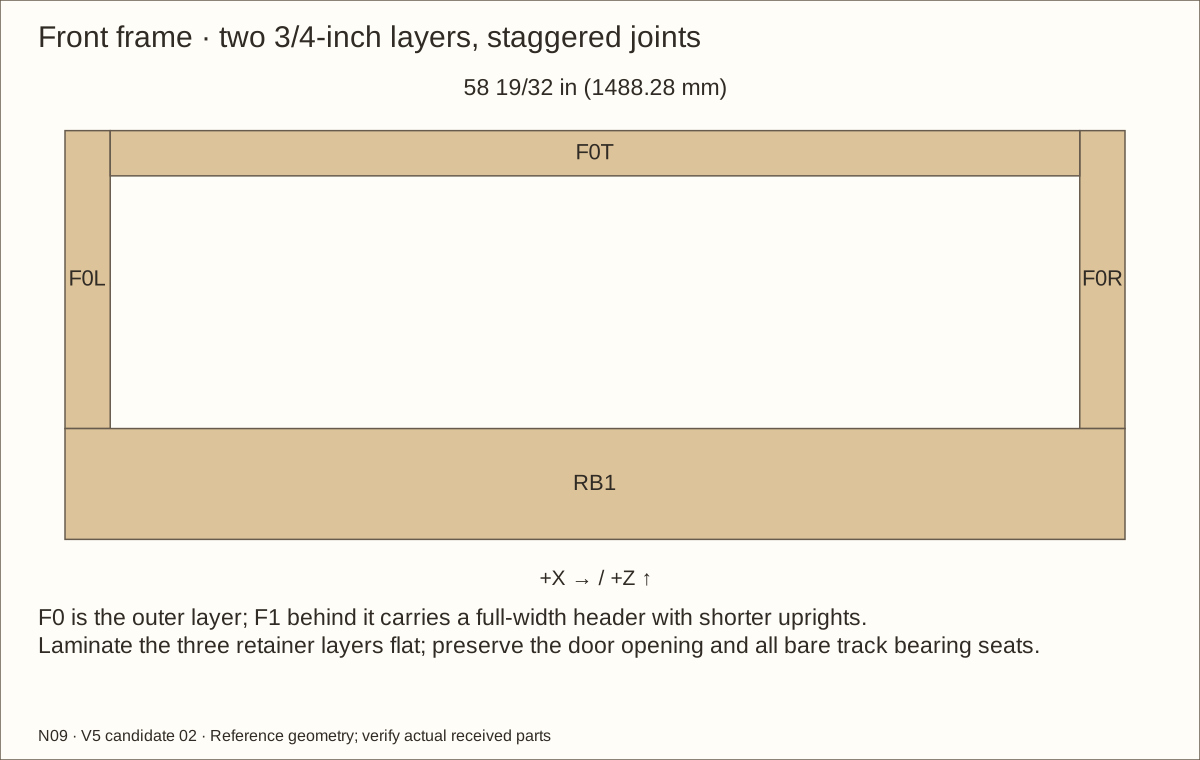
Dry-stack RB1, RB2 and RB3 face to face, flush at their top and ends. Their combined depth matches three layers of the actual plywood. Dry-lay the front frame above them: outer layer jambs run full height, inner layer header runs full width.
Spread Titebond III on the two retainer bond interfaces and between the two frame layers. Keep a consistent film across bare wood; use padded straight clamping pads and enough clamps to close the joints without bowing the long members.
Compare both frame diagonals and check the track-bearing faces with a straightedge. Wipe away squeeze-out before it hardens. Do not glue the frame to the retainer yet; these remain separate assemblies for finishing.
Follow the glue label for temperature and clamping. Leave these unstressed glue-ups for at least 24 hours before drilling or loading, extending the wait when the manufacturer requires it.
Check before continuing: The laminated retainer is flat and the 1 1/2 in (38.1 mm) deep frame has staggered, closed joints.
Required wait: Glue cure: at least 24 hours; follow the received label
Before you begin: Supplier acceptance comes before this trial. Reference glass sizes are not order sizes.
Build the track and liner trial gauges
Make a rigid opening gauge for the 53 19/32 in (1361.28 mm) × 13 31/32 in (354.81 mm) reference opening, then substitute actual dry-frame measurements. Use a smooth disposable panel measured to 0.23622047 in (6 mm). A 1/4 in (6.35 mm) board is thicker than 6 mm. This sample is a fit gauge, never a substitute door.
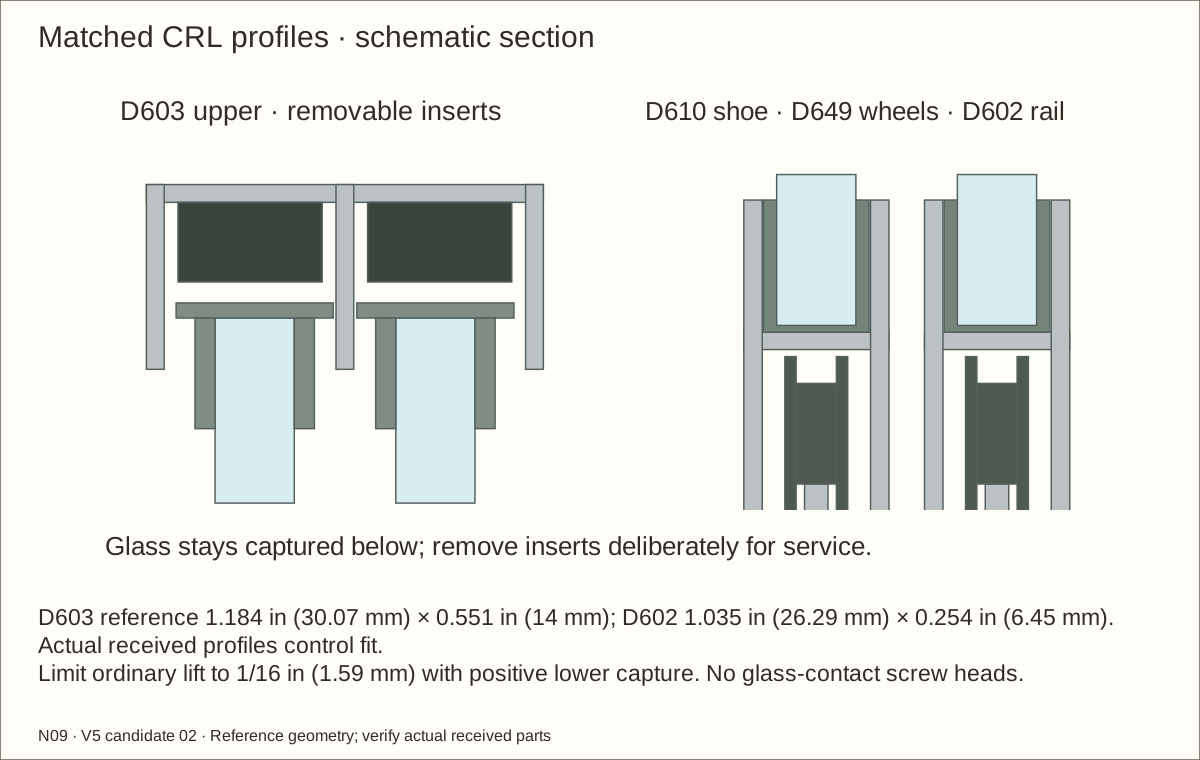
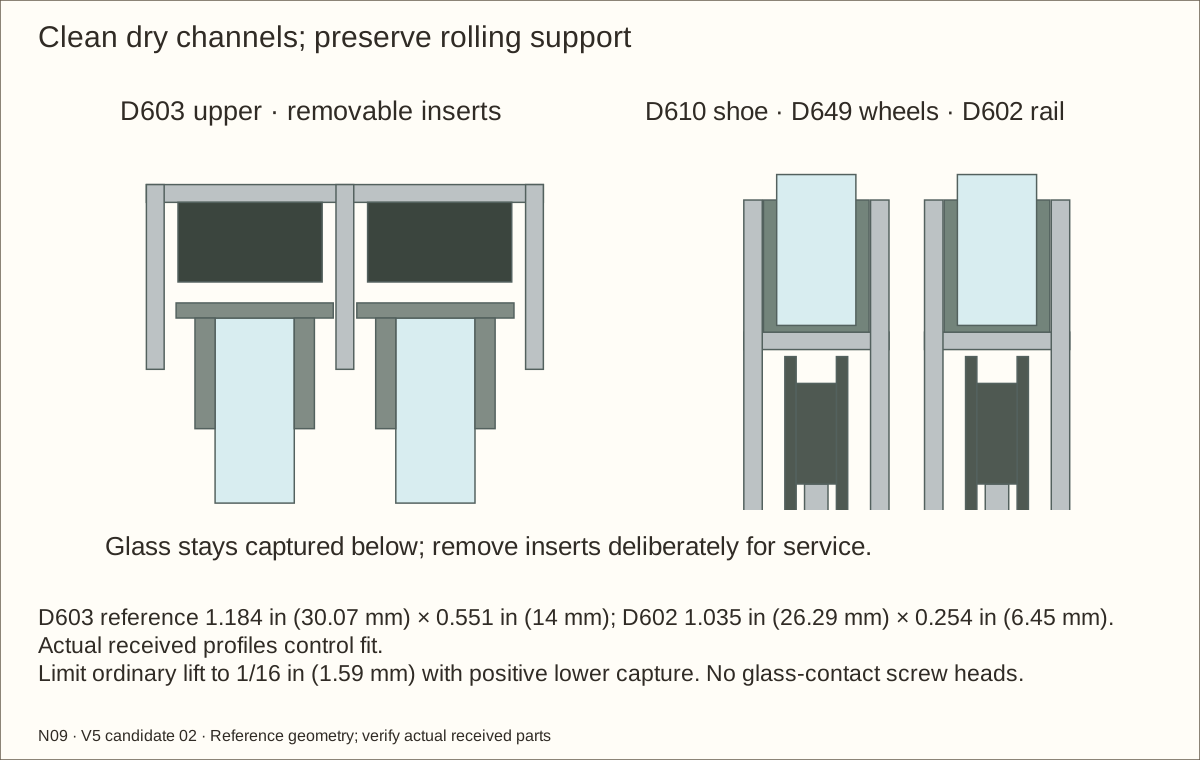
Seat the sample in a received D610 offcut with the supplier-confirmed vinyl. Install D649 wheels and a D652 guide by the supplied method. Measure the actual sections, guide, wheel groove, glazing pocket and retention. Resolve the GC728C thickness conflict before forcing anything into the channel.
Check the manufacturer’s 1 1/8 in (28.58 mm) height deduction against the complete sample. Prove rolling, positive lower engagement, the 1 1/2 in (38.1 mm) closed overlap and deliberate lift-out. Use fully deburred uncapped shoe ends, as this candidate omits cosmetic D332A caps. Reject a snag, loosened wheel or metal contact with glass. Record the received geometry; the drawing/model is not a physical fit certificate.
Fold a liner offcut over an eased wood support and into a corner. Keep the central floor reference mark distinct from the raised wood support shelf. Reserve 1/8 in (3.18 mm) at each wall for the lining and folds; a larger fold must be accommodated and deducted from the clear space.
Check before continuing: The sample rolls, lifts out with retention removed, and seats securely with the guide inside the upper channel.
Parts: Matching plywood/pine offcuts, actual #8/#6/#4 screws and the named station schedule
Tools / setup: Tape, square, clamps, drill/driver, clearance and pilot bits, countersink and depth stops; helper for turning
Identify the receivers and trial each pilot
Use the revised named station schedule as each joint is assembled. Identify its first part, any through-members and the solid receiver before drilling. Inspect both faces for missing receivers, splits and exposed points.
Make pilot tests in matching offcuts. The starting pilots are 7/64 in (2.78 mm) for #8, 3/32 in (2.38 mm) for #6 and 1/16 in (1.59 mm) for #4. Adjust for the actual wood and screw root; a split or spinning test means the setup is wrong.
Check before continuing: Each joint has named mating parts; the offcut pilots hold without splitting or spinning.
14. Set clearance holes, head seats and depth stops
Parts: Matching plywood/pine offcuts, actual #8/#6/#4 screws and the named station schedule
Tools / setup: Tape, square, clamps, drill/driver, clearance and pilot bits, countersink and depth stops; helper for turning
Set clearance holes, head seats and depth stops
Set the clearance depth separately from the receiver pilot. Use 11/64 in (4.37 mm), 9/64 in (3.57 mm) and 1/8 in (3.18 mm) starting clearance bits for #8, #6 and #4 respectively. Confirm head shape in a scrap countersink.
Maintain at least 1/16 in (1.59 mm) reference wood beyond each screw tip. Include the drill point in the stopped pilot depth. Veneer service openings preserve the original wood head seats and engagement. Keep them open. Replace stripped receivers instead of fitting longer screws.
Check before continuing: The trial clearance passes the screw freely and the head sits flush; the stopped pilot leaves the specified point cover.
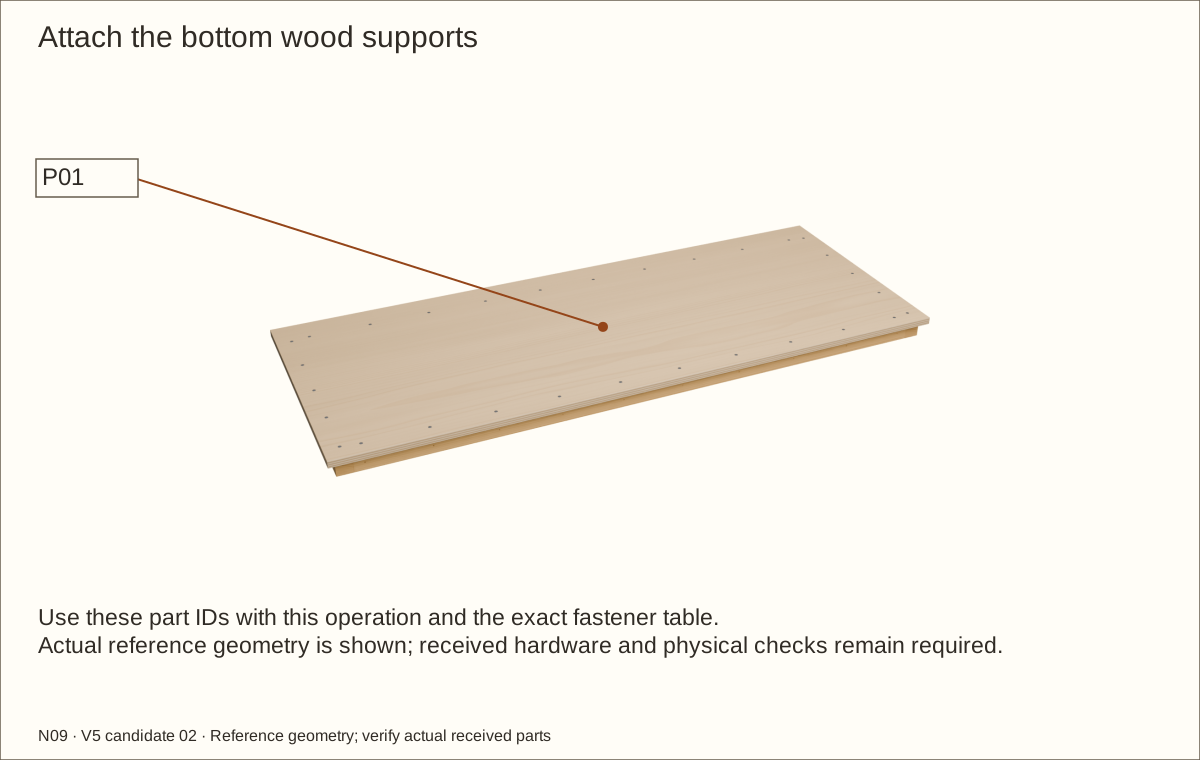
Parts: P01 — Floor; CLB — L bottom cleat; CRB — R bottom cleat; CF — Front floor cleat; CB — Back floor cleat
Tools / setup: Tape, square, clamps, drill/driver, clearance and pilot bits, countersink and depth stops; helper for turning
Attach the bottom wood supports
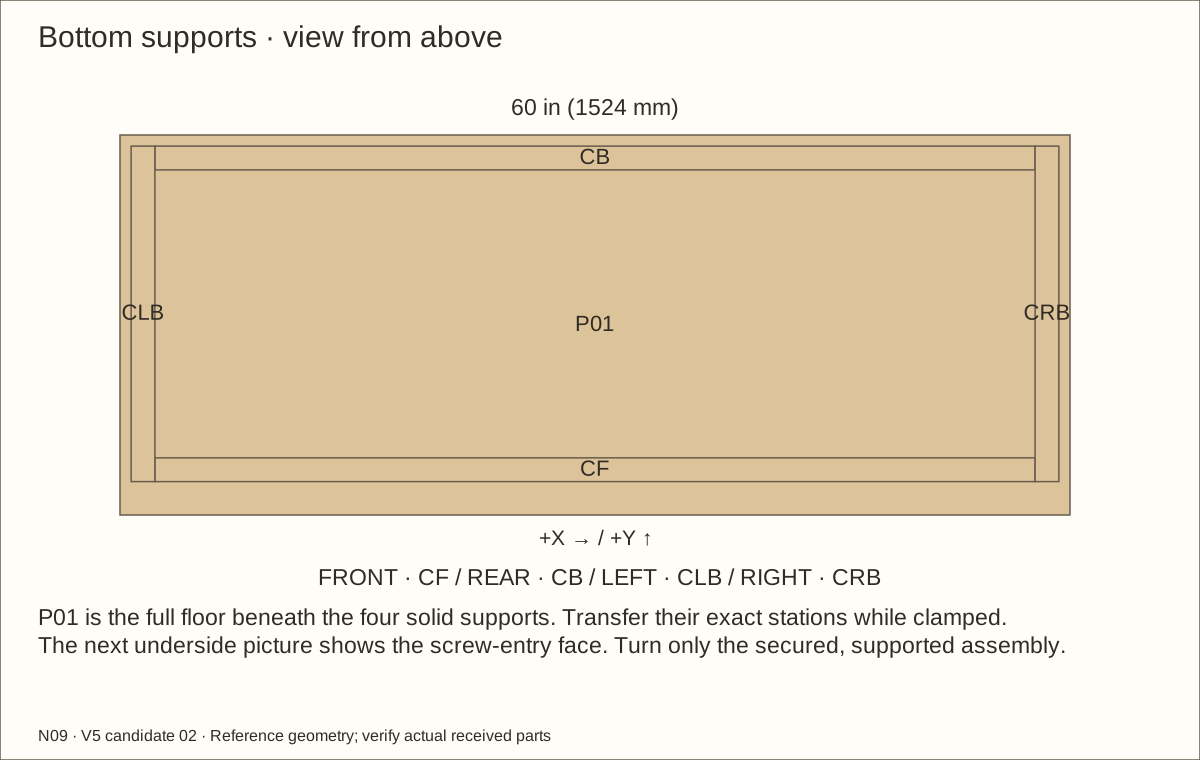
Place P01 on a flat sacrificial board. Set the left and right bottom supports inward by the actual side-panel thickness, using an offcut as a spacer. Set their front ends behind the three-layer retaining panel. Fit CF between them against the back of that panel; fit CB between them against the inside face of the back panel.
Clamp the dry floor/support assembly. With a helper, turn it onto padded supports exposing the underside and a clear drill path. Transfer the scheduled stations: 11/64 in (4.37 mm) clearance through P01 only and a trial 7/64 in (2.78 mm) stopped pilot in pine. Label every mating face, return upright, then separate the supports for glue.
Apply Titebond III only to floor/support bond faces. Reassemble on the marks and clamp. With a helper, turn the secured assembly onto padded supports and drive #8 × 1 1/4 in (31.75 mm) screws from below. Keep heads flush, wipe squeeze-out and return the assembly upright and flat for cure. Never balance it on an edge or drill into the bench.
Check before continuing: The floor underside sits completely flat, with no projecting head; the front recess fits the three-layer retaining panel.
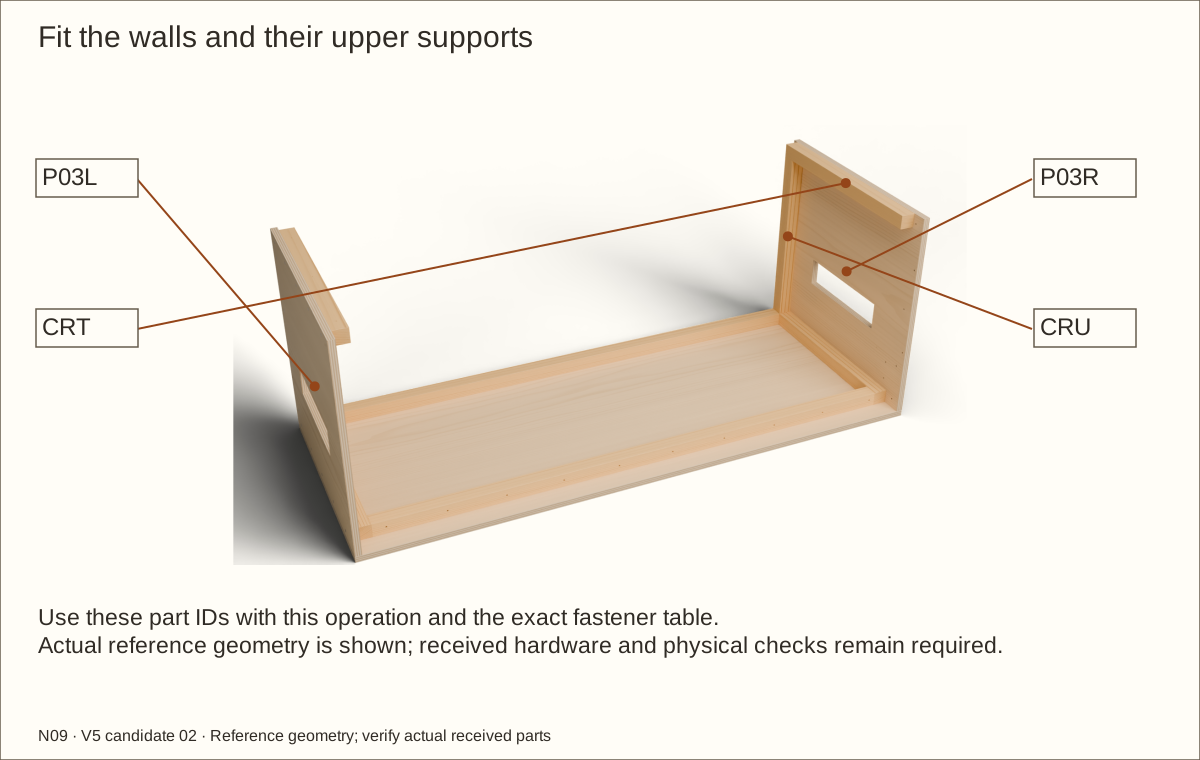
Parts: P03L — L wall; P03R — R wall; CLU — L rear upright; CRU — R rear upright; CLT — L upper cleat; CRT — R upper cleat
Tools / setup: Tape, square, clamps, drill/driver, clearance and pilot bits, countersink and depth stops; helper for turning
Fit the walls and their upper supports
Clamp CLU and CLT to the inside of the left wall; repeat with CRU and CRT on the right. Upper wood supports end at the back-panel face and start 1 1/2 in (38.1 mm) behind the front. The rear uprights fit between lower and upper wood supports.
Stand each wall on P01, flush with its outer edge and front. Clamp it to the bottom wood support. Use a helper while the box is open.
Transfer the listed stations through each wall into the matching solid receiver. Drill the #8 clearance through the plywood, then a stopped pilot into pine. Keep the rear-upright back screws offset from the side screws as shown in the station schedule.
Check before continuing: Walls are upright and parallel; all screw points terminate in solid wood supports, and no screw projects into the room.
18. Fit the walls and their upper supports · continue
Parts: P03L — L wall; P03R — R wall; CLU — L rear upright; CRU — R rear upright; CLT — L upper cleat; CRT — R upper cleat
Tools / setup: Tape, square, clamps, drill/driver, clearance and pilot bits, countersink and depth stops; helper for turning
Fit the walls and their upper supports · continue
Fasten with #8 × 1 1/4 in (31.75 mm) screws, tightening by hand for the last turn. These wall joints stay dry during fitting so the panels can be removed for finishing.
Check before continuing: Walls are upright and parallel; all screw points terminate in solid wood supports, and no screw projects into the room.
Tools / setup: Tape, square, clamps, drill/driver, clearance and pilot bits, countersink and depth stops; helper for turning
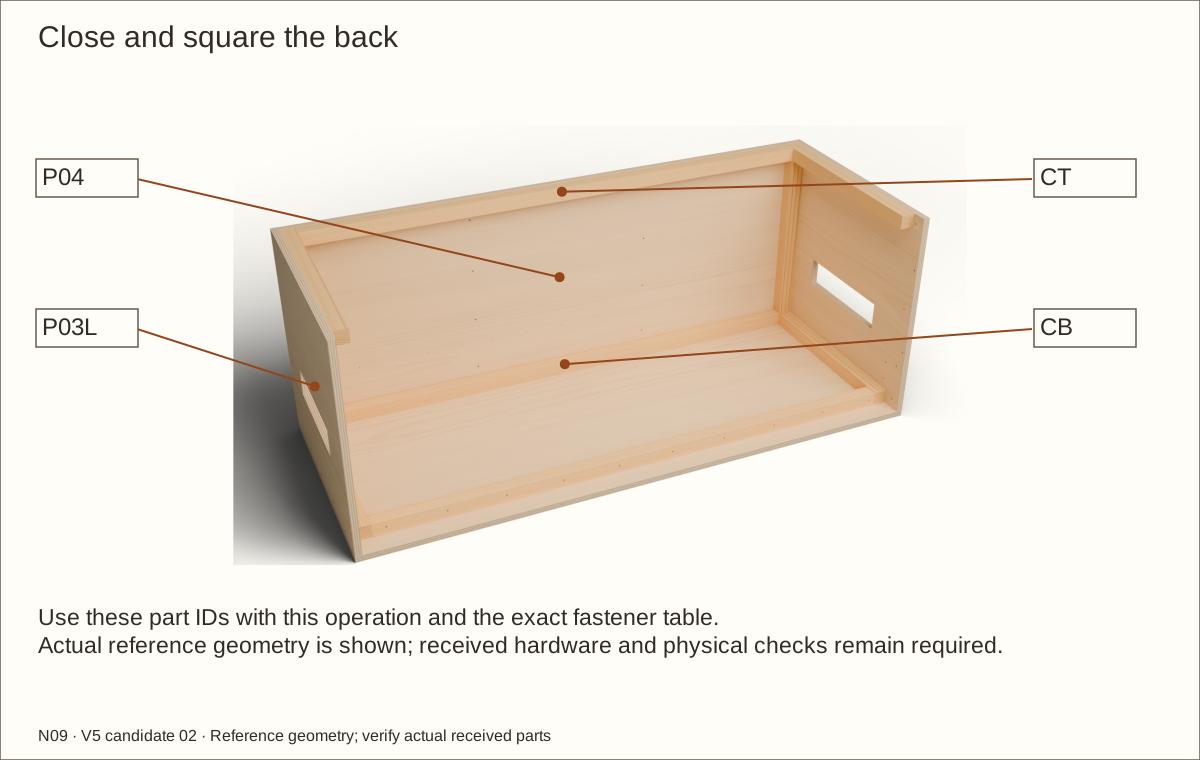
Close and square the back
Fit P04 between the side panels, resting on the floor with its outside face flush to the side-panel rear edges. Clamp to CB, CT and both rear uprights.
Compare the two diagonals across the front and across the back. Adjust until each pair differs by no more than 1/16 in (1.59 mm). Recheck on the final supporting surface if it differs from the bench.
Drill clearance through P04 and stopped pilots into the named receivers at the close and square the back operation stations. Use the offset upright positions so a back screw does not meet a side screw.
Check before continuing: The shell remains square without clamp pressure; the back and both walls bear on the floor.
Parts: CM1 — Intermediate back upright; CM2 — Intermediate back upright
Tools / setup: Tape, square, clamps, drill/driver, clearance and pilot bits, countersink and depth stops; helper for turning
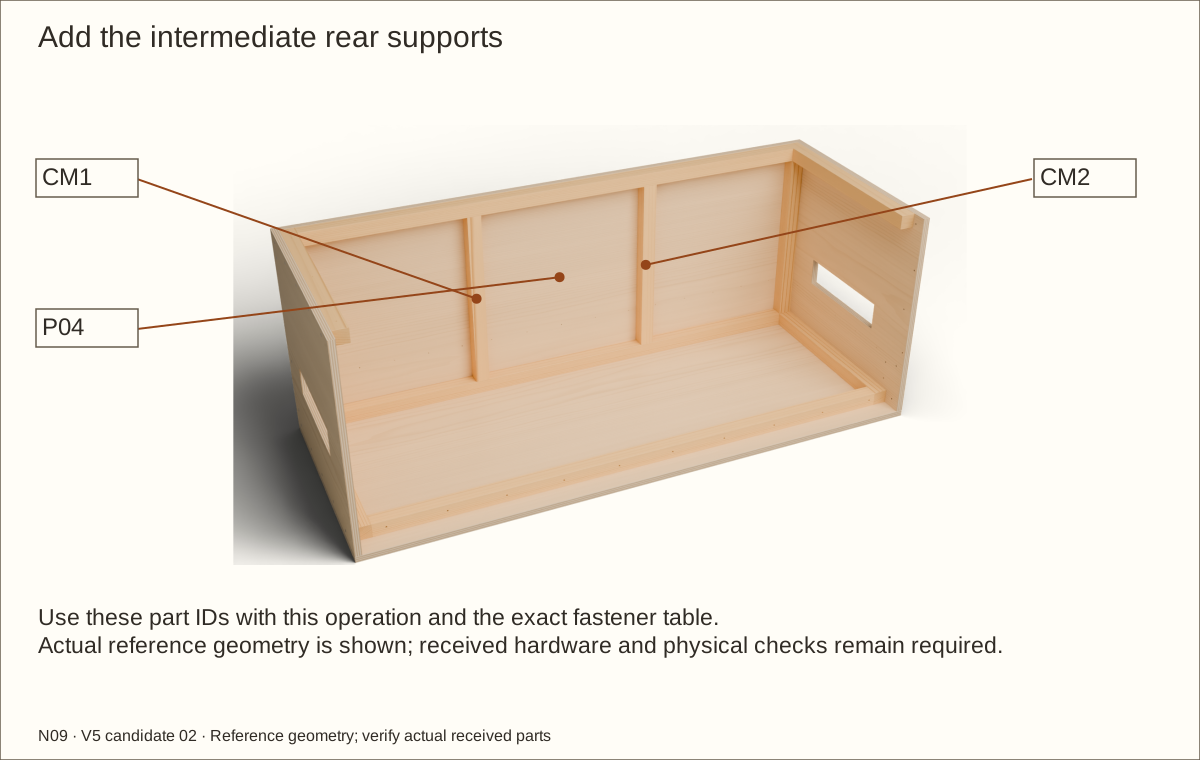
Add the intermediate rear supports
Place CM1 and CM2 against the back at centres 20 in (508 mm) and 40 in (1016 mm) from outside LEFT. Their reference length is 19 19/32 in (497.68 mm), between CB and CT. Confirm actual bearing faces before drilling.
Clamp each upright square with its bottom bearing fully on CB. Transfer the add the intermediate rear supports operation stations through P04. Drill #8 clearance through the plywood and stopped 7/64 in (2.78 mm) starting pilots into the solid pine.
Fit the listed #8 × 1 1/4 in (31.75 mm) screws from the back. Tighten evenly by hand, keeping the back flat and the upper wood support level. Confirm all points remain buried.
Check before continuing: Four rear uprights are square and secure; no screw point or sharp corner meets the future liner.
Parts: CM1 — Intermediate back upright; CM2 — Intermediate back upright
Tools / setup: Tape, square, clamps, drill/driver, clearance and pilot bits, countersink and depth stops; helper for turning
Add the intermediate rear supports · continue
Check both intermediate uprights and both rear corner uprights bear on their lower wood supports. Ease the edges that the liner will wrap around. Leave the four front posts loose until the retainer is seated in the next step.
Check before continuing: Four rear uprights are square and secure; no screw point or sharp corner meets the future liner.
Tools / setup: Tape, square, clamps, drill/driver, clearance and pilot bits, countersink and depth stops; helper for turning
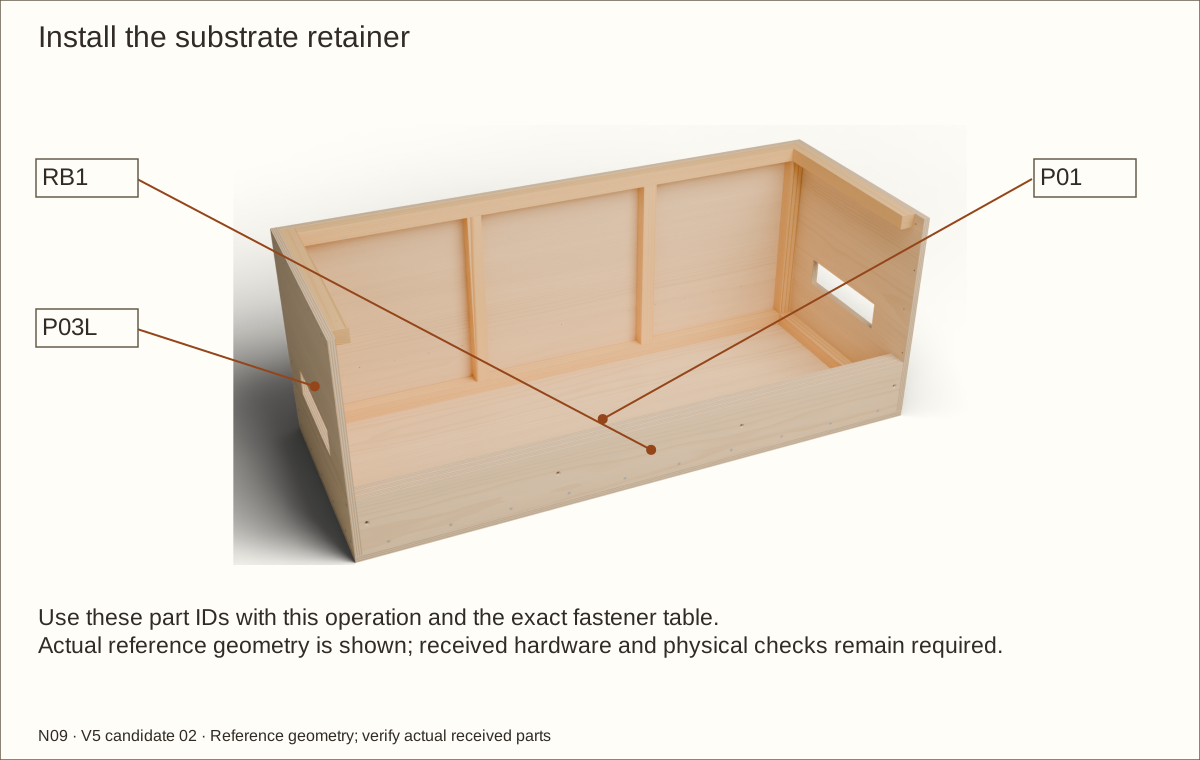
Install the substrate retainer
Seat the cured three-layer retainer on P01 in front of CF. Its ends fit between the side panels and its front face is flush with the front of the floor.
Set the wood retaining-panel top 6 in (152.4 mm) above the finished floor, before adding the track. A 4 in (101.6 mm) total bed leaves 2 in (50.8 mm) to the wood top.
At the end stations, drill #8 clearance through each side and pilots into the retainer ends. At the front stations, drill clearance through RB1 and RB2 and pilots into RB3; keep the 2 in (50.8 mm) screws within the laminate.
Check before continuing: The retaining top is level, continuous and at the marked reference mark; no screw point projects through its inner face.
Tools / setup: Tape, square, clamps, drill/driver, clearance and pilot bits, countersink and depth stops; helper for turning
Install the substrate retainer · continue
From inside, drill clearance through CF and pilots into RB3 for the separate rear-facing 2 in (50.8 mm) screws. Offset these stations 3/8 in (9.53 mm) to the right of the front-facing stations so opposing screws cannot meet. Tighten all screws flush; these low fasteners will be isolated behind the unpunctured liner.
Check before continuing: The retaining top is level, continuous and at the marked reference mark; no screw point projects through its inner face.
Parts: CFL — Front retainer post; CF1 — Front retainer post; CF2 — Front retainer post; CFR — Front retainer post; BTL1 — Flush retainer machine screw, recessed interior washer and locknut; BT11 — Flush retainer machine screw, recessed interior washer and locknut; BT21 — Flush retainer machine screw, recessed interior washer and locknut; BTR1 — Flush retainer machine screw, recessed interior washer and locknut
Tools / setup: Tape, square, clamps, supported drill setup, 9/32 in (7.14 mm) clearance bit, 1 in (25.4 mm) flat-bottom cutter and depth stop, matched 82-degree countersink, 5/32 in (3.97 mm) hex key and received 7/16 in (11.11 mm) socket
Before you begin: Bolt and hardware dimensions are receiving checks; never infer structural capacity from bolt count.
Position and clamp the four retainer posts
Stand CFL, CF1, CF2 and CFR behind the retainer with their front faces against the back of the three-layer retaining panel. The end posts bear on the side bottom wood supports; the intermediate posts bear on CF at centres 20 in (508 mm) and 40 in (1016 mm) from the left outside face. Each reference post is 4 5/8 in (117.48 mm) long, with its top flush to the retainer. Clamp all four tightly to the retainer.
For each end post, transfer the two side screw stations at heights above the finished floor of 2 1/2 in (63.5 mm) and 4 1/2 in (114.3 mm). Drill clearance through the side and stopped pilots into the post, then fit the listed #8 × 1 1/4 in (31.75 mm) screws. Keep the two intermediate posts clamped; their through-bolts provide the front connection.
Check before continuing: All four posts sit square and fully bear on their supports; end posts are secured and the two intermediate posts remain clamped.
Parts: CFL — Front retainer post; CF1 — Front retainer post; CF2 — Front retainer post; CFR — Front retainer post; BTL1 — Flush retainer machine screw, recessed interior washer and locknut; BT11 — Flush retainer machine screw, recessed interior washer and locknut; BT21 — Flush retainer machine screw, recessed interior washer and locknut; BTR1 — Flush retainer machine screw, recessed interior washer and locknut
Tools / setup: Tape, square, clamps, supported drill setup, 9/32 in (7.14 mm) clearance bit, 1 in (25.4 mm) flat-bottom cutter and depth stop, matched 82-degree countersink, 5/32 in (3.97 mm) hex key and received 7/16 in (11.11 mm) socket
Before you begin: Bolt and hardware dimensions are receiving checks; never infer structural capacity from bolt count.
Trial the flush head and recessed nut
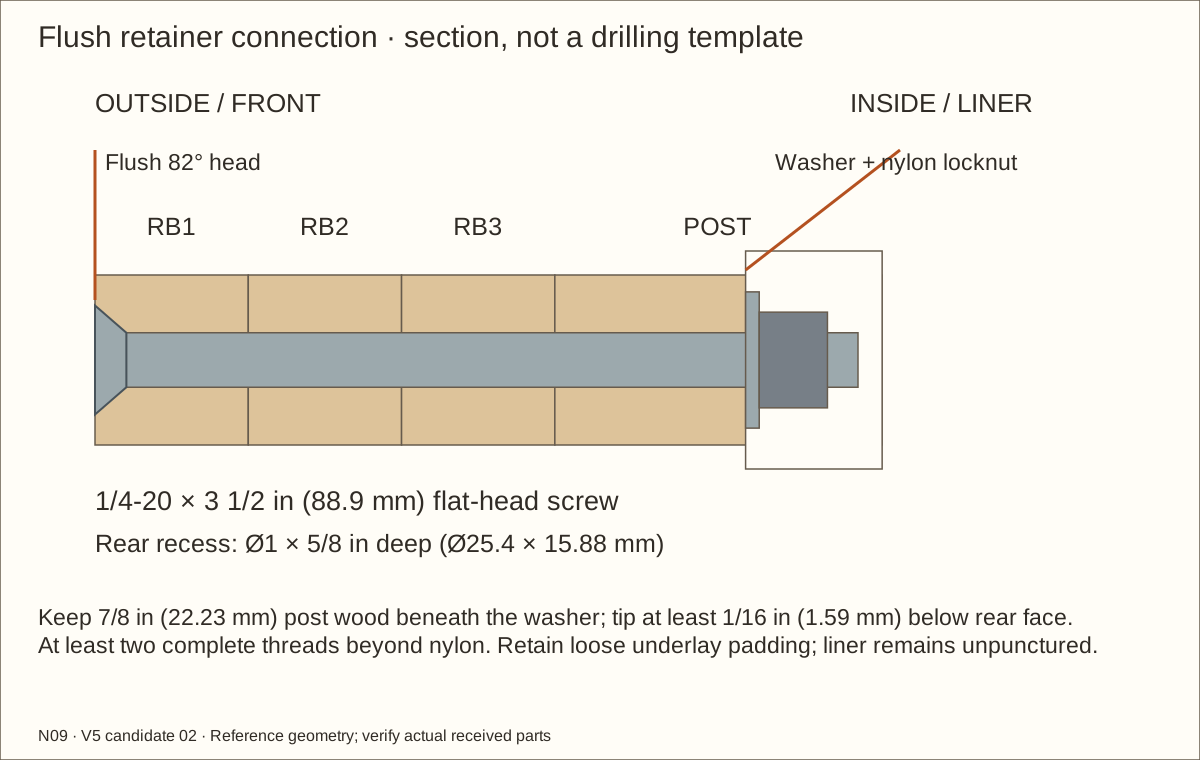
Bench-fit a received Bolt Depot 24910 flat-head 1/4-20 × 3 1/2 in (88.9 mm) screw with washer 16019 and nylon locknut 16008 through three matching plywood layers and one post. Screw length includes the flat head. Use a 5/32 in (3.97 mm) hex key and 82-degree countersink matched to the actual head; make its top flush with bare front wood. The 0.55 in (13.97 mm) veneer service opening keeps the drive accessible.
Clamp the post blank on a supported bench and drill a flat-bottom 1 in (25.4 mm)-diameter recess from its REAR, room-facing face. Stop at 5/8 in (15.88 mm) deep; keep at least 7/8 in (22.23 mm) of wood beneath the washer seat. Reference wood grip is 2 63/64 in (75.8 mm). Washer thickness must be at most 1/16 in (1.59 mm); the selected nut is listed as 0.298 in (7.57 mm)–0.328 in (8.33 mm) high. Trial the actual 7/16 in (11.11 mm) socket: outside diameter at most 7/8 in (22.23 mm), with straight access through the recess.
Check before continuing: The received sample accepts the flush head, washer, nut and actual socket without splitting; bearing wood, thread engagement and buried tip meet the stated limits.
Parts: CFL — Front retainer post; CF1 — Front retainer post; CF2 — Front retainer post; CFR — Front retainer post; BTL1 — Flush retainer machine screw, recessed interior washer and locknut; BT11 — Flush retainer machine screw, recessed interior washer and locknut; BT21 — Flush retainer machine screw, recessed interior washer and locknut; BTR1 — Flush retainer machine screw, recessed interior washer and locknut
Tools / setup: Tape, square, clamps, supported drill setup, 9/32 in (7.14 mm) clearance bit, 1 in (25.4 mm) flat-bottom cutter and depth stop, matched 82-degree countersink, 5/32 in (3.97 mm) hex key and received 7/16 in (11.11 mm) socket
Before you begin: Bolt and hardware dimensions are receiving checks; never infer structural capacity from bolt count.
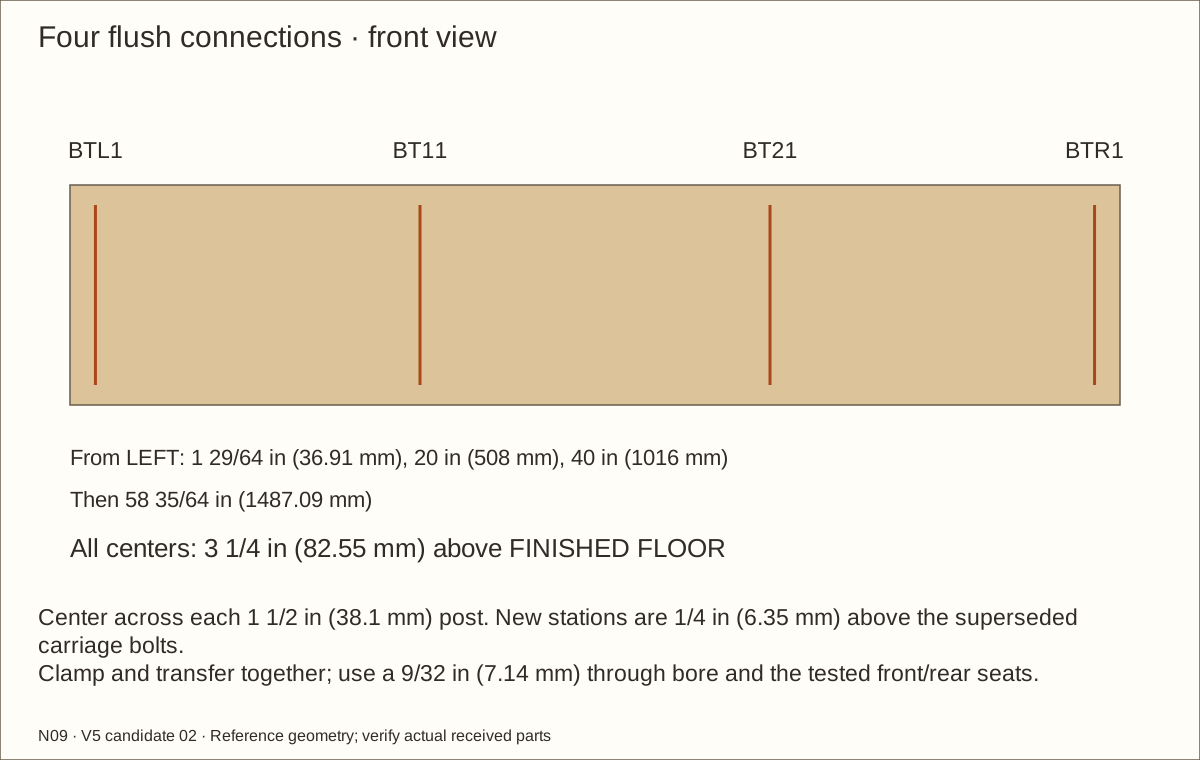
Drill and fit the flush retainer fasteners
Mark each revised bolt center: centered across the 1 1/2 in (38.1 mm) post and 3 1/4 in (82.55 mm) above the finished floor. This higher station keeps the new nut pocket clear of the side screws. Clamp the panel and post together with a waste backing block; bore the square 9/32 in (7.14 mm) clearance hole. Make the stopped nut recess on the post rear and the matched countersink on the front retaining panel. The two shapes are different: flat-bottom recess for washer/nut, cone-shaped seat for the flat head. Keep all machining and sample checks before finish.
Insert the flat-head screw from the OUTSIDE FRONT. Fit the washer and nylon locknut inside the post recess. Hold the hex drive and tighten the nut by hand until the joint closes without crushing wood. Stainless threads can seize; stop at binding, galling, a spinning seat or split wood. Do not use an impact driver or invent a torque setting. At least two complete threads must pass the nylon ring, with the screw tip at least 1/16 in (1.59 mm) below the rear post face. If the received stack fails either check, stop and revise it; do not omit the washer or deepen the recess.
Check before continuing: All four exterior heads are flush to bare wood; nuts and tails stay below the rear post faces; complete thread engagement, intact bearing wood, socket access and padded liner contact pass the actual dry trial.
28. Inspect the flush connection and liner protection
Parts: CFL — Front retainer post; CF1 — Front retainer post; CF2 — Front retainer post; CFR — Front retainer post; BTL1 — Flush retainer machine screw, recessed interior washer and locknut; BT11 — Flush retainer machine screw, recessed interior washer and locknut; BT21 — Flush retainer machine screw, recessed interior washer and locknut; BTR1 — Flush retainer machine screw, recessed interior washer and locknut
Tools / setup: Tape, square, clamps, supported drill setup, 9/32 in (7.14 mm) clearance bit, 1 in (25.4 mm) flat-bottom cutter and depth stop, matched 82-degree countersink, 5/32 in (3.97 mm) hex key and received 7/16 in (11.11 mm) socket
Before you begin: Bolt and hardware dimensions are receiving checks; never infer structural capacity from bolt count.
Inspect the flush connection and liner protection
Inspect the front with a straightedge: no raised heads, washers, nuts or tails. Inspect the rear recess for burrs and check the full nut/socket access before lining. Keep the existing second loose underlay pad over each recessed connection; no bolt passes through the membrane. Recheck square and retainer straightness. Empty the bed and remove liner/clamps to reach the interior nuts for exceptional retainer service; ordinary cleaning leaves the retainer fixed.
Check before continuing: All four exterior heads are flush to bare wood; nuts and tails stay below the rear post faces; complete thread engagement, intact bearing wood, socket access and padded liner contact pass the actual dry trial.
29. Transfer the revised frame and roof screw rows
Parts: F0/F1 front frame layers; P03 side walls; P02 roof
Tools / setup: Tape, square, clamps, drill/driver, clearance and pilot bits, countersink and depth stops; helper for turning
Transfer the revised frame and roof screw rows
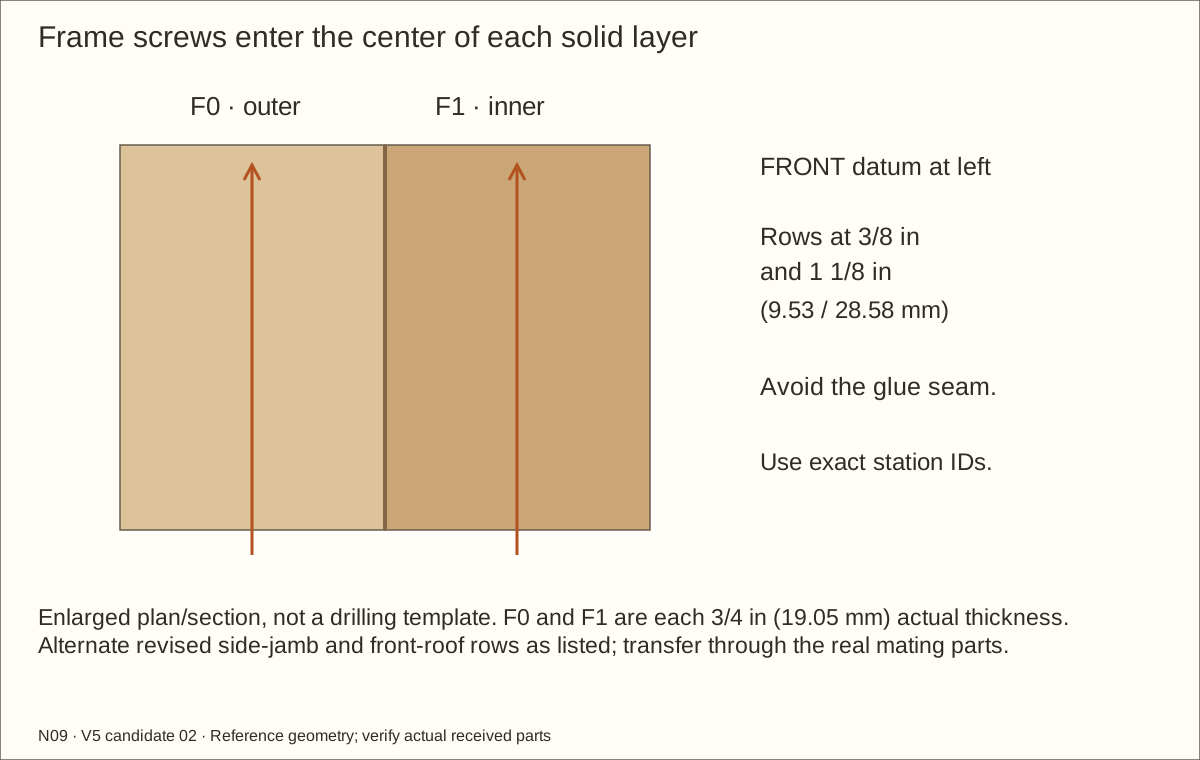
The side-to-jamb screws and front roof screws must enter solid wood, not run down the seam between frame layers F0 and F1. The revised stations alternate 3/8 in (9.53 mm) and 1 1/8 in (28.58 mm) behind the outside FRONT datum. These are the centers of the two actual 3/4 in (19.05 mm) layers.
Use the exact IDs and coordinates in the drilling reference. Mark the entry face, clamp the real mating layers, then make a clearance hole in the first part and a stopped pilot in the named receiver. Do not reuse the old seam-centered holes.
Trial the driver with the dry shell assembled. Correct access before finishing; preserve every removable roof screw and its veneer service opening.
Check before continuing: Every affected pilot enters the named solid layer and remains clear of other screws and the glass hardware.
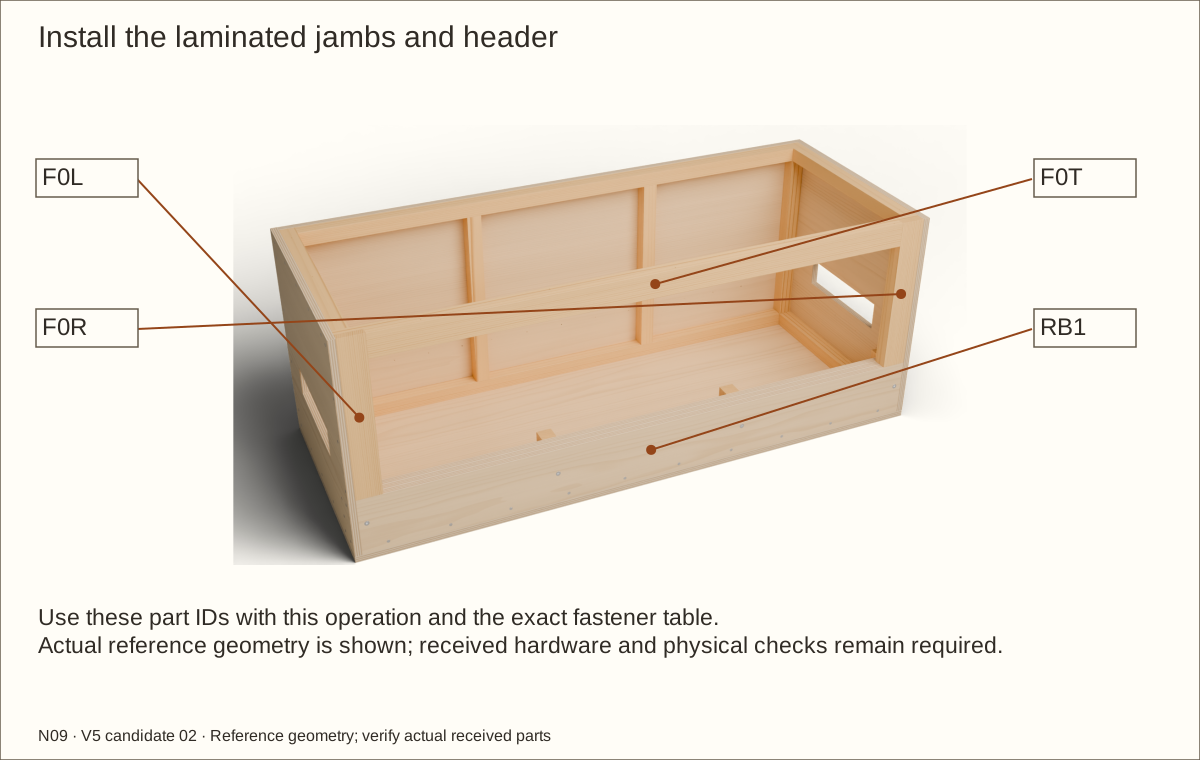
Parts: F0L — L jamb layer; F1L — L jamb layer; F0R — R jamb layer; F1R — R jamb layer; F0T — Header layer; F1T — Header layer
Tools / setup: Tape, square, clamps, drill/driver, clearance and pilot bits, countersink and depth stops; helper for turning
Install the laminated jambs and header
Set the laminated front frame on the retaining top. Align its front face with the retainer and sides. Both jambs must bear fully on the retainer; do not suspend them on screws.
Clamp the frame square. Drill #8 clearance through the side panels into stopped pilots in the jamb ends at the scheduled heights. Fit #8 × 2 in (50.8 mm) screws.
Measure opening width at top, middle and bottom and height at three positions. The reference clear wood opening is 53 19/32 in (1361.28 mm) × 13 31/32 in (354.81 mm). Record the smallest actual values and both diagonals before dependent hardware or glass sizing.
Check before continuing: The opening is square within 1/16 in (1.59 mm) and its upper/lower track faces are straight and parallel.
31. Install the laminated jambs and header · continue
Parts: F0L — L jamb layer; F1L — L jamb layer; F0R — R jamb layer; F1R — R jamb layer; F0T — Header layer; F1T — Header layer
Tools / setup: Tape, square, clamps, drill/driver, clearance and pilot bits, countersink and depth stops; helper for turning
Install the laminated jambs and header · continue
Lay a straightedge beneath the header and over the retainer. Correct any bow now. The detachable roof will later screw into the header and wood supports, further closing the box.
Check before continuing: The opening is square within 1/16 in (1.59 mm) and its upper/lower track faces are straight and parallel.
Cut two roof pieces 23 in (584.2 mm) × 17 in (431.8 mm), and two side pieces 13 in (330.2 mm) × 4 in (101.6 mm), from the hardware-cloth roll. Wear eye protection and cut-resistant gloves while handling the cut edges.
Remove projecting wire ends and burrs. The nominal mesh margin beyond each opening is 1/2 in (12.7 mm). The revised pocket adds 0.006 in (0.15 mm) perimeter relief for coating and fit, leaving 0.494 in (12.55 mm) reference outer land. Keep every cut end beneath a capture strip and away from its screw row.
Check the mesh opening against the future occupant and feeder plan. This 1/2 in (12.7 mm) construction mesh will require a securely retained finer barrier for many occupants; do not treat it as universal animal containment.
Label the two roof pieces and two side pieces. Store them flat until their capture strips are ready.
Check before continuing: All edges are smooth and will be enclosed; none of the four pieces is stretched, rusted or damaged.
Parts: ML — L ventilation mesh; MR — R ventilation mesh; VLB — Vent capture strip; VLT — Vent capture strip; VLF — Vent end strip; VLA — Vent end strip; VRB — Vent capture strip; VRT — Vent capture strip; VRF — Vent end strip; VRA — Vent end strip
Tools / setup: Tape, square, clamps, drill/driver, clearance and pilot bits, countersink and depth stops; helper for turning
Dry-fit the side screen captures
Centre each wire panel outside its wall opening. The wall-facing capture recess houses the measured welded crossing plus coating. The outer solid land remains flat against the wall; do not trap wire beneath that land.
Clamp captures flat. Transfer the revised screw rows through solid outer lands into the wall, with separate clearance and stopped pilot depths. No station passes through mesh. Never force a screw to displace a wire.
Check before continuing: There is no accessible cut wire or loose mesh edge; the opening remains above the fill line.
Parts: ML — L ventilation mesh; MR — R ventilation mesh; VLB — Vent capture strip; VLT — Vent capture strip; VLF — Vent end strip; VLA — Vent end strip; VRB — Vent capture strip; VRT — Vent capture strip; VRF — Vent end strip; VRA — Vent end strip
Tools / setup: Tape, square, clamps, drill/driver, clearance and pilot bits, countersink and depth stops; helper for turning
Seat capture screws and inspect both faces
Drive the #6 × 1 in (25.4 mm) screws until the strips hold the mesh firmly. With 3/8 in (9.53 mm) captures and the reference plywood, the points must stay buried; verify from inside after every group.
Run a cloth along the entire interior reveal and gently press the mesh perimeter. Fix any snag or loose edge. Remove the assemblies again during the finishing step, preserving the labels.
Check before continuing: There is no accessible cut wire or loose mesh edge; the opening remains above the fill line.
Tools / setup: Tape, square, clamps, drill/driver, clearance and pilot bits, countersink and depth stops; helper for turning
Fit roof ribs and recessed screen retainers
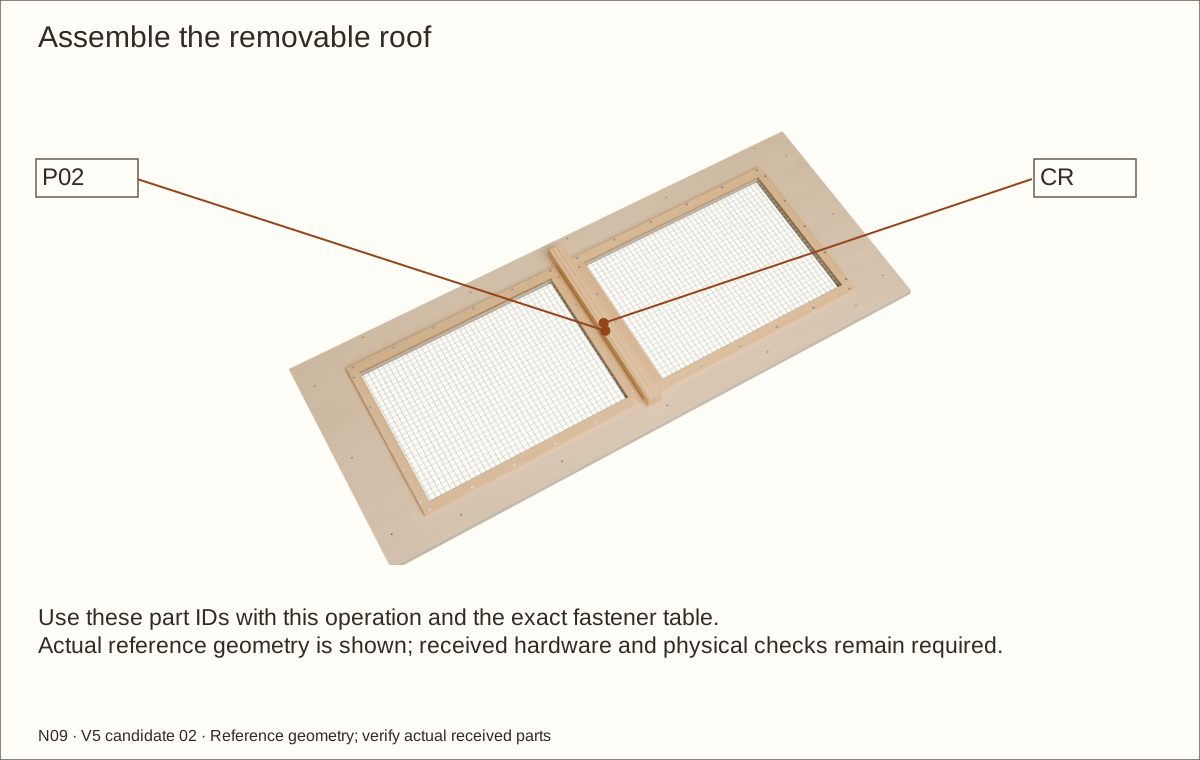
Place the roof underside up on padded supports. Fit CR between the front frame position and rear upper wood support, with centre 30 in (762 mm) from the left outside edge. The rib lies beneath the solid web between openings. Transfer their top-down #8 screw stations through the roof into each rib.
Centre both mesh pieces in their matching roof-facing recesses. Clamp the outer lands flat, then use the revised capture stations. Each #6 × 1 in (25.4 mm) screw enters solid plywood beyond the opening. Check point cover.
Check before continuing: The roof sits flat, its wire edges are enclosed and it can lift off without catching the frame.
Tools / setup: Tape, square, clamps, drill/driver, clearance and pilot bits, countersink and depth stops; helper for turning
Turn, seat and predrill the removable roof
Turn the roof with a helper and check every point remains beneath the outer face. The rib sits between the openings and ends against the rear wood support; the vent borders stay fully supported.
Dry-seat the roof on the shell and transfer the final roof screw holes. Leave them unfastened until the later access work is complete. The roof and mesh are not shelves; heat and light fixtures require separately supported, specifically qualified equipment.
Check before continuing: The roof sits flat, its wire edges are enclosed and it can lift off without catching the frame.
Tools / setup: Caliper, square, clamps, hacksaw, metal file and disposable panel gauge
Trial the matched tracks and approved jamb relief
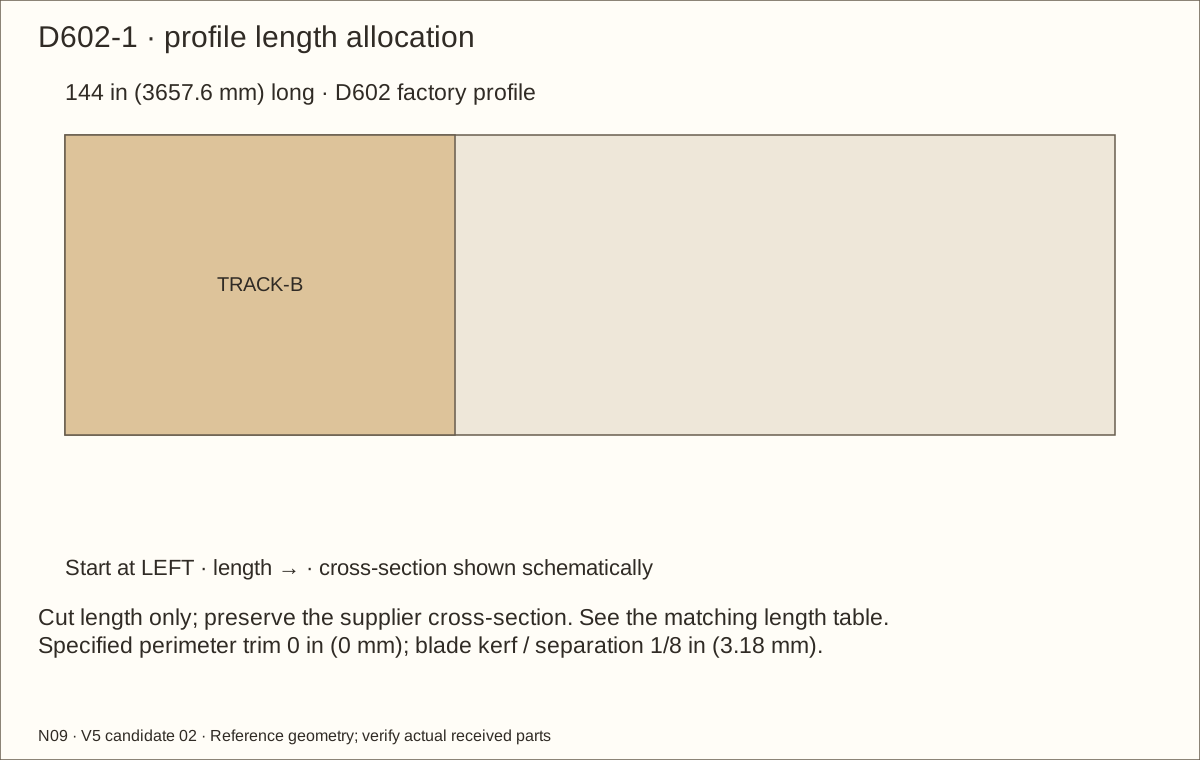
After H01 acceptance, cut D603 upper and jamb sections, D602 lower rail and D610 shoes from their exact stock layouts. The reference horizontal length is 53.36275 in (1355.41 mm) and jamb length 13.16375 in (334.36 mm). Receive and trial the actual profiles before final cuts. Keep cuts square, deburr all edges and remove every chip. No D332A end cap or unverified cap attachment is included.
Centre the matched track lanes in the 1 1/2 in (38.1 mm) frame depth. Use the actual running lanes to align the upper channel directly over the lower rail. Their lane spacing differs slightly; confirm each top guide runs freely in its corresponding upper lane. Keep both tracks straight and parallel.
Check before continuing: The trial rolls freely; flush mechanical web holes and four cushion bond areas are marked. No cushion screw holes are drilled.
Tools / setup: Caliper, square, clamps, hacksaw, metal file and disposable panel gauge
Trial web fastening and jamb cushions
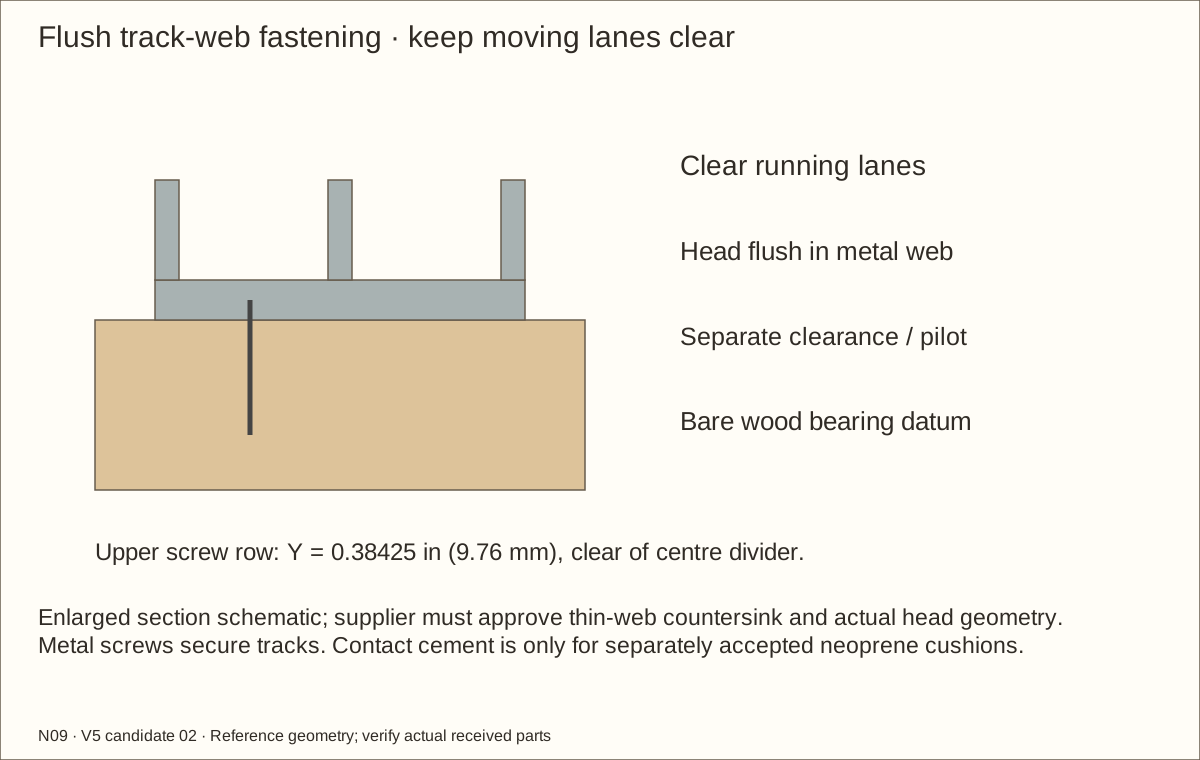
Mark separate metal clearance and stopped wood-pilot operations. The upper-channel screws lie in the front lane at Y = 0.38425 in (9.76 mm) from the core FRONT datum, clear of the centre divider. Lower screws sit between running rails at Y = 0.6 in (15.24 mm). Jamb screws use the front lane at left and rear lane at right. H01 must approve the thin-web countersink. Trial actual head angle and diameter, keeping heads flush without distorting or breaking out the extrusion. Do not countersink a running rib.
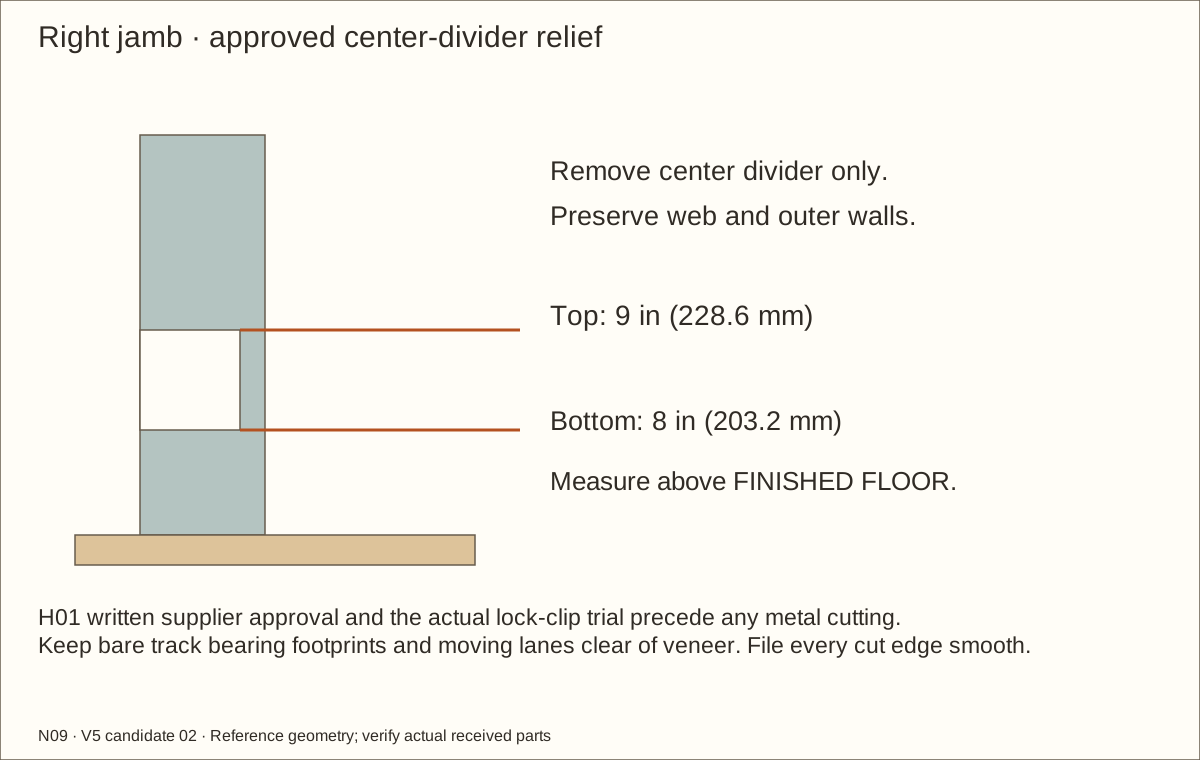
Only after CRL approves the alteration, relieve the centre divider of the RIGHT vertical D603 jamb from 8 in (203.2 mm) to 9 in (228.6 mm) above the finished floor. Preserve its continuous backing web, both outer walls and mounting holes. Support the loose extrusion while cutting, file every edge and remove swarf. Trial the actual rear-leaf lock clip through the full path: soft cushion contact must precede any metal or wood contact.
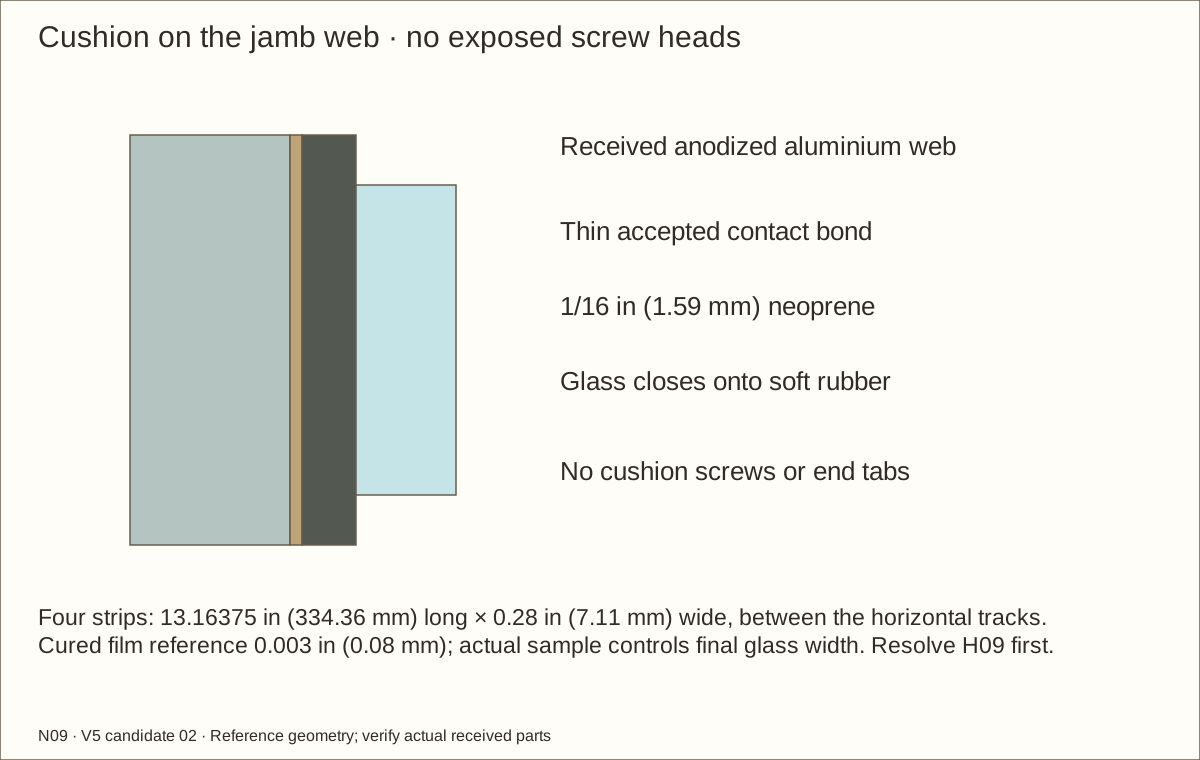
Dry-fit four 13.16375 in (334.36 mm) × 0.28 in (7.11 mm) × 1/16 in (1.59 mm) neoprene cushions between the horizontal tracks, with no end tabs or cushion screws. Test the supplier-accepted bond on offcuts and measure its cured film. Temporarily clamp for the gauge trial, install the remaining track screws by hand and prove both lanes. A bowed track, projecting head or loose wheel fails this trial.
Check before continuing: The trial rolls freely; flush mechanical web holes and four cushion bond areas are marked. No cushion screw holes are drilled.
Parts: Upper track, six HDPE inserts, four cushions, lock and disposable glass gauge
Tools / setup: Drill/driver, separate metal-clearance and wood-pilot bits, depth stops, caliper, sample panel and labeled hardware
Before you begin: A locked door can still escape its track if anti-lift capture is wrong.
Predrill anti-lift and final hardware holes
With the sample panel supported in the received tracks, fit all six removable anti-lift inserts. Transfer every #4 screw station now, while the wood is dry and unfinished. Also trial all sixteen liner clamps and their stopped #6 pilots above the fill line. Use separate metal clearance and wood-pilot operations; never drill the running anvils.
Trial the CRL lock and both pull locations, with the lock body removed for sliding. Prove every door position, positive lower capture, no more than 1/16 in (1.59 mm) upward play and supported lift-out after the inserts are deliberately removed.
Label each insert, cushion, screw and position; record hole depths and keep those parts together. Remove them for coating. If any final fit later needs fresh wood cuts, stop, reseal and restart full cure before glazing.
Check before continuing: Every hardware hole and service path is rehearsed before any veneer or finish.
Tools / setup: Labels, hand tools for disassembly, sanding block, vacuum, masking and prescribed dust protection
Disassemble, sand and retain the labels
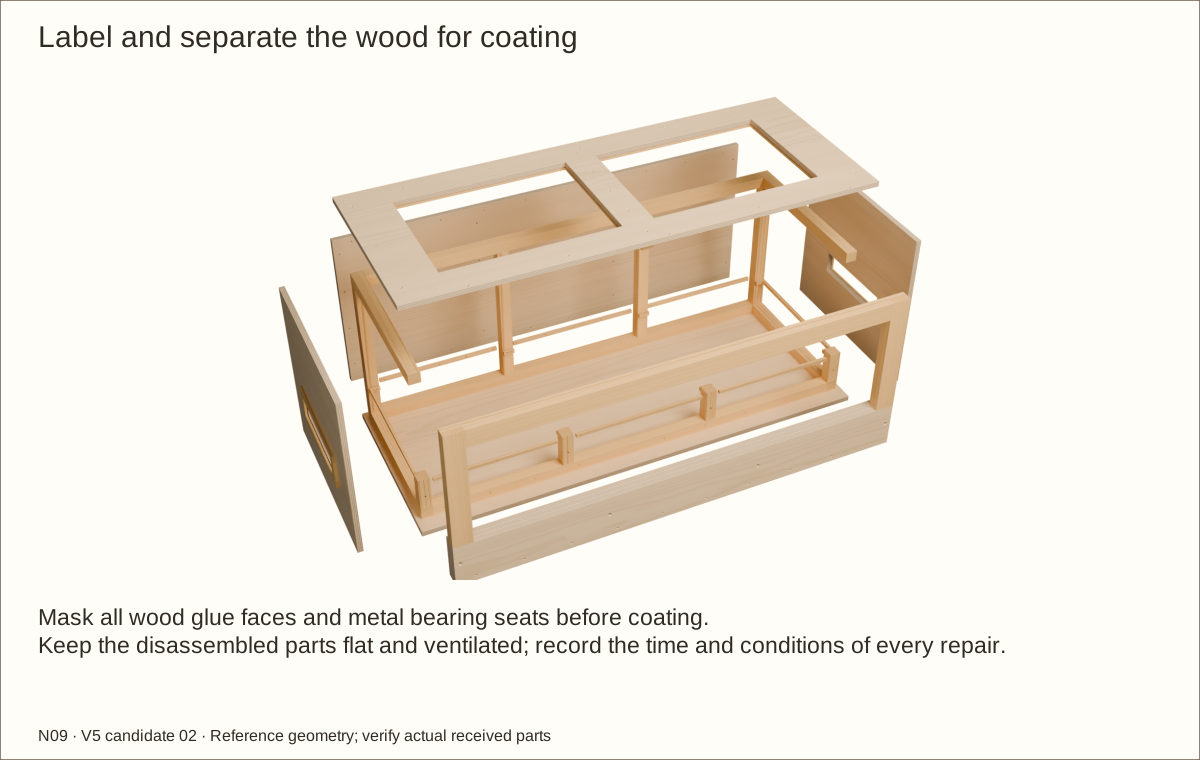
Photograph the labelled dry fit, then remove the tracks, mesh captures, roof, walls, frame, retainer, loose posts and four bolt stacks. Preserve the head recesses and bore edges for coating. Keep the permanently bonded floor/wood support assembly and laminated frame/retainer intact.
Sand from 120 to 220 grit along the grain. Ease all liner-contact edges; vacuum dust and wipe with a clean lint-free cloth. Fill no structural defect with finish; replace damaged material.
Check before continuing: Wood is clean and dry, the liner path is smooth and all fittings are labelled for reinstatement.
Tools / setup: Labels, hand tools for disassembly, sanding block, vacuum, masking and prescribed dust protection
Mask glue and metal seats; measure finish coverage
Keep glass, wheels, mesh and liner away from sanding and finish. Mask bare wood-glue interfaces, actual metal bearing footprints and washer seats. Veneer may not alter those hardware datums.
The revised coating allowance is 198.04 square feet (18.40 square metres), including substrate preseal, veneer topcoat, trials and contingency. At 50 square feet per quart, buy 4 quart cans as two two-can packs. Extra coats or balance layers require recalculation.
Check before continuing: Wood is clean and dry, the liner path is smooth and all fittings are labelled for reinstatement.
42. Preseal the veneer substrates and prove the bond
Parts: Dedicated trial board, accepted veneer and sealer
Tools / setup: Sharp knife, straightedge, sacrificial cutting board, firm veneer scraper, masking and helper for long pieces
Preseal the veneer substrates and prove the bond
Keep all wood-glue joints, metal bearing seats and track bond footprints masked. Seal the outside veneer substrates with the accepted sealer. Oakwood’s PSA guide requires at least 24 hours drying before its 120-grit scuff preparation; also meet the selected sealer’s longer full-cure and compatibility requirements.
For this reference Varathane system, reserve the full seven-day cure at 70°F (21°C) and 50% relative humidity before scuffing and the supplier-approved PSA trial. Follow the current can’s temperature and ventilation directions. Vacuum and wipe away dust; do not leave grit beneath the veneer.
Make the trial with the same wood, coating, veneer and application pressure. Record the complete cured stack and confirmed adhesive dwell. It must be no more than 0.046 in (1.17 mm) at any covered surface. Supplier balance and environment approval remain mandatory.
Check before continuing: The cured bond sample is accepted and complete stack is recorded before final skins are cut.
Required wait: Seven-day reference sealer cure under stated conditions; longer if directed. Then the actual supplier-confirmed PSA dwell. Do not substitute dry-touch time.
Parts: All V- veneer pieces and the selected species sheets
Tools / setup: Sharp knife, straightedge, sacrificial cutting board, firm veneer scraper, masking and helper for long pieces
Cut the veneer blanks with the grain plan
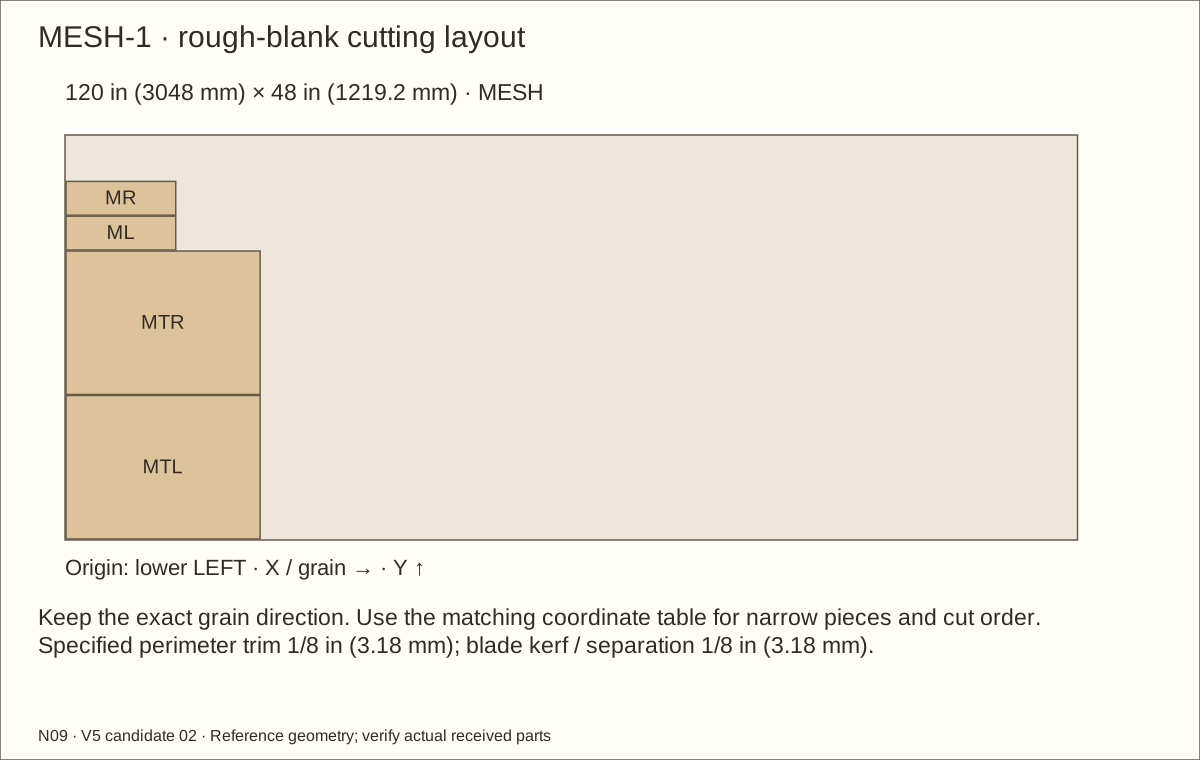
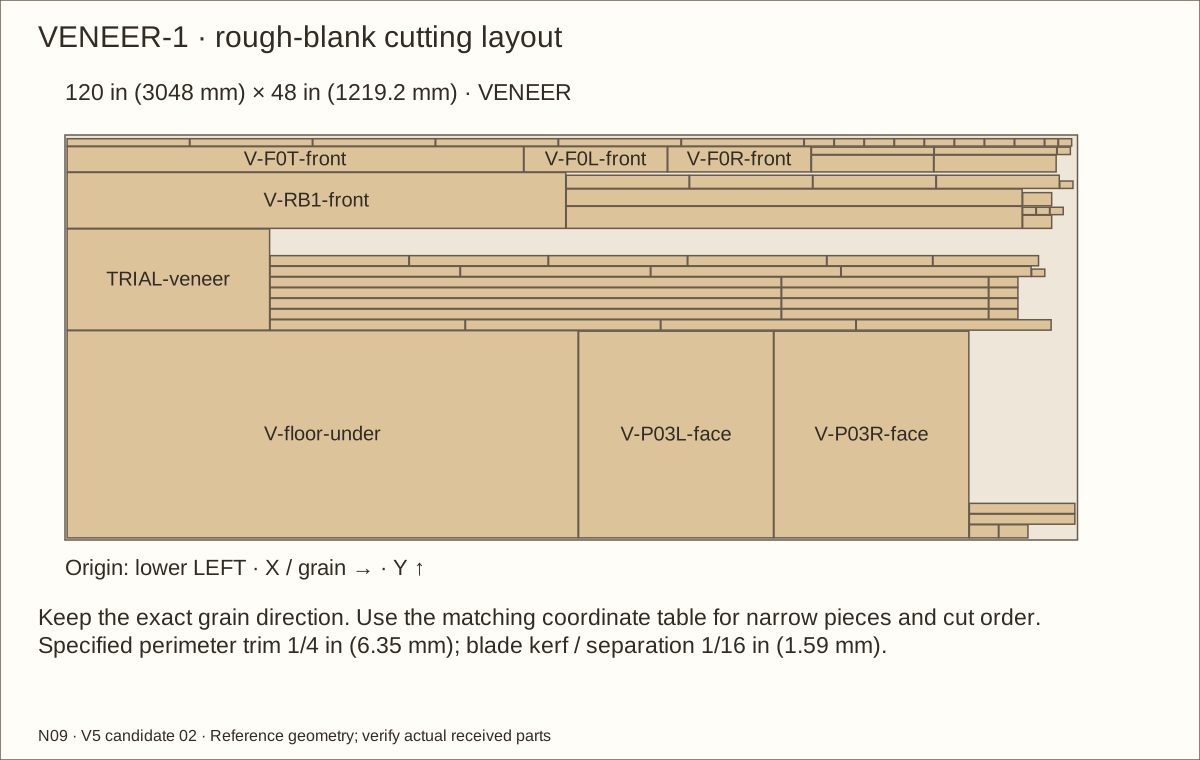
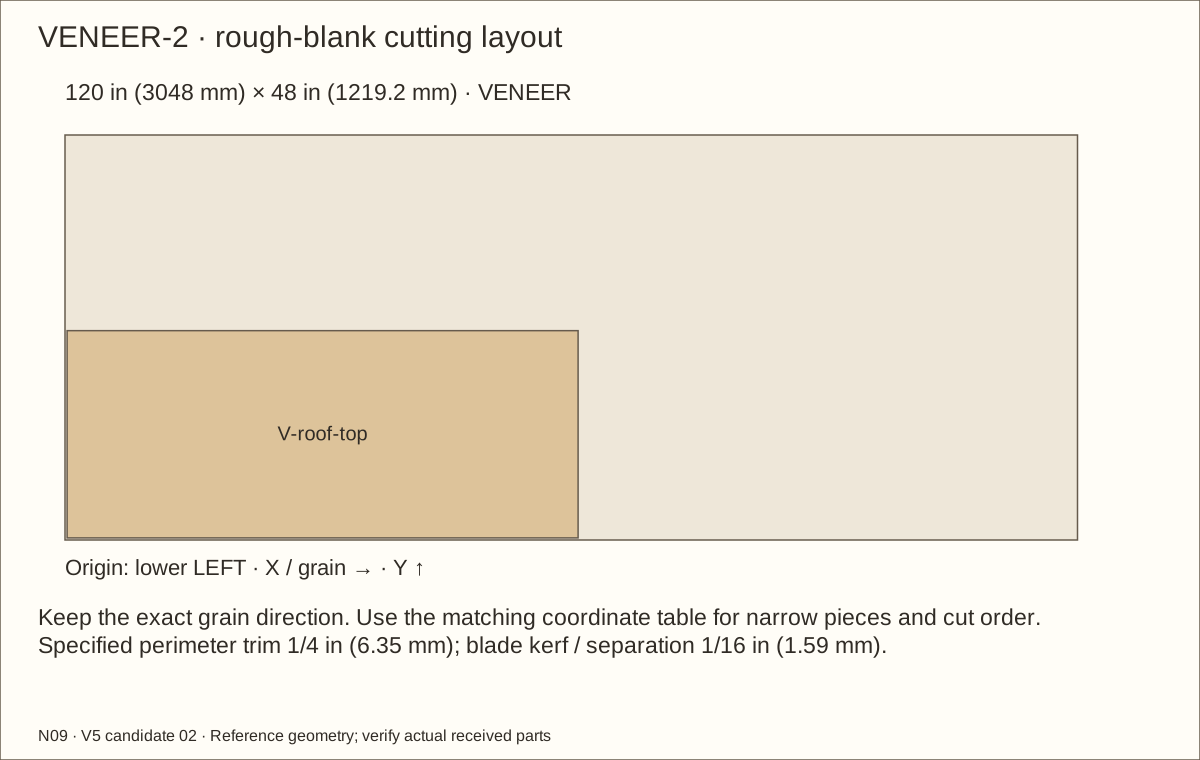
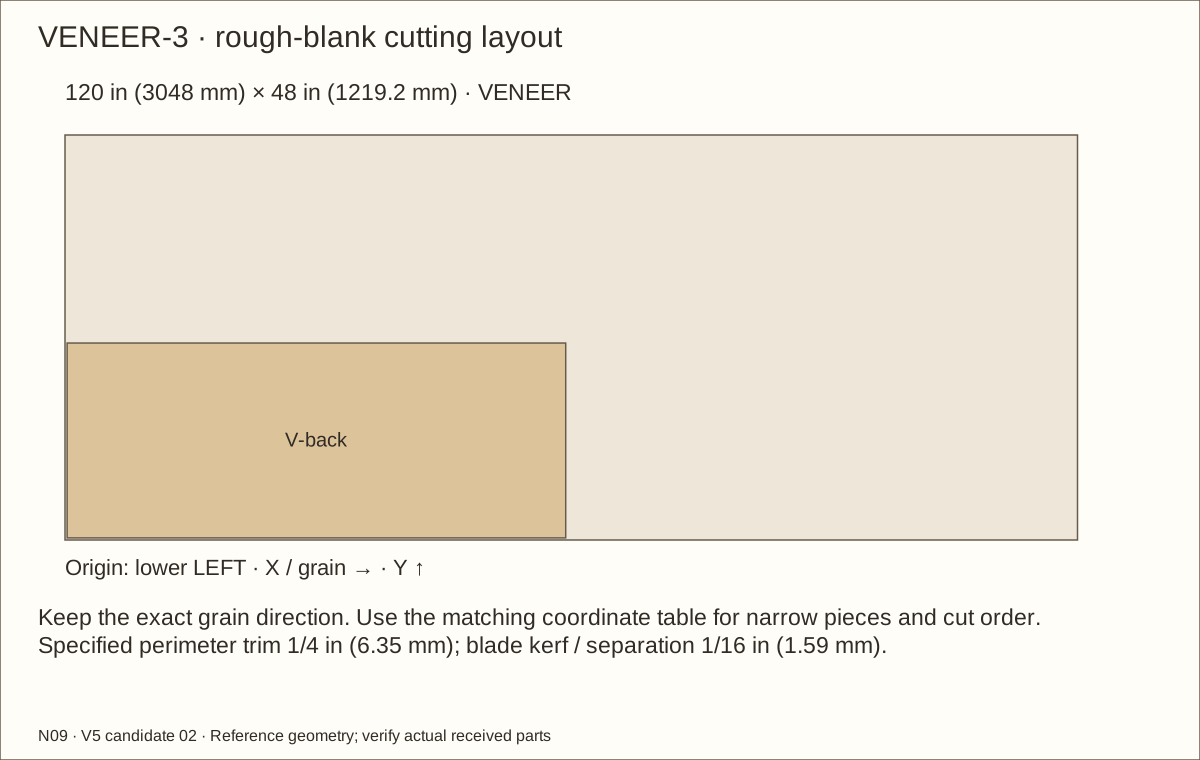
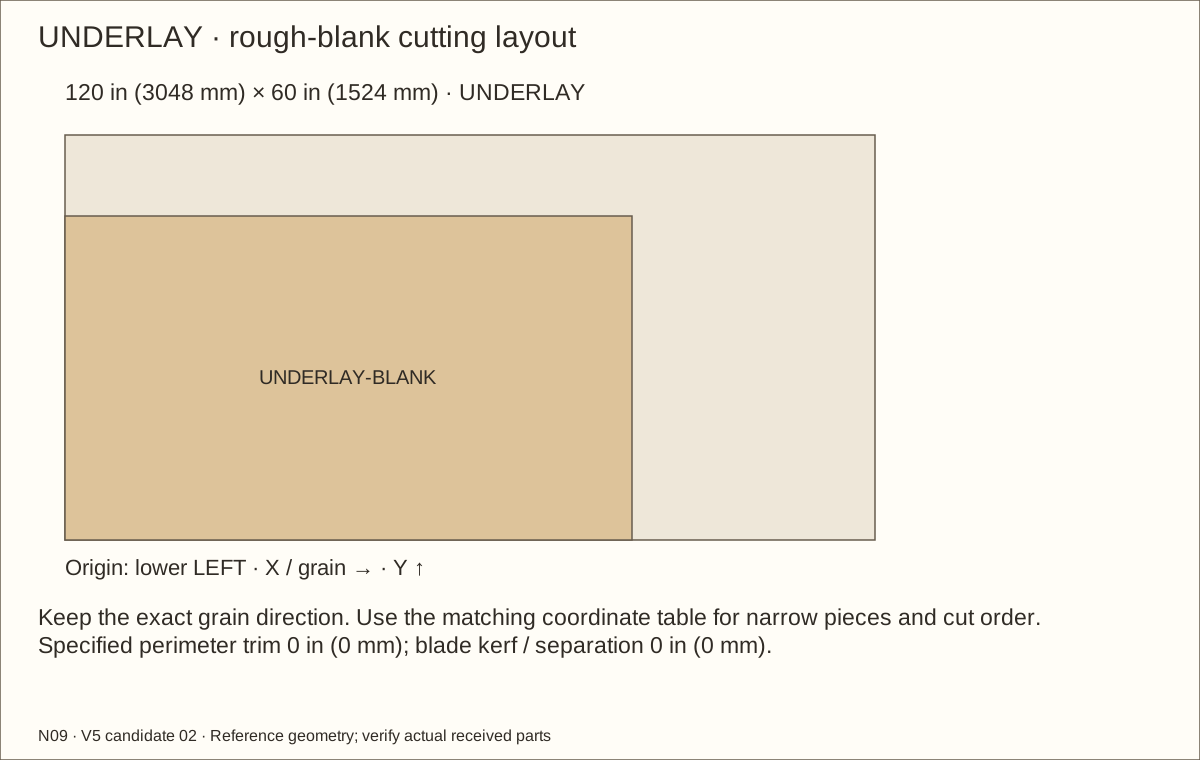
Choose one species and follow its three 120 in (3048 mm) × 48 in (1219.2 mm) sheet layouts. Cut each labeled rough blank on a sacrificial board with a straightedge and several shallow knife passes. The plan reserves 1/4 in (6.35 mm) sheet-edge trim, 1/16 in (1.59 mm) separation and 1/2 in (12.7 mm) extra in each blank dimension.
Mark roof and floor grain across the 60 in (1524 mm) width. Keep side grain upright, front uprights vertical and rails widthwise. Match each roof front/back edge strip to the adjacent face. Do not rotate a long blank simply to make it fit.
Keep each removable panel separate. Mask actual fastener heads, washers, sockets and metal seats as shown. Veneer cannot cover a service screw or bridge a removable joint.
Check before continuing: Every piece has its parent ID and grain arrow; masks and service seams remain identifiable.
Tools / setup: Tape, square and labels; supported cutting tool suited to this material, helper and padded glass supports, sharp knife, straightedge and firm scraper
Cover exposed edges and opening reveals first
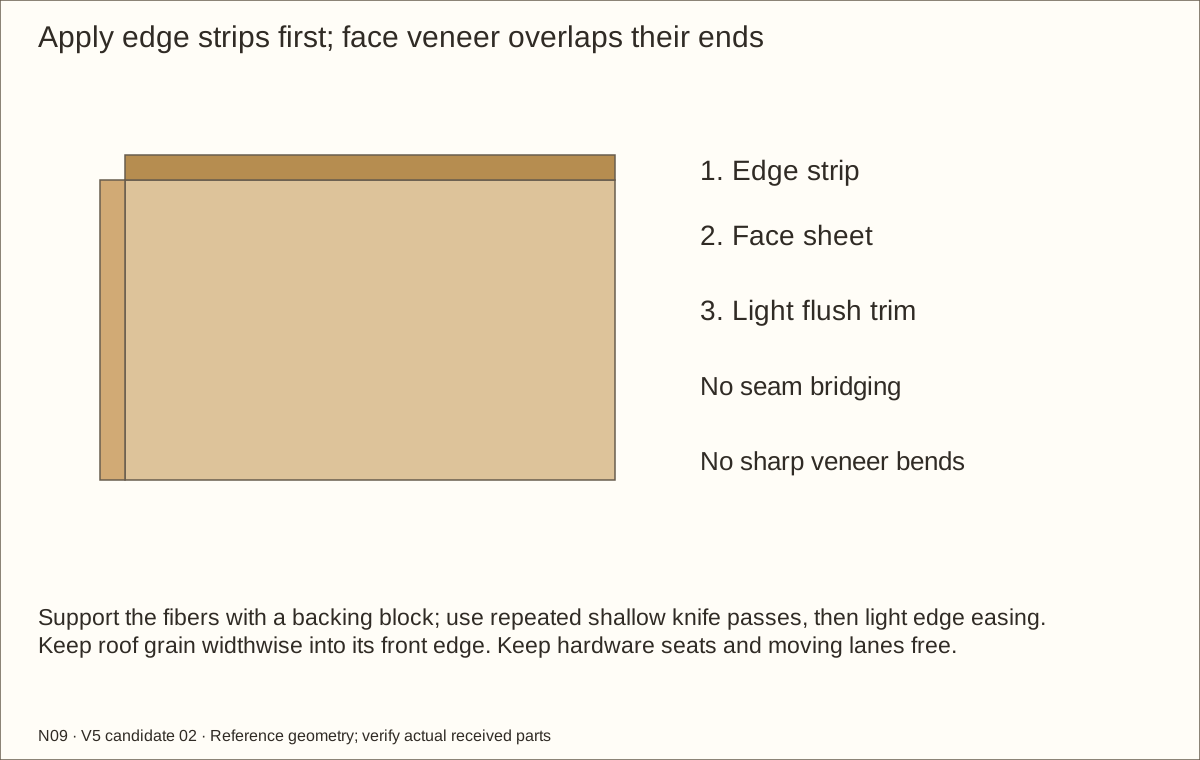
Apply the labeled edge strips to the floor, roof, panel ends, vent reveals and external capture-strip edges. Peel only enough liner to align the piece, then work along it with the supplier-specified firm scraper pressure.
Trim with repeated shallow cuts backed by a sacrificial surface. Support the thin wood fibers; finish with only the light edge easing allowed by the veneer supplier. Do not round the joint datums or sand through the thin decorative face.
At the sliding opening, retain the original bare track/bond footprints. Trim the neighboring strips outside the actual swept glass, shoe, wheel and lock path, with at least 1/16 in (1.59 mm) lateral clearance. Metal bearing planes must remain on the original core, not on veneer.
Check before continuing: Edges are covered in the chosen species; moving lanes, metal seats, screw heads and removable joints stay accessible.
Tools / setup: Tape, square and labels; sharp knife, straightedge and firm scraper, compatible applicator and prescribed protection
Apply the matching exterior face veneers
Apply each large face to its own panel with the accepted sample method. Use a helper for the five-foot roof and floor. Work from the center outward along the grain with the specified firm scraper; a light roller alone does not satisfy the Oakwood instructions.
Cover the roof, underside, walls, front frame, retainer and exposed faces of the side screen retainers. Follow the masks around metal seats and fasteners. Trim face veneers flush to the previously covered edges, keeping the roof grain visually continuous into its front and rear edge strips.
Leave all seams at removable panel joints open. Inspect for raised edges, bubbles, cracks and trapped debris. Record the application time and complete the actual confirmed adhesive dwell before trimming repairs or topcoating.
Check before continuing: All exterior wood and visible edges match; no layer hides a fastener or covers a required metal seat.
Required wait: Supplier-confirmed PSA dwell from the accepted sample and written instructions; the value remains a receiving input.
Check the can is Varathane Triple Thick clear satin water-based polyurethane, manufacturer 284473. The selected Lowe’s pack contains two quart cans. Stir; do not shake. Follow the received label and use a quality synthetic-bristle brush.
Apply one uniform coat to the exposed wood faces, all edges and opening reveals. The manufacturer’s application range is 60–90°F (16–32°C) below 85% relative humidity (RH). Ventilate the work area and use the label’s protective equipment.
Check before continuing: The selected compatible coat covers the intended faces, edges and reveals; leave the parts supported and ventilated for full cure.
Required wait: Begin the full-cure record in the next operation.
Record the time and conditions of the final applied coat. Full cure is seven days at 70°F (21°C) and 50% relative humidity (RH) with ventilation; adverse conditions need longer under the manufacturer’s directions. Two-hour recoat and 48-hour light-use times are not full cure.
If repair coverage is needed, follow the 220-grit intercoat preparation and recoat instructions; add its coat area to the quantity record and restart the final-coat cure clock. Inspect the dry film for missed end grain, runs, tackiness and damage.
This coating protects an ordinary indoor wood shell. The separate liner takes the damp bed; do not rely on polyurethane or wood glue as an immersed joint seal.
Check before continuing: The recorded full-cure period has passed under suitable conditions and every coated surface is intact.
Required wait: Full cure: seven days at 70°F (21°C), 50% relative humidity (RH); longer when required
Parts: STOPLF/STOPLB/STOPRF/STOPRB; accepted DAP 00271; received vertical jambs
Tools / setup: Small brush, masking, nonmetal pressing tool with supported jamb, caliper and prescribed protection
Before you begin: Do not install the eight former cushion screws. Obtain product and substrate acceptance before bonding.
Bond the four accepted jamb cushions
After H09 acceptance, work with the jambs on a supported bench before their final installation. Follow the current DAP label and safety sheet; ventilate, remove ignition sources, protect eyes and skin, and isolate the liner, glass and finished wood from solvent.
Keep materials above 65°F (18°C) for 24 hours before and after application. Prepare clean, dry mating faces as accepted in the sample. Brush a uniform film on both surfaces; wait about 15–20 minutes until tacky, then align once and press evenly at 25 pounds per square inch (172 kPa). Do not shift a bonded strip.
Reserve seven days for maximum strength before glass measurements and use. Confirm no loose edges or hard beads. Record actual cured film thickness; 0.003 in (0.08 mm) is only the digital reference. These strips cushion gentle closing; they are not structural door stops.
Check before continuing: Both lanes have continuous soft contact and the cured sample and full bond pass H09.
Required wait: Seven days before final glass sizing or operation; follow longer requirements on the actual label.
49. Reassemble and fasten the accepted track system
Parts: D602 lower track; D603 upper track and jambs; D610 shoes; D652 guides; four STOP cushions; GL/GR field-order worksheet
Tools / setup: Caliper, tape, square, hand driver, clamps, masking and field-order worksheet
Before you begin: Reference glass dimensions are not a blind ordering instruction.
Reassemble and fasten the accepted track system
After the separately accepted cushion bonds are fully cured, reassemble the labelled shell, posts, four bolt stacks, front frame, recessed screen captures and mechanically fastened tracks into their predrilled, sealed and cured holes. Recheck the recessed interior locknuts before fitting the liner; do not crush the bearing wood. Do not introduce fresh wood holes without resealing and repeating cure.
Check the support surface, diagonals, header straightness and the complete sample-panel motion again. The cured finish reduces clearances, so measure the finished assembly before ordering glass.
Check before continuing: The frame is square, tracks mechanically secure and cushions fully cured before field glass measurements.
Parts: D602 lower track; D603 upper track and jambs; D610 shoes; D652 guides; four STOP cushions; GL/GR field-order worksheet
Tools / setup: Caliper, tape, square, hand driver, clamps, masking and field-order worksheet
Before you begin: Do not order from the reference dimensions. Manufacturer acceptance and a glass-fabricator review are required.
Measure and release the glass order
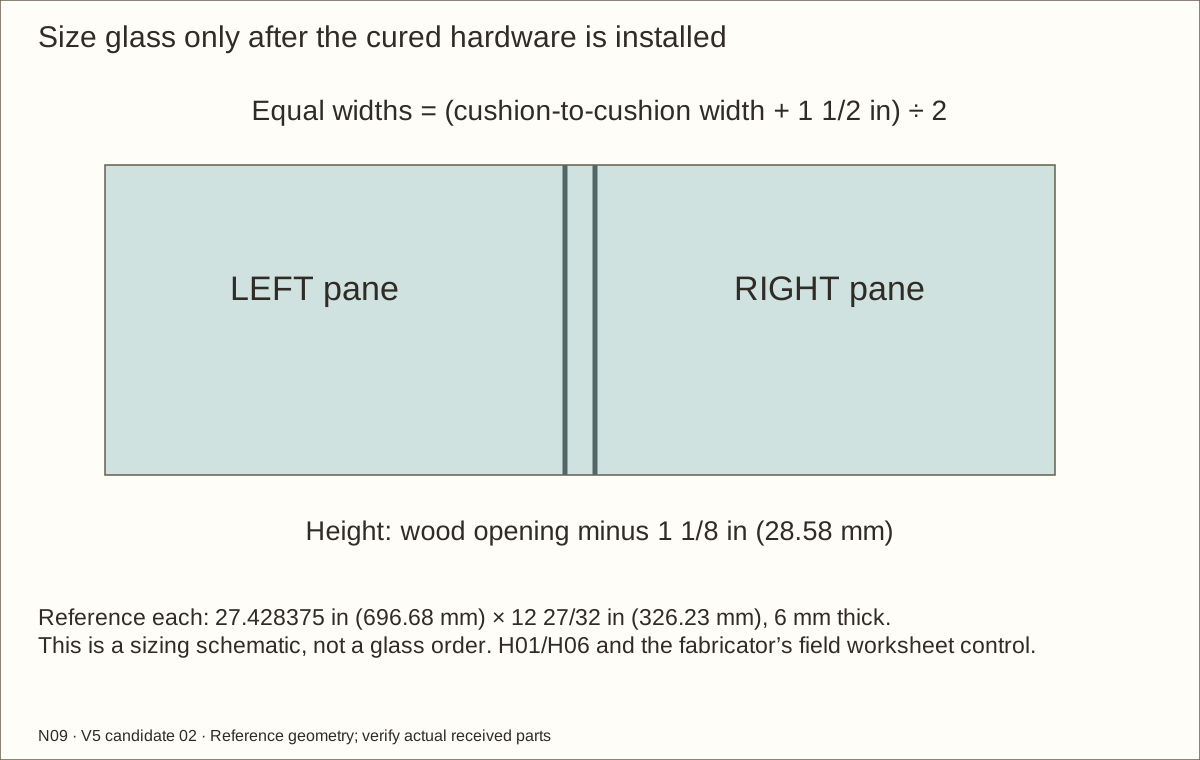
Measure between the cured cushion closing faces and from the bare retaining top to the header underside. Give the fabricator the accepted received track/shoe/vinyl/guide samples and completed field worksheet. The starting width is (measured cushion-to-cushion width + 1 1/2 in (38.1 mm) overlap) divided by two. The starting height is opening height minus 1 1/8 in (28.58 mm). The fabricator must approve both deductions, edgework and tolerances from the actual assembly.
Planning reference only: each pane is 27.428375 in (696.68 mm) wide × 12 27/32 in (326.23 mm) high × 0.23622047 in (6 mm), approximately 7.52 lb (3.41 kg). These are NOT order sizes. Order monolithic tempered panes with fabricator-approved polished edges and tolerances. Complete all fabrication before tempering; never drill, cut or grind tempered glass.
Document both finished cuts in the fitting worksheet and update any changed cut/model dimensions before construction acceptance. Each reference pane is 2.45 sq ft (0.23 m²). CRL’s complete-system maximum suggested panel size is 36 in (914.4 mm) × 48 in (1219.2 mm). Its D649 guidance permits four rollers on larger panels up to 15 sq ft (1.39 m²); use four per leaf here, while keeping the smaller complete-system size limit. Neither statement supplies a numeric mass rating.
Check before continuing: The final measured opening, exact profiles and supplier-confirmed glass cuts are recorded; the panes are within the kit’s stated size guidance.
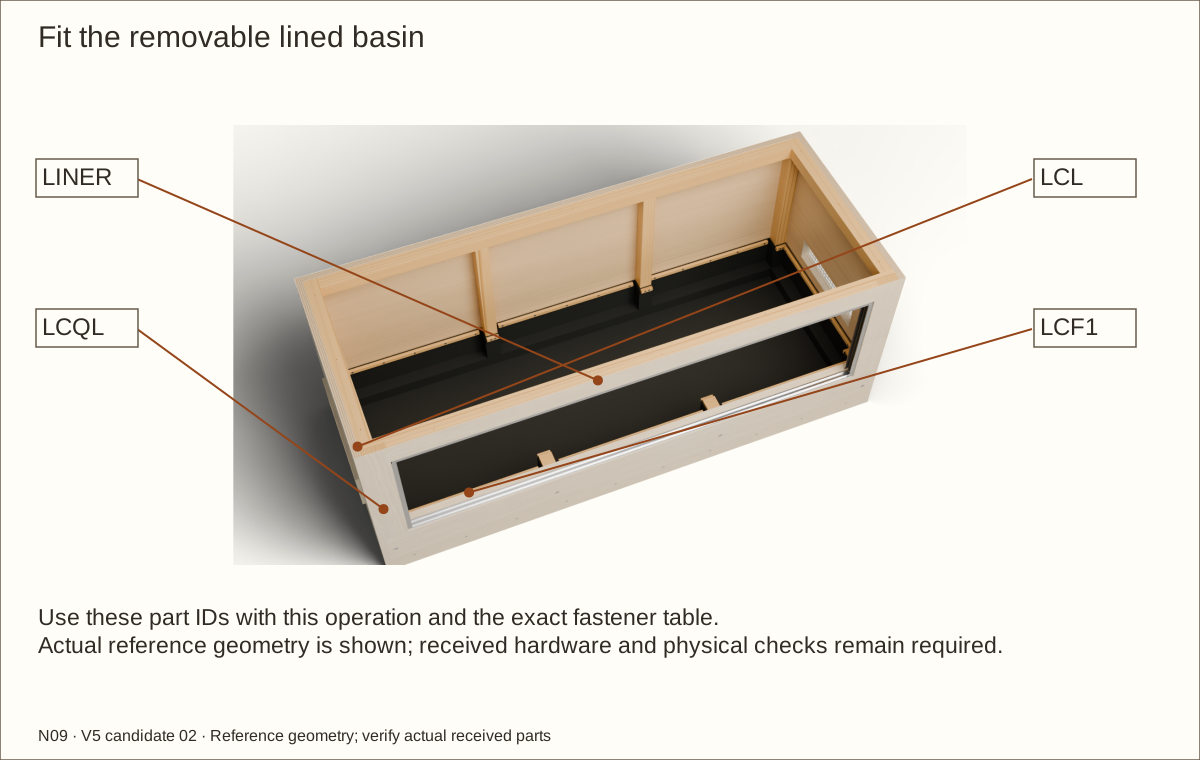
Parts: LINER uncut basin; underlay; sixteen LC clamps around sides, front, rear and eight posts.
Tools / setup: Soft brush, vacuum, liner blank, underlay pads and driver with a slender extension
Fit the removable lined basin
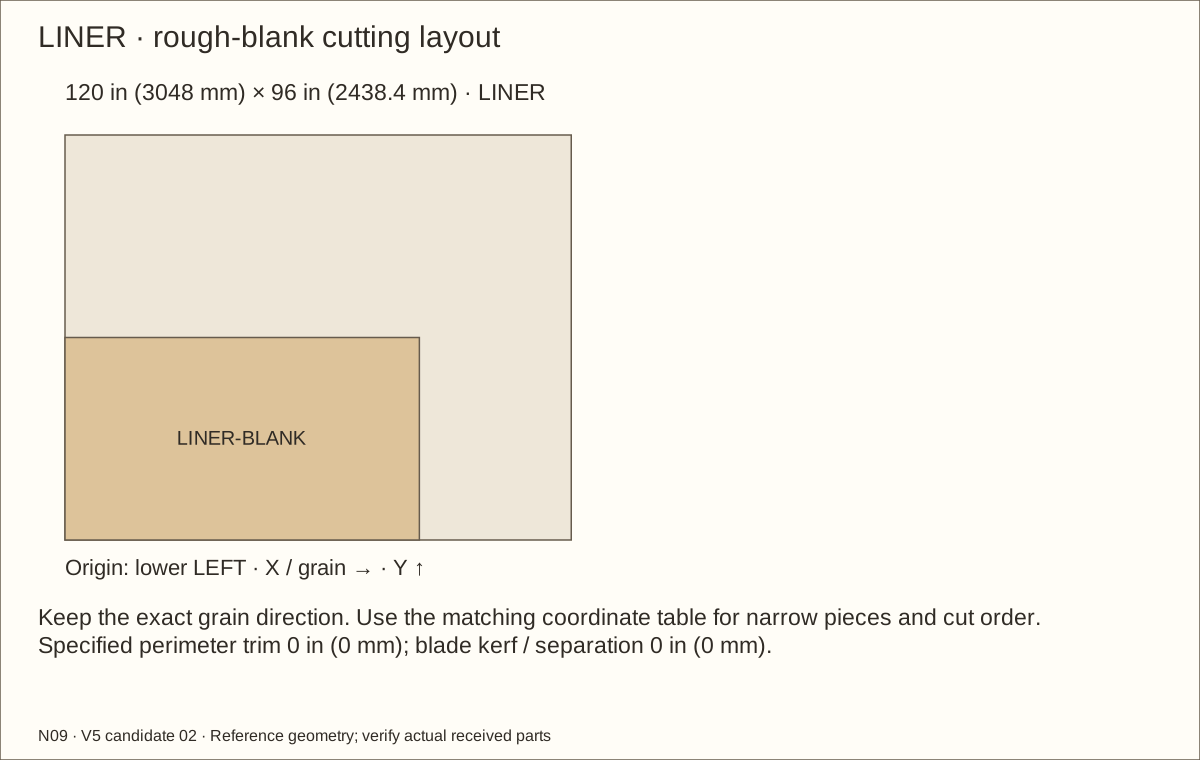
With the doors and roof off, cut one 84 in (2133.6 mm) × 48 in (1219.2 mm) underlay blank and one matching EPDM blank. Dry-fold the full blank before any trimming; retain enough surplus for every post fold. If the received stack needs more slack, use a larger uncut blank from the purchased stock. Clean the floor, double-pad the recessed washers and nuts, cover all eased wood supports and let the liner settle with slack into the central floor and up over the wood support shelves. Measure the local intrusion of doubled pads and corner folds; deduct any excess beyond the reference lining allowance from the usable rectangle. Never stretch the membrane tightly over a head to recover space.
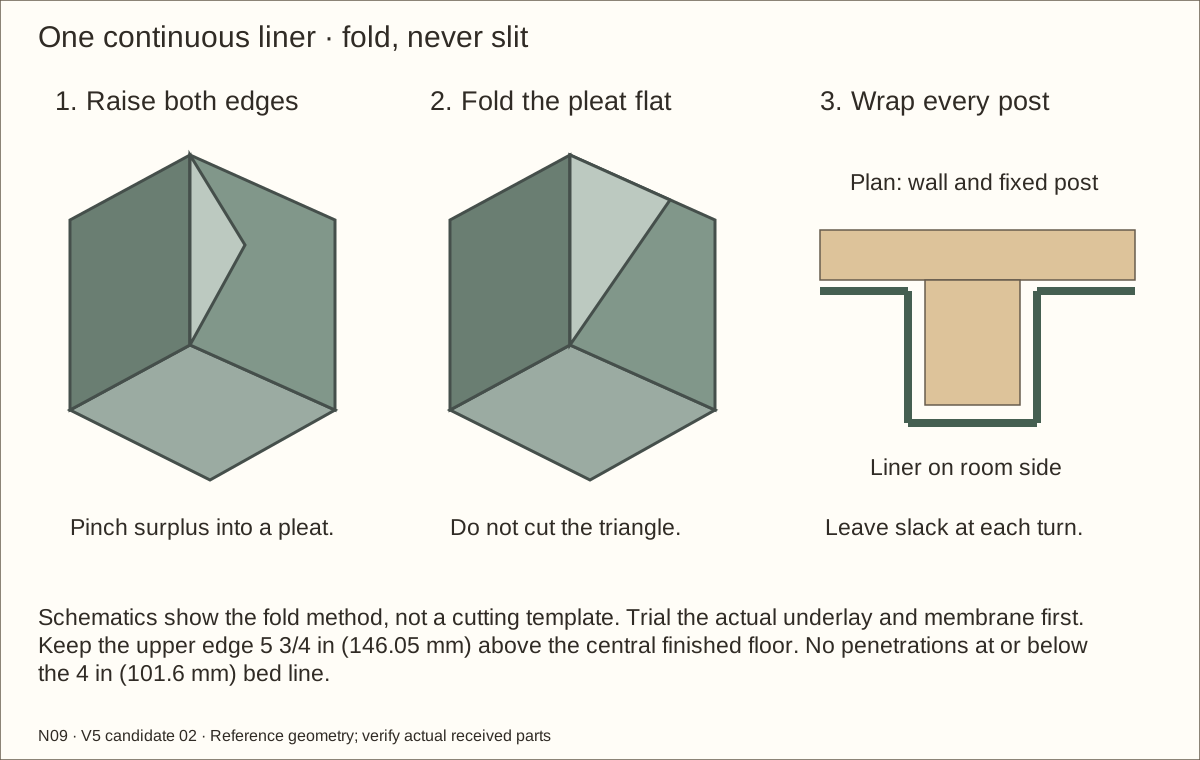
At each corner, raise both liner edges, pinch surplus into an upright triangular pleat and fold it flat against the wall. This is an uncut hospital corner. Leave slack around the supports. Wrap all four front posts and four rear uprights on their room-facing surfaces; never slit corners or route membrane through a post.
Recheck the finished central floor reference mark with a straightedge and depth gauge. Mark the 4 in (101.6 mm) maximum total bed on the lining. Bring the liner edge to 5 3/4 in (146.05 mm) above that floor, leaving it below the retaining top and clear of the door track.
Check before continuing: The liner is uncut below its upper edge, the bed mark is measured from its floor, and the shell remains dry.
Parts: LINER uncut basin; underlay; sixteen LC clamps around sides, front, rear and eight posts.
Tools / setup: Soft brush, vacuum, liner blank, underlay pads and driver with a slender extension
Fit the removable lined basin · continue
Fit sixteen rounded clamps using their predrilled, sealed, fully cured holes: two side strips, three front, three rear and eight post-face strips. Screw centres are 5 3/8 in (136.53 mm) above finished floor, centred across each 1/2 in (12.7 mm) strip. Pierce membrane only through these above-fill holes, then use the stopped receiver pilots and #6 × 1 in (25.4 mm) screws. Fit post-face clamps first and LCL/LCR side clamps last so the driver can reach corner screws. Remove LCL/LCR first for service. Any fresh wood cut requires reseal and full recure.
Before adding substrate, wet-test with 1 in (25.4 mm) of water on the fully supported base for 24 hours. Inspect the outside and accessible underside. Siphon or wet-vacuum it out; dry and investigate any dampness. This is a shallow liner check, not a pressure-vessel test or permission to use the box as an aquarium.
Check before continuing: The liner is uncut below its upper edge, the bed mark is measured from its floor, and the shell remains dry.
Required wait: Inspect a 24-hour shallow water test before filling
Tools / setup: Helper, padded glass supports, caliper, fitting hand tools and labeled received hardware
Glaze, roll and seat the two door leaves
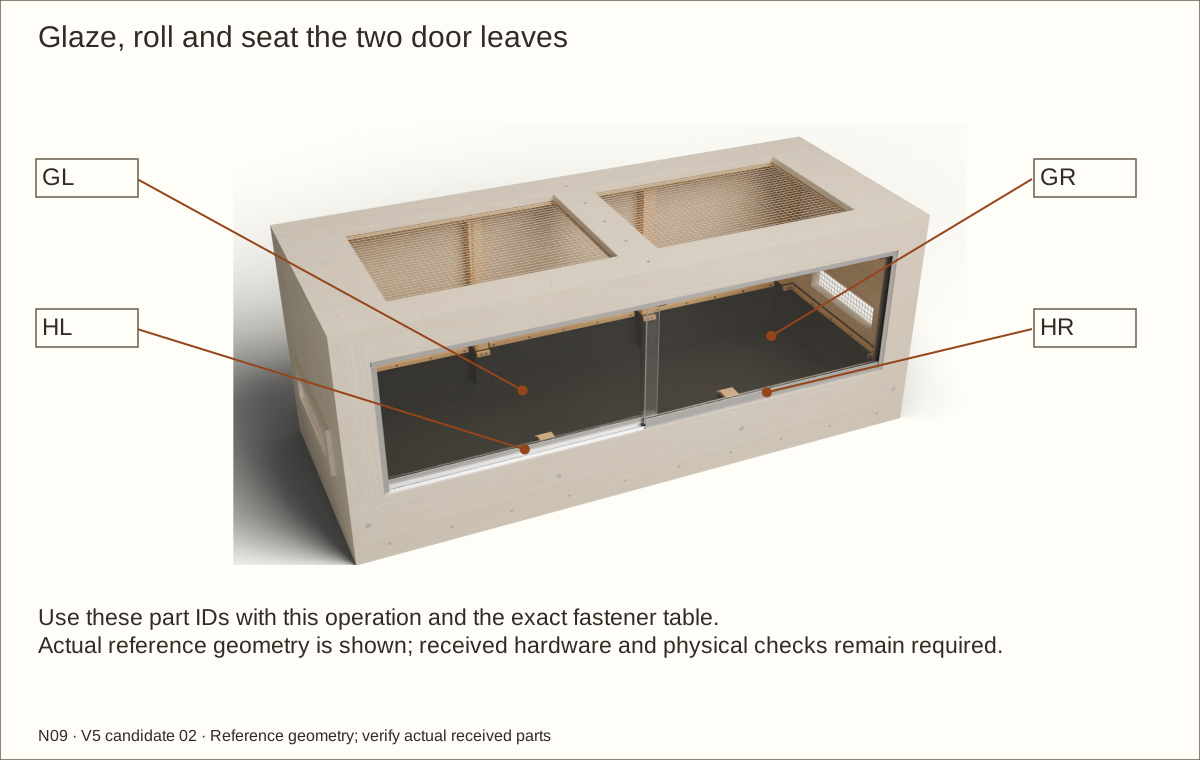
Inspect both panes for chips, cracks and damaged edges. Use a helper and a padded clean bench. Fit the supplier-confirmed dry glazing vinyl and glass to each D610 shoe with the supplied procedure. Do not assume the unresolved GC728C listing accepts this glass thickness.
Install four D649 wheels per shoe at the scheduled reference stations, corrected by the accepted received gauge trial. The outer wheel centres are 1 1/2 in (38.1 mm) from each pane end; the two inner centres use the exact listed stations, retained within each shoe. Use the supplied insertion tool and confirm all four wheels seat firmly and share the rail. Fit two D652 top guides per pane. This candidate uses no cosmetic end caps: fully deburr the shoe ends and prove snag-free clearance and wheel retention before glazing.
Insert the left closing leaf into the rear upper channel first, lift it, bring the roller shoe over the corresponding lower rail and lower gently. Install the right closing leaf in the front lane in the same way. Do not let the pane twist.
Check before continuing: Both doors roll without binding and remain seated throughout their travel; there is no glass-edge damage.
Tools / setup: Helper, padded glass supports, caliper, fitting hand tools and labeled received hardware
Glaze, roll and seat the two door leaves · continue
Move each leaf through its entire path and check the 1 1/2 in (38.1 mm) closed overlap. Inspect the guide engagement at both ends and the middle. The panes must not rub one another, a mounting head or a wood edge.
Check before continuing: Both doors roll without binding and remain seated throughout their travel; there is no glass-edge damage.
Tools / setup: Helper, padded glass supports, caliper, fitting hand tools and labeled received hardware
Fit the removable anti-lift inserts and jamb cushions
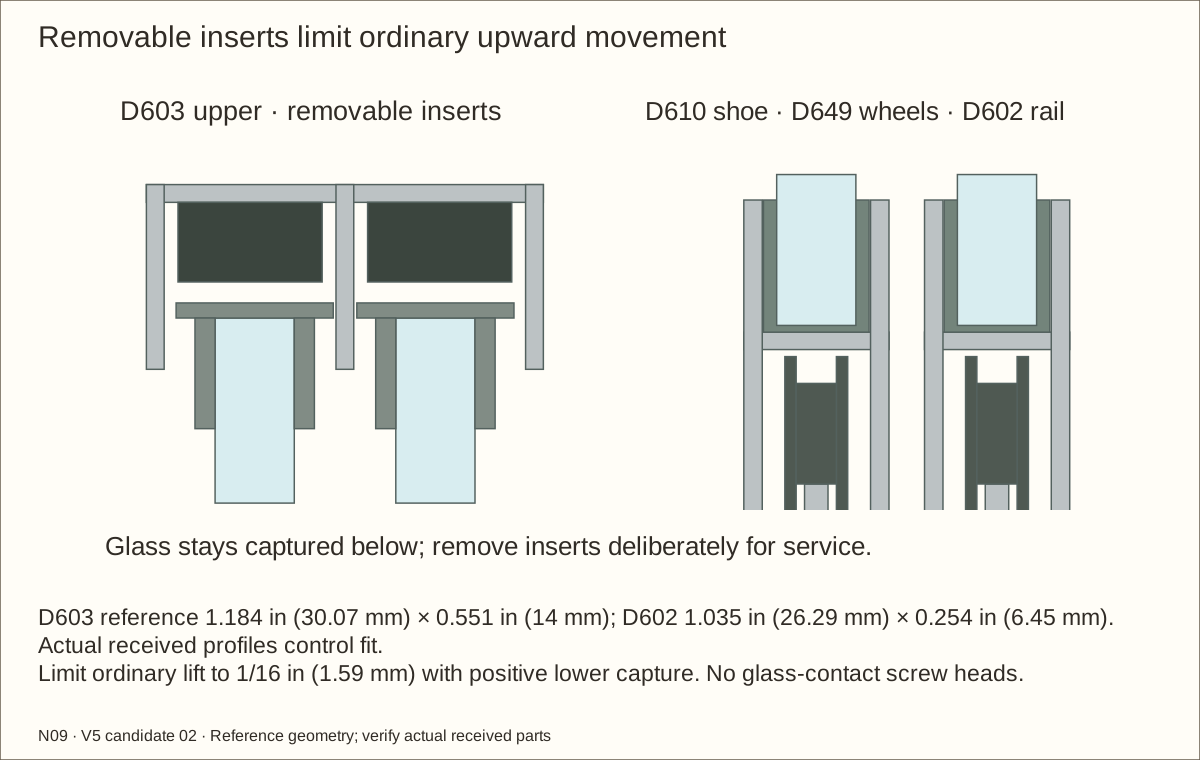
Use the six labelled HDPE inserts accepted during the pre-finish trial. Reference pieces are 17.78758333 in (451.8 mm) long × 0.43 in (10.92 mm) wide × 0.2375 in (6.03 mm) high, three per lane. Actual seated guides and tracks control the final height. Allow at most 1/16 in (1.59 mm) upward play while preserving positive lower engagement.
Use three short strips to cover each lane continuously, with close butt joints at the thirds and no position where a guide can rise into a large gap. Keep their edges smooth and clear of the running faces.
Support the glass and fit the labelled inserts through their predrilled clearance holes into sealed, fully cured header pilots. Keep heads below the guide path. If any hole or strip needs a new cut, remove the panes, correct the work, reseal exposed wood and repeat full cure before reglazing.
Check before continuing: Neither pane can be lifted off its rail in any operating position; both remain removable after the inserts are unscrewed.
Tools / setup: Helper, padded glass supports, caliper, fitting hand tools and labeled received hardware
Fit the removable anti-lift inserts and jamb cushions · continue
Inspect all four bond-retained cushions. No cushion screw or hard adhesive bead may enter a moving path. Reject loose edges, creep or metal contact with glass; repair the accepted bond and repeat its complete cure and closing trial.
At both ends and the middle of travel, gently lift each pane. It must remain positively engaged on the lower rail, with the top guide retained. Remove the inserts to demonstrate safe service removal, then reinstall them. If the pane can clear its lower rail with the inserts fitted, correct the profile fit before proceeding.
Check before continuing: Neither pane can be lifted off its rail in any operating position; both remain removable after the inserts are unscrewed.
Tools / setup: Helper, padded glass supports, caliper, fitting hand tools and labeled received hardware
Fit the lock and finger pulls
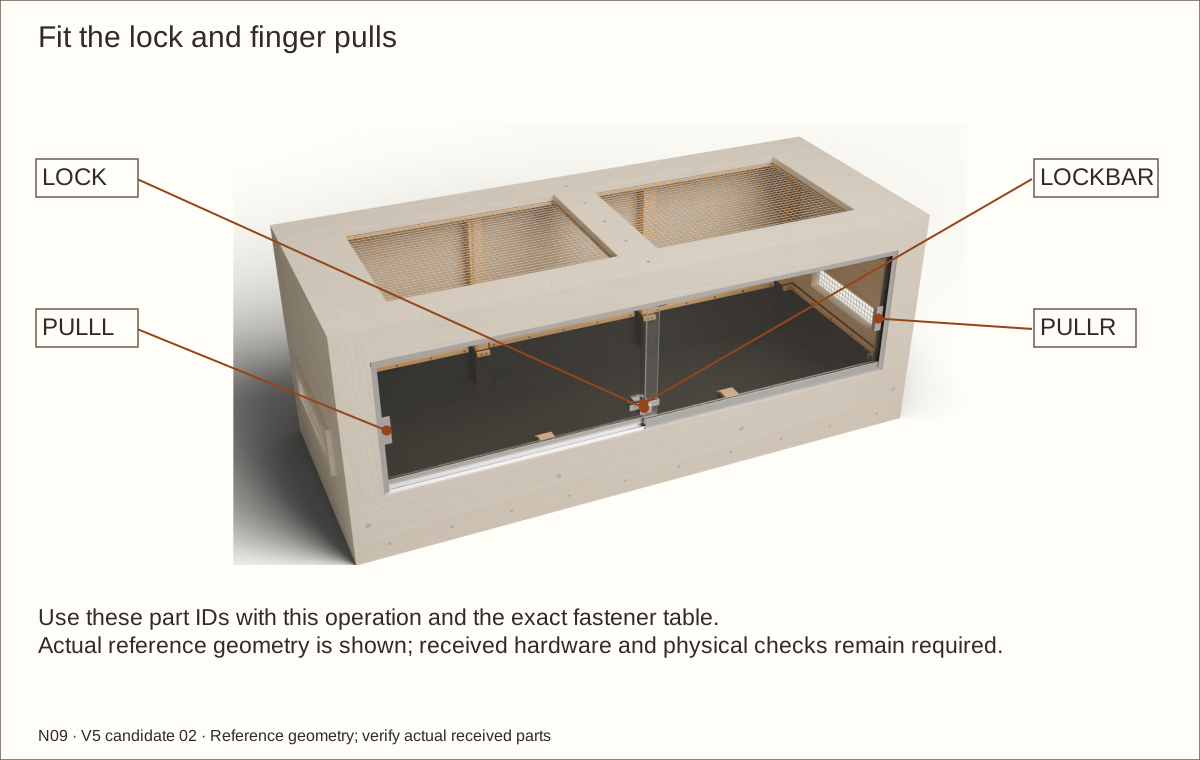
Close both doors on their cushioned jamb stops. Fit the 963L ratchet bar to the rear leaf and its anti-spread housing across the overlap following the supplied orientation. Protect the polished edge; no improvised metal packing may touch glass.
Adjust the ratchet to secure both leaves without forcing or bowing them. With the key removed, gently test each door separately for sliding, spreading and lifting. The anti-lift inserts remain installed independently of the lock.
Clean the pull locations using the pull maker’s instructions. Place each FP86 near its closing edge, away from the lock and shoe, and confirm the complete bypass path before bonding. Follow the adhesive preparation and dwell time on the received product.
Check before continuing: The lock holds both closed leaves and releases predictably; pulls do not collide and service access is documented.
Tools / setup: Helper, padded glass supports, caliper, fitting hand tools and labeled received hardware
Fit the lock and finger pulls · continue
Remove the lock body before sliding. Reference clear one-leaf access is 25.367875 in (644.34 mm); actual jamb noses, guides and lock clip control the available height and width. Measure with all fittings in place. The rear-leaf clip must meet its soft cushion before metal touches the jamb. Plan at least 24 in (609.6 mm) width for equipment access; larger items require both panes or roof removal.
Check before continuing: The lock holds both closed leaves and releases predictably; pulls do not collide and service access is documented.
Tools / setup: Helper, padded roof supports and hand driver for the labeled roof screws
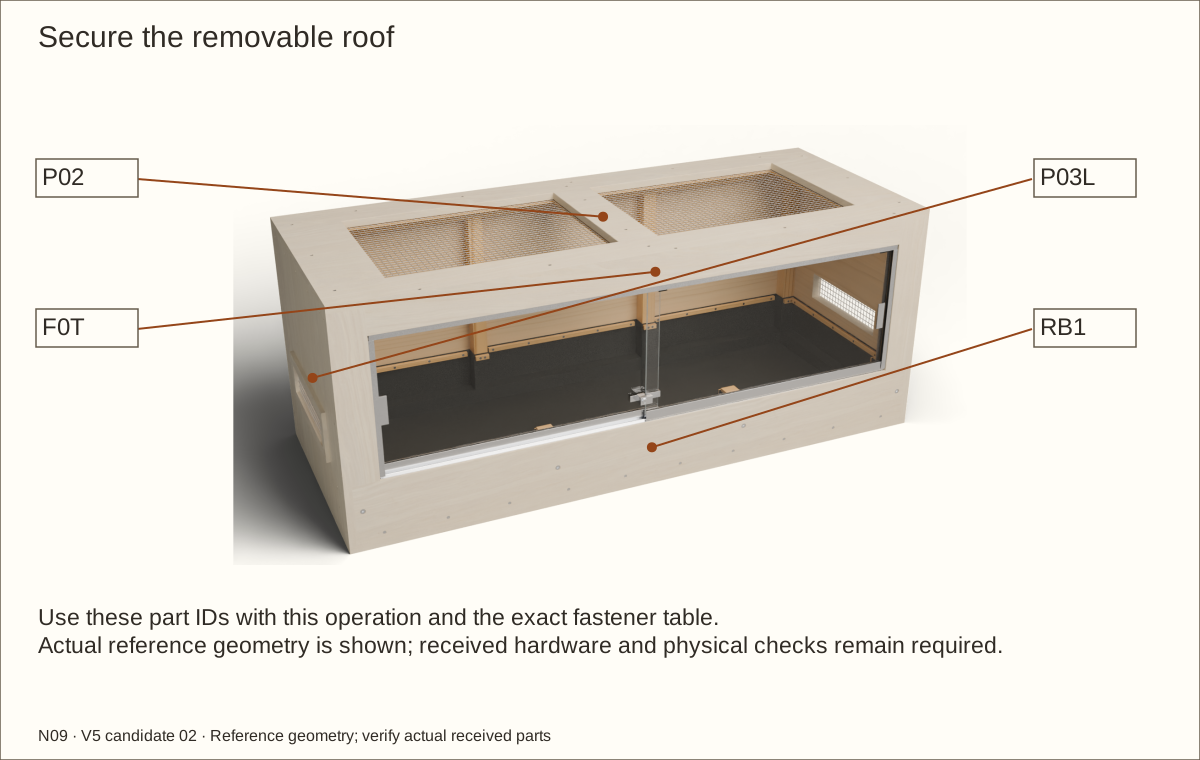
Secure the removable roof
Check that mesh, liner clamps and track hardware are complete before setting the roof down. Seat it without trapping the liner, glass guides or future cables.
Use the predrilled, sealed and cured roof stations: three per side support, five across the front header and five across the rear upper support. The front row alternates Y = 3/8 in (9.53 mm) and 1 1/8 in (28.58 mm) behind the core FRONT datum, centred in the two solid frame layers. Do not drill new holes after cure; a correction requires reseal and full recure.
Fit #8 × 1 1/4 in (31.75 mm) screws, tightening evenly by hand. Do not glue the roof and do not use the mesh as a handle. Check the doors again with the roof secured.
Check before continuing: The roof cannot shift or lift unintentionally, and both doors still operate without binding.
Tools / setup: Helper, padded roof supports and hand driver for the labeled roof screws
Secure the removable roof · continue
Keep the roof screw locations accessible in the final equipment arrangement. Remove equipment and disconnect power before roof service; support equipment independently of the screen.
Check before continuing: The roof cannot shift or lift unintentionally, and both doors still operate without binding.
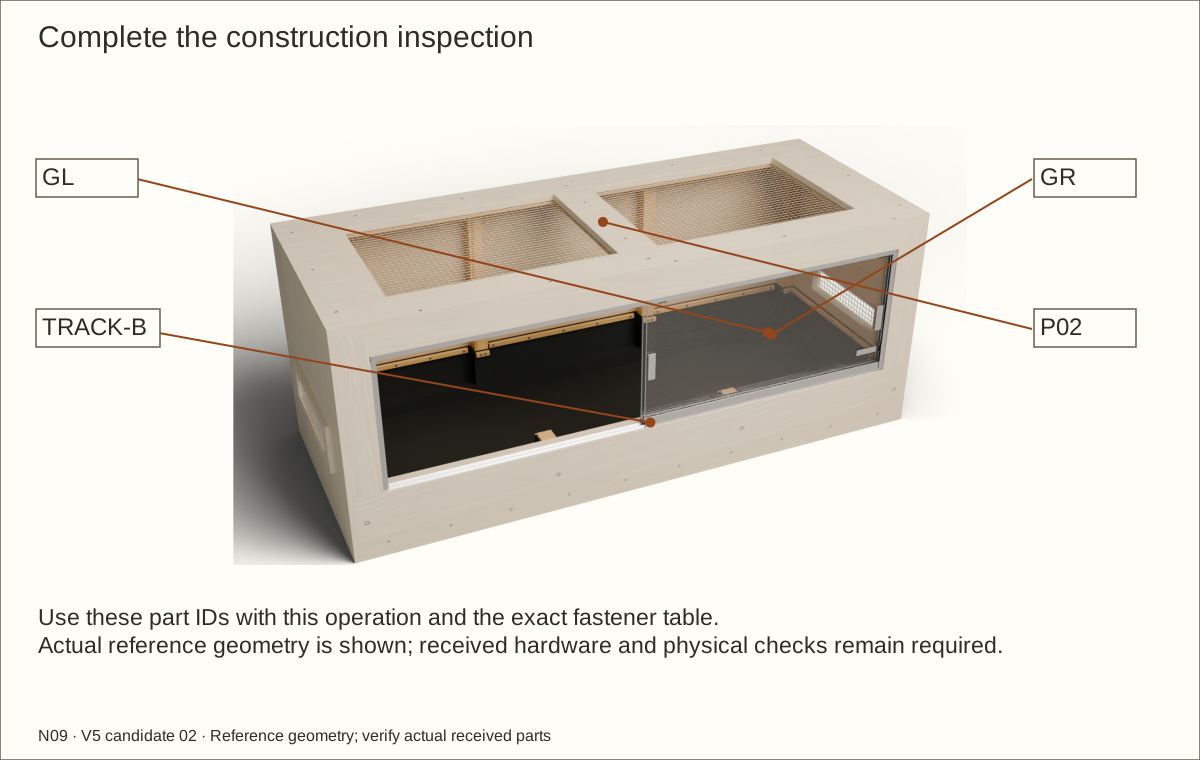
Parts: Complete empty enclosure, fitted glass GL/GR, anti-lift inserts, lock, roof and four screened openings
Tools / setup: Inspection record, tape, scale and actual equipment needed for the stated trial; helper for service
Complete the construction inspection
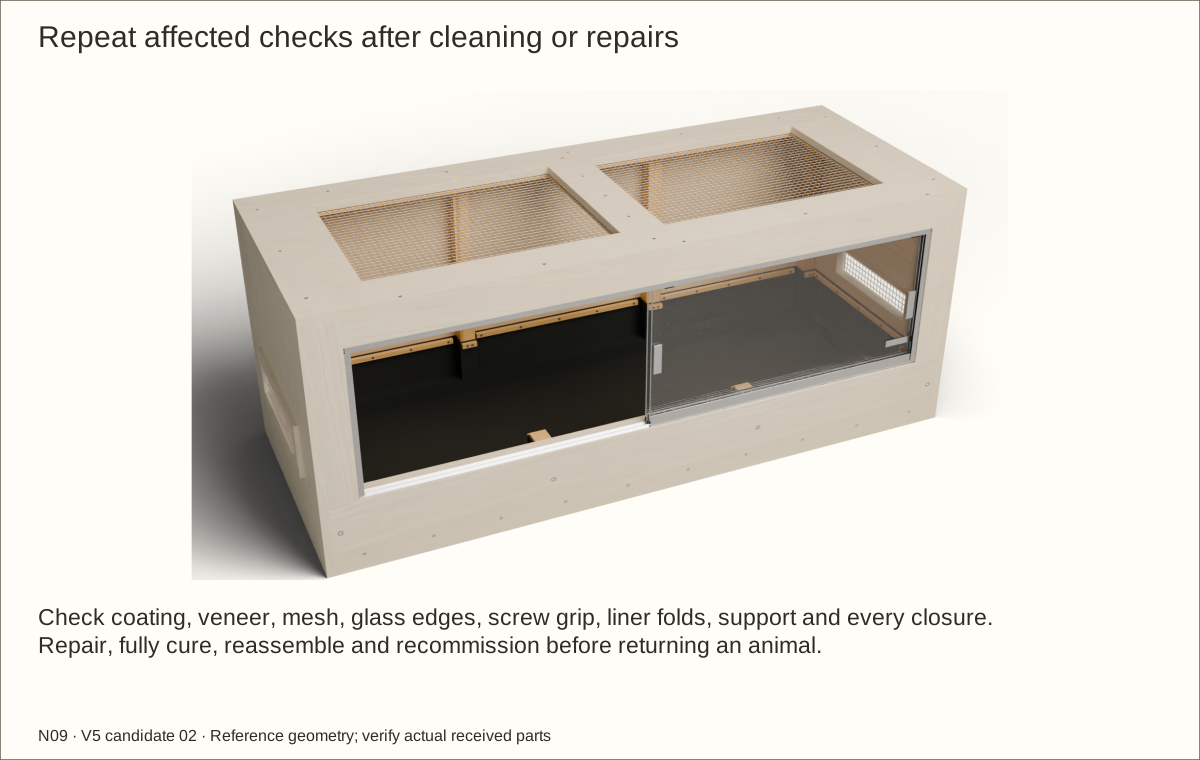
Check every screw against the station schedule, all four retainer bolt stacks and their full nut engagement, every mesh capture, all glass edges, the full perimeter of the roof, both lock positions and each anti-lift insert. Repair splits, burrs, loose fittings and stripped receivers.
Measure the closed gaps at the jambs, between the glass leaves, below the shoes, around the roof and at the mesh. Record actual values; the construction clearances alone do not establish containment for an animal or feeder.
Verify the cured finish and dry shell after the liner test. Check that no below-fill screw or cable has penetrated the basin and that the removable liner clamps are accessible.
Check before continuing: The completed construction record has no unresolved defect. Animal and equipment commissioning remains a separate step.
62. Complete the construction inspection · continue
Parts: Complete empty enclosure, fitted glass GL/GR, anti-lift inserts, lock, roof and four screened openings
Tools / setup: Inspection record, tape, scale and actual equipment needed for the stated trial; helper for service
Complete the construction inspection · continue
Rehearse removing and reinstalling the lock, anti-lift inserts, both panes and roof with the enclosure empty. Confirm that the cleaning tools can reach the rear corners and that the full bed can be removed without tipping the box.
Check before continuing: The completed construction record has no unresolved defect. Animal and equipment commissioning remains a separate step.
Tools / setup: Inspection record, tape, scale and actual equipment needed for the stated trial; helper for service
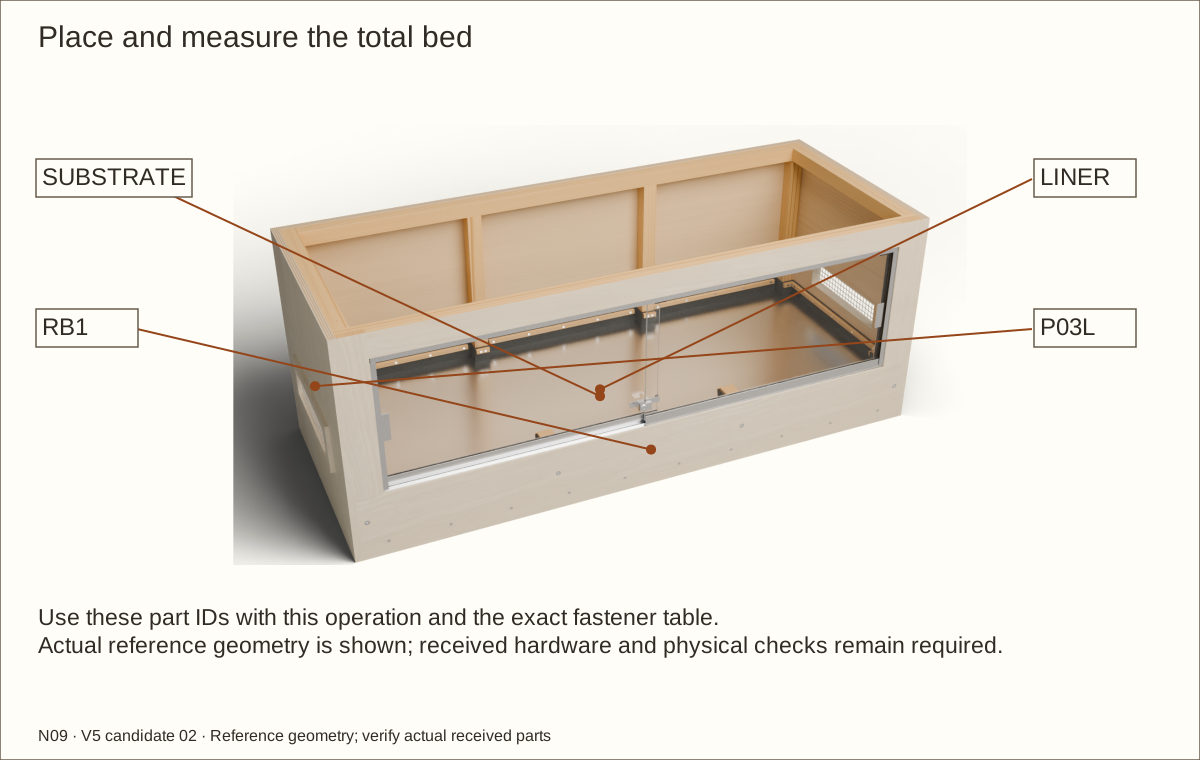
Place and measure the total bed
Place the enclosure permanently on its qualified full-footprint support before filling. Add smooth protective pads under hard decorations, spreading their loads without puncturing the liner. Do not place a sharp rock directly on the membrane.
Measure the entire bed from the finished central liner floor. A drainage layer, separator and substrate all count toward 4 in (101.6 mm); for example, 1 in (25.4 mm) drainage leaves at most 3 in (76.2 mm) for the remaining layers.
The uninterrupted reference floor rectangle between lined supports is 55 11/32 in (1405.73 mm) × 17 15/16 in (455.61 mm), about 6.894 square feet (0.6405 square metres). Above the 4 in (101.6 mm) bed, reference clear height beneath upper supports is 16 31/32 in (431.01 mm). Deduct actual lining folds, pads, equipment and furnishings.
Check before continuing: The total bed stays at or below its line, with 2 in (50.8 mm) retaining-wall freeboard and documented remaining usable space.
Tools / setup: Inspection record, tape, scale and actual equipment needed for the stated trial; helper for service
Place and measure the total bed · continue
Weigh the delivered damp mix and record the total installed load. Check support deflection, doors and liner after filling; remove the bed if anything shifts or binds. The density scenarios are planning arithmetic, not a structural rating.
Check before continuing: The total bed stays at or below its line, with 2 in (50.8 mm) retaining-wall freeboard and documented remaining usable space.
65. Commission the actual habitat before animal entry
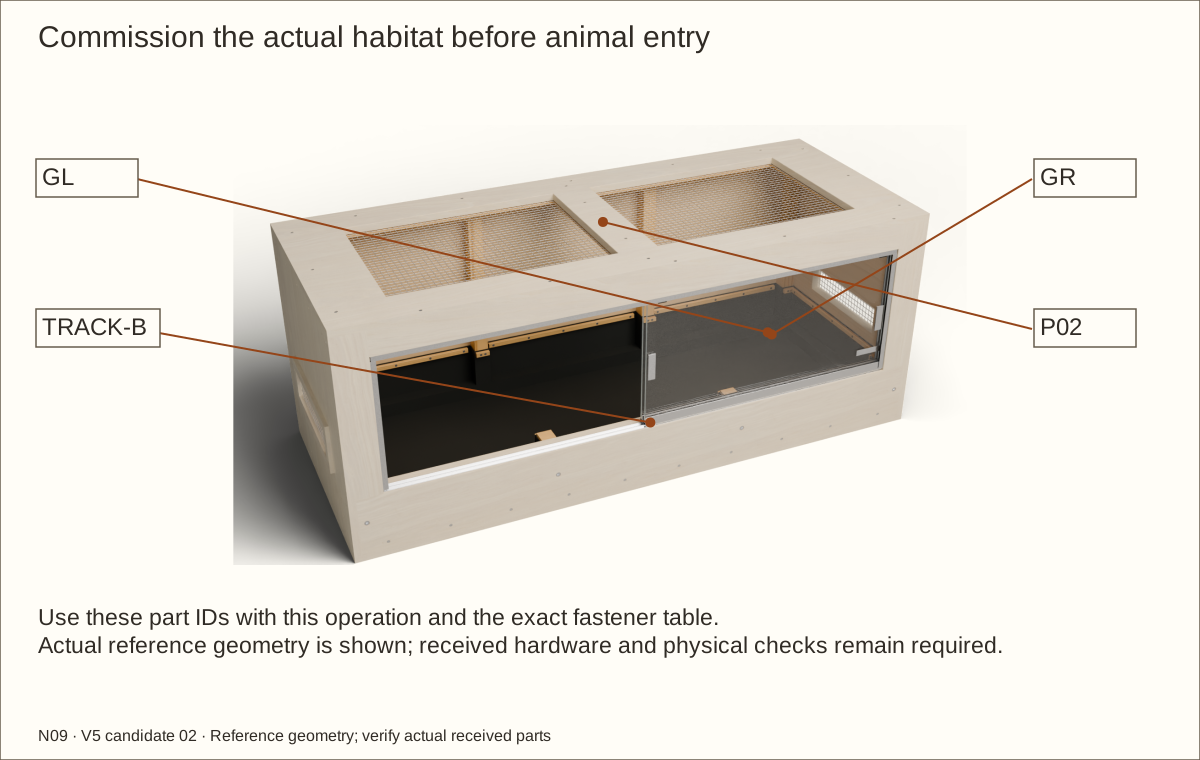
Parts: Complete enclosure, accepted liner and bed, actual lighting/heating equipment and measuring instruments
Tools / setup: Inspection record, tape, scale and actual equipment needed for the stated trial; helper for service
Commission the actual habitat before animal entry
Select the intended species, life stage and number of occupants against current care requirements using the finished usable interior, not the nominal 60 in (1524 mm) × 24 in (609.6 mm) × 24 in (609.6 mm) shell. This generic guide assigns no species suitability.
Qualify every gap and the mesh opening for the occupant and feeders. Add a mechanically retained finer barrier when needed, then reassess ventilation, visibility, cleaning and equipment performance.
Choose heat, light, ultraviolet and control equipment for the actual habitat. An internally mounted fixture may be used when its manufacturer permits that installation and specifies its secure attachment, guard and clearances. A lamp placed above the mesh must have support qualified for that exact fixture; this guide does not rate the screen to carry it. Follow the exact equipment separation and combustible-clearance instructions. Keep hot parts away from wood, liner, glass and animal contact. An exterior support stand is not required when a permitted internal installation is used.
Check before continuing: Animal entry follows a separate, documented species/equipment commissioning review; a finished wooden shell is not that approval.
66. Commission the actual habitat before animal entry · continue
Parts: Use the labeled parts in the picture and the matching cut schedule
Tools / setup: Inspection record, tape, scale and actual equipment needed for the stated trial; helper for service
Commission the actual habitat before animal entry · continue
Plan any cable penetration against the exact connector and strain relief before cutting. Put it above the liner, seal and finish its wood reveal, then fit a retained closure that cannot be pushed open. Do not trap a cord in the roof joint or make a new hole through the wet basin.
Run the complete configured habitat unoccupied through its planned day/night and wet/dry cycles. Measure the relevant temperatures, humidity, ventilation and light exposure; verify thermostat control, safe surfaces, door retention and cleaning access. Record passing results before animal entry.
Check before continuing: Animal entry follows a separate, documented species/equipment commissioning review; a finished wooden shell is not that approval.
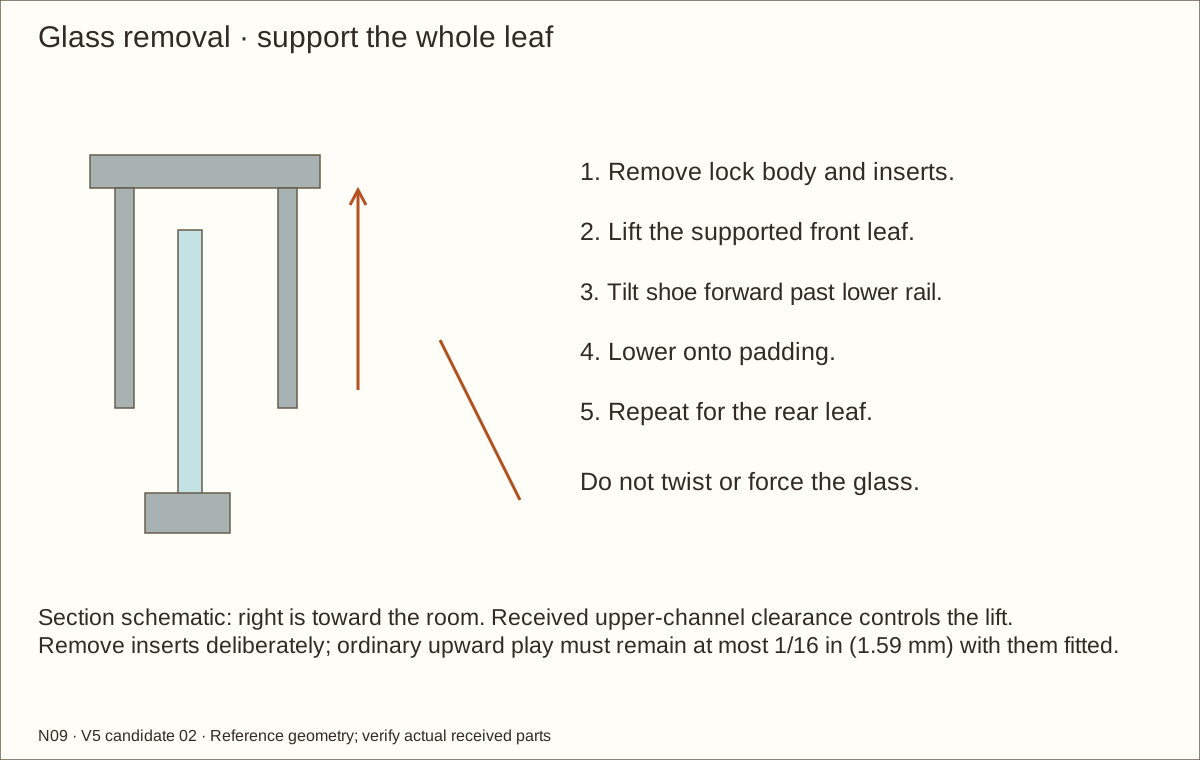
Parts: Glass GL/GR, removable lock body and anti-lift inserts
Tools / setup: Inspection record, tape, scale and actual equipment needed for the stated trial; helper for service
Before you begin: Service the enclosure empty, with the animal housed securely elsewhere and equipment disconnected.
Remove the glass for service
Remove the lock body and slide each leaf to expose its anti-lift screws. Support the glass while removing its lane inserts; keep all screws out of the bed.
Lift the front leaf into the upper channel, tilt its shoe clear of the lower rail, and lower it onto a padded support. Repeat for the rear leaf. Never twist glass or rest an edge on a hard floor.
Check before continuing: Both panes are on padded supports and all small hardware is retained.
Parts: Tracks, wheels, shoes, cushions, glass and anti-lift inserts
Tools / setup: Inspection record, tape, scale and actual equipment needed for the stated trial; helper for service
Clean the tracks and reinstall the panes
Vacuum the dry tracks, then wipe them with a soft damp cloth. Do not flood the wheel channels or coat them with an unapproved lubricant. Inspect rollers, guides, deburred shoe ends, glass edges and cushions.
Reinstall the rear leaf first, then the front leaf, inserts and lock. Repeat the full-travel, anti-lift and closed-gap checks before returning the animal.
Check before continuing: Both leaves travel freely, remain captured and close securely before reuse.
Parts: Removable roof, sixteen liner clamps and the one-piece liner
Tools / setup: Inspection record, tape, scale and actual equipment needed for the stated trial; helper for service
Before you begin: Use cleaning products compatible with the selected liner, wood finish and actual animal requirements. Rinse and dry as directed. Never mix cleaners or use an abrasive blade on glass edges.
Empty and remove the lined basin
Remove animals and disconnect equipment before a full clean. Lift decorations out; never drag a sharp object over the liner.
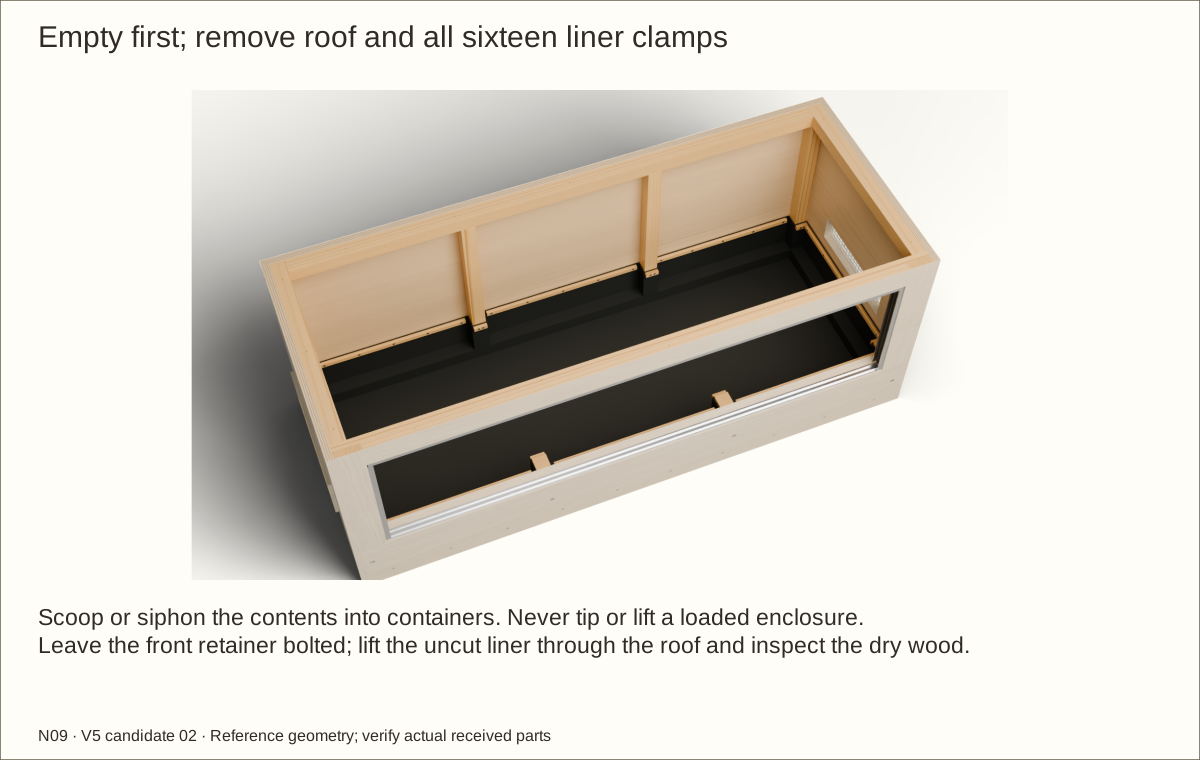
Scoop substrate into containers through the front opening; remove both glass leaves for larger tools. Siphon or wet-vacuum free liquid without dragging a hard nozzle across the membrane. Do not tip or lift a loaded shell.
For the 6 in (152.4 mm) retaining front, use a stable service position that lets you reach the floor without leaning on glass or tracks. Once empty, remove the roof and side clamps LCL/LCR first, then the remaining fourteen liner clamps to lift out the one-piece basin. Leave the retainer bolted in place during normal cleaning. Inspect and dry the wood beneath it. Repair or replace liner using the liner manufacturer’s method; cure any finish repair fully before reassembly.
Check before continuing: The empty liner lifts out without cutting a fold or disturbing the bolted retainer.
Quantities apply to this revision. Choose ONE veneer species: three 48 × 120 in (1219.2 × 3048 mm) sheets. Do not buy all three species. Three pine boards include a dedicated trial board. No complete affiliate cart or local inventory is verified.
1/2 in (12.7 mm) openings. This construction mesh is not containment for many animals or feeders; see commissioning.
Materials and hardware · continued
Quantities apply to this revision. Choose ONE veneer species: three 48 × 120 in (1219.2 × 3048 mm) sheets. Do not buy all three species. Three pine boards include a dedicated trial board. No complete affiliate cart or local inventory is verified.
30-004-062-012-036 Needed 1; 1 per package; buy 1 package(s)
Four reference cushions: 13.16375 in (334.36 mm) long × 0.28 in (7.11 mm) wide × 1/16 in (1.59 mm) thick. Cut from the scheduled sheet; accepted bond only. No screw tabs.
35054 Needed 119; 100 per package; buy 2 package(s)
Exact screw count comes from the station schedule; purchased packs include spare screws.
Materials and hardware · continued
Quantities apply to this revision. Choose ONE veneer species: three 48 × 120 in (1219.2 × 3048 mm) sheets. Do not buy all three species. Three pine boards include a dedicated trial board. No complete affiliate cart or local inventory is verified.
D2203ABB Needed 1; 1 per package; buy 1 package(s)
One 12-foot D602, D603 and D610 section; eight D649 wheels and four D652 guides installed. Catalogue kit inventory and current web quantities conflict; supplier must confirm contents before order. Cosmetic D332A end caps are not used.
HOLD: kit recommendation for 6 mm glass conflicts with current GC728C thickness listing. Supplier must confirm exact vinyl for measured glass and shoe. Do not substitute or force the glass.
Materials and hardware · continued
Quantities apply to this revision. Choose ONE veneer species: three 48 × 120 in (1219.2 × 3048 mm) sheets. Do not buy all three species. Three pine boards include a dedicated trial board. No complete affiliate cart or local inventory is verified.
Published overlap range 3/4–3 3/8 in (19.05–85.73 mm); this design targets 1 1/2 in (38.1 mm). Remove the lock body for sliding. Separate anti-lift inserts remain installed.
806891 Needed 38; 12 per package; buy 4 package(s)
Thirty-eight installed: ten lower rail, ten upper channel, six jamb and twelve anti-lift. Eight former pad screws removed. Supplier-approved thin-web countersink and flush trial required; do not drill the upper centre divider.
GLASS · Two made-to-measure monolithic tempered glass leaves Custom order · supplier unresolved
6 mm clear, polished edges; no holes Needed 2; 1 per package; buy 2 package(s)
Two 6 mm tempered reference panes. Size after actual tracks, cushions, vinyl, guides, finish and anti-lift acceptance; no glass order from this reference.
Materials and hardware · continued
Quantities apply to this revision. Choose ONE veneer species: three 48 × 120 in (1219.2 × 3048 mm) sheets. Do not buy all three species. Three pine boards include a dedicated trial board. No complete affiliate cart or local inventory is verified.
Product
Model and purchase quantity
Fit / purchase condition
LINER · Aquascape 45 mil ethylene propylene diene monomer (EPDM) boxed liner, 8′ × 10′ Direct product listing
85009 Needed 1; 1 per package; buy 1 package(s)
Select the 96 in (2438.4 mm) × 120 in (3048 mm) variant. Cut one 84 in (2133.6 mm) × 48 in (1219.2 mm) blank; retain the offcut for service patches under the liner maker’s repair procedure.
Select exactly 60 in (1524 mm) × 120 in (3048 mm). Orient the 84 in (2133.6 mm) cut along the 120 in (3048 mm) length and the 48 in (1219.2 mm) cut across the 60 in (1524 mm) width. Cut one 84 in (2133.6 mm) × 48 in (1219.2 mm) blank and local protective pads. Published loft is about 0.068 in (1.73 mm); the installed compressed stack must be measured.
HDPE · Polymershapes smooth black high-density polyethylene (HDPE) sheet Direct product listing
51962104 Needed 1; 1 per package; buy 1 package(s)
Six inserts, three per lane. Machine from wide stock; use actual received guide clearance, at most 1/16 in (1.59 mm) upward play and positive lower rail engagement.
One exterior flush screw per retainer post; 5/32 in (3.97 mm) hex drive, 82-degree seat. Length includes flat head.
Materials and hardware · continued
Quantities apply to this revision. Choose ONE veneer species: three 48 × 120 in (1219.2 × 3048 mm) sheets. Do not buy all three species. Three pine boards include a dedicated trial board. No complete affiliate cart or local inventory is verified.
One inside each recessed post under locknut. 5/8 in (15.88 mm) outside and 9/32 in (7.14 mm) inside diameters; receive thickness at most 1/16 in (1.59 mm) for this reference stack.
One inside each recessed post. Listed height .298-0.328 in (8.33 mm); two full threads beyond nylon, entire tail below post face. Hand-tighten to avoid stainless galling; never force seized threads.
Full exterior faces, roof, edges, reveals and trial. Written balance, substrate/finish and service-environment acceptance required.
Materials and hardware · continued
Quantities apply to this revision. Choose ONE veneer species: three 48 × 120 in (1219.2 × 3048 mm) sheets. Do not buy all three species. Three pine boards include a dedicated trial board. No complete affiliate cart or local inventory is verified.
Four neoprene jamb cushions only, 0.205 square feet two-face area plus trial. Written anodized aluminium/neoprene acceptance and seven-day sample cure. Never use on liner, glass or HDPE.
Cut list
Cut list
One of each ID. Length follows the allocated grain. Rough blanks include trimming; finished sizes describe the reference assembly. V-parts represent the whole cured veneer system. Hardware and glass remain sample/field-controlled; underlay thickness is a receiving input.
Part
Rough length × width
Finished length × width × thickness
P01 · Floor
60 1/8 in (1527.18 mm) × 24 1/16 in (611.19 mm)
60 in (1524 mm) × 24 in (609.6 mm) × 45/64 in (17.86 mm)
P02 · Removable roof
60 1/8 in (1527.18 mm) × 24 1/16 in (611.19 mm)
60 in (1524 mm) × 24 in (609.6 mm) × 45/64 in (17.86 mm)
P03L · L wall
24 1/8 in (612.78 mm) × 22 21/32 in (575.47 mm)
24 in (609.6 mm) × 22 19/32 in (573.88 mm) × 45/64 in (17.86 mm)
P03R · R wall
24 1/8 in (612.78 mm) × 22 21/32 in (575.47 mm)
24 in (609.6 mm) × 22 19/32 in (573.88 mm) × 45/64 in (17.86 mm)
P04 · Back
58 23/32 in (1491.46 mm) × 22 21/32 in (575.47 mm)
58 19/32 in (1488.28 mm) × 22 19/32 in (573.88 mm) × 45/64 in (17.86 mm)
RB1 · Laminated substrate retaining board
58 23/32 in (1491.46 mm) × 6 3/16 in (157.16 mm)
58 19/32 in (1488.28 mm) × 6 1/8 in (155.58 mm) × 45/64 in (17.86 mm)
RB2 · Laminated substrate retaining board
58 23/32 in (1491.46 mm) × 6 3/16 in (157.16 mm)
58 19/32 in (1488.28 mm) × 6 1/8 in (155.58 mm) × 45/64 in (17.86 mm)
RB3 · Laminated substrate retaining board
58 23/32 in (1491.46 mm) × 6 3/16 in (157.16 mm)
58 19/32 in (1488.28 mm) × 6 1/8 in (155.58 mm) × 45/64 in (17.86 mm)
F0L · L jamb layer
16 19/32 in (421.48 mm) × 2 9/16 in (65.09 mm)
16 15/32 in (418.31 mm) × 2 1/2 in (63.5 mm) × 3/4 in (19.05 mm)
F0R · R jamb layer
16 19/32 in (421.48 mm) × 2 9/16 in (65.09 mm)
16 15/32 in (418.31 mm) × 2 1/2 in (63.5 mm) × 3/4 in (19.05 mm)
Cut list · continued
One of each ID. Length follows the allocated grain. Rough blanks include trimming; finished sizes describe the reference assembly. V-parts represent the whole cured veneer system. Hardware and glass remain sample/field-controlled; underlay thickness is a receiving input.
Part
Rough length × width
Finished length × width × thickness
F0T · Header layer
53 23/32 in (1364.46 mm) × 2 9/16 in (65.09 mm)
53 19/32 in (1361.28 mm) × 2 1/2 in (63.5 mm) × 3/4 in (19.05 mm)
F1L · L jamb layer
14 3/32 in (357.98 mm) × 2 9/16 in (65.09 mm)
13 31/32 in (354.81 mm) × 2 1/2 in (63.5 mm) × 3/4 in (19.05 mm)
F1R · R jamb layer
14 3/32 in (357.98 mm) × 2 9/16 in (65.09 mm)
13 31/32 in (354.81 mm) × 2 1/2 in (63.5 mm) × 3/4 in (19.05 mm)
F1T · Header layer
58 23/32 in (1491.46 mm) × 2 9/16 in (65.09 mm)
58 19/32 in (1488.28 mm) × 2 1/2 in (63.5 mm) × 3/4 in (19.05 mm)
CLB · L bottom cleat
21 5/16 in (541.34 mm) × 1 1/2 in (38.1 mm)
21 3/16 in (538.16 mm) × 1 1/2 in (38.1 mm) × 1 1/2 in (38.1 mm)
CLU · L rear upright
19 23/32 in (500.86 mm) × 1 1/2 in (38.1 mm)
19 19/32 in (497.68 mm) × 1 1/2 in (38.1 mm) × 1 1/2 in (38.1 mm)
CLT · L upper cleat
21 59/64 in (556.82 mm) × 1 1/2 in (38.1 mm)
21 51/64 in (553.64 mm) × 1 1/2 in (38.1 mm) × 1 1/2 in (38.1 mm)
CRB · R bottom cleat
21 5/16 in (541.34 mm) × 1 1/2 in (38.1 mm)
21 3/16 in (538.16 mm) × 1 1/2 in (38.1 mm) × 1 1/2 in (38.1 mm)
CRU · R rear upright
19 23/32 in (500.86 mm) × 1 1/2 in (38.1 mm)
19 19/32 in (497.68 mm) × 1 1/2 in (38.1 mm) × 1 1/2 in (38.1 mm)
CRT · R upper cleat
21 59/64 in (556.82 mm) × 1 1/2 in (38.1 mm)
21 51/64 in (553.64 mm) × 1 1/2 in (38.1 mm) × 1 1/2 in (38.1 mm)
Cut list · continued
One of each ID. Length follows the allocated grain. Rough blanks include trimming; finished sizes describe the reference assembly. V-parts represent the whole cured veneer system. Hardware and glass remain sample/field-controlled; underlay thickness is a receiving input.
Part
Rough length × width
Finished length × width × thickness
CF · Front floor cleat
55 23/32 in (1415.26 mm) × 1 1/2 in (38.1 mm)
55 19/32 in (1412.08 mm) × 1 1/2 in (38.1 mm) × 1 1/2 in (38.1 mm)
CB · Back floor cleat
55 23/32 in (1415.26 mm) × 1 1/2 in (38.1 mm)
55 19/32 in (1412.08 mm) × 1 1/2 in (38.1 mm) × 1 1/2 in (38.1 mm)
CT · Back upper cleat
55 23/32 in (1415.26 mm) × 1 1/2 in (38.1 mm)
55 19/32 in (1412.08 mm) × 1 1/2 in (38.1 mm) × 1 1/2 in (38.1 mm)
CR · Roof web rib
20 27/64 in (518.72 mm) × 1 1/2 in (38.1 mm)
20 19/64 in (515.54 mm) × 1 1/2 in (38.1 mm) × 1 1/2 in (38.1 mm)
ML · L ventilation mesh
13 in (330.2 mm) × 4 in (101.6 mm)
13 in (330.2 mm) × 4 in (101.6 mm) × 0.082 in (2.08 mm)
VLB · Vent capture strip
14 1/8 in (358.78 mm) × 1 1/16 in (26.99 mm)
14 in (355.6 mm) × 1 in (25.4 mm) × 3/8 in (9.53 mm)
VLT · Vent capture strip
14 1/8 in (358.78 mm) × 1 1/16 in (26.99 mm)
14 in (355.6 mm) × 1 in (25.4 mm) × 3/8 in (9.53 mm)
VLF · Vent end strip
3 1/8 in (79.38 mm) × 1 1/16 in (26.99 mm)
3 in (76.2 mm) × 1 in (25.4 mm) × 3/8 in (9.53 mm)
VLA · Vent end strip
3 1/8 in (79.38 mm) × 1 1/16 in (26.99 mm)
3 in (76.2 mm) × 1 in (25.4 mm) × 3/8 in (9.53 mm)
MR · R ventilation mesh
13 in (330.2 mm) × 4 in (101.6 mm)
13 in (330.2 mm) × 4 in (101.6 mm) × 0.082 in (2.08 mm)
Cut list · continued
One of each ID. Length follows the allocated grain. Rough blanks include trimming; finished sizes describe the reference assembly. V-parts represent the whole cured veneer system. Hardware and glass remain sample/field-controlled; underlay thickness is a receiving input.
Part
Rough length × width
Finished length × width × thickness
VRB · Vent capture strip
14 1/8 in (358.78 mm) × 1 1/16 in (26.99 mm)
14 in (355.6 mm) × 1 in (25.4 mm) × 3/8 in (9.53 mm)
VRT · Vent capture strip
14 1/8 in (358.78 mm) × 1 1/16 in (26.99 mm)
14 in (355.6 mm) × 1 in (25.4 mm) × 3/8 in (9.53 mm)
VRF · Vent end strip
3 1/8 in (79.38 mm) × 1 1/16 in (26.99 mm)
3 in (76.2 mm) × 1 in (25.4 mm) × 3/8 in (9.53 mm)
VRA · Vent end strip
3 1/8 in (79.38 mm) × 1 1/16 in (26.99 mm)
3 in (76.2 mm) × 1 in (25.4 mm) × 3/8 in (9.53 mm)
MTL · Roof mesh
23 in (584.2 mm) × 17 in (431.8 mm)
23 in (584.2 mm) × 17 in (431.8 mm) × 0.082 in (2.08 mm)
RTLF · Roof mesh capture strip
24 1/8 in (612.78 mm) × 1 1/16 in (26.99 mm)
24 in (609.6 mm) × 1 in (25.4 mm) × 3/8 in (9.53 mm)
RTLA · Roof mesh capture strip
24 1/8 in (612.78 mm) × 1 1/16 in (26.99 mm)
24 in (609.6 mm) × 1 in (25.4 mm) × 3/8 in (9.53 mm)
RTLL · Roof mesh side strip
16 1/8 in (409.58 mm) × 1 1/16 in (26.99 mm)
16 in (406.4 mm) × 1 in (25.4 mm) × 3/8 in (9.53 mm)
RTLR · Roof mesh side strip
16 1/8 in (409.58 mm) × 1 1/16 in (26.99 mm)
16 in (406.4 mm) × 1 in (25.4 mm) × 3/8 in (9.53 mm)
MTR · Roof mesh
23 in (584.2 mm) × 17 in (431.8 mm)
23 in (584.2 mm) × 17 in (431.8 mm) × 0.082 in (2.08 mm)
Cut list · continued
One of each ID. Length follows the allocated grain. Rough blanks include trimming; finished sizes describe the reference assembly. V-parts represent the whole cured veneer system. Hardware and glass remain sample/field-controlled; underlay thickness is a receiving input.
Part
Rough length × width
Finished length × width × thickness
RTRF · Roof mesh capture strip
24 1/8 in (612.78 mm) × 1 1/16 in (26.99 mm)
24 in (609.6 mm) × 1 in (25.4 mm) × 3/8 in (9.53 mm)
RTRA · Roof mesh capture strip
24 1/8 in (612.78 mm) × 1 1/16 in (26.99 mm)
24 in (609.6 mm) × 1 in (25.4 mm) × 3/8 in (9.53 mm)
RTRL · Roof mesh side strip
16 1/8 in (409.58 mm) × 1 1/16 in (26.99 mm)
16 in (406.4 mm) × 1 in (25.4 mm) × 3/8 in (9.53 mm)
RTRR · Roof mesh side strip
16 1/8 in (409.58 mm) × 1 1/16 in (26.99 mm)
16 in (406.4 mm) × 1 in (25.4 mm) × 3/8 in (9.53 mm)
LCL · Liner side clamp
17.1525 in (435.67 mm) × 9/16 in (14.29 mm)
17.0275 in (432.5 mm) × 1/2 in (12.7 mm) × 3/8 in (9.53 mm)
LCR · Liner side clamp
17.1525 in (435.67 mm) × 9/16 in (14.29 mm)
17.0275 in (432.5 mm) × 1/2 in (12.7 mm) × 3/8 in (9.53 mm)
LCF1 · Liner clamp between posts
16.261875 in (413.05 mm) × 9/16 in (14.29 mm)
16.136875 in (409.88 mm) × 1/2 in (12.7 mm) × 3/8 in (9.53 mm)
LCF2 · Liner clamp between posts
17.715 in (449.96 mm) × 9/16 in (14.29 mm)
17.59 in (446.79 mm) × 1/2 in (12.7 mm) × 3/8 in (9.53 mm)
LCF3 · Liner clamp between posts
16.261875 in (413.05 mm) × 9/16 in (14.29 mm)
16.136875 in (409.88 mm) × 1/2 in (12.7 mm) × 3/8 in (9.53 mm)
LCB1 · Liner clamp between posts
16.261875 in (413.05 mm) × 9/16 in (14.29 mm)
16.136875 in (409.88 mm) × 1/2 in (12.7 mm) × 3/8 in (9.53 mm)
Cut list · continued
One of each ID. Length follows the allocated grain. Rough blanks include trimming; finished sizes describe the reference assembly. V-parts represent the whole cured veneer system. Hardware and glass remain sample/field-controlled; underlay thickness is a receiving input.
Part
Rough length × width
Finished length × width × thickness
LCB2 · Liner clamp between posts
17.715 in (449.96 mm) × 9/16 in (14.29 mm)
17.59 in (446.79 mm) × 1/2 in (12.7 mm) × 3/8 in (9.53 mm)
LCB3 · Liner clamp between posts
16.261875 in (413.05 mm) × 9/16 in (14.29 mm)
16.136875 in (409.88 mm) × 1/2 in (12.7 mm) × 3/8 in (9.53 mm)
LCQL · Liner post-face clamp
1 1/2 in (38.1 mm) × 9/16 in (14.29 mm)
1 3/8 in (34.93 mm) × 1/2 in (12.7 mm) × 3/8 in (9.53 mm)
LCQ1 · Liner post-face clamp
1 5/8 in (41.28 mm) × 9/16 in (14.29 mm)
1 1/2 in (38.1 mm) × 1/2 in (12.7 mm) × 3/8 in (9.53 mm)
LCQ2 · Liner post-face clamp
1 5/8 in (41.28 mm) × 9/16 in (14.29 mm)
1 1/2 in (38.1 mm) × 1/2 in (12.7 mm) × 3/8 in (9.53 mm)
LCQR · Liner post-face clamp
1 1/2 in (38.1 mm) × 9/16 in (14.29 mm)
1 3/8 in (34.93 mm) × 1/2 in (12.7 mm) × 3/8 in (9.53 mm)
LCPL · Liner post-face clamp
1 1/2 in (38.1 mm) × 9/16 in (14.29 mm)
1 3/8 in (34.93 mm) × 1/2 in (12.7 mm) × 3/8 in (9.53 mm)
LCP1 · Liner post-face clamp
1 5/8 in (41.28 mm) × 9/16 in (14.29 mm)
1 1/2 in (38.1 mm) × 1/2 in (12.7 mm) × 3/8 in (9.53 mm)
LCP2 · Liner post-face clamp
1 5/8 in (41.28 mm) × 9/16 in (14.29 mm)
1 1/2 in (38.1 mm) × 1/2 in (12.7 mm) × 3/8 in (9.53 mm)
LCPR · Liner post-face clamp
1 1/2 in (38.1 mm) × 9/16 in (14.29 mm)
1 3/8 in (34.93 mm) × 1/2 in (12.7 mm) × 3/8 in (9.53 mm)
Cut list · continued
One of each ID. Length follows the allocated grain. Rough blanks include trimming; finished sizes describe the reference assembly. V-parts represent the whole cured veneer system. Hardware and glass remain sample/field-controlled; underlay thickness is a receiving input.
Part
Rough length × width
Finished length × width × thickness
CFL · Front retainer post
4 3/4 in (120.65 mm) × 1 1/2 in (38.1 mm)
4 5/8 in (117.48 mm) × 1 1/2 in (38.1 mm) × 1 1/2 in (38.1 mm)
CF1 · Front retainer post
4 3/4 in (120.65 mm) × 1 1/2 in (38.1 mm)
4 5/8 in (117.48 mm) × 1 1/2 in (38.1 mm) × 1 1/2 in (38.1 mm)
CF2 · Front retainer post
4 3/4 in (120.65 mm) × 1 1/2 in (38.1 mm)
4 5/8 in (117.48 mm) × 1 1/2 in (38.1 mm) × 1 1/2 in (38.1 mm)
CFR · Front retainer post
4 3/4 in (120.65 mm) × 1 1/2 in (38.1 mm)
4 5/8 in (117.48 mm) × 1 1/2 in (38.1 mm) × 1 1/2 in (38.1 mm)
CM1 · Intermediate back upright
19 23/32 in (500.86 mm) × 1 1/2 in (38.1 mm)
19 19/32 in (497.68 mm) × 1 1/2 in (38.1 mm) × 1 1/2 in (38.1 mm)
CM2 · Intermediate back upright
19 23/32 in (500.86 mm) × 1 1/2 in (38.1 mm)
19 19/32 in (497.68 mm) × 1 1/2 in (38.1 mm) × 1 1/2 in (38.1 mm)
V-floor-under · Veneer · floor-under
60.561 in (1538.25 mm) × 24.561 in (623.85 mm)
60.061 in (1525.55 mm) × 24.061 in (611.15 mm) × 0.0305 in (0.77 mm)
V-roof-top · Veneer · roof-top
60.561 in (1538.25 mm) × 24.561 in (623.85 mm)
60.061 in (1525.55 mm) × 24.061 in (611.15 mm) × 0.0305 in (0.77 mm)
V-P01-front · Veneer · P01-front
60.561 in (1538.25 mm) × 1 13/64 in (30.56 mm)
60.061 in (1525.55 mm) × 45/64 in (17.86 mm) × 0.0305 in (0.77 mm)
V-P01-back · Veneer · P01-back
60.561 in (1538.25 mm) × 1 13/64 in (30.56 mm)
60.061 in (1525.55 mm) × 45/64 in (17.86 mm) × 0.0305 in (0.77 mm)
Cut list · continued
One of each ID. Length follows the allocated grain. Rough blanks include trimming; finished sizes describe the reference assembly. V-parts represent the whole cured veneer system. Hardware and glass remain sample/field-controlled; underlay thickness is a receiving input.
Part
Rough length × width
Finished length × width × thickness
V-P01-left · Veneer · P01-left
24 1/2 in (622.3 mm) × 1 13/64 in (30.56 mm)
24 in (609.6 mm) × 45/64 in (17.86 mm) × 0.0305 in (0.77 mm)
V-P01-right · Veneer · P01-right
24 1/2 in (622.3 mm) × 1 13/64 in (30.56 mm)
24 in (609.6 mm) × 45/64 in (17.86 mm) × 0.0305 in (0.77 mm)
V-P02-front · Veneer · P02-front
60.561 in (1538.25 mm) × 1 13/64 in (30.56 mm)
60.061 in (1525.55 mm) × 45/64 in (17.86 mm) × 0.0305 in (0.77 mm)
V-P02-back · Veneer · P02-back
60.561 in (1538.25 mm) × 1 13/64 in (30.56 mm)
60.061 in (1525.55 mm) × 45/64 in (17.86 mm) × 0.0305 in (0.77 mm)
V-P02-left · Veneer · P02-left
24 1/2 in (622.3 mm) × 1 13/64 in (30.56 mm)
24 in (609.6 mm) × 45/64 in (17.86 mm) × 0.0305 in (0.77 mm)
V-P02-right · Veneer · P02-right
24 1/2 in (622.3 mm) × 1 13/64 in (30.56 mm)
24 in (609.6 mm) × 45/64 in (17.86 mm) × 0.0305 in (0.77 mm)
V-P03L-face · Veneer · P03L-face
23 3/32 in (586.58 mm) × 24 1/2 in (622.3 mm)
22 19/32 in (573.88 mm) × 24 in (609.6 mm) × 0.0305 in (0.77 mm)
V-P03L-front · Veneer · P03L-front
23 3/32 in (586.58 mm) × 1.233625 in (31.33 mm)
22 19/32 in (573.88 mm) × 0.733625 in (18.63 mm) × 0.0305 in (0.77 mm)
V-P03L-back · Veneer · P03L-back
23 3/32 in (586.58 mm) × 1.233625 in (31.33 mm)
22 19/32 in (573.88 mm) × 0.733625 in (18.63 mm) × 0.0305 in (0.77 mm)
V-P03L-vent-near · Veneer · P03L-vent-near
3.439 in (87.35 mm) × 1 13/64 in (30.56 mm)
2.939 in (74.65 mm) × 45/64 in (17.86 mm) × 0.0305 in (0.77 mm)
Cut list · continued
One of each ID. Length follows the allocated grain. Rough blanks include trimming; finished sizes describe the reference assembly. V-parts represent the whole cured veneer system. Hardware and glass remain sample/field-controlled; underlay thickness is a receiving input.
Part
Rough length × width
Finished length × width × thickness
V-P03L-vent-far · Veneer · P03L-vent-far
3.439 in (87.35 mm) × 1 13/64 in (30.56 mm)
2.939 in (74.65 mm) × 45/64 in (17.86 mm) × 0.0305 in (0.77 mm)
V-P03L-vent-bottom · Veneer · P03L-vent-bottom
12 1/2 in (317.5 mm) × 1 13/64 in (30.56 mm)
12 in (304.8 mm) × 45/64 in (17.86 mm) × 0.0305 in (0.77 mm)
V-P03L-vent-top · Veneer · P03L-vent-top
12 1/2 in (317.5 mm) × 1 13/64 in (30.56 mm)
12 in (304.8 mm) × 45/64 in (17.86 mm) × 0.0305 in (0.77 mm)
V-P03R-face · Veneer · P03R-face
23 3/32 in (586.58 mm) × 24 1/2 in (622.3 mm)
22 19/32 in (573.88 mm) × 24 in (609.6 mm) × 0.0305 in (0.77 mm)
V-P03R-front · Veneer · P03R-front
23 3/32 in (586.58 mm) × 1.233625 in (31.33 mm)
22 19/32 in (573.88 mm) × 0.733625 in (18.63 mm) × 0.0305 in (0.77 mm)
V-P03R-back · Veneer · P03R-back
23 3/32 in (586.58 mm) × 1.233625 in (31.33 mm)
22 19/32 in (573.88 mm) × 0.733625 in (18.63 mm) × 0.0305 in (0.77 mm)
V-P03R-vent-near · Veneer · P03R-vent-near
3.439 in (87.35 mm) × 1 13/64 in (30.56 mm)
2.939 in (74.65 mm) × 45/64 in (17.86 mm) × 0.0305 in (0.77 mm)
V-P03R-vent-far · Veneer · P03R-vent-far
3.439 in (87.35 mm) × 1 13/64 in (30.56 mm)
2.939 in (74.65 mm) × 45/64 in (17.86 mm) × 0.0305 in (0.77 mm)
V-P03R-vent-bottom · Veneer · P03R-vent-bottom
12 1/2 in (317.5 mm) × 1 13/64 in (30.56 mm)
12 in (304.8 mm) × 45/64 in (17.86 mm) × 0.0305 in (0.77 mm)
V-P03R-vent-top · Veneer · P03R-vent-top
12 1/2 in (317.5 mm) × 1 13/64 in (30.56 mm)
12 in (304.8 mm) × 45/64 in (17.86 mm) × 0.0305 in (0.77 mm)
Cut list · continued
One of each ID. Length follows the allocated grain. Rough blanks include trimming; finished sizes describe the reference assembly. V-parts represent the whole cured veneer system. Hardware and glass remain sample/field-controlled; underlay thickness is a receiving input.
Part
Rough length × width
Finished length × width × thickness
V-back · Veneer · back
59 3/32 in (1500.98 mm) × 23 3/32 in (586.58 mm)
58 19/32 in (1488.28 mm) × 22 19/32 in (573.88 mm) × 0.0305 in (0.77 mm)
V-RB1-front · Veneer · RB1-front
59 3/32 in (1500.98 mm) × 6 5/8 in (168.28 mm)
58 19/32 in (1488.28 mm) × 6 1/8 in (155.58 mm) × 0.0305 in (0.77 mm)
V-F0L-front · Veneer · F0L-front
16 31/32 in (431.01 mm) × 3 in (76.2 mm)
16 15/32 in (418.31 mm) × 2 1/2 in (63.5 mm) × 0.0305 in (0.77 mm)
V-F0R-front · Veneer · F0R-front
16 31/32 in (431.01 mm) × 3 in (76.2 mm)
16 15/32 in (418.31 mm) × 2 1/2 in (63.5 mm) × 0.0305 in (0.77 mm)
V-F0T-front · Veneer · F0T-front
54 3/32 in (1373.98 mm) × 3 in (76.2 mm)
53 19/32 in (1361.28 mm) × 2 1/2 in (63.5 mm) × 0.0305 in (0.77 mm)
V-opening-left · Veneer · opening-left
14 15/32 in (367.51 mm) × 2 in (50.8 mm)
13 31/32 in (354.81 mm) × 1 1/2 in (38.1 mm) × 0.0305 in (0.77 mm)
V-opening-right · Veneer · opening-right
14 15/32 in (367.51 mm) × 2 in (50.8 mm)
13 31/32 in (354.81 mm) × 1 1/2 in (38.1 mm) × 0.0305 in (0.77 mm)
V-opening-upper · Veneer · opening-upper
54.03275 in (1372.43 mm) × 2 in (50.8 mm)
53.53275 in (1359.73 mm) × 1 1/2 in (38.1 mm) × 0.0305 in (0.77 mm)
V-retainer-top · Veneer · retainer-top
54.03275 in (1372.43 mm) × 2 39/64 in (66.28 mm)
53.53275 in (1359.73 mm) × 2 7/64 in (53.58 mm) × 0.0305 in (0.77 mm)
V-TL-left · Veneer · TL-left
16.439 in (417.55 mm) × 1 13/64 in (30.56 mm)
15.939 in (404.85 mm) × 45/64 in (17.86 mm) × 0.0305 in (0.77 mm)
Cut list · continued
One of each ID. Length follows the allocated grain. Rough blanks include trimming; finished sizes describe the reference assembly. V-parts represent the whole cured veneer system. Hardware and glass remain sample/field-controlled; underlay thickness is a receiving input.
Part
Rough length × width
Finished length × width × thickness
V-TL-right · Veneer · TL-right
16.439 in (417.55 mm) × 1 13/64 in (30.56 mm)
15.939 in (404.85 mm) × 45/64 in (17.86 mm) × 0.0305 in (0.77 mm)
V-TL-front · Veneer · TL-front
22 1/2 in (571.5 mm) × 1 13/64 in (30.56 mm)
22 in (558.8 mm) × 45/64 in (17.86 mm) × 0.0305 in (0.77 mm)
V-TL-back · Veneer · TL-back
22 1/2 in (571.5 mm) × 1 13/64 in (30.56 mm)
22 in (558.8 mm) × 45/64 in (17.86 mm) × 0.0305 in (0.77 mm)
V-TR-left · Veneer · TR-left
16.439 in (417.55 mm) × 1 13/64 in (30.56 mm)
15.939 in (404.85 mm) × 45/64 in (17.86 mm) × 0.0305 in (0.77 mm)
V-TR-right · Veneer · TR-right
16.439 in (417.55 mm) × 1 13/64 in (30.56 mm)
15.939 in (404.85 mm) × 45/64 in (17.86 mm) × 0.0305 in (0.77 mm)
V-TR-front · Veneer · TR-front
22 1/2 in (571.5 mm) × 1 13/64 in (30.56 mm)
22 in (558.8 mm) × 45/64 in (17.86 mm) × 0.0305 in (0.77 mm)
V-TR-back · Veneer · TR-back
22 1/2 in (571.5 mm) × 1 13/64 in (30.56 mm)
22 in (558.8 mm) × 45/64 in (17.86 mm) × 0.0305 in (0.77 mm)
V-VLB-outer · Veneer · VLB-outer
14.561 in (369.85 mm) × 1.561 in (39.65 mm)
14.061 in (357.15 mm) × 1.061 in (26.95 mm) × 0.0305 in (0.77 mm)
V-VLB-low · Veneer · VLB-low
14 1/2 in (368.3 mm) × 7/8 in (22.23 mm)
14 in (355.6 mm) × 3/8 in (9.53 mm) × 0.0305 in (0.77 mm)
V-VLB-high · Veneer · VLB-high
14 1/2 in (368.3 mm) × 7/8 in (22.23 mm)
14 in (355.6 mm) × 3/8 in (9.53 mm) × 0.0305 in (0.77 mm)
Cut list · continued
One of each ID. Length follows the allocated grain. Rough blanks include trimming; finished sizes describe the reference assembly. V-parts represent the whole cured veneer system. Hardware and glass remain sample/field-controlled; underlay thickness is a receiving input.
Part
Rough length × width
Finished length × width × thickness
V-VLB-near · Veneer · VLB-near
1.561 in (39.65 mm) × 7/8 in (22.23 mm)
1.061 in (26.95 mm) × 3/8 in (9.53 mm) × 0.0305 in (0.77 mm)
V-VLB-far · Veneer · VLB-far
1.561 in (39.65 mm) × 7/8 in (22.23 mm)
1.061 in (26.95 mm) × 3/8 in (9.53 mm) × 0.0305 in (0.77 mm)
V-VLT-outer · Veneer · VLT-outer
14.561 in (369.85 mm) × 1.561 in (39.65 mm)
14.061 in (357.15 mm) × 1.061 in (26.95 mm) × 0.0305 in (0.77 mm)
V-VLT-low · Veneer · VLT-low
14 1/2 in (368.3 mm) × 7/8 in (22.23 mm)
14 in (355.6 mm) × 3/8 in (9.53 mm) × 0.0305 in (0.77 mm)
V-VLT-high · Veneer · VLT-high
14 1/2 in (368.3 mm) × 7/8 in (22.23 mm)
14 in (355.6 mm) × 3/8 in (9.53 mm) × 0.0305 in (0.77 mm)
V-VLT-near · Veneer · VLT-near
1.561 in (39.65 mm) × 7/8 in (22.23 mm)
1.061 in (26.95 mm) × 3/8 in (9.53 mm) × 0.0305 in (0.77 mm)
V-VLT-far · Veneer · VLT-far
1.561 in (39.65 mm) × 7/8 in (22.23 mm)
1.061 in (26.95 mm) × 3/8 in (9.53 mm) × 0.0305 in (0.77 mm)
V-VLF-outer · Veneer · VLF-outer
3.439 in (87.35 mm) × 1.561 in (39.65 mm)
2.939 in (74.65 mm) × 1.061 in (26.95 mm) × 0.0305 in (0.77 mm)
V-VLF-near · Veneer · VLF-near
3 1/2 in (88.9 mm) × 7/8 in (22.23 mm)
3 in (76.2 mm) × 3/8 in (9.53 mm) × 0.0305 in (0.77 mm)
V-VLF-far · Veneer · VLF-far
3 1/2 in (88.9 mm) × 7/8 in (22.23 mm)
3 in (76.2 mm) × 3/8 in (9.53 mm) × 0.0305 in (0.77 mm)
Cut list · continued
One of each ID. Length follows the allocated grain. Rough blanks include trimming; finished sizes describe the reference assembly. V-parts represent the whole cured veneer system. Hardware and glass remain sample/field-controlled; underlay thickness is a receiving input.
Part
Rough length × width
Finished length × width × thickness
V-VLA-outer · Veneer · VLA-outer
3.439 in (87.35 mm) × 1.561 in (39.65 mm)
2.939 in (74.65 mm) × 1.061 in (26.95 mm) × 0.0305 in (0.77 mm)
V-VLA-near · Veneer · VLA-near
3 1/2 in (88.9 mm) × 7/8 in (22.23 mm)
3 in (76.2 mm) × 3/8 in (9.53 mm) × 0.0305 in (0.77 mm)
V-VLA-far · Veneer · VLA-far
3 1/2 in (88.9 mm) × 7/8 in (22.23 mm)
3 in (76.2 mm) × 3/8 in (9.53 mm) × 0.0305 in (0.77 mm)
V-VRB-outer · Veneer · VRB-outer
14.561 in (369.85 mm) × 1.561 in (39.65 mm)
14.061 in (357.15 mm) × 1.061 in (26.95 mm) × 0.0305 in (0.77 mm)
V-VRB-low · Veneer · VRB-low
14 1/2 in (368.3 mm) × 7/8 in (22.23 mm)
14 in (355.6 mm) × 3/8 in (9.53 mm) × 0.0305 in (0.77 mm)
V-VRB-high · Veneer · VRB-high
14 1/2 in (368.3 mm) × 7/8 in (22.23 mm)
14 in (355.6 mm) × 3/8 in (9.53 mm) × 0.0305 in (0.77 mm)
V-VRB-near · Veneer · VRB-near
1.561 in (39.65 mm) × 7/8 in (22.23 mm)
1.061 in (26.95 mm) × 3/8 in (9.53 mm) × 0.0305 in (0.77 mm)
V-VRB-far · Veneer · VRB-far
1.561 in (39.65 mm) × 7/8 in (22.23 mm)
1.061 in (26.95 mm) × 3/8 in (9.53 mm) × 0.0305 in (0.77 mm)
V-VRT-outer · Veneer · VRT-outer
14.561 in (369.85 mm) × 1.561 in (39.65 mm)
14.061 in (357.15 mm) × 1.061 in (26.95 mm) × 0.0305 in (0.77 mm)
V-VRT-low · Veneer · VRT-low
14 1/2 in (368.3 mm) × 7/8 in (22.23 mm)
14 in (355.6 mm) × 3/8 in (9.53 mm) × 0.0305 in (0.77 mm)
Cut list · continued
One of each ID. Length follows the allocated grain. Rough blanks include trimming; finished sizes describe the reference assembly. V-parts represent the whole cured veneer system. Hardware and glass remain sample/field-controlled; underlay thickness is a receiving input.
Part
Rough length × width
Finished length × width × thickness
V-VRT-high · Veneer · VRT-high
14 1/2 in (368.3 mm) × 7/8 in (22.23 mm)
14 in (355.6 mm) × 3/8 in (9.53 mm) × 0.0305 in (0.77 mm)
V-VRT-near · Veneer · VRT-near
1.561 in (39.65 mm) × 7/8 in (22.23 mm)
1.061 in (26.95 mm) × 3/8 in (9.53 mm) × 0.0305 in (0.77 mm)
V-VRT-far · Veneer · VRT-far
1.561 in (39.65 mm) × 7/8 in (22.23 mm)
1.061 in (26.95 mm) × 3/8 in (9.53 mm) × 0.0305 in (0.77 mm)
V-VRF-outer · Veneer · VRF-outer
3.439 in (87.35 mm) × 1.561 in (39.65 mm)
2.939 in (74.65 mm) × 1.061 in (26.95 mm) × 0.0305 in (0.77 mm)
V-VRF-near · Veneer · VRF-near
3 1/2 in (88.9 mm) × 7/8 in (22.23 mm)
3 in (76.2 mm) × 3/8 in (9.53 mm) × 0.0305 in (0.77 mm)
V-VRF-far · Veneer · VRF-far
3 1/2 in (88.9 mm) × 7/8 in (22.23 mm)
3 in (76.2 mm) × 3/8 in (9.53 mm) × 0.0305 in (0.77 mm)
V-VRA-outer · Veneer · VRA-outer
3.439 in (87.35 mm) × 1.561 in (39.65 mm)
2.939 in (74.65 mm) × 1.061 in (26.95 mm) × 0.0305 in (0.77 mm)
V-VRA-near · Veneer · VRA-near
3 1/2 in (88.9 mm) × 7/8 in (22.23 mm)
3 in (76.2 mm) × 3/8 in (9.53 mm) × 0.0305 in (0.77 mm)
V-VRA-far · Veneer · VRA-far
3 1/2 in (88.9 mm) × 7/8 in (22.23 mm)
3 in (76.2 mm) × 3/8 in (9.53 mm) × 0.0305 in (0.77 mm)
TRACK-T · D603 upper channel
53.48775 in (1358.59 mm) long; supplied D603 profile
53.36275 in (1355.41 mm) × 1.184 in (30.07 mm) × 0.551 in (14 mm)
Cut list · continued
One of each ID. Length follows the allocated grain. Rough blanks include trimming; finished sizes describe the reference assembly. V-parts represent the whole cured veneer system. Hardware and glass remain sample/field-controlled; underlay thickness is a receiving input.
Part
Rough length × width
Finished length × width × thickness
JAMBL · D603 vertical jamb receiver
13.28875 in (337.53 mm) long; supplied D603 profile
13.16375 in (334.36 mm) × 0.551 in (14 mm) × 1.184 in (30.07 mm)
JAMBR · D603 vertical jamb receiver
13.28875 in (337.53 mm) long; supplied D603 profile
13.16375 in (334.36 mm) × 0.551 in (14 mm) × 1.184 in (30.07 mm)
TRACK-B · D602 lower rail
53.48775 in (1358.59 mm) long; supplied D602 profile
53.36275 in (1355.41 mm) × 1.035 in (26.29 mm) × 0.254 in (6.45 mm)
HL · D610 roller shoe
27.553375 in (699.86 mm) long; supplied D610 profile
27.428375 in (696.68 mm) × 0.433 in (11 mm) × 0.996 in (25.3 mm)
HR · D610 roller shoe
27.553375 in (699.86 mm) long; supplied D610 profile
27.428375 in (696.68 mm) × 0.433 in (11 mm) × 0.996 in (25.3 mm)
ALF1 · Removable anti-lift insert
17.91258333 in (454.98 mm) × 0.555 in (14.1 mm)
17.78758333 in (451.8 mm) × 0.43 in (10.92 mm) × 0.2375 in (6.03 mm)
ALF2 · Removable anti-lift insert
17.91258333 in (454.98 mm) × 0.555 in (14.1 mm)
17.78758333 in (451.8 mm) × 0.43 in (10.92 mm) × 0.2375 in (6.03 mm)
ALF3 · Removable anti-lift insert
17.91258333 in (454.98 mm) × 0.555 in (14.1 mm)
17.78758333 in (451.8 mm) × 0.43 in (10.92 mm) × 0.2375 in (6.03 mm)
ALB1 · Removable anti-lift insert
17.91258333 in (454.98 mm) × 0.555 in (14.1 mm)
17.78758333 in (451.8 mm) × 0.43 in (10.92 mm) × 0.2375 in (6.03 mm)
ALB2 · Removable anti-lift insert
17.91258333 in (454.98 mm) × 0.555 in (14.1 mm)
17.78758333 in (451.8 mm) × 0.43 in (10.92 mm) × 0.2375 in (6.03 mm)
Cut list · continued
One of each ID. Length follows the allocated grain. Rough blanks include trimming; finished sizes describe the reference assembly. V-parts represent the whole cured veneer system. Hardware and glass remain sample/field-controlled; underlay thickness is a receiving input.
Part
Rough length × width
Finished length × width × thickness
ALB3 · Removable anti-lift insert
17.91258333 in (454.98 mm) × 0.555 in (14.1 mm)
17.78758333 in (451.8 mm) × 0.43 in (10.92 mm) × 0.2375 in (6.03 mm)
STOPLF · Bond-retained neoprene jamb cushion
13.28875 in (337.53 mm) × 0.405 in (10.29 mm)
13.16375 in (334.36 mm) × 0.28 in (7.11 mm) × 1/16 in (1.59 mm)
STOPLB · Bond-retained neoprene jamb cushion
13.28875 in (337.53 mm) × 0.405 in (10.29 mm)
13.16375 in (334.36 mm) × 0.28 in (7.11 mm) × 1/16 in (1.59 mm)
STOPRF · Bond-retained neoprene jamb cushion
13.28875 in (337.53 mm) × 0.405 in (10.29 mm)
13.16375 in (334.36 mm) × 0.28 in (7.11 mm) × 1/16 in (1.59 mm)
STOPRB · Bond-retained neoprene jamb cushion
13.28875 in (337.53 mm) × 0.405 in (10.29 mm)
13.16375 in (334.36 mm) × 0.28 in (7.11 mm) × 1/16 in (1.59 mm)
LINER-BLANK · Continuous basin blank
84 in (2133.6 mm) × 48 in (1219.2 mm)
84 in (2133.6 mm) × 48 in (1219.2 mm) × 0.045 in (1.14 mm)
UNDERLAY-BLANK · Protective underlay blank
84 in (2133.6 mm) × 48 in (1219.2 mm)
84 in (2133.6 mm) × 48 in (1219.2 mm) × received compressed thickness; measure with liner
GL · L polished tempered glass
27.428375 in (696.68 mm) × 12 27/32 in (326.23 mm)
27.428375 in (696.68 mm) × 12 27/32 in (326.23 mm) × 0.23622047 in (6 mm)
GR · R polished tempered glass
27.428375 in (696.68 mm) × 12 27/32 in (326.23 mm)
27.428375 in (696.68 mm) × 12 27/32 in (326.23 mm) × 0.23622047 in (6 mm)
Cutting diagrams
PLY-1 · rough-stock cutting plan
Read IDs with the exact coordinate table; retain grain, trim and kerf
Length allocation only; preserve the supplied cross-section
Cut and deburr lengths from the accepted supplied profile. Clamp and support each piece; do not rip the profile to width.
D603-1 · profile length cuts
Length allocation only; preserve the supplied cross-section
Cut and deburr lengths from the accepted supplied profile. Clamp and support each piece; do not rip the profile to width.
D610-1 · profile length cuts
Length allocation only; preserve the supplied cross-section
Cut and deburr lengths from the accepted supplied profile. Clamp and support each piece; do not rip the profile to width.
PINE-TRIAL · rough-stock cutting plan
Read IDs with the exact coordinate table; retain grain, trim and kerf
Dedicated wide stock for hardware, routing and finish trials; machine minimum feed length controls
LINER · rough-stock cutting plan
Read IDs with the exact coordinate table; retain grain, trim and kerf
Dry-fold full blank around eight supports before trim; reserve underlay offcuts for pads over the recessed interior washers and nuts
UNDERLAY · rough-stock cutting plan
Read IDs with the exact coordinate table; retain grain, trim and kerf
Dry-fold full blank around eight supports before trim; reserve underlay offcuts for pads over the recessed interior washers and nuts
Workshop drawings and measurements
PLY-1 · exact rough blank positions
X runs along the stock length; Y across its width. Both start at the illustrated lower-left corner. These are stock coordinates, not assembled fastener coordinates. All dimensions include the stated rough allowance; keep each blank labeled.
Part ID
Stock X / Y
Rough length × width
P01
1/8 in (3.18 mm) / 1/8 in (3.18 mm)
60 1/8 in (1527.18 mm) × 24 1/16 in (611.19 mm)
P04
1/8 in (3.18 mm) / 24 5/16 in (617.54 mm)
58 23/32 in (1491.46 mm) × 22 21/32 in (575.47 mm)
P03L
60 3/8 in (1533.53 mm) / 1/8 in (3.18 mm)
24 1/8 in (612.78 mm) × 22 21/32 in (575.47 mm)
P03R
60 3/8 in (1533.53 mm) / 22 29/32 in (581.82 mm)
24 1/8 in (612.78 mm) × 22 21/32 in (575.47 mm)
Stock 96.468 in (2450.29 mm) × 48.468 in (1231.09 mm); perimeter trim 1/8 in (3.18 mm); kerf / separation 1/8 in (3.18 mm). Full cut order and offcuts are in the versioned specification.
PLY-2 · exact rough blank positions
X runs along the stock length; Y across its width. Both start at the illustrated lower-left corner. These are stock coordinates, not assembled fastener coordinates. All dimensions include the stated rough allowance; keep each blank labeled.
Part ID
Stock X / Y
Rough length × width
P02
1/8 in (3.18 mm) / 1/8 in (3.18 mm)
60 1/8 in (1527.18 mm) × 24 1/16 in (611.19 mm)
RB1
1/8 in (3.18 mm) / 24 5/16 in (617.54 mm)
58 23/32 in (1491.46 mm) × 6 3/16 in (157.16 mm)
RB2
1/8 in (3.18 mm) / 30 5/8 in (777.88 mm)
58 23/32 in (1491.46 mm) × 6 3/16 in (157.16 mm)
RB3
1/8 in (3.18 mm) / 36 15/16 in (938.21 mm)
58 23/32 in (1491.46 mm) × 6 3/16 in (157.16 mm)
Stock 96.468 in (2450.29 mm) × 48.468 in (1231.09 mm); perimeter trim 1/8 in (3.18 mm); kerf / separation 1/8 in (3.18 mm). Full cut order and offcuts are in the versioned specification.
SOLID-1 · exact rough blank positions
X runs along the stock length; Y across its width. Both start at the illustrated lower-left corner. These are stock coordinates, not assembled fastener coordinates. All dimensions include the stated rough allowance; keep each blank labeled.
Part ID
Stock X / Y
Rough length × width
CF
0 in (0 mm) / 0 in (0 mm)
55 23/32 in (1415.26 mm) × 1 1/2 in (38.1 mm)
CLT
55 27/32 in (1418.43 mm) / 0 in (0 mm)
21 59/64 in (556.82 mm) × 1 1/2 in (38.1 mm)
CFL
77 57/64 in (1978.42 mm) / 0 in (0 mm)
4 3/4 in (120.65 mm) × 1 1/2 in (38.1 mm)
CF1
82 49/64 in (2102.25 mm) / 0 in (0 mm)
4 3/4 in (120.65 mm) × 1 1/2 in (38.1 mm)
CF2
87 41/64 in (2226.07 mm) / 0 in (0 mm)
4 3/4 in (120.65 mm) × 1 1/2 in (38.1 mm)
Stock 96 in (2438.4 mm) × 1 1/2 in (38.1 mm); perimeter trim 0 in (0 mm); kerf / separation 1/8 in (3.18 mm). Full cut order and offcuts are in the versioned specification.
SOLID-2 · exact rough blank positions
X runs along the stock length; Y across its width. Both start at the illustrated lower-left corner. These are stock coordinates, not assembled fastener coordinates. All dimensions include the stated rough allowance; keep each blank labeled.
Part ID
Stock X / Y
Rough length × width
CB
0 in (0 mm) / 0 in (0 mm)
55 23/32 in (1415.26 mm) × 1 1/2 in (38.1 mm)
CRT
55 27/32 in (1418.43 mm) / 0 in (0 mm)
21 59/64 in (556.82 mm) × 1 1/2 in (38.1 mm)
CFR
77 57/64 in (1978.42 mm) / 0 in (0 mm)
4 3/4 in (120.65 mm) × 1 1/2 in (38.1 mm)
Stock 96 in (2438.4 mm) × 1 1/2 in (38.1 mm); perimeter trim 0 in (0 mm); kerf / separation 1/8 in (3.18 mm). Full cut order and offcuts are in the versioned specification.
SOLID-3 · exact rough blank positions
X runs along the stock length; Y across its width. Both start at the illustrated lower-left corner. These are stock coordinates, not assembled fastener coordinates. All dimensions include the stated rough allowance; keep each blank labeled.
Part ID
Stock X / Y
Rough length × width
CT
0 in (0 mm) / 0 in (0 mm)
55 23/32 in (1415.26 mm) × 1 1/2 in (38.1 mm)
CLB
55 27/32 in (1418.43 mm) / 0 in (0 mm)
21 5/16 in (541.34 mm) × 1 1/2 in (38.1 mm)
Stock 96 in (2438.4 mm) × 1 1/2 in (38.1 mm); perimeter trim 0 in (0 mm); kerf / separation 1/8 in (3.18 mm). Full cut order and offcuts are in the versioned specification.
SOLID-4 · exact rough blank positions
X runs along the stock length; Y across its width. Both start at the illustrated lower-left corner. These are stock coordinates, not assembled fastener coordinates. All dimensions include the stated rough allowance; keep each blank labeled.
Part ID
Stock X / Y
Rough length × width
CRB
0 in (0 mm) / 0 in (0 mm)
21 5/16 in (541.34 mm) × 1 1/2 in (38.1 mm)
CR
21 7/16 in (544.51 mm) / 0 in (0 mm)
20 27/64 in (518.72 mm) × 1 1/2 in (38.1 mm)
CLU
41 63/64 in (1066.4 mm) / 0 in (0 mm)
19 23/32 in (500.86 mm) × 1 1/2 in (38.1 mm)
CRU
61 53/64 in (1570.43 mm) / 0 in (0 mm)
19 23/32 in (500.86 mm) × 1 1/2 in (38.1 mm)
Stock 96 in (2438.4 mm) × 1 1/2 in (38.1 mm); perimeter trim 0 in (0 mm); kerf / separation 1/8 in (3.18 mm). Full cut order and offcuts are in the versioned specification.
SOLID-5 · exact rough blank positions
X runs along the stock length; Y across its width. Both start at the illustrated lower-left corner. These are stock coordinates, not assembled fastener coordinates. All dimensions include the stated rough allowance; keep each blank labeled.
Part ID
Stock X / Y
Rough length × width
CM1
0 in (0 mm) / 0 in (0 mm)
19 23/32 in (500.86 mm) × 1 1/2 in (38.1 mm)
CM2
19 27/32 in (504.03 mm) / 0 in (0 mm)
19 23/32 in (500.86 mm) × 1 1/2 in (38.1 mm)
Stock 96 in (2438.4 mm) × 1 1/2 in (38.1 mm); perimeter trim 0 in (0 mm); kerf / separation 1/8 in (3.18 mm). Full cut order and offcuts are in the versioned specification.
MESH-1 · exact rough blank positions
X runs along the stock length; Y across its width. Both start at the illustrated lower-left corner. These are stock coordinates, not assembled fastener coordinates. All dimensions include the stated rough allowance; keep each blank labeled.
Part ID
Stock X / Y
Rough length × width
MTL
1/8 in (3.18 mm) / 1/8 in (3.18 mm)
23 in (584.2 mm) × 17 in (431.8 mm)
MTR
1/8 in (3.18 mm) / 17 1/4 in (438.15 mm)
23 in (584.2 mm) × 17 in (431.8 mm)
ML
1/8 in (3.18 mm) / 34 3/8 in (873.13 mm)
13 in (330.2 mm) × 4 in (101.6 mm)
MR
1/8 in (3.18 mm) / 38 1/2 in (977.9 mm)
13 in (330.2 mm) × 4 in (101.6 mm)
Stock 120 in (3048 mm) × 48 in (1219.2 mm); perimeter trim 1/8 in (3.18 mm); kerf / separation 1/8 in (3.18 mm). Full cut order and offcuts are in the versioned specification.
VENEER-1 · exact rough blank positions
X runs along the stock length; Y across its width. Both start at the illustrated lower-left corner. These are stock coordinates, not assembled fastener coordinates. All dimensions include the stated rough allowance; keep each blank labeled.
Part ID
Stock X / Y
Rough length × width
V-floor-under
1/4 in (6.35 mm) / 1/4 in (6.35 mm)
60.561 in (1538.25 mm) × 24.561 in (623.85 mm)
V-P03L-face
60.8735 in (1546.19 mm) / 1/4 in (6.35 mm)
23 3/32 in (586.58 mm) × 24 1/2 in (622.3 mm)
V-P03R-face
84.02975 in (2134.36 mm) / 1/4 in (6.35 mm)
23 3/32 in (586.58 mm) × 24 1/2 in (622.3 mm)
TRIAL-veneer
1/4 in (6.35 mm) / 24.8735 in (631.79 mm)
24 in (609.6 mm) × 12 in (304.8 mm)
V-RB1-front
1/4 in (6.35 mm) / 36.936 in (938.17 mm)
59 3/32 in (1500.98 mm) × 6 5/8 in (168.28 mm)
V-F0T-front
1/4 in (6.35 mm) / 43.6235 in (1108.04 mm)
54 3/32 in (1373.98 mm) × 3 in (76.2 mm)
V-F0L-front
54 13/32 in (1381.92 mm) / 43.6235 in (1108.04 mm)
16 31/32 in (431.01 mm) × 3 in (76.2 mm)
V-F0R-front
71 7/16 in (1814.51 mm) / 43.6235 in (1108.04 mm)
16 31/32 in (431.01 mm) × 3 in (76.2 mm)
V-retainer-top
59 13/32 in (1508.92 mm) / 36.936 in (938.17 mm)
54.03275 in (1372.43 mm) × 2 39/64 in (66.28 mm)
V-opening-upper
59 13/32 in (1508.92 mm) / 39.607875 in (1006.04 mm)
54.03275 in (1372.43 mm) × 2 in (50.8 mm)
V-opening-left
88 15/32 in (2247.11 mm) / 43.6235 in (1108.04 mm)
14 15/32 in (367.51 mm) × 2 in (50.8 mm)
V-opening-right
103 in (2616.2 mm) / 43.6235 in (1108.04 mm)
14 15/32 in (367.51 mm) × 2 in (50.8 mm)
V-VLB-outer
59 13/32 in (1508.92 mm) / 41.670375 in (1058.43 mm)
14.561 in (369.85 mm) × 1.561 in (39.65 mm)
V-VLT-outer
74.02975 in (1880.36 mm) / 41.670375 in (1058.43 mm)
14.561 in (369.85 mm) × 1.561 in (39.65 mm)
V-VRB-outer
88.65325 in (2251.79 mm) / 41.670375 in (1058.43 mm)
14.561 in (369.85 mm) × 1.561 in (39.65 mm)
V-VRT-outer
103.27675 in (2623.23 mm) / 41.670375 in (1058.43 mm)
14.561 in (369.85 mm) × 1.561 in (39.65 mm)
Stock 120 in (3048 mm) × 48 in (1219.2 mm); perimeter trim 1/4 in (6.35 mm); kerf / separation 1/16 in (1.59 mm). Full cut order and offcuts are in the versioned specification.
VENEER-1 · exact rough blank positions
X runs along the stock length; Y across its width. Both start at the illustrated lower-left corner. These are stock coordinates, not assembled fastener coordinates. All dimensions include the stated rough allowance; keep each blank labeled.
Part ID
Stock X / Y
Rough length × width
V-VLF-outer
113.5015 in (2882.94 mm) / 39.607875 in (1006.04 mm)
3.439 in (87.35 mm) × 1.561 in (39.65 mm)
V-VLA-outer
113.5015 in (2882.94 mm) / 36.936 in (938.17 mm)
3.439 in (87.35 mm) × 1.561 in (39.65 mm)
V-VRF-outer
107.186 in (2722.52 mm) / 1/4 in (6.35 mm)
3.439 in (87.35 mm) × 1.561 in (39.65 mm)
V-VRA-outer
110 11/16 in (2811.46 mm) / 1/4 in (6.35 mm)
3.439 in (87.35 mm) × 1.561 in (39.65 mm)
V-P03L-front
24 5/16 in (617.54 mm) / 24.8735 in (631.79 mm)
23 3/32 in (586.58 mm) × 1.233625 in (31.33 mm)
V-P03L-back
47 15/32 in (1205.71 mm) / 24.8735 in (631.79 mm)
23 3/32 in (586.58 mm) × 1.233625 in (31.33 mm)
V-P03R-front
70 5/8 in (1793.88 mm) / 24.8735 in (631.79 mm)
23 3/32 in (586.58 mm) × 1.233625 in (31.33 mm)
V-P03R-back
93 25/32 in (2382.04 mm) / 24.8735 in (631.79 mm)
23 3/32 in (586.58 mm) × 1.233625 in (31.33 mm)
V-P01-front
24 5/16 in (617.54 mm) / 26.169625 in (664.71 mm)
60.561 in (1538.25 mm) × 1 13/64 in (30.56 mm)
V-P01-back
24 5/16 in (617.54 mm) / 27.43525 in (696.86 mm)
60.561 in (1538.25 mm) × 1 13/64 in (30.56 mm)
V-P02-front
24 5/16 in (617.54 mm) / 28.700875 in (729 mm)
60.561 in (1538.25 mm) × 1 13/64 in (30.56 mm)
V-P02-back
24 5/16 in (617.54 mm) / 29.9665 in (761.15 mm)
60.561 in (1538.25 mm) × 1 13/64 in (30.56 mm)
V-P01-left
84.936 in (2157.37 mm) / 26.169625 in (664.71 mm)
24 1/2 in (622.3 mm) × 1 13/64 in (30.56 mm)
V-P01-right
84.936 in (2157.37 mm) / 27.43525 in (696.86 mm)
24 1/2 in (622.3 mm) × 1 13/64 in (30.56 mm)
V-P02-left
84.936 in (2157.37 mm) / 28.700875 in (729 mm)
24 1/2 in (622.3 mm) × 1 13/64 in (30.56 mm)
V-P02-right
84.936 in (2157.37 mm) / 29.9665 in (761.15 mm)
24 1/2 in (622.3 mm) × 1 13/64 in (30.56 mm)
Stock 120 in (3048 mm) × 48 in (1219.2 mm); perimeter trim 1/4 in (6.35 mm); kerf / separation 1/16 in (1.59 mm). Full cut order and offcuts are in the versioned specification.
VENEER-1 · exact rough blank positions
X runs along the stock length; Y across its width. Both start at the illustrated lower-left corner. These are stock coordinates, not assembled fastener coordinates. All dimensions include the stated rough allowance; keep each blank labeled.
Part ID
Stock X / Y
Rough length × width
V-TL-front
24 5/16 in (617.54 mm) / 31.232125 in (793.3 mm)
22 1/2 in (571.5 mm) × 1 13/64 in (30.56 mm)
V-TL-back
46 7/8 in (1190.63 mm) / 31.232125 in (793.3 mm)
22 1/2 in (571.5 mm) × 1 13/64 in (30.56 mm)
V-TR-front
69 7/16 in (1763.71 mm) / 31.232125 in (793.3 mm)
22 1/2 in (571.5 mm) × 1 13/64 in (30.56 mm)
V-TR-back
92 in (2336.8 mm) / 31.232125 in (793.3 mm)
22 1/2 in (571.5 mm) × 1 13/64 in (30.56 mm)
V-TL-left
24 5/16 in (617.54 mm) / 32.49775 in (825.44 mm)
16.439 in (417.55 mm) × 1 13/64 in (30.56 mm)
V-TL-right
40.814 in (1036.68 mm) / 32.49775 in (825.44 mm)
16.439 in (417.55 mm) × 1 13/64 in (30.56 mm)
V-TR-left
57.3155 in (1455.81 mm) / 32.49775 in (825.44 mm)
16.439 in (417.55 mm) × 1 13/64 in (30.56 mm)
V-TR-right
73.817 in (1874.95 mm) / 32.49775 in (825.44 mm)
16.439 in (417.55 mm) × 1 13/64 in (30.56 mm)
V-P03L-vent-bottom
90.3185 in (2294.09 mm) / 32.49775 in (825.44 mm)
12 1/2 in (317.5 mm) × 1 13/64 in (30.56 mm)
V-P03L-vent-top
102.881 in (2613.18 mm) / 32.49775 in (825.44 mm)
12 1/2 in (317.5 mm) × 1 13/64 in (30.56 mm)
V-P03R-vent-bottom
107.186 in (2722.52 mm) / 1.8735 in (47.59 mm)
12 1/2 in (317.5 mm) × 1 13/64 in (30.56 mm)
V-P03R-vent-top
107.186 in (2722.52 mm) / 3.139125 in (79.73 mm)
12 1/2 in (317.5 mm) × 1 13/64 in (30.56 mm)
V-P03L-vent-near
109.4985 in (2781.26 mm) / 26.169625 in (664.71 mm)
3.439 in (87.35 mm) × 1 13/64 in (30.56 mm)
V-P03L-vent-far
109.4985 in (2781.26 mm) / 27.43525 in (696.86 mm)
3.439 in (87.35 mm) × 1 13/64 in (30.56 mm)
V-P03R-vent-near
109.4985 in (2781.26 mm) / 28.700875 in (729 mm)
3.439 in (87.35 mm) × 1 13/64 in (30.56 mm)
V-P03R-vent-far
109.4985 in (2781.26 mm) / 29.9665 in (761.15 mm)
3.439 in (87.35 mm) × 1 13/64 in (30.56 mm)
Stock 120 in (3048 mm) × 48 in (1219.2 mm); perimeter trim 1/4 in (6.35 mm); kerf / separation 1/16 in (1.59 mm). Full cut order and offcuts are in the versioned specification.
VENEER-1 · exact rough blank positions
X runs along the stock length; Y across its width. Both start at the illustrated lower-left corner. These are stock coordinates, not assembled fastener coordinates. All dimensions include the stated rough allowance; keep each blank labeled.
Part ID
Stock X / Y
Rough length × width
V-VLB-low
88 15/32 in (2247.11 mm) / 45.686 in (1160.42 mm)
14 1/2 in (368.3 mm) × 7/8 in (22.23 mm)
V-VLB-high
103 1/32 in (2616.99 mm) / 45.686 in (1160.42 mm)
14 1/2 in (368.3 mm) × 7/8 in (22.23 mm)
V-VLT-low
1/4 in (6.35 mm) / 46.686 in (1185.82 mm)
14 1/2 in (368.3 mm) × 7/8 in (22.23 mm)
V-VLT-high
14 13/16 in (376.24 mm) / 46.686 in (1185.82 mm)
14 1/2 in (368.3 mm) × 7/8 in (22.23 mm)
V-VRB-low
29 3/8 in (746.13 mm) / 46.686 in (1185.82 mm)
14 1/2 in (368.3 mm) × 7/8 in (22.23 mm)
V-VRB-high
43 15/16 in (1116.01 mm) / 46.686 in (1185.82 mm)
14 1/2 in (368.3 mm) × 7/8 in (22.23 mm)
V-VRT-low
58 1/2 in (1485.9 mm) / 46.686 in (1185.82 mm)
14 1/2 in (368.3 mm) × 7/8 in (22.23 mm)
V-VRT-high
73 1/16 in (1855.79 mm) / 46.686 in (1185.82 mm)
14 1/2 in (368.3 mm) × 7/8 in (22.23 mm)
V-VLF-near
87 5/8 in (2225.68 mm) / 46.686 in (1185.82 mm)
3 1/2 in (88.9 mm) × 7/8 in (22.23 mm)
V-VLF-far
91 3/16 in (2316.16 mm) / 46.686 in (1185.82 mm)
3 1/2 in (88.9 mm) × 7/8 in (22.23 mm)
V-VLA-near
94 3/4 in (2406.65 mm) / 46.686 in (1185.82 mm)
3 1/2 in (88.9 mm) × 7/8 in (22.23 mm)
V-VLA-far
98 5/16 in (2497.14 mm) / 46.686 in (1185.82 mm)
3 1/2 in (88.9 mm) × 7/8 in (22.23 mm)
V-VRF-near
101 7/8 in (2587.63 mm) / 46.686 in (1185.82 mm)
3 1/2 in (88.9 mm) × 7/8 in (22.23 mm)
V-VRF-far
105 7/16 in (2678.11 mm) / 46.686 in (1185.82 mm)
3 1/2 in (88.9 mm) × 7/8 in (22.23 mm)
V-VRA-near
109 in (2768.6 mm) / 46.686 in (1185.82 mm)
3 1/2 in (88.9 mm) × 7/8 in (22.23 mm)
V-VRA-far
112 9/16 in (2859.09 mm) / 46.686 in (1185.82 mm)
3 1/2 in (88.9 mm) × 7/8 in (22.23 mm)
Stock 120 in (3048 mm) × 48 in (1219.2 mm); perimeter trim 1/4 in (6.35 mm); kerf / separation 1/16 in (1.59 mm). Full cut order and offcuts are in the versioned specification.
VENEER-1 · exact rough blank positions
X runs along the stock length; Y across its width. Both start at the illustrated lower-left corner. These are stock coordinates, not assembled fastener coordinates. All dimensions include the stated rough allowance; keep each blank labeled.
Part ID
Stock X / Y
Rough length × width
V-VLB-near
117 19/32 in (2986.88 mm) / 45.686 in (1160.42 mm)
1.561 in (39.65 mm) × 7/8 in (22.23 mm)
V-VLB-far
116 1/8 in (2949.58 mm) / 46.686 in (1185.82 mm)
1.561 in (39.65 mm) × 7/8 in (22.23 mm)
V-VLT-near
117.7485 in (2990.81 mm) / 46.686 in (1185.82 mm)
1.561 in (39.65 mm) × 7/8 in (22.23 mm)
V-VLT-far
113.5015 in (2882.94 mm) / 38.5595 in (979.41 mm)
1.561 in (39.65 mm) × 7/8 in (22.23 mm)
V-VRB-near
115 1/8 in (2924.18 mm) / 38.5595 in (979.41 mm)
1.561 in (39.65 mm) × 7/8 in (22.23 mm)
V-VRB-far
116.7485 in (2965.41 mm) / 38.5595 in (979.41 mm)
1.561 in (39.65 mm) × 7/8 in (22.23 mm)
V-VRT-near
117.90025 in (2994.67 mm) / 41.670375 in (1058.43 mm)
1.561 in (39.65 mm) × 7/8 in (22.23 mm)
V-VRT-far
114 9/16 in (2909.89 mm) / 31.232125 in (793.3 mm)
1.561 in (39.65 mm) × 7/8 in (22.23 mm)
Stock 120 in (3048 mm) × 48 in (1219.2 mm); perimeter trim 1/4 in (6.35 mm); kerf / separation 1/16 in (1.59 mm). Full cut order and offcuts are in the versioned specification.
VENEER-2 · exact rough blank positions
X runs along the stock length; Y across its width. Both start at the illustrated lower-left corner. These are stock coordinates, not assembled fastener coordinates. All dimensions include the stated rough allowance; keep each blank labeled.
Part ID
Stock X / Y
Rough length × width
V-roof-top
1/4 in (6.35 mm) / 1/4 in (6.35 mm)
60.561 in (1538.25 mm) × 24.561 in (623.85 mm)
Stock 120 in (3048 mm) × 48 in (1219.2 mm); perimeter trim 1/4 in (6.35 mm); kerf / separation 1/16 in (1.59 mm). Full cut order and offcuts are in the versioned specification.
VENEER-3 · exact rough blank positions
X runs along the stock length; Y across its width. Both start at the illustrated lower-left corner. These are stock coordinates, not assembled fastener coordinates. All dimensions include the stated rough allowance; keep each blank labeled.
Part ID
Stock X / Y
Rough length × width
V-back
1/4 in (6.35 mm) / 1/4 in (6.35 mm)
59 3/32 in (1500.98 mm) × 23 3/32 in (586.58 mm)
Stock 120 in (3048 mm) × 48 in (1219.2 mm); perimeter trim 1/4 in (6.35 mm); kerf / separation 1/16 in (1.59 mm). Full cut order and offcuts are in the versioned specification.
HDPE-1 · exact rough blank positions
X runs along the stock length; Y across its width. Both start at the illustrated lower-left corner. These are stock coordinates, not assembled fastener coordinates. All dimensions include the stated rough allowance; keep each blank labeled.
Part ID
Stock X / Y
Rough length × width
ALF1
1/8 in (3.18 mm) / 1/8 in (3.18 mm)
17.91258333 in (454.98 mm) × 0.555 in (14.1 mm)
ALF2
1/8 in (3.18 mm) / 0.805 in (20.45 mm)
17.91258333 in (454.98 mm) × 0.555 in (14.1 mm)
ALF3
1/8 in (3.18 mm) / 1.485 in (37.72 mm)
17.91258333 in (454.98 mm) × 0.555 in (14.1 mm)
ALB1
1/8 in (3.18 mm) / 2.165 in (54.99 mm)
17.91258333 in (454.98 mm) × 0.555 in (14.1 mm)
ALB2
1/8 in (3.18 mm) / 2.845 in (72.26 mm)
17.91258333 in (454.98 mm) × 0.555 in (14.1 mm)
ALB3
1/8 in (3.18 mm) / 3.525 in (89.53 mm)
17.91258333 in (454.98 mm) × 0.555 in (14.1 mm)
Stock 24 in (609.6 mm) × 12 in (304.8 mm); perimeter trim 1/8 in (3.18 mm); kerf / separation 1/8 in (3.18 mm). Full cut order and offcuts are in the versioned specification.
PAD-1 · exact rough blank positions
X runs along the stock length; Y across its width. Both start at the illustrated lower-left corner. These are stock coordinates, not assembled fastener coordinates. All dimensions include the stated rough allowance; keep each blank labeled.
Part ID
Stock X / Y
Rough length × width
STOPLF
1/8 in (3.18 mm) / 1/8 in (3.18 mm)
13.28875 in (337.53 mm) × 0.405 in (10.29 mm)
STOPLB
1/8 in (3.18 mm) / 0.5925 in (15.05 mm)
13.28875 in (337.53 mm) × 0.405 in (10.29 mm)
STOPRF
1/8 in (3.18 mm) / 1.06 in (26.92 mm)
13.28875 in (337.53 mm) × 0.405 in (10.29 mm)
STOPRB
1/8 in (3.18 mm) / 1.5275 in (38.8 mm)
13.28875 in (337.53 mm) × 0.405 in (10.29 mm)
Stock 36 in (914.4 mm) × 12 in (304.8 mm); perimeter trim 1/8 in (3.18 mm); kerf / separation 1/16 in (1.59 mm). Full cut order and offcuts are in the versioned specification.
PINE-FRAME-1 · exact rough blank positions
X runs along the stock length; Y across its width. Both start at the illustrated lower-left corner. These are stock coordinates, not assembled fastener coordinates. All dimensions include the stated rough allowance; keep each blank labeled.
Part ID
Stock X / Y
Rough length × width
F1T
1/8 in (3.18 mm) / 1/8 in (3.18 mm)
58 23/32 in (1491.46 mm) × 2 9/16 in (65.09 mm)
F0T
1/8 in (3.18 mm) / 2 13/16 in (71.44 mm)
53 23/32 in (1364.46 mm) × 2 9/16 in (65.09 mm)
F0L
58 31/32 in (1497.81 mm) / 1/8 in (3.18 mm)
16 19/32 in (421.48 mm) × 2 9/16 in (65.09 mm)
F0R
58 31/32 in (1497.81 mm) / 2 13/16 in (71.44 mm)
16 19/32 in (421.48 mm) × 2 9/16 in (65.09 mm)
F1L
75 11/16 in (1922.46 mm) / 1/8 in (3.18 mm)
14 3/32 in (357.98 mm) × 2 9/16 in (65.09 mm)
F1R
75 11/16 in (1922.46 mm) / 2 13/16 in (71.44 mm)
14 3/32 in (357.98 mm) × 2 9/16 in (65.09 mm)
Stock 96 in (2438.4 mm) × 5 1/2 in (139.7 mm); perimeter trim 1/8 in (3.18 mm); kerf / separation 1/8 in (3.18 mm). Full cut order and offcuts are in the versioned specification.
PINE-THIN-1 · exact rough blank positions
X runs along the stock length; Y across its width. Both start at the illustrated lower-left corner. These are stock coordinates, not assembled fastener coordinates. All dimensions include the stated rough allowance; keep each blank labeled.
Part ID
Stock X / Y
Rough length × width
RTLF
1/8 in (3.18 mm) / 1/8 in (3.18 mm)
24 1/8 in (612.78 mm) × 1 1/16 in (26.99 mm)
RTLA
1/8 in (3.18 mm) / 1 5/16 in (33.34 mm)
24 1/8 in (612.78 mm) × 1 1/16 in (26.99 mm)
RTRF
1/8 in (3.18 mm) / 2 1/2 in (63.5 mm)
24 1/8 in (612.78 mm) × 1 1/16 in (26.99 mm)
RTRA
1/8 in (3.18 mm) / 3 11/16 in (93.66 mm)
24 1/8 in (612.78 mm) × 1 1/16 in (26.99 mm)
RTLL
24 3/8 in (619.13 mm) / 1/8 in (3.18 mm)
16 1/8 in (409.58 mm) × 1 1/16 in (26.99 mm)
RTLR
24 3/8 in (619.13 mm) / 1 5/16 in (33.34 mm)
16 1/8 in (409.58 mm) × 1 1/16 in (26.99 mm)
RTRL
24 3/8 in (619.13 mm) / 2 1/2 in (63.5 mm)
16 1/8 in (409.58 mm) × 1 1/16 in (26.99 mm)
RTRR
24 3/8 in (619.13 mm) / 3 11/16 in (93.66 mm)
16 1/8 in (409.58 mm) × 1 1/16 in (26.99 mm)
VLB
40 5/8 in (1031.88 mm) / 1/8 in (3.18 mm)
14 1/8 in (358.78 mm) × 1 1/16 in (26.99 mm)
VLT
40 5/8 in (1031.88 mm) / 1 5/16 in (33.34 mm)
14 1/8 in (358.78 mm) × 1 1/16 in (26.99 mm)
VRB
40 5/8 in (1031.88 mm) / 2 1/2 in (63.5 mm)
14 1/8 in (358.78 mm) × 1 1/16 in (26.99 mm)
VRT
40 5/8 in (1031.88 mm) / 3 11/16 in (93.66 mm)
14 1/8 in (358.78 mm) × 1 1/16 in (26.99 mm)
VLF
54 7/8 in (1393.83 mm) / 1/8 in (3.18 mm)
3 1/8 in (79.38 mm) × 1 1/16 in (26.99 mm)
VLA
54 7/8 in (1393.83 mm) / 1 5/16 in (33.34 mm)
3 1/8 in (79.38 mm) × 1 1/16 in (26.99 mm)
VRF
54 7/8 in (1393.83 mm) / 2 1/2 in (63.5 mm)
3 1/8 in (79.38 mm) × 1 1/16 in (26.99 mm)
VRA
54 7/8 in (1393.83 mm) / 3 11/16 in (93.66 mm)
3 1/8 in (79.38 mm) × 1 1/16 in (26.99 mm)
Stock 96 in (2438.4 mm) × 5 1/2 in (139.7 mm); perimeter trim 1/8 in (3.18 mm); kerf / separation 1/8 in (3.18 mm). Full cut order and offcuts are in the versioned specification.
PINE-THIN-1 · exact rough blank positions
X runs along the stock length; Y across its width. Both start at the illustrated lower-left corner. These are stock coordinates, not assembled fastener coordinates. All dimensions include the stated rough allowance; keep each blank labeled.
Part ID
Stock X / Y
Rough length × width
LCF2
58 1/8 in (1476.38 mm) / 1/8 in (3.18 mm)
17.715 in (449.96 mm) × 9/16 in (14.29 mm)
LCB2
58 1/8 in (1476.38 mm) / 13/16 in (20.64 mm)
17.715 in (449.96 mm) × 9/16 in (14.29 mm)
LCL
58 1/8 in (1476.38 mm) / 1 1/2 in (38.1 mm)
17.1525 in (435.67 mm) × 9/16 in (14.29 mm)
LCR
58 1/8 in (1476.38 mm) / 2 3/16 in (55.56 mm)
17.1525 in (435.67 mm) × 9/16 in (14.29 mm)
LCF1
58 1/8 in (1476.38 mm) / 2 7/8 in (73.03 mm)
16.261875 in (413.05 mm) × 9/16 in (14.29 mm)
LCF3
58 1/8 in (1476.38 mm) / 3 9/16 in (90.49 mm)
16.261875 in (413.05 mm) × 9/16 in (14.29 mm)
LCB1
58 1/8 in (1476.38 mm) / 4 1/4 in (107.95 mm)
16.261875 in (413.05 mm) × 9/16 in (14.29 mm)
LCB3
75.965 in (1929.51 mm) / 1/8 in (3.18 mm)
16.261875 in (413.05 mm) × 9/16 in (14.29 mm)
LCQ1
92.351875 in (2345.74 mm) / 1/8 in (3.18 mm)
1 5/8 in (41.28 mm) × 9/16 in (14.29 mm)
LCQ2
92.351875 in (2345.74 mm) / 13/16 in (20.64 mm)
1 5/8 in (41.28 mm) × 9/16 in (14.29 mm)
LCP1
92.351875 in (2345.74 mm) / 1 1/2 in (38.1 mm)
1 5/8 in (41.28 mm) × 9/16 in (14.29 mm)
LCP2
92.351875 in (2345.74 mm) / 2 3/16 in (55.56 mm)
1 5/8 in (41.28 mm) × 9/16 in (14.29 mm)
LCQL
92.351875 in (2345.74 mm) / 2 7/8 in (73.03 mm)
1 1/2 in (38.1 mm) × 9/16 in (14.29 mm)
LCQR
92.351875 in (2345.74 mm) / 3 9/16 in (90.49 mm)
1 1/2 in (38.1 mm) × 9/16 in (14.29 mm)
LCPL
92.351875 in (2345.74 mm) / 4 1/4 in (107.95 mm)
1 1/2 in (38.1 mm) × 9/16 in (14.29 mm)
LCPR
94.101875 in (2390.19 mm) / 1/8 in (3.18 mm)
1 1/2 in (38.1 mm) × 9/16 in (14.29 mm)
Stock 96 in (2438.4 mm) × 5 1/2 in (139.7 mm); perimeter trim 1/8 in (3.18 mm); kerf / separation 1/8 in (3.18 mm). Full cut order and offcuts are in the versioned specification.
D602-1 · exact length positions
Start at the illustrated LEFT end. These are stock positions along the profile, not assembly coordinates. The diagram uses a schematic lane height; it is not a width-cut instruction.
Part ID
Start along profile
Rough cut length
TRACK-B
0 in (0 mm)
53.48775 in (1358.59 mm)
Stock 144 in (3657.6 mm) long; supplied D602 cross-section. End trim 0 in (0 mm); saw kerf 1/8 in (3.18 mm). Preserve the supplier profile and follow the accepted hardware trial.
D603-1 · exact length positions
Start at the illustrated LEFT end. These are stock positions along the profile, not assembly coordinates. The diagram uses a schematic lane height; it is not a width-cut instruction.
Part ID
Start along profile
Rough cut length
TRACK-T
0 in (0 mm)
53.48775 in (1358.59 mm)
JAMBL
53.61275 in (1361.76 mm)
13.28875 in (337.53 mm)
JAMBR
67.0265 in (1702.47 mm)
13.28875 in (337.53 mm)
Stock 144 in (3657.6 mm) long; supplied D603 cross-section. End trim 0 in (0 mm); saw kerf 1/8 in (3.18 mm). Preserve the supplier profile and follow the accepted hardware trial.
D610-1 · exact length positions
Start at the illustrated LEFT end. These are stock positions along the profile, not assembly coordinates. The diagram uses a schematic lane height; it is not a width-cut instruction.
Part ID
Start along profile
Rough cut length
HL
0 in (0 mm)
27.553375 in (699.86 mm)
HR
27.678375 in (703.03 mm)
27.553375 in (699.86 mm)
Stock 144 in (3657.6 mm) long; supplied D610 cross-section. End trim 0 in (0 mm); saw kerf 1/8 in (3.18 mm). Preserve the supplier profile and follow the accepted hardware trial.
PINE-TRIAL · exact rough blank positions
X runs along the stock length; Y across its width. Both start at the illustrated lower-left corner. These are stock coordinates, not assembled fastener coordinates. All dimensions include the stated rough allowance; keep each blank labeled.
Part ID
Stock X / Y
Rough length × width
TRIAL-track
1/8 in (3.18 mm) / 1/8 in (3.18 mm)
36 in (914.4 mm) × 5 1/4 in (133.35 mm)
TRIAL-capture
36 1/4 in (920.75 mm) / 1/8 in (3.18 mm)
24 in (609.6 mm) × 5 1/4 in (133.35 mm)
TRIAL-finish
60 3/8 in (1533.53 mm) / 1/8 in (3.18 mm)
24 in (609.6 mm) × 5 1/4 in (133.35 mm)
Stock 96 in (2438.4 mm) × 5 1/2 in (139.7 mm); perimeter trim 1/8 in (3.18 mm); kerf / separation 1/8 in (3.18 mm). Full cut order and offcuts are in the versioned specification.
LINER · exact rough blank positions
X runs along the stock length; Y across its width. Both start at the illustrated lower-left corner. These are stock coordinates, not assembled fastener coordinates. All dimensions include the stated rough allowance; keep each blank labeled.
Part ID
Stock X / Y
Rough length × width
LINER-BLANK
0 in (0 mm) / 0 in (0 mm)
84 in (2133.6 mm) × 48 in (1219.2 mm)
Stock 120 in (3048 mm) × 96 in (2438.4 mm); perimeter trim 0 in (0 mm); kerf / separation 0 in (0 mm). Full cut order and offcuts are in the versioned specification.
UNDERLAY · exact rough blank positions
X runs along the stock length; Y across its width. Both start at the illustrated lower-left corner. These are stock coordinates, not assembled fastener coordinates. All dimensions include the stated rough allowance; keep each blank labeled.
Part ID
Stock X / Y
Rough length × width
UNDERLAY-BLANK
0 in (0 mm) / 0 in (0 mm)
84 in (2133.6 mm) × 48 in (1219.2 mm)
Stock 120 in (3048 mm) × 60 in (1524 mm); perimeter trim 0 in (0 mm); kerf / separation 0 in (0 mm). Full cut order and offcuts are in the versioned specification.
Use the exact fastener stations
Coordinates are X from outside LEFT, Y from outside FRONT and Z from FLOOR UNDERSIDE. Direction gives the driver axis. Mark these datums on the setup board and transfer through clamped mating parts. Pilot sizes start with the receiving trial; include the drill point in the depth stop.
Veneer has head-access openings. Every head stays on its original wood bearing plane, so the planned receiver engagement does not change. Revised side-jamb and front-roof rows alternate between solid frame layers, avoiding the glue seam.
Hardware
Installed count
W125
119
W200
32
W100
128
TRACK
38
Exact part drawings, all stock coordinates and cut order are included in the workshop package. The receiving record is separate from these digital dimensions.
X / Y / Z from the outside assembly datums. Use the exact named first part and receiver. Hardware samples control clearance/countersink forms.
ID
Through → receiver
Start X / Y / Z
Direction / length
S-CLB-0
P01 → CLB
1.45312 / 3.10938 / 0 in 36.91 / 78.98 / 0.00 mm
+Z · 1 1/4 in (31.75 mm)
S-CLB-1
P01 → CLB
1.45312 / 7.90625 / 0 in 36.91 / 200.82 / 0.00 mm
+Z · 1 1/4 in (31.75 mm)
S-CLB-2
P01 → CLB
1.45312 / 12.70312 / 0 in 36.91 / 322.66 / 0.00 mm
+Z · 1 1/4 in (31.75 mm)
S-CLB-3
P01 → CLB
1.45312 / 17.5 / 0 in 36.91 / 444.50 / 0.00 mm
+Z · 1 1/4 in (31.75 mm)
S-CLB-4
P01 → CLB
1.45312 / 22.29688 / 0 in 36.91 / 566.34 / 0.00 mm
+Z · 1 1/4 in (31.75 mm)
S-CRB-0
P01 → CRB
58.54688 / 3.10938 / 0 in 1487.09 / 78.98 / 0.00 mm
+Z · 1 1/4 in (31.75 mm)
S-CRB-1
P01 → CRB
58.54688 / 7.90625 / 0 in 1487.09 / 200.82 / 0.00 mm
+Z · 1 1/4 in (31.75 mm)
S-CRB-2
P01 → CRB
58.54688 / 12.70312 / 0 in 1487.09 / 322.66 / 0.00 mm
+Z · 1 1/4 in (31.75 mm)
S-CRB-3
P01 → CRB
58.54688 / 17.5 / 0 in 1487.09 / 444.50 / 0.00 mm
+Z · 1 1/4 in (31.75 mm)
S-CRB-4
P01 → CRB
58.54688 / 22.29688 / 0 in 1487.09 / 566.34 / 0.00 mm
+Z · 1 1/4 in (31.75 mm)
S-CF-0
P01 → CF
3.20312 / 2.85938 / 0 in 81.36 / 72.63 / 0.00 mm
+Z · 1 1/4 in (31.75 mm)
S-CF-1
P01 → CF
9.15799 / 2.85938 / 0 in 232.61 / 72.63 / 0.00 mm
+Z · 1 1/4 in (31.75 mm)
S-CF-2
P01 → CF
15.11285 / 2.85938 / 0 in 383.87 / 72.63 / 0.00 mm
+Z · 1 1/4 in (31.75 mm)
S-CF-3
P01 → CF
21.06771 / 2.85938 / 0 in 535.12 / 72.63 / 0.00 mm
+Z · 1 1/4 in (31.75 mm)
Fastener stations · 15–28
X / Y / Z from the outside assembly datums. Use the exact named first part and receiver. Hardware samples control clearance/countersink forms.
ID
Through → receiver
Start X / Y / Z
Direction / length
S-CF-4
P01 → CF
27.02257 / 2.85938 / 0 in 686.37 / 72.63 / 0.00 mm
+Z · 1 1/4 in (31.75 mm)
S-CF-5
P01 → CF
32.97743 / 2.85938 / 0 in 837.63 / 72.63 / 0.00 mm
+Z · 1 1/4 in (31.75 mm)
S-CF-6
P01 → CF
38.93229 / 2.85938 / 0 in 988.88 / 72.63 / 0.00 mm
+Z · 1 1/4 in (31.75 mm)
S-CF-7
P01 → CF
44.88715 / 2.85938 / 0 in 1140.13 / 72.63 / 0.00 mm
+Z · 1 1/4 in (31.75 mm)
S-CF-8
P01 → CF
50.84201 / 2.85938 / 0 in 1291.39 / 72.63 / 0.00 mm
+Z · 1 1/4 in (31.75 mm)
S-CF-9
P01 → CF
56.79688 / 2.85938 / 0 in 1442.64 / 72.63 / 0.00 mm
+Z · 1 1/4 in (31.75 mm)
S-CB-0
P01 → CB
3.20312 / 22.54688 / 0 in 81.36 / 572.69 / 0.00 mm
+Z · 1 1/4 in (31.75 mm)
S-CB-1
P01 → CB
9.15799 / 22.54688 / 0 in 232.61 / 572.69 / 0.00 mm
+Z · 1 1/4 in (31.75 mm)
S-CB-2
P01 → CB
15.11285 / 22.54688 / 0 in 383.87 / 572.69 / 0.00 mm
+Z · 1 1/4 in (31.75 mm)
S-CB-3
P01 → CB
21.06771 / 22.54688 / 0 in 535.12 / 572.69 / 0.00 mm
+Z · 1 1/4 in (31.75 mm)
S-CB-4
P01 → CB
27.02257 / 22.54688 / 0 in 686.37 / 572.69 / 0.00 mm
+Z · 1 1/4 in (31.75 mm)
S-CB-5
P01 → CB
32.97743 / 22.54688 / 0 in 837.63 / 572.69 / 0.00 mm
+Z · 1 1/4 in (31.75 mm)
S-CB-6
P01 → CB
38.93229 / 22.54688 / 0 in 988.88 / 572.69 / 0.00 mm
+Z · 1 1/4 in (31.75 mm)
S-CB-7
P01 → CB
44.88715 / 22.54688 / 0 in 1140.13 / 572.69 / 0.00 mm
+Z · 1 1/4 in (31.75 mm)
Fastener stations · 29–42
X / Y / Z from the outside assembly datums. Use the exact named first part and receiver. Hardware samples control clearance/countersink forms.
ID
Through → receiver
Start X / Y / Z
Direction / length
S-CB-8
P01 → CB
50.84201 / 22.54688 / 0 in 1291.39 / 572.69 / 0.00 mm
+Z · 1 1/4 in (31.75 mm)
S-CB-9
P01 → CB
56.79688 / 22.54688 / 0 in 1442.64 / 572.69 / 0.00 mm
+Z · 1 1/4 in (31.75 mm)
S-WL-CLB-0
P03L → CLB
0 / 3.10938 / 1.45312 in 0.00 / 78.98 / 36.91 mm
+X · 1 1/4 in (31.75 mm)
S-WL-CLB-1
P03L → CLB
0 / 7.90625 / 1.45312 in 0.00 / 200.82 / 36.91 mm
+X · 1 1/4 in (31.75 mm)
S-WL-CLB-2
P03L → CLB
0 / 12.70312 / 1.45312 in 0.00 / 322.66 / 36.91 mm
+X · 1 1/4 in (31.75 mm)
S-WL-CLB-3
P03L → CLB
0 / 17.5 / 1.45312 in 0.00 / 444.50 / 36.91 mm
+X · 1 1/4 in (31.75 mm)
S-WL-CLB-4
P03L → CLB
0 / 22.29688 / 1.45312 in 0.00 / 566.34 / 36.91 mm
+X · 1 1/4 in (31.75 mm)
S-WL-CLT-0
P03L → CLT
0 / 2.5 / 22.54688 in 0.00 / 63.50 / 572.69 mm
+X · 1 1/4 in (31.75 mm)
S-WL-CLT-1
P03L → CLT
0 / 7.44922 / 22.54688 in 0.00 / 189.21 / 572.69 mm
+X · 1 1/4 in (31.75 mm)
S-WL-CLT-2
P03L → CLT
0 / 12.39844 / 22.54688 in 0.00 / 314.92 / 572.69 mm
+X · 1 1/4 in (31.75 mm)
S-WL-CLT-3
P03L → CLT
0 / 17.34766 / 22.54688 in 0.00 / 440.63 / 572.69 mm
+X · 1 1/4 in (31.75 mm)
S-WL-CLT-4
P03L → CLT
0 / 22.29688 / 22.54688 in 0.00 / 566.34 / 572.69 mm
+X · 1 1/4 in (31.75 mm)
S-WL-CLU-0
P03L → CLU
0 / 22.54688 / 3.20312 in 0.00 / 572.69 / 81.36 mm
+X · 1 1/4 in (31.75 mm)
S-WL-CLU-1
P03L → CLU
0 / 22.54688 / 9.06771 in 0.00 / 572.69 / 230.32 mm
+X · 1 1/4 in (31.75 mm)
Fastener stations · 43–56
X / Y / Z from the outside assembly datums. Use the exact named first part and receiver. Hardware samples control clearance/countersink forms.
ID
Through → receiver
Start X / Y / Z
Direction / length
S-WL-CLU-2
P03L → CLU
0 / 22.54688 / 14.93229 in 0.00 / 572.69 / 379.28 mm
+X · 1 1/4 in (31.75 mm)
S-WL-CLU-3
P03L → CLU
0 / 22.54688 / 20.79688 in 0.00 / 572.69 / 528.24 mm
+X · 1 1/4 in (31.75 mm)
S-WR-CRB-0
P03R → CRB
60 / 3.10938 / 1.45312 in 1524.00 / 78.98 / 36.91 mm
−X · 1 1/4 in (31.75 mm)
S-WR-CRB-1
P03R → CRB
60 / 7.90625 / 1.45312 in 1524.00 / 200.82 / 36.91 mm
−X · 1 1/4 in (31.75 mm)
S-WR-CRB-2
P03R → CRB
60 / 12.70312 / 1.45312 in 1524.00 / 322.66 / 36.91 mm
−X · 1 1/4 in (31.75 mm)
S-WR-CRB-3
P03R → CRB
60 / 17.5 / 1.45312 in 1524.00 / 444.50 / 36.91 mm
−X · 1 1/4 in (31.75 mm)
S-WR-CRB-4
P03R → CRB
60 / 22.29688 / 1.45312 in 1524.00 / 566.34 / 36.91 mm
−X · 1 1/4 in (31.75 mm)
S-WR-CRT-0
P03R → CRT
60 / 2.5 / 22.54688 in 1524.00 / 63.50 / 572.69 mm
−X · 1 1/4 in (31.75 mm)
S-WR-CRT-1
P03R → CRT
60 / 7.44922 / 22.54688 in 1524.00 / 189.21 / 572.69 mm
−X · 1 1/4 in (31.75 mm)
S-WR-CRT-2
P03R → CRT
60 / 12.39844 / 22.54688 in 1524.00 / 314.92 / 572.69 mm
−X · 1 1/4 in (31.75 mm)
S-WR-CRT-3
P03R → CRT
60 / 17.34766 / 22.54688 in 1524.00 / 440.63 / 572.69 mm
−X · 1 1/4 in (31.75 mm)
S-WR-CRT-4
P03R → CRT
60 / 22.29688 / 22.54688 in 1524.00 / 566.34 / 572.69 mm
−X · 1 1/4 in (31.75 mm)
S-WR-CRU-0
P03R → CRU
60 / 22.54688 / 3.20312 in 1524.00 / 572.69 / 81.36 mm
−X · 1 1/4 in (31.75 mm)
S-WR-CRU-1
P03R → CRU
60 / 22.54688 / 9.06771 in 1524.00 / 572.69 / 230.32 mm
−X · 1 1/4 in (31.75 mm)
Fastener stations · 57–70
X / Y / Z from the outside assembly datums. Use the exact named first part and receiver. Hardware samples control clearance/countersink forms.
ID
Through → receiver
Start X / Y / Z
Direction / length
S-WR-CRU-2
P03R → CRU
60 / 22.54688 / 14.93229 in 1524.00 / 572.69 / 379.28 mm
−X · 1 1/4 in (31.75 mm)
S-WR-CRU-3
P03R → CRU
60 / 22.54688 / 20.79688 in 1524.00 / 572.69 / 528.24 mm
−X · 1 1/4 in (31.75 mm)
S-B-CB-0
P04 → CB
3.20312 / 24 / 1.45312 in 81.36 / 609.60 / 36.91 mm
−Y · 1 1/4 in (31.75 mm)
S-B-CB-1
P04 → CB
9.15799 / 24 / 1.45312 in 232.61 / 609.60 / 36.91 mm
−Y · 1 1/4 in (31.75 mm)
S-B-CB-2
P04 → CB
15.11285 / 24 / 1.45312 in 383.87 / 609.60 / 36.91 mm
−Y · 1 1/4 in (31.75 mm)
S-B-CB-3
P04 → CB
21.06771 / 24 / 1.45312 in 535.12 / 609.60 / 36.91 mm
−Y · 1 1/4 in (31.75 mm)
S-B-CB-4
P04 → CB
27.02257 / 24 / 1.45312 in 686.37 / 609.60 / 36.91 mm
−Y · 1 1/4 in (31.75 mm)
S-B-CB-5
P04 → CB
32.97743 / 24 / 1.45312 in 837.63 / 609.60 / 36.91 mm
−Y · 1 1/4 in (31.75 mm)
S-B-CB-6
P04 → CB
38.93229 / 24 / 1.45312 in 988.88 / 609.60 / 36.91 mm
−Y · 1 1/4 in (31.75 mm)
S-B-CB-7
P04 → CB
44.88715 / 24 / 1.45312 in 1140.13 / 609.60 / 36.91 mm
−Y · 1 1/4 in (31.75 mm)
S-B-CB-8
P04 → CB
50.84201 / 24 / 1.45312 in 1291.39 / 609.60 / 36.91 mm
−Y · 1 1/4 in (31.75 mm)
S-B-CB-9
P04 → CB
56.79688 / 24 / 1.45312 in 1442.64 / 609.60 / 36.91 mm
−Y · 1 1/4 in (31.75 mm)
S-B-CT-0
P04 → CT
3.20312 / 24 / 22.54688 in 81.36 / 609.60 / 572.69 mm
−Y · 1 1/4 in (31.75 mm)
S-B-CT-1
P04 → CT
9.15799 / 24 / 22.54688 in 232.61 / 609.60 / 572.69 mm
−Y · 1 1/4 in (31.75 mm)
Fastener stations · 71–84
X / Y / Z from the outside assembly datums. Use the exact named first part and receiver. Hardware samples control clearance/countersink forms.
ID
Through → receiver
Start X / Y / Z
Direction / length
S-B-CT-2
P04 → CT
15.11285 / 24 / 22.54688 in 383.87 / 609.60 / 572.69 mm
−Y · 1 1/4 in (31.75 mm)
S-B-CT-3
P04 → CT
21.06771 / 24 / 22.54688 in 535.12 / 609.60 / 572.69 mm
−Y · 1 1/4 in (31.75 mm)
S-B-CT-4
P04 → CT
27.02257 / 24 / 22.54688 in 686.37 / 609.60 / 572.69 mm
−Y · 1 1/4 in (31.75 mm)
S-B-CT-5
P04 → CT
32.97743 / 24 / 22.54688 in 837.63 / 609.60 / 572.69 mm
−Y · 1 1/4 in (31.75 mm)
S-B-CT-6
P04 → CT
38.93229 / 24 / 22.54688 in 988.88 / 609.60 / 572.69 mm
−Y · 1 1/4 in (31.75 mm)
S-B-CT-7
P04 → CT
44.88715 / 24 / 22.54688 in 1140.13 / 609.60 / 572.69 mm
−Y · 1 1/4 in (31.75 mm)
S-B-CT-8
P04 → CT
50.84201 / 24 / 22.54688 in 1291.39 / 609.60 / 572.69 mm
−Y · 1 1/4 in (31.75 mm)
S-B-CT-9
P04 → CT
56.79688 / 24 / 22.54688 in 1442.64 / 609.60 / 572.69 mm
−Y · 1 1/4 in (31.75 mm)
S-B-CLU-0
P04 → CLU
1.45312 / 24 / 3.50312 in 36.91 / 609.60 / 88.98 mm
−Y · 1 1/4 in (31.75 mm)
S-B-CLU-1
P04 → CLU
1.45312 / 24 / 9.36771 in 36.91 / 609.60 / 237.94 mm
−Y · 1 1/4 in (31.75 mm)
S-B-CLU-2
P04 → CLU
1.45312 / 24 / 15.23229 in 36.91 / 609.60 / 386.90 mm
−Y · 1 1/4 in (31.75 mm)
S-B-CLU-3
P04 → CLU
1.45312 / 24 / 21.09688 in 36.91 / 609.60 / 535.86 mm
−Y · 1 1/4 in (31.75 mm)
S-B-CRU-0
P04 → CRU
58.54688 / 24 / 3.50312 in 1487.09 / 609.60 / 88.98 mm
−Y · 1 1/4 in (31.75 mm)
S-B-CRU-1
P04 → CRU
58.54688 / 24 / 9.36771 in 1487.09 / 609.60 / 237.94 mm
−Y · 1 1/4 in (31.75 mm)
Fastener stations · 85–98
X / Y / Z from the outside assembly datums. Use the exact named first part and receiver. Hardware samples control clearance/countersink forms.
ID
Through → receiver
Start X / Y / Z
Direction / length
S-B-CRU-2
P04 → CRU
58.54688 / 24 / 15.23229 in 1487.09 / 609.60 / 386.90 mm
−Y · 1 1/4 in (31.75 mm)
S-B-CRU-3
P04 → CRU
58.54688 / 24 / 21.09688 in 1487.09 / 609.60 / 535.86 mm
−Y · 1 1/4 in (31.75 mm)
S-RBL-0
P03L → RB2
0 / 1.05469 / 1.70312 in 0.00 / 26.79 / 43.26 mm
+X · 2 in (50.8 mm)
S-RBL-1
P03L → RB2
0 / 1.05469 / 5.82812 in 0.00 / 26.79 / 148.03 mm
+X · 2 in (50.8 mm)
S-JL-0
P03L → F0L
0 / 0.375 / 7.82812 in 0.00 / 9.52 / 198.83 mm
+X · 2 in (50.8 mm)
S-JL-1
P03L → F1L
0 / 1.125 / 12.65104 in 0.00 / 28.57 / 321.34 mm
+X · 2 in (50.8 mm)
S-JL-2
P03L → F0L
0 / 0.375 / 17.47396 in 0.00 / 9.52 / 443.84 mm
+X · 2 in (50.8 mm)
S-JL-3
P03L → F1T
0 / 1.125 / 22.29688 in 0.00 / 28.57 / 566.34 mm
+X · 2 in (50.8 mm)
S-RBR-0
P03R → RB2
60 / 1.05469 / 1.70312 in 1524.00 / 26.79 / 43.26 mm
−X · 2 in (50.8 mm)
S-RBR-1
P03R → RB2
60 / 1.05469 / 5.82812 in 1524.00 / 26.79 / 148.03 mm
−X · 2 in (50.8 mm)
S-JR-0
P03R → F0R
60 / 0.375 / 7.82812 in 1524.00 / 9.52 / 198.83 mm
−X · 2 in (50.8 mm)
S-JR-1
P03R → F1R
60 / 1.125 / 12.65104 in 1524.00 / 28.57 / 321.34 mm
−X · 2 in (50.8 mm)
S-JR-2
P03R → F0R
60 / 0.375 / 17.47396 in 1524.00 / 9.52 / 443.84 mm
−X · 2 in (50.8 mm)
S-JR-3
P03R → F1T
60 / 1.125 / 22.29688 in 1524.00 / 28.57 / 566.34 mm
−X · 2 in (50.8 mm)
Fastener stations · 99–112
X / Y / Z from the outside assembly datums. Use the exact named first part and receiver. Hardware samples control clearance/countersink forms.
ID
Through → receiver
Start X / Y / Z
Direction / length
S-RBF-0
RB1 → RB3
3.20312 / 0 / 1.45312 in 81.36 / 0.00 / 36.91 mm
+Y · 2 in (50.8 mm)
S-RBF-1
RB1 → RB3
9.15799 / 0 / 1.45312 in 232.61 / 0.00 / 36.91 mm
+Y · 2 in (50.8 mm)
S-RBF-2
RB1 → RB3
15.11285 / 0 / 1.45312 in 383.87 / 0.00 / 36.91 mm
+Y · 2 in (50.8 mm)
S-RBF-3
RB1 → RB3
21.06771 / 0 / 1.45312 in 535.12 / 0.00 / 36.91 mm
+Y · 2 in (50.8 mm)
S-RBF-4
RB1 → RB3
27.02257 / 0 / 1.45312 in 686.37 / 0.00 / 36.91 mm
+Y · 2 in (50.8 mm)
S-RBF-5
RB1 → RB3
32.97743 / 0 / 1.45312 in 837.63 / 0.00 / 36.91 mm
+Y · 2 in (50.8 mm)
S-RBF-6
RB1 → RB3
38.93229 / 0 / 1.45312 in 988.88 / 0.00 / 36.91 mm
+Y · 2 in (50.8 mm)
S-RBF-7
RB1 → RB3
44.88715 / 0 / 1.45312 in 1140.13 / 0.00 / 36.91 mm
+Y · 2 in (50.8 mm)
S-RBF-8
RB1 → RB3
50.84201 / 0 / 1.45312 in 1291.39 / 0.00 / 36.91 mm
+Y · 2 in (50.8 mm)
S-RBF-9
RB1 → RB3
56.79688 / 0 / 1.45312 in 1442.64 / 0.00 / 36.91 mm
+Y · 2 in (50.8 mm)
S-RBC-0
CF → RB3
3.57812 / 3.60938 / 1.45312 in 90.88 / 91.68 / 36.91 mm
−Y · 2 in (50.8 mm)
S-RBC-1
CF → RB3
9.53299 / 3.60938 / 1.45312 in 242.14 / 91.68 / 36.91 mm
−Y · 2 in (50.8 mm)
S-RBC-2
CF → RB3
15.48785 / 3.60938 / 1.45312 in 393.39 / 91.68 / 36.91 mm
−Y · 2 in (50.8 mm)
S-RBC-3
CF → RB3
21.44271 / 3.60938 / 1.45312 in 544.64 / 91.68 / 36.91 mm
−Y · 2 in (50.8 mm)
Fastener stations · 113–126
X / Y / Z from the outside assembly datums. Use the exact named first part and receiver. Hardware samples control clearance/countersink forms.
ID
Through → receiver
Start X / Y / Z
Direction / length
S-RBC-4
CF → RB3
27.39757 / 3.60938 / 1.45312 in 695.90 / 91.68 / 36.91 mm
−Y · 2 in (50.8 mm)
S-RBC-5
CF → RB3
33.35243 / 3.60938 / 1.45312 in 847.15 / 91.68 / 36.91 mm
−Y · 2 in (50.8 mm)
S-RBC-6
CF → RB3
39.30729 / 3.60938 / 1.45312 in 998.41 / 91.68 / 36.91 mm
−Y · 2 in (50.8 mm)
S-RBC-7
CF → RB3
45.26215 / 3.60938 / 1.45312 in 1149.66 / 91.68 / 36.91 mm
−Y · 2 in (50.8 mm)
S-RBC-8
CF → RB3
51.21701 / 3.60938 / 1.45312 in 1300.91 / 91.68 / 36.91 mm
−Y · 2 in (50.8 mm)
S-RBC-9
CF → RB3
57.17188 / 3.60938 / 1.45312 in 1452.17 / 91.68 / 36.91 mm
−Y · 2 in (50.8 mm)
S-VLB-0
VLB → P03L
-0.375 / 5.625 / 7.07812 in -9.52 / 142.88 / 179.78 mm
+X · 1 in (25.4 mm)
S-VLB-1
VLB → P03L
-0.375 / 8.8125 / 7.07812 in -9.52 / 223.84 / 179.78 mm
+X · 1 in (25.4 mm)
S-VLB-2
VLB → P03L
-0.375 / 12 / 7.07812 in -9.52 / 304.80 / 179.78 mm
+X · 1 in (25.4 mm)
S-VLB-3
VLB → P03L
-0.375 / 15.1875 / 7.07812 in -9.52 / 385.76 / 179.78 mm
+X · 1 in (25.4 mm)
S-VLB-4
VLB → P03L
-0.375 / 18.375 / 7.07812 in -9.52 / 466.72 / 179.78 mm
+X · 1 in (25.4 mm)
S-VLT-0
VLT → P03L
-0.375 / 5.625 / 11.57812 in -9.52 / 142.88 / 294.08 mm
+X · 1 in (25.4 mm)
S-VLT-1
VLT → P03L
-0.375 / 8.8125 / 11.57812 in -9.52 / 223.84 / 294.08 mm
+X · 1 in (25.4 mm)
S-VLT-2
VLT → P03L
-0.375 / 12 / 11.57812 in -9.52 / 304.80 / 294.08 mm
+X · 1 in (25.4 mm)
Fastener stations · 127–140
X / Y / Z from the outside assembly datums. Use the exact named first part and receiver. Hardware samples control clearance/countersink forms.
ID
Through → receiver
Start X / Y / Z
Direction / length
S-VLT-3
VLT → P03L
-0.375 / 15.1875 / 11.57812 in -9.52 / 385.76 / 294.08 mm
+X · 1 in (25.4 mm)
S-VLT-4
VLT → P03L
-0.375 / 18.375 / 11.57812 in -9.52 / 466.72 / 294.08 mm
+X · 1 in (25.4 mm)
S-VLF-0
VLF → P03L
-0.375 / 5.25 / 8.20312 in -9.52 / 133.35 / 208.36 mm
+X · 1 in (25.4 mm)
S-VLF-1
VLF → P03L
-0.375 / 5.25 / 10.45312 in -9.52 / 133.35 / 265.51 mm
+X · 1 in (25.4 mm)
S-VLA-0
VLA → P03L
-0.375 / 18.75 / 8.20312 in -9.52 / 476.25 / 208.36 mm
+X · 1 in (25.4 mm)
S-VLA-1
VLA → P03L
-0.375 / 18.75 / 10.45312 in -9.52 / 476.25 / 265.51 mm
+X · 1 in (25.4 mm)
S-VRB-0
VRB → P03R
60.375 / 5.625 / 7.07812 in 1533.52 / 142.88 / 179.78 mm
−X · 1 in (25.4 mm)
S-VRB-1
VRB → P03R
60.375 / 8.8125 / 7.07812 in 1533.52 / 223.84 / 179.78 mm
−X · 1 in (25.4 mm)
S-VRB-2
VRB → P03R
60.375 / 12 / 7.07812 in 1533.52 / 304.80 / 179.78 mm
−X · 1 in (25.4 mm)
S-VRB-3
VRB → P03R
60.375 / 15.1875 / 7.07812 in 1533.52 / 385.76 / 179.78 mm
−X · 1 in (25.4 mm)
S-VRB-4
VRB → P03R
60.375 / 18.375 / 7.07812 in 1533.52 / 466.72 / 179.78 mm
−X · 1 in (25.4 mm)
S-VRT-0
VRT → P03R
60.375 / 5.625 / 11.57812 in 1533.52 / 142.88 / 294.08 mm
−X · 1 in (25.4 mm)
S-VRT-1
VRT → P03R
60.375 / 8.8125 / 11.57812 in 1533.52 / 223.84 / 294.08 mm
−X · 1 in (25.4 mm)
S-VRT-2
VRT → P03R
60.375 / 12 / 11.57812 in 1533.52 / 304.80 / 294.08 mm
−X · 1 in (25.4 mm)
Fastener stations · 141–154
X / Y / Z from the outside assembly datums. Use the exact named first part and receiver. Hardware samples control clearance/countersink forms.
ID
Through → receiver
Start X / Y / Z
Direction / length
S-VRT-3
VRT → P03R
60.375 / 15.1875 / 11.57812 in 1533.52 / 385.76 / 294.08 mm
−X · 1 in (25.4 mm)
S-VRT-4
VRT → P03R
60.375 / 18.375 / 11.57812 in 1533.52 / 466.72 / 294.08 mm
−X · 1 in (25.4 mm)
S-VRF-0
VRF → P03R
60.375 / 5.25 / 8.20312 in 1533.52 / 133.35 / 208.36 mm
−X · 1 in (25.4 mm)
S-VRF-1
VRF → P03R
60.375 / 5.25 / 10.45312 in 1533.52 / 133.35 / 265.51 mm
−X · 1 in (25.4 mm)
S-VRA-0
VRA → P03R
60.375 / 18.75 / 8.20312 in 1533.52 / 476.25 / 208.36 mm
−X · 1 in (25.4 mm)
S-VRA-1
VRA → P03R
60.375 / 18.75 / 10.45312 in 1533.52 / 476.25 / 265.51 mm
−X · 1 in (25.4 mm)
S-CR-0
P02 → CR
30 / 1.875 / 24 in 762.00 / 47.62 / 609.60 mm
−Z · 1 1/4 in (31.75 mm)
S-CR-1
P02 → CR
30 / 6.76172 / 24 in 762.00 / 171.75 / 609.60 mm
−Z · 1 1/4 in (31.75 mm)
S-CR-2
P02 → CR
30 / 11.64844 / 24 in 762.00 / 295.87 / 609.60 mm
−Z · 1 1/4 in (31.75 mm)
S-CR-3
P02 → CR
30 / 16.53516 / 24 in 762.00 / 419.99 / 609.60 mm
−Z · 1 1/4 in (31.75 mm)
S-CR-4
P02 → CR
30 / 21.42188 / 24 in 762.00 / 544.12 / 609.60 mm
−Z · 1 1/4 in (31.75 mm)
S-RTLF-0
RTLF → P02
5.625 / 3.25 / 22.92188 in 142.88 / 82.55 / 582.22 mm
+Z · 1 in (25.4 mm)
S-RTLF-1
RTLF → P02
10.175 / 3.25 / 22.92188 in 258.44 / 82.55 / 582.22 mm
+Z · 1 in (25.4 mm)
S-RTLF-2
RTLF → P02
14.725 / 3.25 / 22.92188 in 374.01 / 82.55 / 582.22 mm
+Z · 1 in (25.4 mm)
Fastener stations · 155–168
X / Y / Z from the outside assembly datums. Use the exact named first part and receiver. Hardware samples control clearance/countersink forms.
ID
Through → receiver
Start X / Y / Z
Direction / length
S-RTLF-3
RTLF → P02
19.275 / 3.25 / 22.92188 in 489.58 / 82.55 / 582.22 mm
+Z · 1 in (25.4 mm)
S-RTLF-4
RTLF → P02
23.825 / 3.25 / 22.92188 in 605.15 / 82.55 / 582.22 mm
+Z · 1 in (25.4 mm)
S-RTLF-5
RTLF → P02
28.375 / 3.25 / 22.92188 in 720.72 / 82.55 / 582.22 mm
+Z · 1 in (25.4 mm)
S-RTLA-0
RTLA → P02
5.625 / 20.75 / 22.92188 in 142.88 / 527.05 / 582.22 mm
+Z · 1 in (25.4 mm)
S-RTLA-1
RTLA → P02
10.175 / 20.75 / 22.92188 in 258.44 / 527.05 / 582.22 mm
+Z · 1 in (25.4 mm)
S-RTLA-2
RTLA → P02
14.725 / 20.75 / 22.92188 in 374.01 / 527.05 / 582.22 mm
+Z · 1 in (25.4 mm)
S-RTLA-3
RTLA → P02
19.275 / 20.75 / 22.92188 in 489.58 / 527.05 / 582.22 mm
+Z · 1 in (25.4 mm)
S-RTLA-4
RTLA → P02
23.825 / 20.75 / 22.92188 in 605.15 / 527.05 / 582.22 mm
+Z · 1 in (25.4 mm)
S-RTLA-5
RTLA → P02
28.375 / 20.75 / 22.92188 in 720.72 / 527.05 / 582.22 mm
+Z · 1 in (25.4 mm)
S-RTLL-0
RTLL → P02
5.25 / 4.375 / 22.92188 in 133.35 / 111.12 / 582.22 mm
+Z · 1 in (25.4 mm)
S-RTLL-1
RTLL → P02
5.25 / 8.1875 / 22.92188 in 133.35 / 207.96 / 582.22 mm
+Z · 1 in (25.4 mm)
S-RTLL-2
RTLL → P02
5.25 / 12 / 22.92188 in 133.35 / 304.80 / 582.22 mm
+Z · 1 in (25.4 mm)
S-RTLL-3
RTLL → P02
5.25 / 15.8125 / 22.92188 in 133.35 / 401.64 / 582.22 mm
+Z · 1 in (25.4 mm)
S-RTLL-4
RTLL → P02
5.25 / 19.625 / 22.92188 in 133.35 / 498.47 / 582.22 mm
+Z · 1 in (25.4 mm)
Fastener stations · 169–182
X / Y / Z from the outside assembly datums. Use the exact named first part and receiver. Hardware samples control clearance/countersink forms.
ID
Through → receiver
Start X / Y / Z
Direction / length
S-RTLR-0
RTLR → P02
28.75 / 4.375 / 22.92188 in 730.25 / 111.12 / 582.22 mm
+Z · 1 in (25.4 mm)
S-RTLR-1
RTLR → P02
28.75 / 8.1875 / 22.92188 in 730.25 / 207.96 / 582.22 mm
+Z · 1 in (25.4 mm)
S-RTLR-2
RTLR → P02
28.75 / 12 / 22.92188 in 730.25 / 304.80 / 582.22 mm
+Z · 1 in (25.4 mm)
S-RTLR-3
RTLR → P02
28.75 / 15.8125 / 22.92188 in 730.25 / 401.64 / 582.22 mm
+Z · 1 in (25.4 mm)
S-RTLR-4
RTLR → P02
28.75 / 19.625 / 22.92188 in 730.25 / 498.47 / 582.22 mm
+Z · 1 in (25.4 mm)
S-RTRF-0
RTRF → P02
31.625 / 3.25 / 22.92188 in 803.27 / 82.55 / 582.22 mm
+Z · 1 in (25.4 mm)
S-RTRF-1
RTRF → P02
36.175 / 3.25 / 22.92188 in 918.84 / 82.55 / 582.22 mm
+Z · 1 in (25.4 mm)
S-RTRF-2
RTRF → P02
40.725 / 3.25 / 22.92188 in 1034.41 / 82.55 / 582.22 mm
+Z · 1 in (25.4 mm)
S-RTRF-3
RTRF → P02
45.275 / 3.25 / 22.92188 in 1149.98 / 82.55 / 582.22 mm
+Z · 1 in (25.4 mm)
S-RTRF-4
RTRF → P02
49.825 / 3.25 / 22.92188 in 1265.56 / 82.55 / 582.22 mm
+Z · 1 in (25.4 mm)
S-RTRF-5
RTRF → P02
54.375 / 3.25 / 22.92188 in 1381.12 / 82.55 / 582.22 mm
+Z · 1 in (25.4 mm)
S-RTRA-0
RTRA → P02
31.625 / 20.75 / 22.92188 in 803.27 / 527.05 / 582.22 mm
+Z · 1 in (25.4 mm)
S-RTRA-1
RTRA → P02
36.175 / 20.75 / 22.92188 in 918.84 / 527.05 / 582.22 mm
+Z · 1 in (25.4 mm)
S-RTRA-2
RTRA → P02
40.725 / 20.75 / 22.92188 in 1034.41 / 527.05 / 582.22 mm
+Z · 1 in (25.4 mm)
Fastener stations · 183–196
X / Y / Z from the outside assembly datums. Use the exact named first part and receiver. Hardware samples control clearance/countersink forms.
ID
Through → receiver
Start X / Y / Z
Direction / length
S-RTRA-3
RTRA → P02
45.275 / 20.75 / 22.92188 in 1149.98 / 527.05 / 582.22 mm
+Z · 1 in (25.4 mm)
S-RTRA-4
RTRA → P02
49.825 / 20.75 / 22.92188 in 1265.56 / 527.05 / 582.22 mm
+Z · 1 in (25.4 mm)
S-RTRA-5
RTRA → P02
54.375 / 20.75 / 22.92188 in 1381.12 / 527.05 / 582.22 mm
+Z · 1 in (25.4 mm)
S-RTRL-0
RTRL → P02
31.25 / 4.375 / 22.92188 in 793.75 / 111.12 / 582.22 mm
+Z · 1 in (25.4 mm)
S-RTRL-1
RTRL → P02
31.25 / 8.1875 / 22.92188 in 793.75 / 207.96 / 582.22 mm
+Z · 1 in (25.4 mm)
S-RTRL-2
RTRL → P02
31.25 / 12 / 22.92188 in 793.75 / 304.80 / 582.22 mm
+Z · 1 in (25.4 mm)
S-RTRL-3
RTRL → P02
31.25 / 15.8125 / 22.92188 in 793.75 / 401.64 / 582.22 mm
+Z · 1 in (25.4 mm)
S-RTRL-4
RTRL → P02
31.25 / 19.625 / 22.92188 in 793.75 / 498.47 / 582.22 mm
+Z · 1 in (25.4 mm)
S-RTRR-0
RTRR → P02
54.75 / 4.375 / 22.92188 in 1390.65 / 111.12 / 582.22 mm
+Z · 1 in (25.4 mm)
S-RTRR-1
RTRR → P02
54.75 / 8.1875 / 22.92188 in 1390.65 / 207.96 / 582.22 mm
+Z · 1 in (25.4 mm)
S-RTRR-2
RTRR → P02
54.75 / 12 / 22.92188 in 1390.65 / 304.80 / 582.22 mm
+Z · 1 in (25.4 mm)
S-RTRR-3
RTRR → P02
54.75 / 15.8125 / 22.92188 in 1390.65 / 401.64 / 582.22 mm
+Z · 1 in (25.4 mm)
S-RTRR-4
RTRR → P02
54.75 / 19.625 / 22.92188 in 1390.65 / 498.47 / 582.22 mm
+Z · 1 in (25.4 mm)
S-TRACKB-0
TRACK-B → RB1
4.20312 / 0.6 / 6.88312 in 106.76 / 15.24 / 174.83 mm
−Z · 3/4 in (19.05 mm)
Fastener stations · 197–210
X / Y / Z from the outside assembly datums. Use the exact named first part and receiver. Hardware samples control clearance/countersink forms.
ID
Through → receiver
Start X / Y / Z
Direction / length
S-TRACKB-1
TRACK-B → RB1
9.93576 / 0.6 / 6.88312 in 252.37 / 15.24 / 174.83 mm
−Z · 3/4 in (19.05 mm)
S-TRACKB-2
TRACK-B → RB1
15.6684 / 0.6 / 6.88312 in 397.98 / 15.24 / 174.83 mm
−Z · 3/4 in (19.05 mm)
S-TRACKB-3
TRACK-B → RB1
21.40104 / 0.6 / 6.88312 in 543.59 / 15.24 / 174.83 mm
−Z · 3/4 in (19.05 mm)
S-TRACKB-4
TRACK-B → RB1
27.13368 / 0.6 / 6.88312 in 689.20 / 15.24 / 174.83 mm
−Z · 3/4 in (19.05 mm)
S-TRACKB-5
TRACK-B → RB1
32.86632 / 0.6 / 6.88312 in 834.80 / 15.24 / 174.83 mm
−Z · 3/4 in (19.05 mm)
S-TRACKB-6
TRACK-B → RB1
38.59896 / 0.6 / 6.88312 in 980.41 / 15.24 / 174.83 mm
−Z · 3/4 in (19.05 mm)
S-TRACKB-7
TRACK-B → RB1
44.3316 / 0.6 / 6.88312 in 1126.02 / 15.24 / 174.83 mm
−Z · 3/4 in (19.05 mm)
S-TRACKB-8
TRACK-B → RB1
50.06424 / 0.6 / 6.88312 in 1271.63 / 15.24 / 174.83 mm
−Z · 3/4 in (19.05 mm)
S-TRACKB-9
TRACK-B → RB1
55.79688 / 0.6 / 6.88312 in 1417.24 / 15.24 / 174.83 mm
−Z · 3/4 in (19.05 mm)
S-TRACKT-0
TRACK-T → F0T
4.20312 / 0.38425 / 20.74387 in 106.76 / 9.76 / 526.89 mm
+Z · 3/4 in (19.05 mm)
S-TRACKT-1
TRACK-T → F0T
9.93576 / 0.38425 / 20.74387 in 252.37 / 9.76 / 526.89 mm
+Z · 3/4 in (19.05 mm)
S-TRACKT-2
TRACK-T → F0T
15.6684 / 0.38425 / 20.74387 in 397.98 / 9.76 / 526.89 mm
+Z · 3/4 in (19.05 mm)
S-TRACKT-3
TRACK-T → F0T
21.40104 / 0.38425 / 20.74387 in 543.59 / 9.76 / 526.89 mm
+Z · 3/4 in (19.05 mm)
S-TRACKT-4
TRACK-T → F0T
27.13368 / 0.38425 / 20.74387 in 689.20 / 9.76 / 526.89 mm
+Z · 3/4 in (19.05 mm)
Fastener stations · 211–224
X / Y / Z from the outside assembly datums. Use the exact named first part and receiver. Hardware samples control clearance/countersink forms.
ID
Through → receiver
Start X / Y / Z
Direction / length
S-TRACKT-5
TRACK-T → F0T
32.86632 / 0.38425 / 20.74387 in 834.80 / 9.76 / 526.89 mm
+Z · 3/4 in (19.05 mm)
S-TRACKT-6
TRACK-T → F0T
38.59896 / 0.38425 / 20.74387 in 980.41 / 9.76 / 526.89 mm
+Z · 3/4 in (19.05 mm)
S-TRACKT-7
TRACK-T → F0T
44.3316 / 0.38425 / 20.74387 in 1126.02 / 9.76 / 526.89 mm
+Z · 3/4 in (19.05 mm)
S-TRACKT-8
TRACK-T → F0T
50.06424 / 0.38425 / 20.74387 in 1271.63 / 9.76 / 526.89 mm
+Z · 3/4 in (19.05 mm)
S-TRACKT-9
TRACK-T → F0T
55.79688 / 0.38425 / 20.74387 in 1417.24 / 9.76 / 526.89 mm
+Z · 3/4 in (19.05 mm)
S-JAMBL-0
JAMBL → F0L
3.25612 / 0.398 / 8.32812 in 82.71 / 10.11 / 211.53 mm
−X · 3/4 in (19.05 mm)
S-JAMBL-1
JAMBL → F0L
3.25612 / 0.398 / 13.8125 in 82.71 / 10.11 / 350.84 mm
−X · 3/4 in (19.05 mm)
S-JAMBL-2
JAMBL → F0L
3.25612 / 0.398 / 19.79688 in 82.71 / 10.11 / 502.84 mm
−X · 3/4 in (19.05 mm)
S-JAMBR-0
JAMBR → F1R
56.74388 / 0.937 / 8.32812 in 1441.29 / 23.80 / 211.53 mm
+X · 3/4 in (19.05 mm)
S-JAMBR-1
JAMBR → F1R
56.74388 / 0.937 / 13.8125 in 1441.29 / 23.80 / 350.84 mm
+X · 3/4 in (19.05 mm)
S-JAMBR-2
JAMBR → F1R
56.74388 / 0.937 / 19.79688 in 1441.29 / 23.80 / 502.84 mm
+X · 3/4 in (19.05 mm)
S-ALF1-0
ALF1 → F0T
4.31862 / 0.38425 / 20.50637 in 109.69 / 9.76 / 520.86 mm
+Z · 3/4 in (19.05 mm)
S-ALF1-1
ALF1 → F0T
20.10621 / 0.38425 / 20.50637 in 510.70 / 9.76 / 520.86 mm
+Z · 3/4 in (19.05 mm)
S-ALF2-0
ALF2 → F0T
22.10621 / 0.38425 / 20.50637 in 561.50 / 9.76 / 520.86 mm
+Z · 3/4 in (19.05 mm)
Fastener stations · 225–238
X / Y / Z from the outside assembly datums. Use the exact named first part and receiver. Hardware samples control clearance/countersink forms.
ID
Through → receiver
Start X / Y / Z
Direction / length
S-ALF2-1
ALF2 → F0T
37.89379 / 0.38425 / 20.50637 in 962.50 / 9.76 / 520.86 mm
+Z · 3/4 in (19.05 mm)
S-ALF3-0
ALF3 → F0T
39.89379 / 0.38425 / 20.50637 in 1013.30 / 9.76 / 520.86 mm
+Z · 3/4 in (19.05 mm)
S-ALF3-1
ALF3 → F0T
55.68137 / 0.38425 / 20.50637 in 1414.31 / 9.76 / 520.86 mm
+Z · 3/4 in (19.05 mm)
S-ALB1-0
ALB1 → F1T
4.31862 / 0.94975 / 20.50637 in 109.69 / 24.12 / 520.86 mm
+Z · 3/4 in (19.05 mm)
S-ALB1-1
ALB1 → F1T
20.10621 / 0.94975 / 20.50637 in 510.70 / 24.12 / 520.86 mm
+Z · 3/4 in (19.05 mm)
S-ALB2-0
ALB2 → F1T
22.10621 / 0.94975 / 20.50637 in 561.50 / 24.12 / 520.86 mm
+Z · 3/4 in (19.05 mm)
S-ALB2-1
ALB2 → F1T
37.89379 / 0.94975 / 20.50637 in 962.50 / 24.12 / 520.86 mm
+Z · 3/4 in (19.05 mm)
S-ALB3-0
ALB3 → F1T
39.89379 / 0.94975 / 20.50637 in 1013.30 / 24.12 / 520.86 mm
+Z · 3/4 in (19.05 mm)
S-ALB3-1
ALB3 → F1T
55.68137 / 0.94975 / 20.50637 in 1414.31 / 24.12 / 520.86 mm
+Z · 3/4 in (19.05 mm)
S-LCL-0
LCL → P03L
1.20312 / 4.68938 / 6.20312 in 30.56 / 119.11 / 157.56 mm
−X · 1 in (25.4 mm)
S-LCL-1
LCL → P03L
1.20312 / 8.69625 / 6.20312 in 30.56 / 220.88 / 157.56 mm
−X · 1 in (25.4 mm)
S-LCL-2
LCL → P03L
1.20312 / 12.70313 / 6.20312 in 30.56 / 322.66 / 157.56 mm
−X · 1 in (25.4 mm)
S-LCL-3
LCL → P03L
1.20312 / 16.71 / 6.20312 in 30.56 / 424.43 / 157.56 mm
−X · 1 in (25.4 mm)
S-LCL-4
LCL → P03L
1.20312 / 20.71688 / 6.20312 in 30.56 / 526.21 / 157.56 mm
−X · 1 in (25.4 mm)
Fastener stations · 239–252
X / Y / Z from the outside assembly datums. Use the exact named first part and receiver. Hardware samples control clearance/countersink forms.
ID
Through → receiver
Start X / Y / Z
Direction / length
S-LCR-0
LCR → P03R
58.79688 / 4.68938 / 6.20312 in 1493.44 / 119.11 / 157.56 mm
+X · 1 in (25.4 mm)
S-LCR-1
LCR → P03R
58.79688 / 8.69625 / 6.20312 in 1493.44 / 220.88 / 157.56 mm
+X · 1 in (25.4 mm)
S-LCR-2
LCR → P03R
58.79688 / 12.70313 / 6.20312 in 1493.44 / 322.66 / 157.56 mm
+X · 1 in (25.4 mm)
S-LCR-3
LCR → P03R
58.79688 / 16.71 / 6.20312 in 1493.44 / 424.43 / 157.56 mm
+X · 1 in (25.4 mm)
S-LCR-4
LCR → P03R
58.79688 / 20.71688 / 6.20312 in 1493.44 / 526.21 / 157.56 mm
+X · 1 in (25.4 mm)
S-LCF1-0
LCF1 → RB3
3.15813 / 2.60938 / 6.20312 in 80.22 / 66.28 / 157.56 mm
−Y · 1 in (25.4 mm)
S-LCF1-1
LCF1 → RB3
6.94234 / 2.60938 / 6.20312 in 176.34 / 66.28 / 157.56 mm
−Y · 1 in (25.4 mm)
S-LCF1-2
LCF1 → RB3
10.72656 / 2.60938 / 6.20312 in 272.45 / 66.28 / 157.56 mm
−Y · 1 in (25.4 mm)
S-LCF1-3
LCF1 → RB3
14.51078 / 2.60938 / 6.20312 in 368.57 / 66.28 / 157.56 mm
−Y · 1 in (25.4 mm)
S-LCF1-4
LCF1 → RB3
18.295 / 2.60938 / 6.20312 in 464.69 / 66.28 / 157.56 mm
−Y · 1 in (25.4 mm)
S-LCF2-0
LCF2 → RB3
21.705 / 2.60938 / 6.20312 in 551.31 / 66.28 / 157.56 mm
−Y · 1 in (25.4 mm)
S-LCF2-1
LCF2 → RB3
25.8525 / 2.60938 / 6.20312 in 656.65 / 66.28 / 157.56 mm
−Y · 1 in (25.4 mm)
S-LCF2-2
LCF2 → RB3
30 / 2.60938 / 6.20312 in 762.00 / 66.28 / 157.56 mm
−Y · 1 in (25.4 mm)
S-LCF2-3
LCF2 → RB3
34.1475 / 2.60938 / 6.20312 in 867.35 / 66.28 / 157.56 mm
−Y · 1 in (25.4 mm)
Fastener stations · 253–266
X / Y / Z from the outside assembly datums. Use the exact named first part and receiver. Hardware samples control clearance/countersink forms.
ID
Through → receiver
Start X / Y / Z
Direction / length
S-LCF2-4
LCF2 → RB3
38.295 / 2.60938 / 6.20312 in 972.69 / 66.28 / 157.56 mm
−Y · 1 in (25.4 mm)
S-LCF3-0
LCF3 → RB3
41.705 / 2.60938 / 6.20312 in 1059.31 / 66.28 / 157.56 mm
−Y · 1 in (25.4 mm)
S-LCF3-1
LCF3 → RB3
45.48922 / 2.60938 / 6.20312 in 1155.43 / 66.28 / 157.56 mm
−Y · 1 in (25.4 mm)
S-LCF3-2
LCF3 → RB3
49.27344 / 2.60938 / 6.20312 in 1251.55 / 66.28 / 157.56 mm
−Y · 1 in (25.4 mm)
S-LCF3-3
LCF3 → RB3
53.05766 / 2.60938 / 6.20312 in 1347.66 / 66.28 / 157.56 mm
−Y · 1 in (25.4 mm)
S-LCF3-4
LCF3 → RB3
56.84188 / 2.60938 / 6.20312 in 1443.78 / 66.28 / 157.56 mm
−Y · 1 in (25.4 mm)
S-LCB1-0
LCB1 → P04
3.15813 / 22.79688 / 6.20312 in 80.22 / 579.04 / 157.56 mm
+Y · 1 in (25.4 mm)
S-LCB1-1
LCB1 → P04
6.94234 / 22.79688 / 6.20312 in 176.34 / 579.04 / 157.56 mm
+Y · 1 in (25.4 mm)
S-LCB1-2
LCB1 → P04
10.72656 / 22.79688 / 6.20312 in 272.45 / 579.04 / 157.56 mm
+Y · 1 in (25.4 mm)
S-LCB1-3
LCB1 → P04
14.51078 / 22.79688 / 6.20312 in 368.57 / 579.04 / 157.56 mm
+Y · 1 in (25.4 mm)
S-LCB1-4
LCB1 → P04
18.295 / 22.79688 / 6.20312 in 464.69 / 579.04 / 157.56 mm
+Y · 1 in (25.4 mm)
S-LCB2-0
LCB2 → P04
21.705 / 22.79688 / 6.20312 in 551.31 / 579.04 / 157.56 mm
+Y · 1 in (25.4 mm)
S-LCB2-1
LCB2 → P04
25.8525 / 22.79688 / 6.20312 in 656.65 / 579.04 / 157.56 mm
+Y · 1 in (25.4 mm)
S-LCB2-2
LCB2 → P04
30 / 22.79688 / 6.20312 in 762.00 / 579.04 / 157.56 mm
+Y · 1 in (25.4 mm)
Fastener stations · 267–280
X / Y / Z from the outside assembly datums. Use the exact named first part and receiver. Hardware samples control clearance/countersink forms.
ID
Through → receiver
Start X / Y / Z
Direction / length
S-LCB2-3
LCB2 → P04
34.1475 / 22.79688 / 6.20312 in 867.35 / 579.04 / 157.56 mm
+Y · 1 in (25.4 mm)
S-LCB2-4
LCB2 → P04
38.295 / 22.79688 / 6.20312 in 972.69 / 579.04 / 157.56 mm
+Y · 1 in (25.4 mm)
S-LCB3-0
LCB3 → P04
41.705 / 22.79688 / 6.20312 in 1059.31 / 579.04 / 157.56 mm
+Y · 1 in (25.4 mm)
S-LCB3-1
LCB3 → P04
45.48922 / 22.79688 / 6.20312 in 1155.43 / 579.04 / 157.56 mm
+Y · 1 in (25.4 mm)
S-LCB3-2
LCB3 → P04
49.27344 / 22.79688 / 6.20312 in 1251.55 / 579.04 / 157.56 mm
+Y · 1 in (25.4 mm)
S-LCB3-3
LCB3 → P04
53.05766 / 22.79688 / 6.20312 in 1347.66 / 579.04 / 157.56 mm
+Y · 1 in (25.4 mm)
S-LCB3-4
LCB3 → P04
56.84188 / 22.79688 / 6.20312 in 1443.78 / 579.04 / 157.56 mm
+Y · 1 in (25.4 mm)
S-LCQL-0
LCQL → CFL
1.32812 / 4.10938 / 6.20312 in 33.73 / 104.38 / 157.56 mm
−Y · 1 in (25.4 mm)
S-LCQL-1
LCQL → CFL
1.70312 / 4.10938 / 6.20312 in 43.26 / 104.38 / 157.56 mm
−Y · 1 in (25.4 mm)
S-LCQ1-0
LCQ1 → CF1
19.75 / 4.10938 / 6.20312 in 501.65 / 104.38 / 157.56 mm
−Y · 1 in (25.4 mm)
S-LCQ1-1
LCQ1 → CF1
20.25 / 4.10938 / 6.20312 in 514.35 / 104.38 / 157.56 mm
−Y · 1 in (25.4 mm)
S-LCQ2-0
LCQ2 → CF2
39.75 / 4.10938 / 6.20312 in 1009.65 / 104.38 / 157.56 mm
−Y · 1 in (25.4 mm)
S-LCQ2-1
LCQ2 → CF2
40.25 / 4.10938 / 6.20312 in 1022.35 / 104.38 / 157.56 mm
−Y · 1 in (25.4 mm)
S-LCQR-0
LCQR → CFR
58.29688 / 4.10938 / 6.20312 in 1480.74 / 104.38 / 157.56 mm
−Y · 1 in (25.4 mm)
Fastener stations · 281–294
X / Y / Z from the outside assembly datums. Use the exact named first part and receiver. Hardware samples control clearance/countersink forms.
ID
Through → receiver
Start X / Y / Z
Direction / length
S-LCQR-1
LCQR → CFR
58.67188 / 4.10938 / 6.20312 in 1490.27 / 104.38 / 157.56 mm
−Y · 1 in (25.4 mm)
S-LCPL-0
LCPL → CLU
1.32812 / 21.29688 / 6.20312 in 33.73 / 540.94 / 157.56 mm
+Y · 1 in (25.4 mm)
S-LCPL-1
LCPL → CLU
1.70312 / 21.29688 / 6.20312 in 43.26 / 540.94 / 157.56 mm
+Y · 1 in (25.4 mm)
S-LCP1-0
LCP1 → CM1
19.75 / 21.29688 / 6.20312 in 501.65 / 540.94 / 157.56 mm
+Y · 1 in (25.4 mm)
S-LCP1-1
LCP1 → CM1
20.25 / 21.29688 / 6.20312 in 514.35 / 540.94 / 157.56 mm
+Y · 1 in (25.4 mm)
S-LCP2-0
LCP2 → CM2
39.75 / 21.29688 / 6.20312 in 1009.65 / 540.94 / 157.56 mm
+Y · 1 in (25.4 mm)
S-LCP2-1
LCP2 → CM2
40.25 / 21.29688 / 6.20312 in 1022.35 / 540.94 / 157.56 mm
+Y · 1 in (25.4 mm)
S-LCPR-0
LCPR → CRU
58.29688 / 21.29688 / 6.20312 in 1480.74 / 540.94 / 157.56 mm
+Y · 1 in (25.4 mm)
S-LCPR-1
LCPR → CRU
58.67188 / 21.29688 / 6.20312 in 1490.27 / 540.94 / 157.56 mm
+Y · 1 in (25.4 mm)
S-ROOFL-0
P02 → CLT
1.45312 / 3 / 24 in 36.91 / 76.20 / 609.60 mm
−Z · 1 1/4 in (31.75 mm)
S-ROOFL-1
P02 → CLT
1.45312 / 12 / 24 in 36.91 / 304.80 / 609.60 mm
−Z · 1 1/4 in (31.75 mm)
S-ROOFL-2
P02 → CLT
1.45312 / 21 / 24 in 36.91 / 533.40 / 609.60 mm
−Z · 1 1/4 in (31.75 mm)
S-ROOFR-0
P02 → CRT
58.54688 / 3 / 24 in 1487.09 / 76.20 / 609.60 mm
−Z · 1 1/4 in (31.75 mm)
S-ROOFR-1
P02 → CRT
58.54688 / 12 / 24 in 1487.09 / 304.80 / 609.60 mm
−Z · 1 1/4 in (31.75 mm)
Fastener stations · 295–308
X / Y / Z from the outside assembly datums. Use the exact named first part and receiver. Hardware samples control clearance/countersink forms.
ID
Through → receiver
Start X / Y / Z
Direction / length
S-ROOFR-2
P02 → CRT
58.54688 / 21 / 24 in 1487.09 / 533.40 / 609.60 mm
−Z · 1 1/4 in (31.75 mm)
S-ROOFF-0
P02 → F0T
8 / 0.375 / 24 in 203.20 / 9.52 / 609.60 mm
−Z · 1 1/4 in (31.75 mm)
S-ROOFF-1
P02 → F1T
20 / 1.125 / 24 in 508.00 / 28.57 / 609.60 mm
−Z · 1 1/4 in (31.75 mm)
S-ROOFF-2
P02 → F0T
32 / 0.375 / 24 in 812.80 / 9.52 / 609.60 mm
−Z · 1 1/4 in (31.75 mm)
S-ROOFF-3
P02 → F1T
44 / 1.125 / 24 in 1117.60 / 28.57 / 609.60 mm
−Z · 1 1/4 in (31.75 mm)
S-ROOFF-4
P02 → F0T
56 / 0.375 / 24 in 1422.40 / 9.52 / 609.60 mm
−Z · 1 1/4 in (31.75 mm)
S-ROOFB-0
P02 → CT
8 / 22.54688 / 24 in 203.20 / 572.69 / 609.60 mm
−Z · 1 1/4 in (31.75 mm)
S-ROOFB-1
P02 → CT
19 / 22.54688 / 24 in 482.60 / 572.69 / 609.60 mm
−Z · 1 1/4 in (31.75 mm)
S-ROOFB-2
P02 → CT
31 / 22.54688 / 24 in 787.40 / 572.69 / 609.60 mm
−Z · 1 1/4 in (31.75 mm)
S-ROOFB-3
P02 → CT
43 / 22.54688 / 24 in 1092.20 / 572.69 / 609.60 mm
−Z · 1 1/4 in (31.75 mm)
S-ROOFB-4
P02 → CT
54 / 22.54688 / 24 in 1371.60 / 572.69 / 609.60 mm
−Z · 1 1/4 in (31.75 mm)
S-CFL-0
P03L → CFL
0 / 2.85938 / 3.32812 in 0.00 / 72.63 / 84.53 mm
+X · 1 1/4 in (31.75 mm)
S-CFL-1
P03L → CFL
0 / 2.85938 / 5.32812 in 0.00 / 72.63 / 135.33 mm
+X · 1 1/4 in (31.75 mm)
S-CFR-0
P03R → CFR
60 / 2.85938 / 3.32812 in 1524.00 / 72.63 / 84.53 mm
−X · 1 1/4 in (31.75 mm)
Fastener stations · 309–317
X / Y / Z from the outside assembly datums. Use the exact named first part and receiver. Hardware samples control clearance/countersink forms.
ID
Through → receiver
Start X / Y / Z
Direction / length
S-CFR-1
P03R → CFR
60 / 2.85938 / 5.32812 in 1524.00 / 72.63 / 135.33 mm
−X · 1 1/4 in (31.75 mm)
S-CM1-0
P04 → CM1
20 / 24 / 3.20312 in 508.00 / 609.60 / 81.36 mm
−Y · 1 1/4 in (31.75 mm)
S-CM1-1
P04 → CM1
20 / 24 / 9.06771 in 508.00 / 609.60 / 230.32 mm
−Y · 1 1/4 in (31.75 mm)
S-CM1-2
P04 → CM1
20 / 24 / 14.93229 in 508.00 / 609.60 / 379.28 mm
−Y · 1 1/4 in (31.75 mm)
S-CM1-3
P04 → CM1
20 / 24 / 20.79688 in 508.00 / 609.60 / 528.24 mm
−Y · 1 1/4 in (31.75 mm)
S-CM2-0
P04 → CM2
40 / 24 / 3.20312 in 1016.00 / 609.60 / 81.36 mm
−Y · 1 1/4 in (31.75 mm)
S-CM2-1
P04 → CM2
40 / 24 / 9.06771 in 1016.00 / 609.60 / 230.32 mm
−Y · 1 1/4 in (31.75 mm)
S-CM2-2
P04 → CM2
40 / 24 / 14.93229 in 1016.00 / 609.60 / 379.28 mm
−Y · 1 1/4 in (31.75 mm)
S-CM2-3
P04 → CM2
40 / 24 / 20.79688 in 1016.00 / 609.60 / 528.24 mm
−Y · 1 1/4 in (31.75 mm)
Openings and recessed captures
Coordinates use the outside assembly datums. Pocket rectangles describe the cutter envelope; only their overlap with each named capture is removed. Trial the actual welded stack and film before machining.
Cut / part
Lower corner X / Y / Z
Size X × Y × Z
POCKET-VLB / VLB
-0.088 in (-2.24 mm) / 5.494 in (139.55 mm) / 7.322125 in (185.98 mm)
0.088 in (2.24 mm) × 13.012 in (330.5 mm) × 4.012 in (101.9 mm)
POCKET-VLT / VLT
-0.088 in (-2.24 mm) / 5.494 in (139.55 mm) / 7.322125 in (185.98 mm)
0.088 in (2.24 mm) × 13.012 in (330.5 mm) × 4.012 in (101.9 mm)
POCKET-VLF / VLF
-0.088 in (-2.24 mm) / 5.494 in (139.55 mm) / 7.322125 in (185.98 mm)
0.088 in (2.24 mm) × 13.012 in (330.5 mm) × 4.012 in (101.9 mm)
POCKET-VLA / VLA
-0.088 in (-2.24 mm) / 5.494 in (139.55 mm) / 7.322125 in (185.98 mm)
0.088 in (2.24 mm) × 13.012 in (330.5 mm) × 4.012 in (101.9 mm)
POCKET-VRB / VRB
60 in (1524 mm) / 5.494 in (139.55 mm) / 7.322125 in (185.98 mm)
0.088 in (2.24 mm) × 13.012 in (330.5 mm) × 4.012 in (101.9 mm)
POCKET-VRT / VRT
60 in (1524 mm) / 5.494 in (139.55 mm) / 7.322125 in (185.98 mm)
0.088 in (2.24 mm) × 13.012 in (330.5 mm) × 4.012 in (101.9 mm)
POCKET-VRF / VRF
60 in (1524 mm) / 5.494 in (139.55 mm) / 7.322125 in (185.98 mm)
0.088 in (2.24 mm) × 13.012 in (330.5 mm) × 4.012 in (101.9 mm)
POCKET-VRA / VRA
60 in (1524 mm) / 5.494 in (139.55 mm) / 7.322125 in (185.98 mm)
0.088 in (2.24 mm) × 13.012 in (330.5 mm) × 4.012 in (101.9 mm)
Openings and recessed captures · continued
Coordinates use the outside assembly datums. Pocket rectangles describe the cutter envelope; only their overlap with each named capture is removed. Trial the actual welded stack and film before machining.
Cut / part
Lower corner X / Y / Z
Size X × Y × Z
POCKET-RTLF / RTLF
5.494 in (139.55 mm) / 3.494 in (88.75 mm) / 23.208875 in (589.51 mm)
23.012 in (584.5 mm) × 17.012 in (432.1 mm) × 0.088 in (2.24 mm)
POCKET-RTLA / RTLA
5.494 in (139.55 mm) / 3.494 in (88.75 mm) / 23.208875 in (589.51 mm)
23.012 in (584.5 mm) × 17.012 in (432.1 mm) × 0.088 in (2.24 mm)
POCKET-RTLL / RTLL
5.494 in (139.55 mm) / 3.494 in (88.75 mm) / 23.208875 in (589.51 mm)
23.012 in (584.5 mm) × 17.012 in (432.1 mm) × 0.088 in (2.24 mm)
POCKET-RTLR / RTLR
5.494 in (139.55 mm) / 3.494 in (88.75 mm) / 23.208875 in (589.51 mm)
23.012 in (584.5 mm) × 17.012 in (432.1 mm) × 0.088 in (2.24 mm)
ROOF-OPEN-TL / P02
6 in (152.4 mm) / 4 in (101.6 mm) / 23 19/64 in (591.74 mm)
22 in (558.8 mm) × 16 in (406.4 mm) × 45/64 in (17.86 mm)
POCKET-RTRF / RTRF
31.494 in (799.95 mm) / 3.494 in (88.75 mm) / 23.208875 in (589.51 mm)
23.012 in (584.5 mm) × 17.012 in (432.1 mm) × 0.088 in (2.24 mm)
POCKET-RTRA / RTRA
31.494 in (799.95 mm) / 3.494 in (88.75 mm) / 23.208875 in (589.51 mm)
23.012 in (584.5 mm) × 17.012 in (432.1 mm) × 0.088 in (2.24 mm)
POCKET-RTRL / RTRL
31.494 in (799.95 mm) / 3.494 in (88.75 mm) / 23.208875 in (589.51 mm)
23.012 in (584.5 mm) × 17.012 in (432.1 mm) × 0.088 in (2.24 mm)
Openings and recessed captures · continued
Coordinates use the outside assembly datums. Pocket rectangles describe the cutter envelope; only their overlap with each named capture is removed. Trial the actual welded stack and film before machining.
Cut / part
Lower corner X / Y / Z
Size X × Y × Z
POCKET-RTRR / RTRR
31.494 in (799.95 mm) / 3.494 in (88.75 mm) / 23.208875 in (589.51 mm)
23.012 in (584.5 mm) × 17.012 in (432.1 mm) × 0.088 in (2.24 mm)
ROOF-OPEN-TR / P02
32 in (812.8 mm) / 4 in (101.6 mm) / 23 19/64 in (591.74 mm)
22 in (558.8 mm) × 16 in (406.4 mm) × 45/64 in (17.86 mm)
VENT-P03L / P03L
0 in (0 mm) / 6 in (152.4 mm) / 7 53/64 in (198.83 mm)
45/64 in (17.86 mm) × 12 in (304.8 mm) × 3 in (76.2 mm)
VENT-P03R / P03R
59 19/64 in (1506.14 mm) / 6 in (152.4 mm) / 7 53/64 in (198.83 mm)
45/64 in (17.86 mm) × 12 in (304.8 mm) × 3 in (76.2 mm)
Inspection records
Receiving and physical acceptance record
Leave blank until measured or performed. A calculation, render or automated check does not fill these fields.
Required checkpoint
Actual result / date / reviewer
H01 · Before hardware purchase/cutting CRL confirmation of matched D602/D603/D610/D649/D652, catalogue/DWG dimension differences, actual kit inventory, uncapped deburred shoe ends, flush #4 countersinks in thin webs and right-jamb divider relief. Wheels must remain firmly retained. No supplier approval received.
___________________
___________________
H02 · Before wood cutting Measure plywood gauge, usable stock, square straight solid wood, kerf and flatness. Reference numbers are not received measurements.
___________________
___________________
H03 · Before veneer purchase Selected species, PSA/backer, stock size, panel balance, cured Varathane compatibility, acclimation, pressure/dwell and heat/humidity/cleaner exposure accepted by supplier. Recalculate all changed layers.
___________________
___________________
H04 · Before capture machining Measure actual wire crossings and cured finish stack; trial fully buried screen with a flat bearing land. Reference recess 0.088 inch, maximum 0.125 inch without redesign.
___________________
___________________
Glue time: __________ · Final coat / repair: __________ Temperature / relative humidity: __________ Full cure due: __________ · Confirmed adhesive dwell: __________ Liner 24-hour test and closure tests: __________
Receiving and physical acceptance record
Leave blank until measured or performed. A calculation, render or automated check does not fill these fields.
Required checkpoint
Actual result / date / reviewer
H05 · Before finish All hardware and anti-lift drilling, countersinks, lock and removal trials completed before coating. Any newly exposed wood needs reseal and full recure. For revised retainer: received 3-1/2-inch flat-head screw, washer <=1/16 inch and locknut .298-.328 inch. Trial 1-inch diameter x 5/8-inch stopped rear recess, socket access, two complete exposed threads and tail >=1/16 inch below post face. Retain 7/8-inch post thickness at the washer seat. No torque or connection capacity inferred.
___________________
___________________
H06 · Before glass order CRL/fabricator resolution of GC728C glass-thickness conflict. Measure accepted vinyl, shoes, glass, cured cushions, guides and anti-lift. Prove insertion/removal and capture before field order; never use reference pane sizes as an order.
___________________
___________________
H07 · Before loading Qualified full support/furniture/building-floor review with weighed wet bed, shell and equipment. Arithmetic bed scenarios are not a load rating. Qualified connection review must include the countersunk front bearing and recessed interior post bearing, not the previous carriage-bolt geometry.
___________________
___________________
H08 · Before animal entry Full cure, 24-hour liner test, snag/edge/mesh/door/anti-lift and service tests, qualified review, species-specific heat/humidity/light/gap/escape commissioning. Half-inch mesh is not universal containment.
___________________
___________________
Glue time: __________ · Final coat / repair: __________ Temperature / relative humidity: __________ Full cure due: __________ · Confirmed adhesive dwell: __________ Liner 24-hour test and closure tests: __________
Receiving and physical acceptance record
Leave blank until measured or performed. A calculation, render or automated check does not fill these fields.
Required checkpoint
Actual result / date / reviewer
H09 · Before cushion bonding CRL/DAP acceptance of neoprene bonded to received anodized aluminium, preparation, actual cured film and seven-day sample bond. Repeated closing and service tests required; detached cushions require repair and renewed acceptance.
___________________
___________________
Glue time: __________ · Final coat / repair: __________ Temperature / relative humidity: __________ Full cure due: __________ · Confirmed adhesive dwell: __________ Liner 24-hour test and closure tests: __________
Sources, limits and upkeep
Primary manufacturer documents and current product links identify the reference system. Product identity, local stock, actual measurements and assembly acceptance are separate questions. Current research evidence and unresolved conflicts are in the review packet.
Separate statuses: research, dimensional checks, calculations and digital validation are recorded separately. No prototype has been built; no physical testing or qualified review has been performed; publication is separate from construction acceptance.
The ordinary indoor wood finish is not an immersion seal. The liner contains the damp bed; keep tracks dry. Disconnect equipment, secure the animal elsewhere and empty the enclosure before maintenance. Never tip a loaded shell. Follow the four pictured service operations and repeat affected checks after any repair.
Full exterior veneer is coordinated as a conditional system in these cuts and geometry. Supplier acceptance of panel balance and actual bond remains open. Texture scans illustrate appearance; natural grain and color vary by delivered sheet.