The Creature Corner

Stand build guide

S48-24 Cabinet stand for 48 × 24 inch enclosures

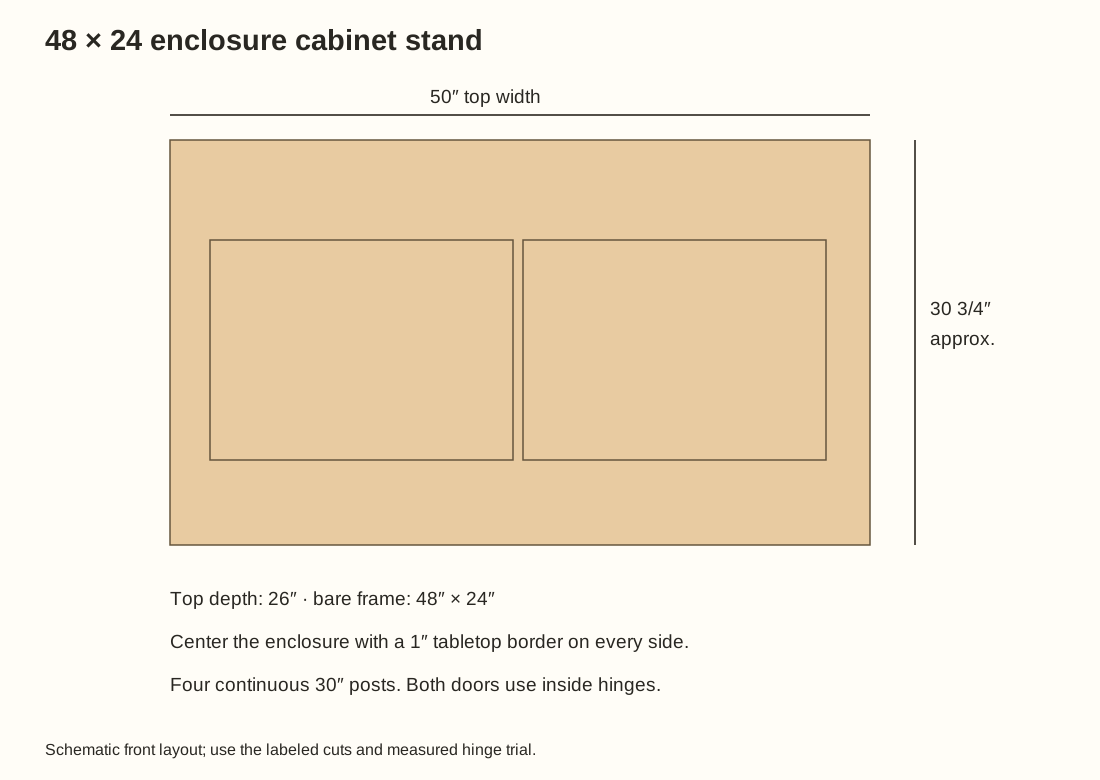
Fits 48″ × 24″ enclosures · 50″ × 26″ top · approximately 30 3⁄4″ tall

Two inset doors · concealed soft-close hinges · continuous corner posts
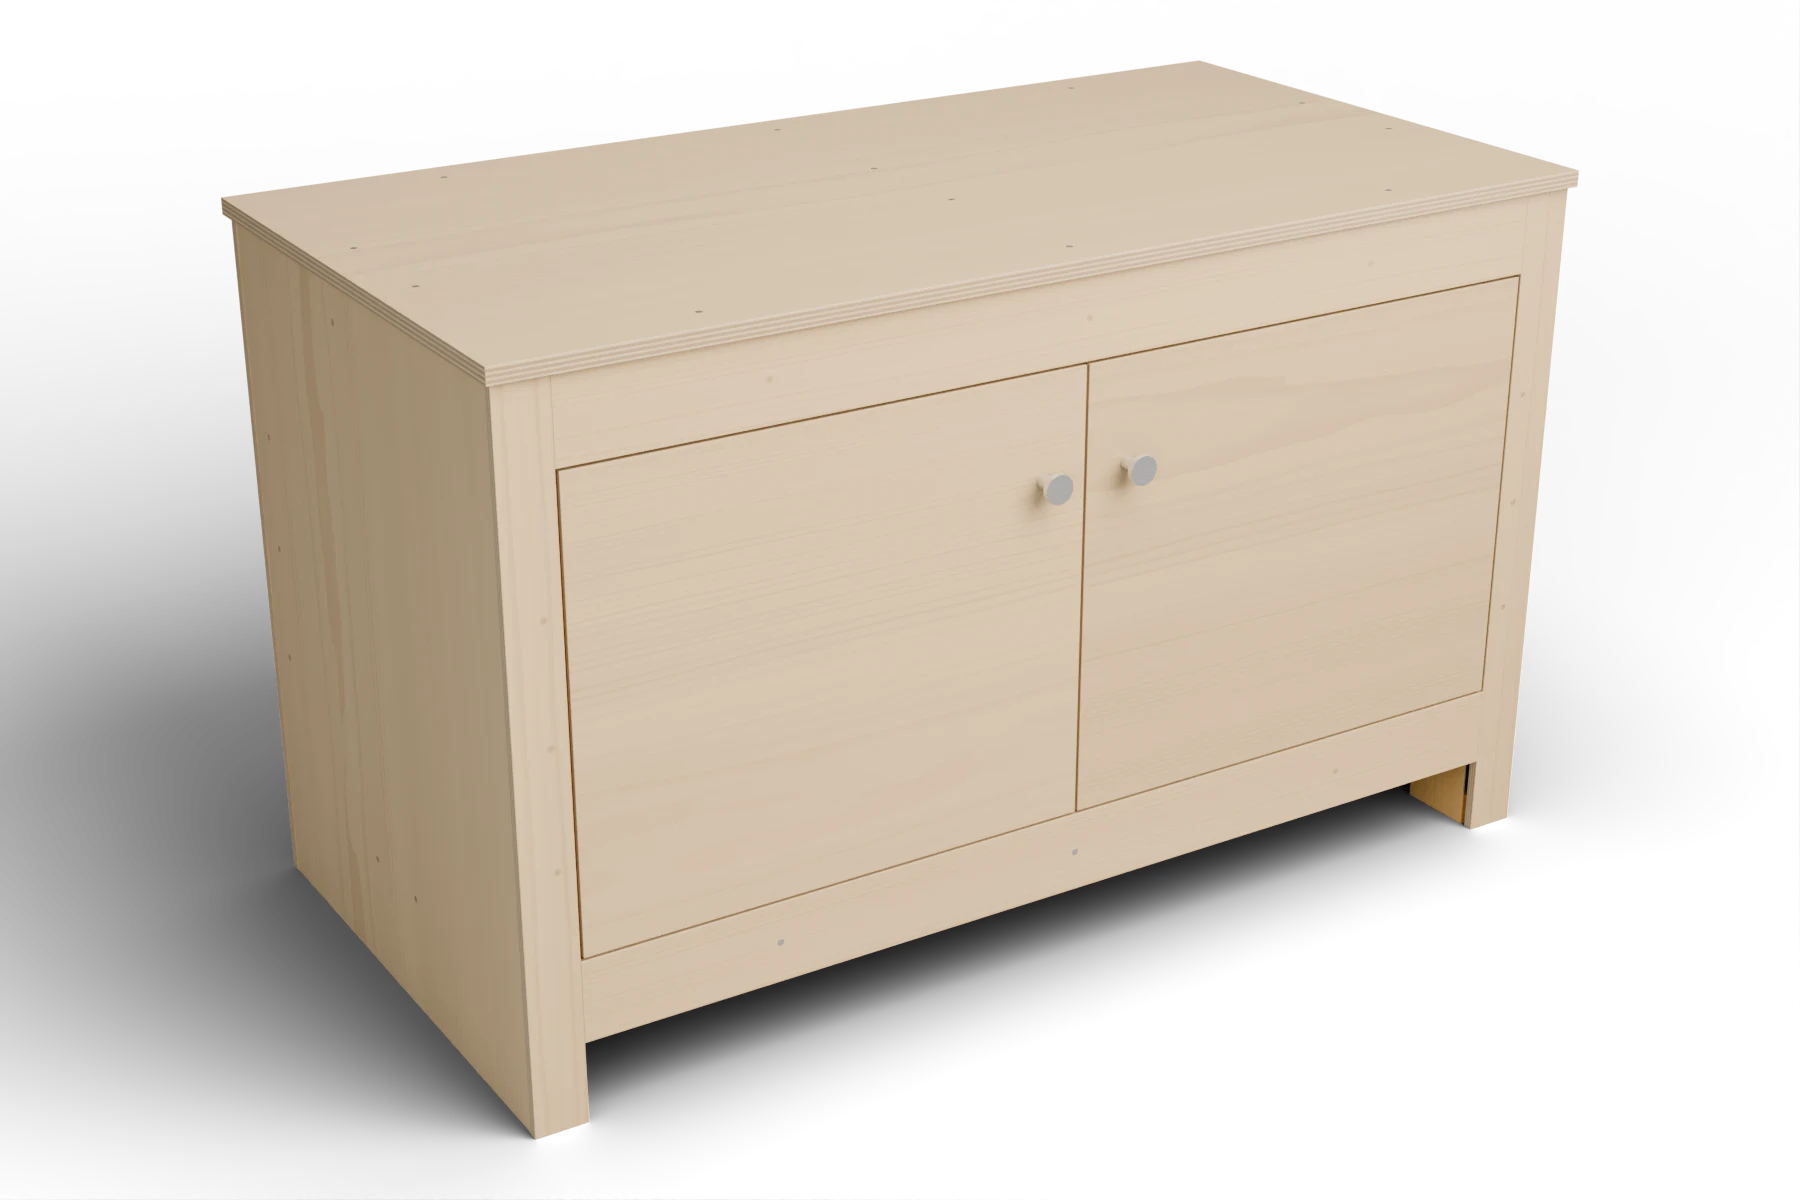
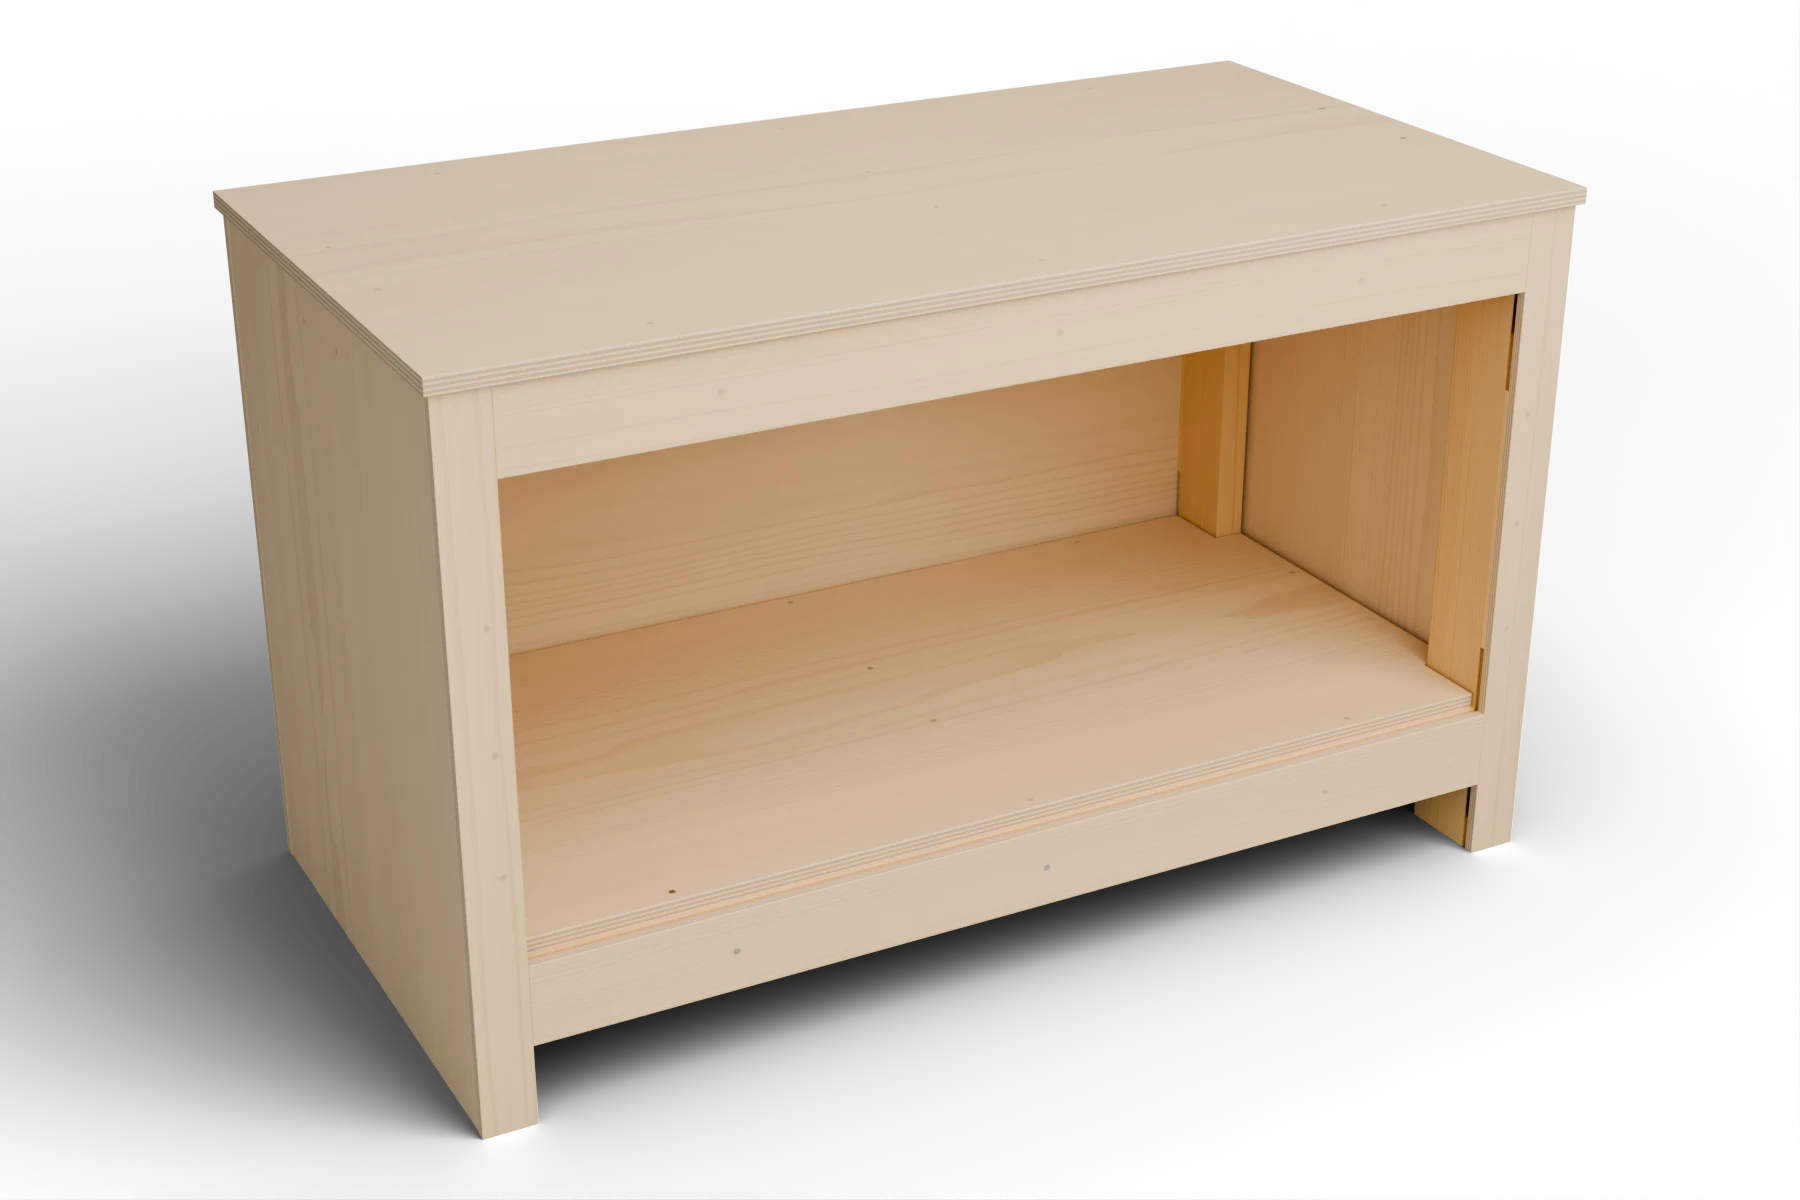
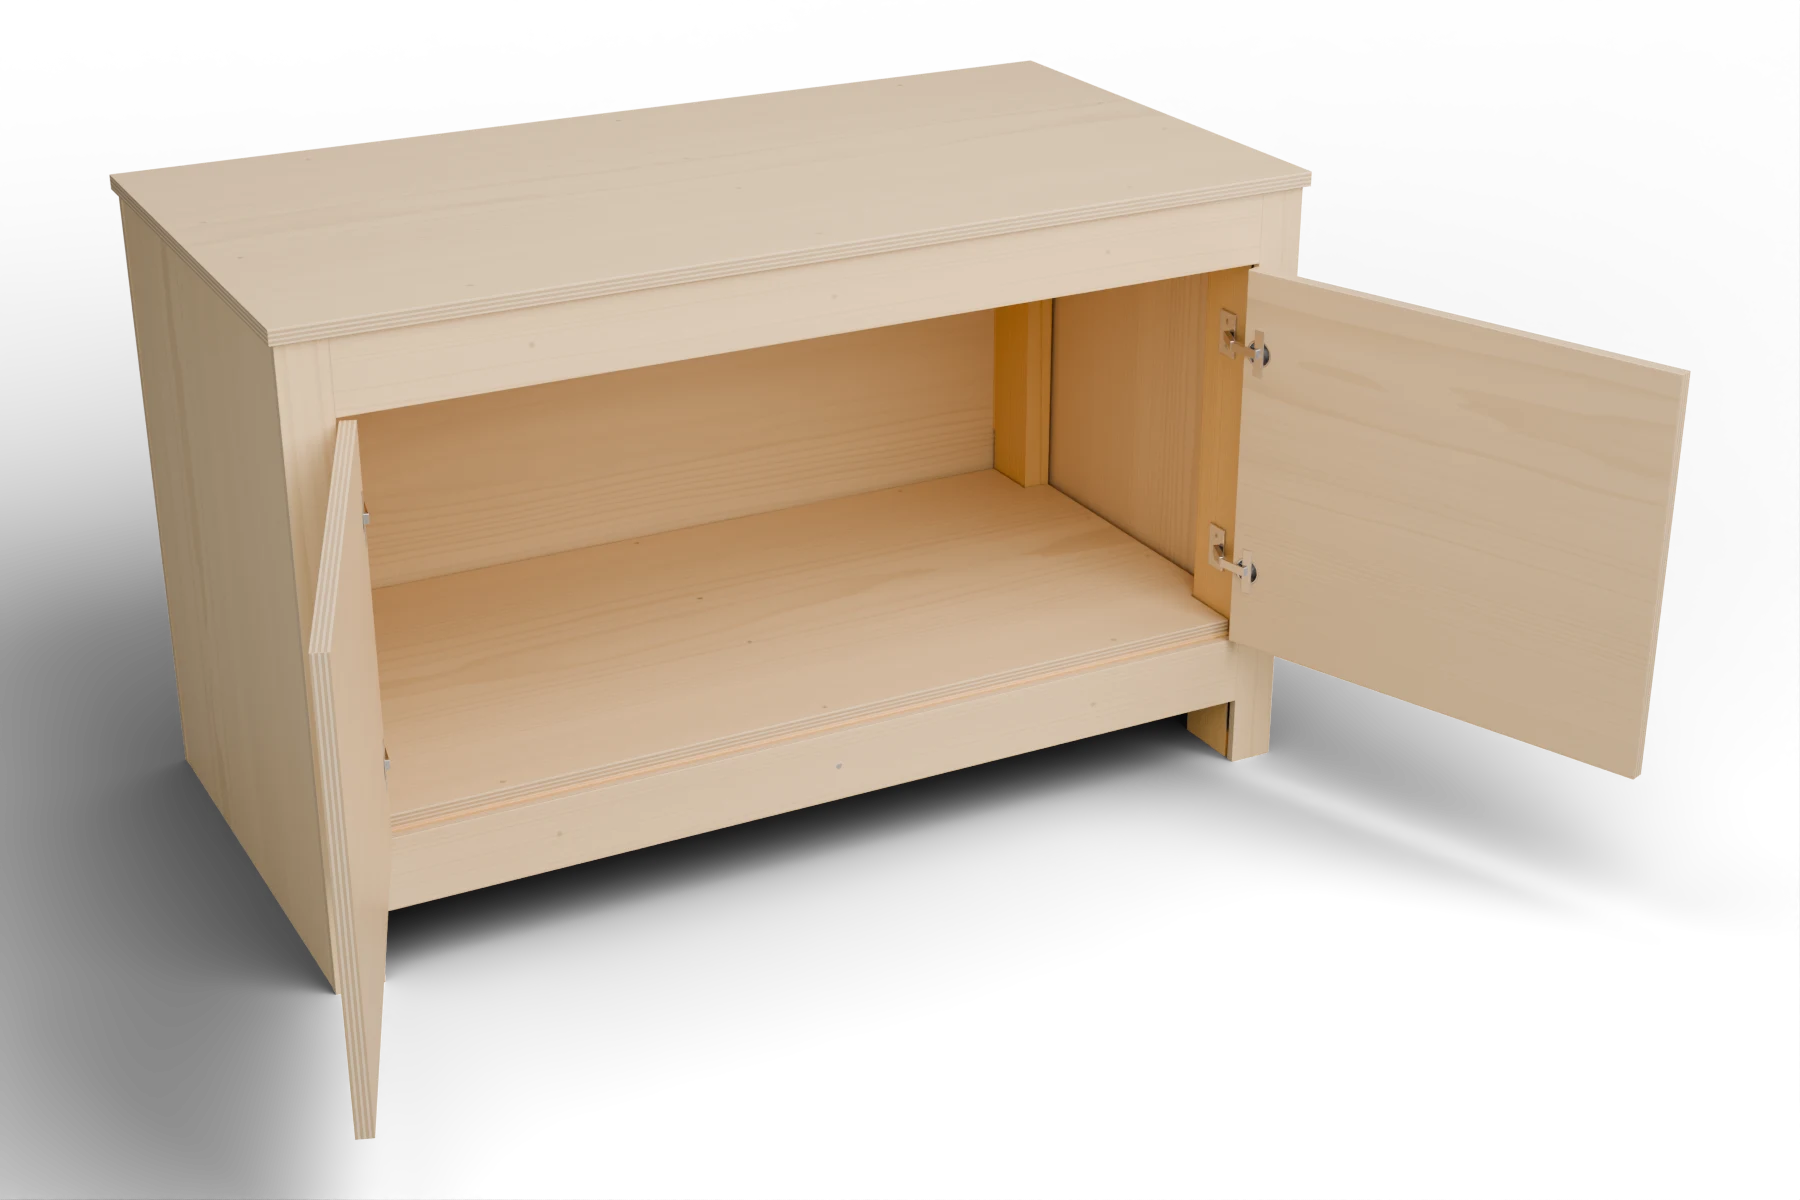
hero closed view of the cabinet stand
Two inset doors conceal the cabinet hardware.

Build a wooden stand with a full support top and a useful cabinet below. Follow the labeled cuts, illustrated steps and interactive model from bare frame to finished cabinet.

Enclosure footprint48″ × 24″
Cabinet accessTwo hinged doors
Construction2 × 4 frame + plywood
Door hardwareConcealed Blum hinges

Researched construction plan. Digitally checked; not physically built or load-certified. Generated October 2, 2026.
Contents

  1. Scope, safety and planning
  2. Before you start: tools, shopping, fasteners, cut list
  3. A. Plan and cut
    1. 1Choose the location and check the enclosure
    2. 2Check the boards and try one hinge
    3. 3Cut and label every wooden part
  4. B. Build the cabinet
    1. 4Attach the corner connectors to the posts
    2. 5Build the lower frame
    3. 6Complete the upper frame
    4. 7Add the cabinet spacers
    5. 8Attach the shelf and the top
    6. 9Cover the cabinet frame
    7. 10Sand and finish the wood
  5. C. Fit the doors and place the stand
    1. 11Drill the door cups and attach the hinges
    2. 12Hang and adjust the cabinet doors
    3. 13Fit the two knobs
    4. 14Level and anchor the empty stand
    5. 15Place the enclosure and make the final checks
  6. After the build
  7. Reference
  8. Sources

Choose the right use

Plan ahead

Measure the real enclosure

Check its required support surface, finished weight and ventilation clearance before buying wood.

Bring the right help

The cabinet and enclosure are heavy. Arrange helpers and a clear route before lifting.

Leave room for curing

Finish all exposed wood and allow the product label’s full cure before loading.

Before you start

Tools and protection

Cut and mark

  • Supported circular or track saw, straightedge and clamps
  • Jigsaw for shelf notches
  • Tape measure, square, level and pencil

Drill and assemble

  • Drill/driver and the connector screw bits
  • 35 mm hinge boring bit with a positive 13 mm depth stop
  • 3⁄32″, 7⁄64″, 9⁄64″, 11⁄64″ and 3⁄16″ drill bits; countersink and depth stops
  • Wood stud finder, hand screwdriver, backing scraps and 1⁄8″ spacers

Protection

  • Eye and hearing protection
  • Dust extraction and suitable respiratory protection while cutting and sanding
  • Gloves for handling sharp metal; remove them around rotating cutting tools

Shopping list

Some shopping links may earn us a commission. Purchase quantities are listed below; retailer carts do not preset them.

Wood

Frame connectors

Cabinet hardware

Panel screws

Restraints

Finish

Workshop supplies

  • Non-compressible shims, sanding supplies and synthetic bristle brush · As needed
    Use sound, broad shims beneath posts; choose a brush recommended by the finish label.

Fastener kit

ScrewHeadUsed forInstallBuyClearancePilotDepth
WBSK supplied #8 × 1 1⁄4″WaferRTC2Z corners96100 includedFactory holesPer kitPer kit
Simpson SD9112 #9 × 1 1⁄2″HexRTA2Z center support angles32100Factory holesPer SimpsonPer Simpson
#6 × 1″FlatSolid pine spacers321009⁄64″ in spacer3⁄32″7⁄8″ into frame
#8 × 2″FlatTop, shelf and covering6810011⁄64″ through panel/spacer7⁄64″1 3⁄8″ into frame
Blum 606N #6 × 5⁄8″FlatHinge cups and plates16100Factory holes3⁄32″9⁄16″ into wood
#8 × 2″ steelPanStand-side restraint brackets4611⁄64″ through panel/spacer7⁄64″1 3⁄8″ into rail

Cut list

2 × 4 frame

Board rows give the cut length; sheet rows give the two face dimensions. Stock thickness is in the group heading.

PartQtySize (in)mmUse
P1, P2, P3, P4430″762 mmContinuous corner post 1; Continuous corner post 2; Continuous corner post 3; Continuous corner post 4
LF, LB, UF, UB445″1143 mmLower front rail; Lower back rail; Upper front rail; Upper back rail
LL, LR, UL, UR417″432 mmLower left end rail; Lower right end rail; Upper left end rail; Upper right end rail
LC, UC221″533 mmLower center support; Upper center support

23⁄32-inch CAT plywood

Board rows give the cut length; sheet rows give the two face dimensions. Stock thickness is in the group heading.

PartQtySize (in)mmUse
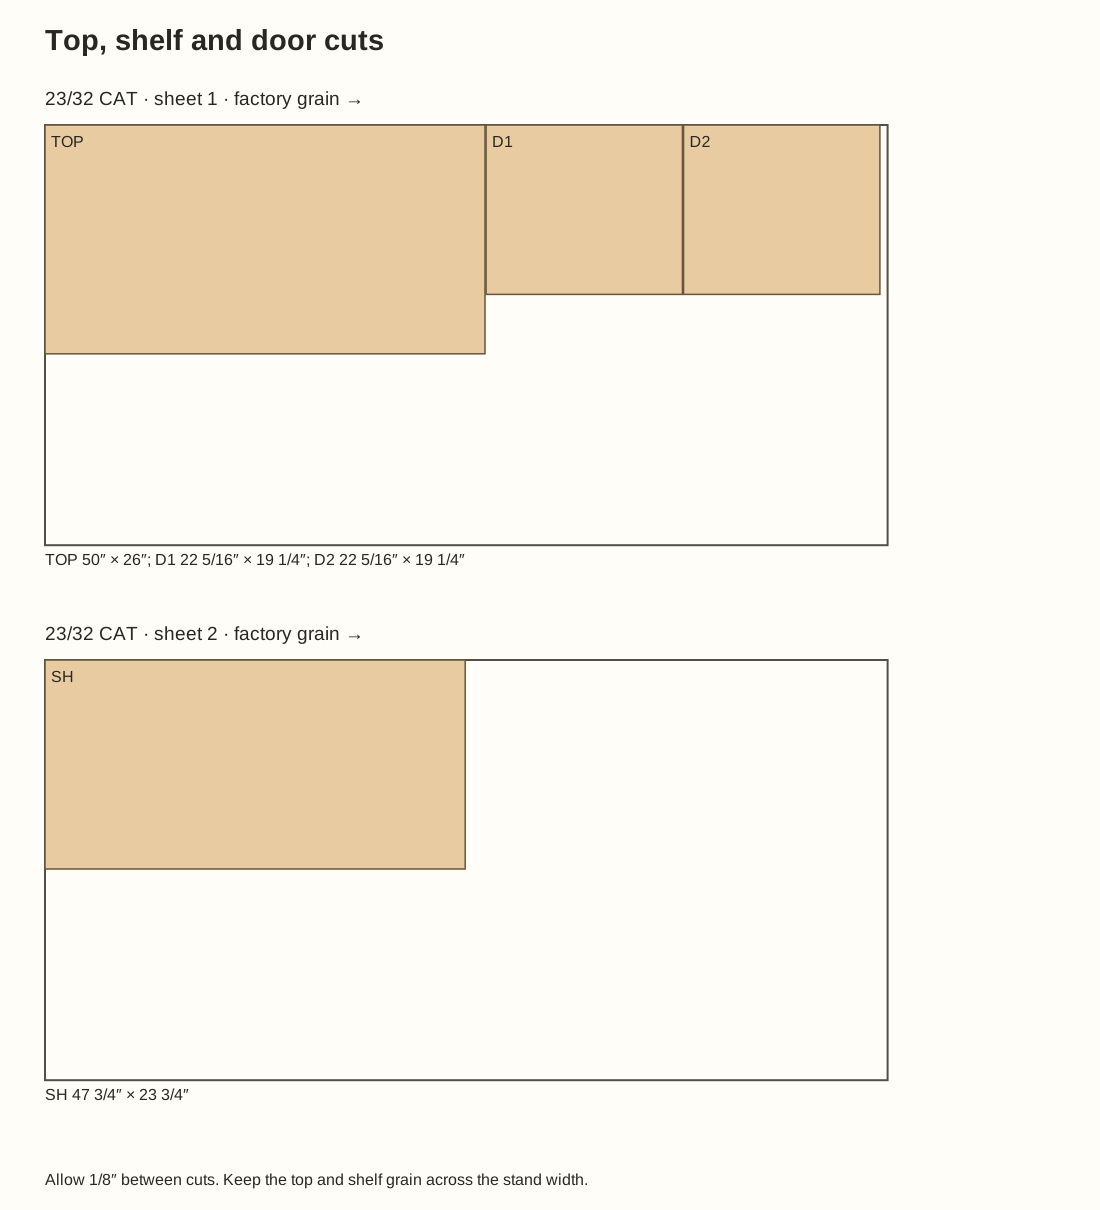
TOP150″ × 26″1270 × 660 mmFull support top
SH147 3⁄4″ × 23 3⁄4″1213 × 603 mmCabinet shelf
D1, D2222 5⁄16″ × 19 1⁄4″567 × 489 mmCabinet door 1; Cabinet door 2

15⁄32-inch CAT plywood

Board rows give the cut length; sheet rows give the two face dimensions. Stock thickness is in the group heading.

PartQtySize (in)mmUse
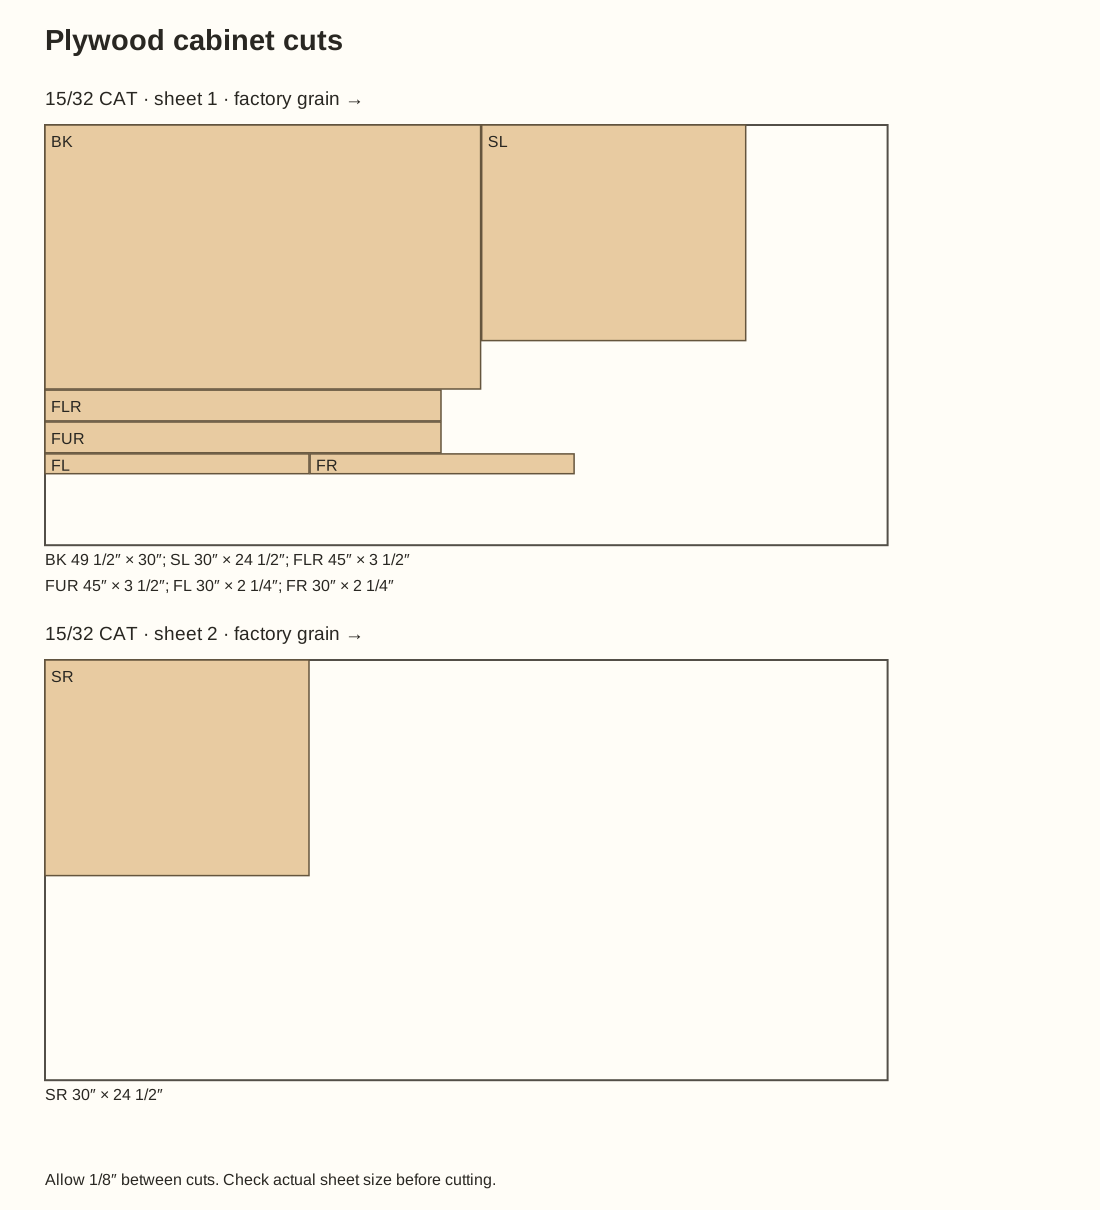
SL, SR230″ × 24 1⁄2″762 × 622 mmLeft cabinet side; Right cabinet side
BK149 1⁄2″ × 30″1257 × 762 mmCabinet back
FL, FR230″ × 2 1⁄4″762 × 57 mmLeft front trim; Right front trim
FLR, FUR245″ × 3 1⁄2″1143 × 89 mmLower front rail cover; Upper front rail cover

1⁄4 × 1 1⁄2-inch solid pine spacers

Board rows give the cut length; sheet rows give the two face dimensions. Stock thickness is in the group heading.

PartQtySize (in)mmUse
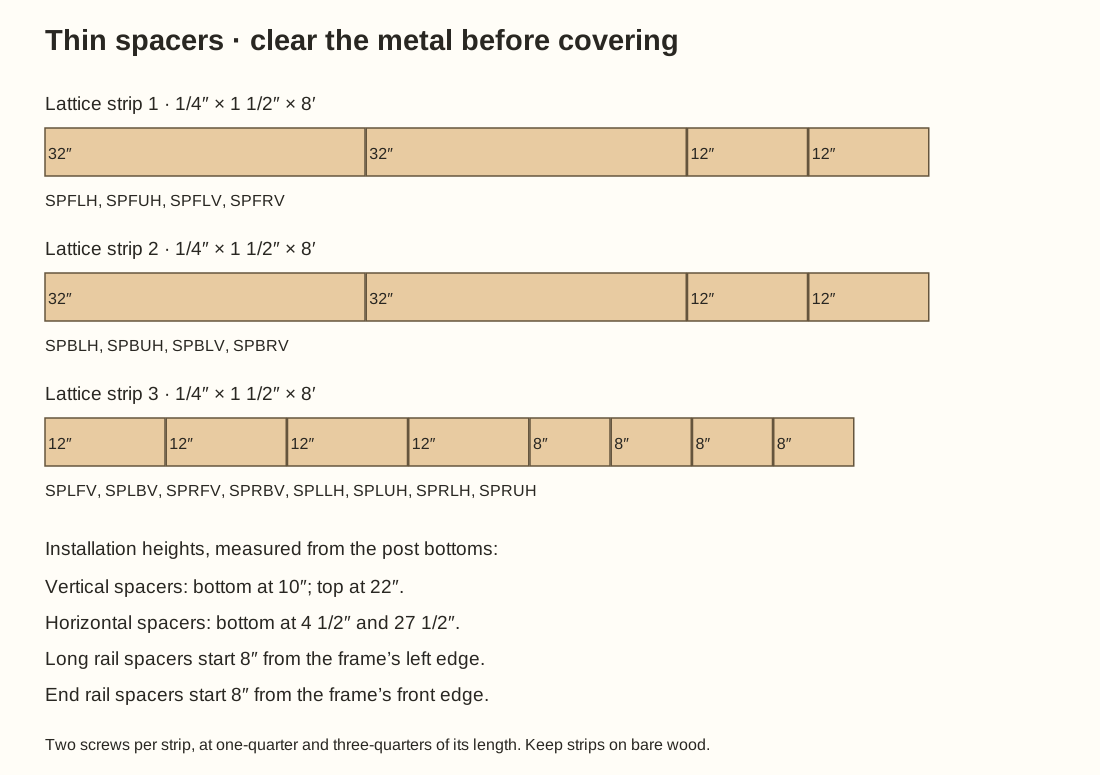
SPFLV, SPFRV, SPBLV, SPBRV, SPLFV, SPLBV, SPRFV, SPRBV812″305 mmFront left vertical spacer; Front right vertical spacer; Back left vertical spacer; Back right vertical spacer; Left side front vertical spacer; Left side back vertical spacer; Right side front vertical spacer; Right side back vertical spacer
SPFLH, SPFUH, SPBLH, SPBUH432″813 mmFront lower rail spacer; Front upper rail spacer; Back lower rail spacer; Back upper rail spacer
SPLLH, SPLUH, SPRLH, SPRUH48″203 mmLeft lower end-rail spacer; Left upper end-rail spacer; Right lower end-rail spacer; Right upper end-rail spacer

Cutting diagrams

Top, shelf and door cuts
Allow 1⁄8″ between cuts. Keep the top and shelf grain across the stand width.
Plywood cabinet cuts
Allow 1⁄8″ between cuts. Check actual sheet size before cutting.
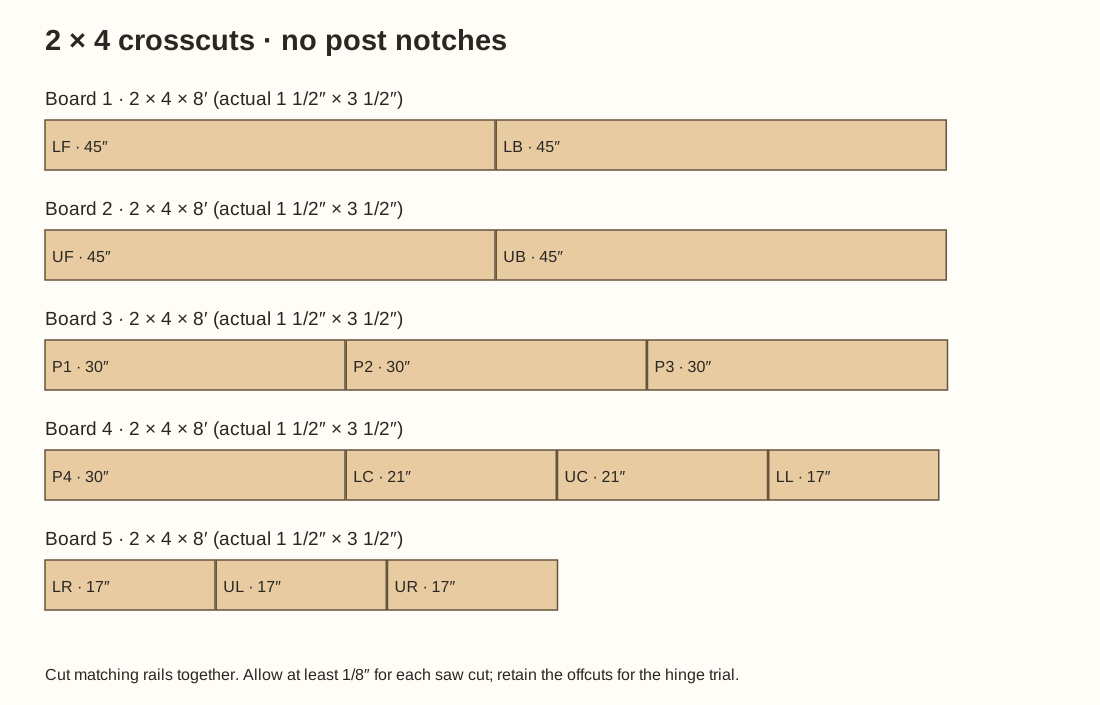
2 × 4 crosscuts · no post notches
Cut matching rails together. Allow at least 1⁄8″ for each saw cut; retain the offcuts for the hinge trial.
Thin spacers · clear the metal before covering
Two screws per strip, at one-quarter and three-quarters of its length. Keep strips on bare wood.
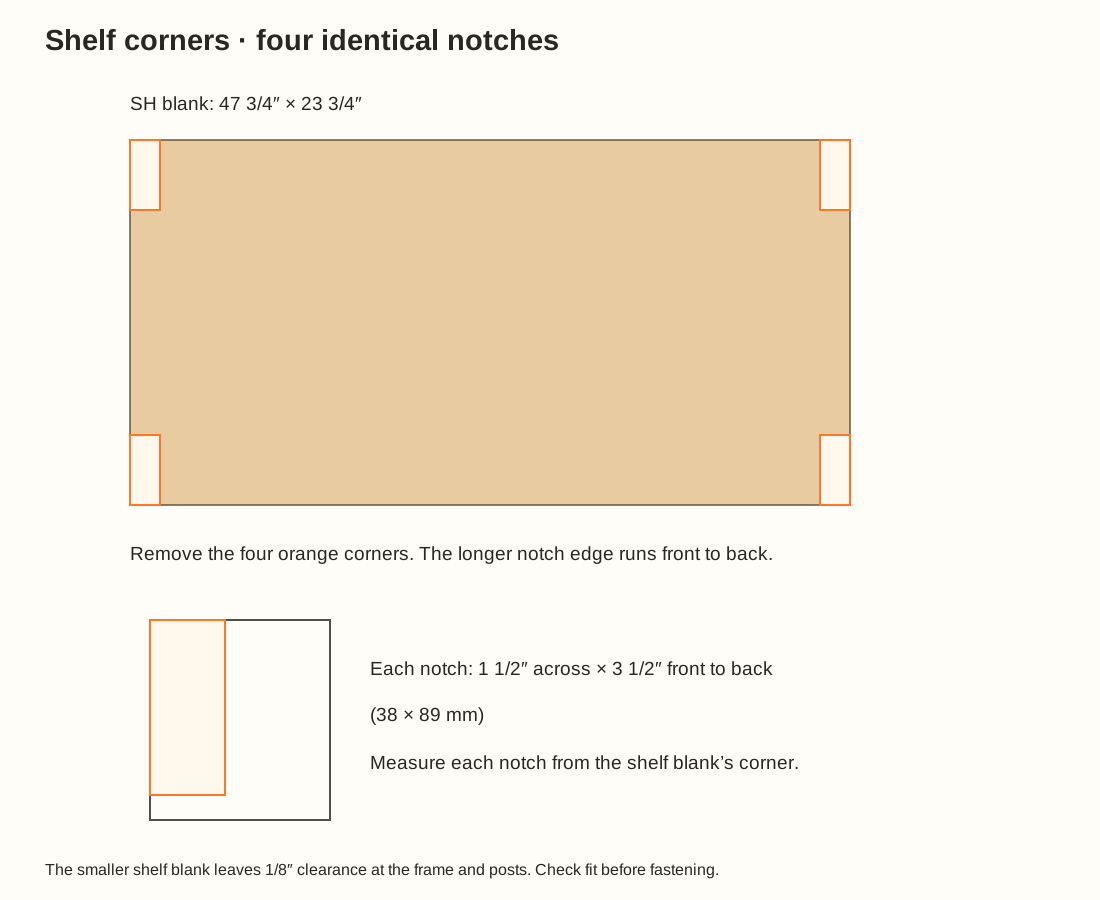
Shelf corners · four identical notches
The smaller shelf blank leaves 1⁄8″ clearance at the frame and posts. Check fit before fastening.

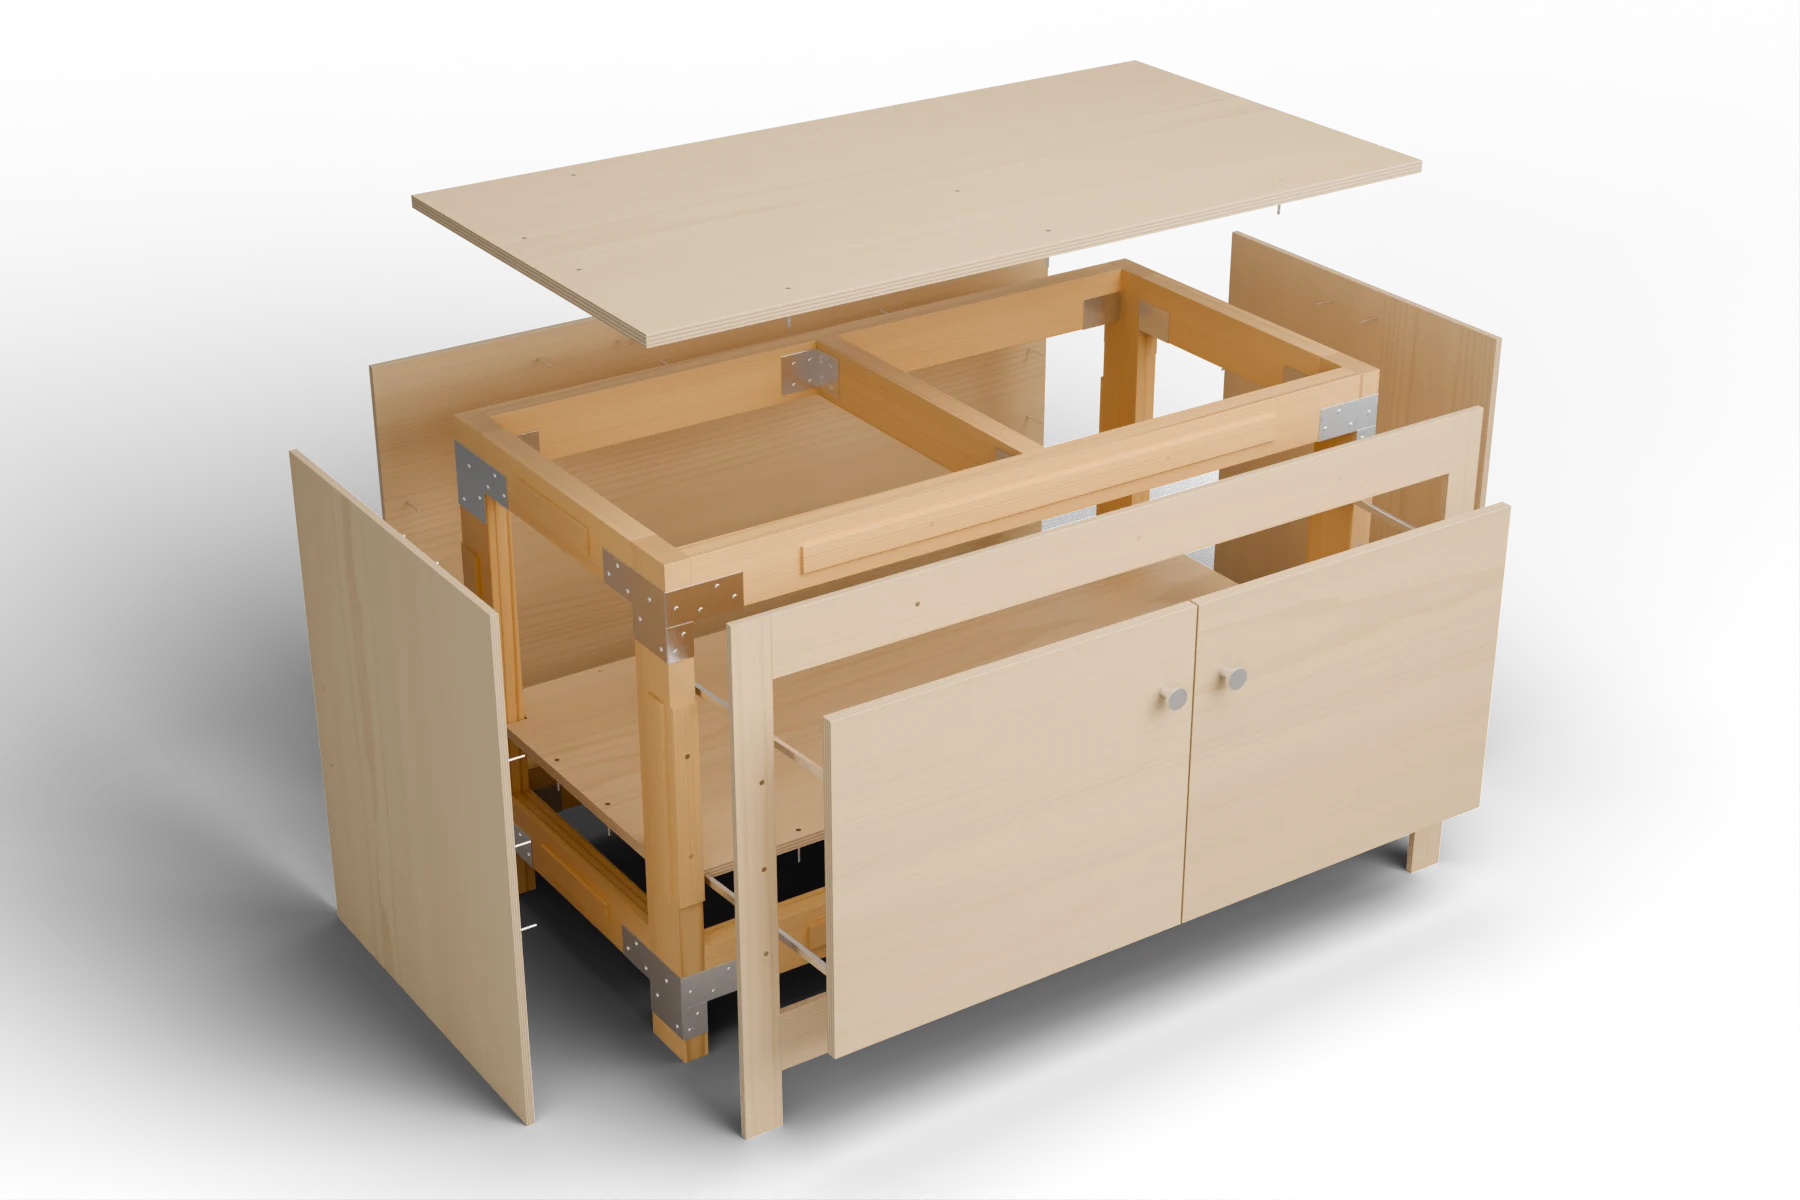
Every part, pulled apart

exploded view of the cabinet stand
  1. Continuous posts and two rail levels
  2. Full top and notched shelf
  3. Sides, back and front trim
  4. Two inset cabinet doors
  5. Spacers and hardware
Phase A

Plan and cut

1

Step 1 of 15 · Phase A

Choose the location and check the enclosure

Allow room for both doors to swing open.

Choose the location and check the enclosure
Allow room for both doors to swing open.
Caution Do not use this plan for an aquarium, a water-filled basin, stacked enclosures, concentrated loads on feet, or as a seat or climbing step.
  1. This stand is for one flat-bottomed 48″ × 24″ (1219 × 610 mm) enclosure. The top is 50″ × 26″ (1270 × 660 mm). Keep the enclosure centered: its outer edges sit 1″ (25 mm) in from the tabletop edges.
  2. Add the empty enclosure, substrate, furnishings and equipment weights before buying materials. The planning ceiling is 300 lb (136 kg) on top and 50 lb (23 kg) on the lower shelf, spread evenly. These are calculated limits for the stated materials and layout, not a physically tested load rating.
  3. Choose a dry indoor location with a solid, level floor and accessible wood wall studs. Leave the enclosure’s own ventilation and cable clearances. Keep at least 30″ (762 mm) clear in front for access.
  4. Use a helper when handling the stand or enclosure. Assemble and anchor the empty stand before placing the enclosure. Secure the enclosure separately as its own guide requires.
Check before you move on The enclosure has a continuous flat base, the total planned weight fits the scope, and the wall location accepts both restraints.
2

Step 2 of 15 · Phase A

Check the boards and try one hinge

A small offcut test prevents expensive door mistakes.

Check the boards and try one hinge
A small offcut test prevents expensive door mistakes.
  1. Use straight, dry, untreated No. 2 or better Southern Pine 2 × 4s. Their finished cross-section must be 1 1⁄2″ × 3 1⁄2″ (38 × 89 mm). Reject split, twisted or damaged pieces at the joints.
  2. Check the APA Group 1 grade stamp on the sanded Southern Pine plywood. Buy 23⁄32-inch thickness category (CAT) for the top, shelf and doors, and 15⁄32-inch CAT for the cabinet covering. The actual sheets are slightly thinner than those labels; measure the sheets you receive.
  3. Make a small practice corner: stand a 2 × 4 offcut upright, then clamp a 1⁄4″ spacer and cabinet-covering offcut onto its 1 1⁄2″-wide front face. Hold a door offcut beside the post with its front flush with the covering. The hinge plate goes on the post’s inside face; the cup goes in the back of the door. Fit one Blum 71B3750 hinge with a 173L6100 plate, using the drilling sizes in steps 11 and 12.
  4. Set a 1⁄8″ (3 mm) gap around the trial door. Open it fully, check that its edge clears the trim, and confirm that the screw tips stay inside the wood. Record the successful jig settings.
Check before you move on The trial hinge closes flush, opens freely and has no exposed screw points.
3

Step 3 of 15 · Phase A

Cut and label every wooden part

The cutting diagrams give a length for every board.

  1. Support sheets across their full area. Use a straight guide, eye and hearing protection, and suitable dust extraction. Keep hands away from the cut and support the offcut so it cannot pinch the blade.
  2. Cut four posts at 30″ (762 mm), four long rails at 45″ (1143 mm), four end rails at 17″ (432 mm), and two center supports at 21″ (533 mm). Do not notch or splice the posts.
  3. Follow the sheet diagrams for the top, shelf, sides, back, trim and two doors. Keep the top and shelf’s face grain running across the stand’s width. Leave at least 1⁄8″ (3 mm) between adjacent cuts for the saw blade; adjust for your blade if wider.
  4. Cut the shelf’s four corner notches to 1 1⁄2″ × 3 1⁄2″ (38 × 89 mm). The shelf blank already includes 1⁄8″ perimeter clearance. Label every part with its ID on masking tape. Smooth the edges without rounding the hinge reference edges.
Check before you move on Matching rails and doors are identical. Every part is labeled and the top and shelf grain directions match the drawing.
Tip Use the full-size cutting diagrams in the preparation section immediately before the assembly steps. They include every board, plywood sheet and shelf notch.
Phase B

Build the cabinet

4

Step 4 of 15 · Phase B

Attach the corner connectors to the posts

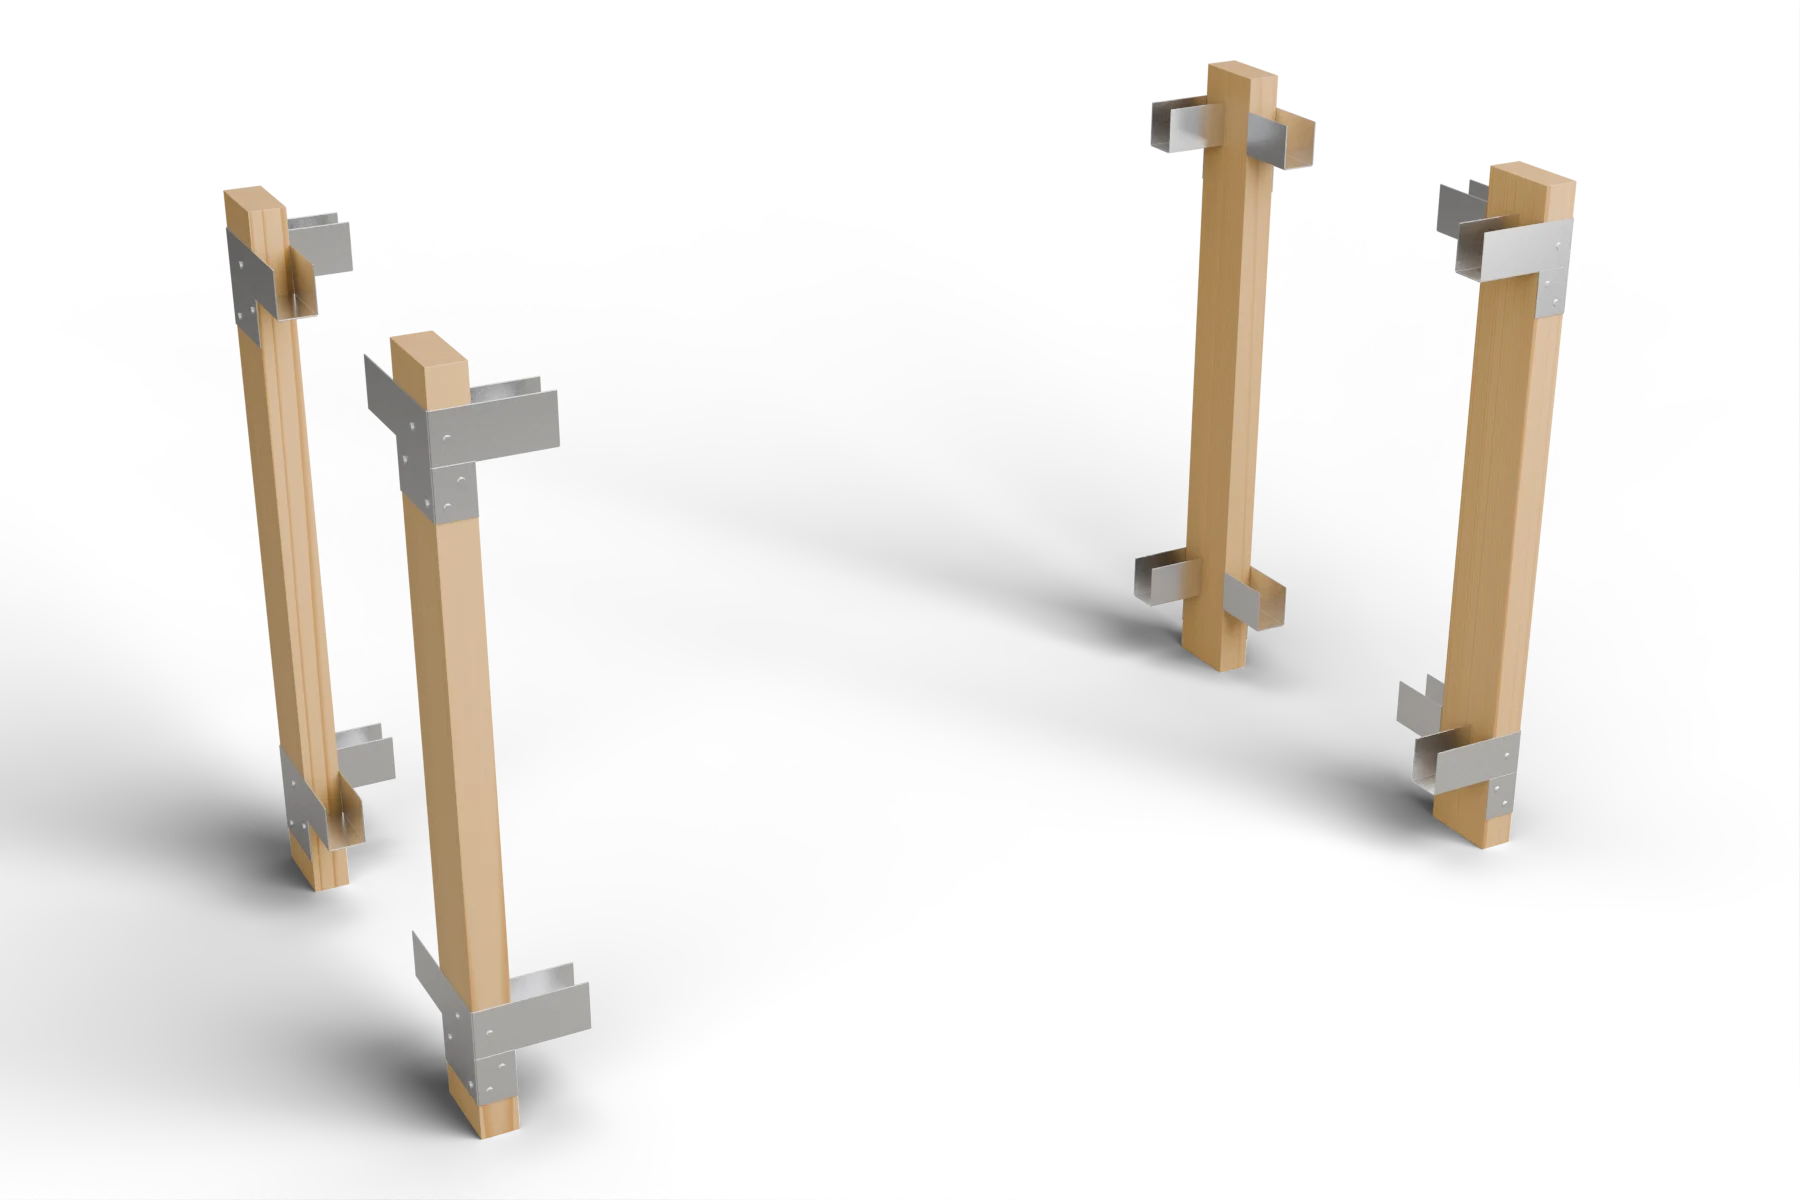
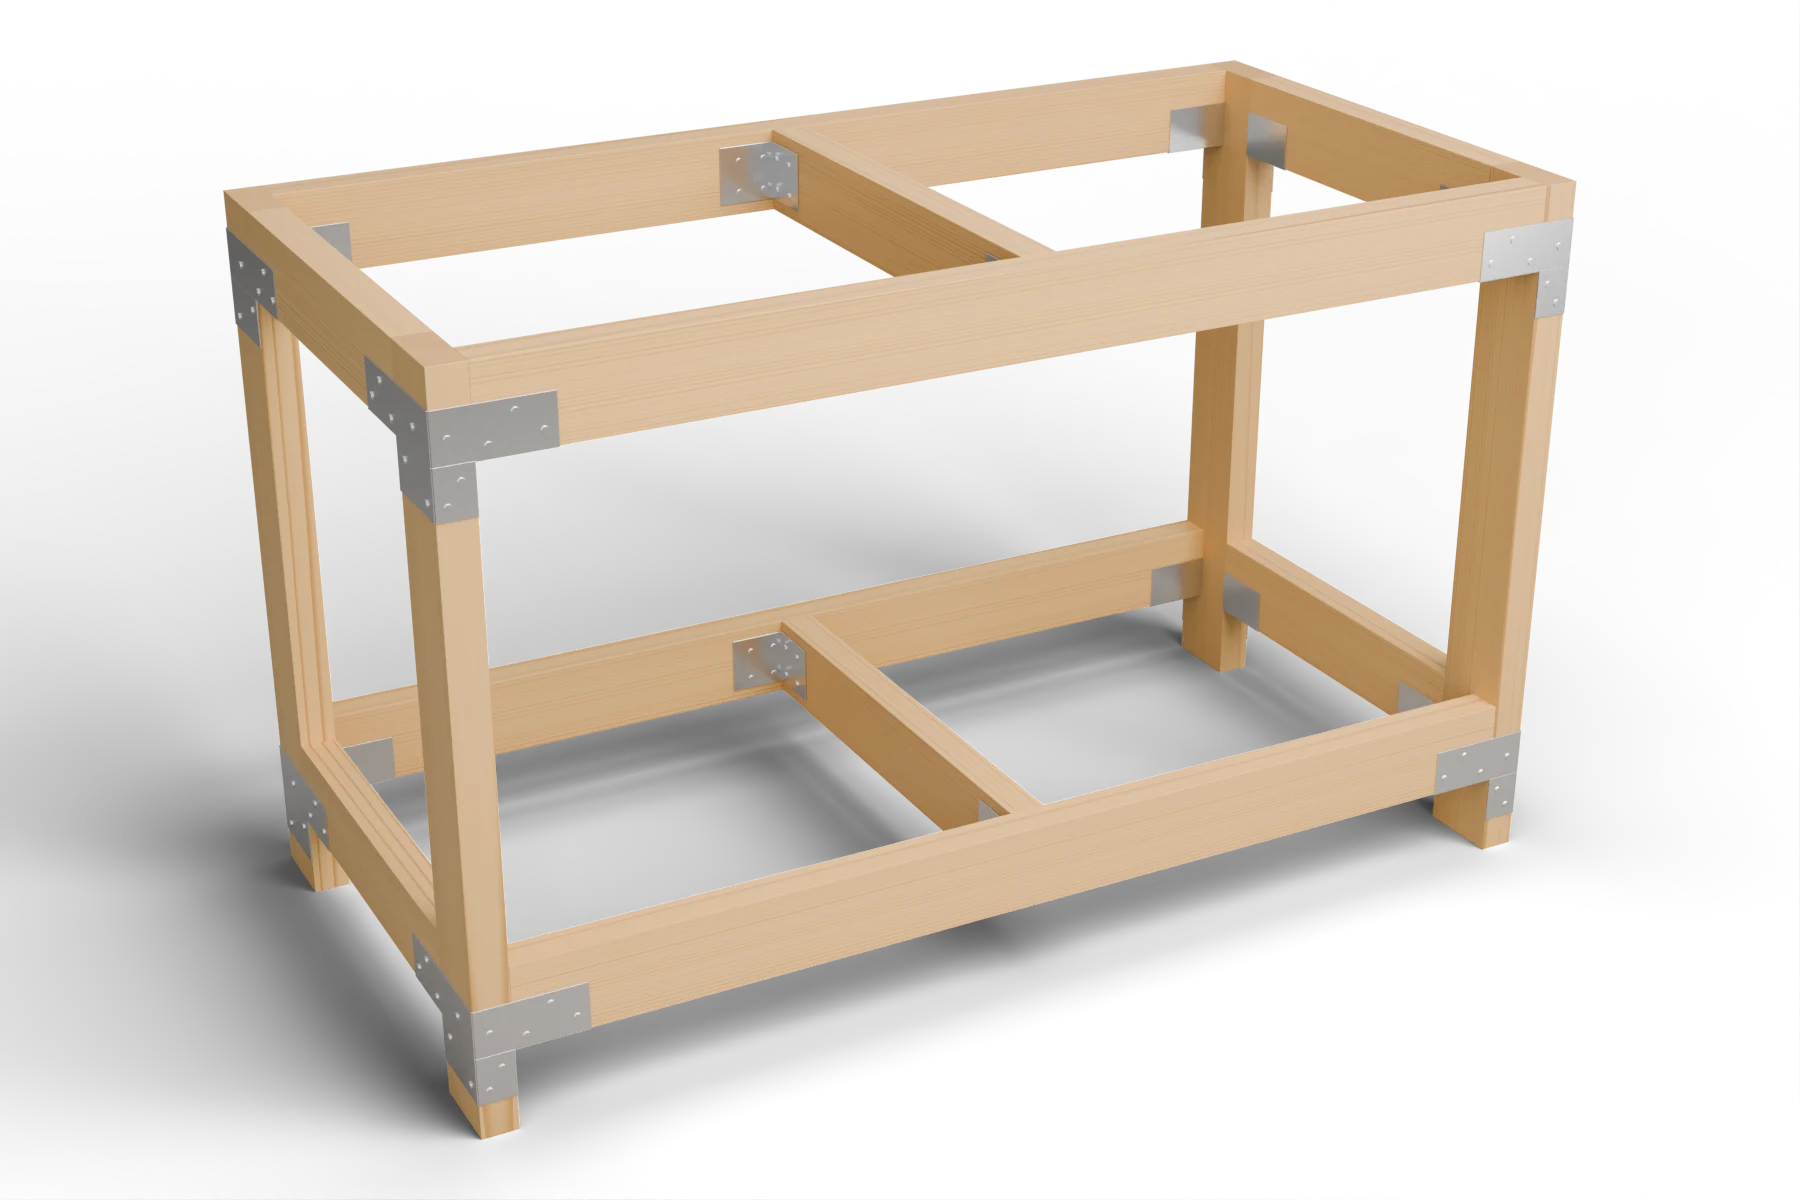
The four posts remain one piece from top to floor.

Attach the corner connectors to the posts
The four posts remain one piece from top to floor.
Parts P1, P2, P3, P4
  1. Lay the posts side by side and mark from the bottom ends. The lower rail undersides sit 3 1⁄2″ (89 mm) above the floor; upper rail undersides sit 26 1⁄2″ (673 mm) above it.
  2. Use an actual rail offcut to position each RTC2Z connector: its seat supports the marked underside, and the upper rail’s top must finish flush with the post top. Mirror the connectors for the four corners as drawn.
  3. Attach two connectors to each post with the WBSK kit’s screws. Install all six post screws per connector, using the factory holes. Drive the heads snug against the metal without stripping the wood.
Check before you move on Eight connectors are fitted, with 48 kit screws in the posts. Upper rails will finish at the same height as all four post tops.
5

Step 5 of 15 · Phase B

Build the lower frame

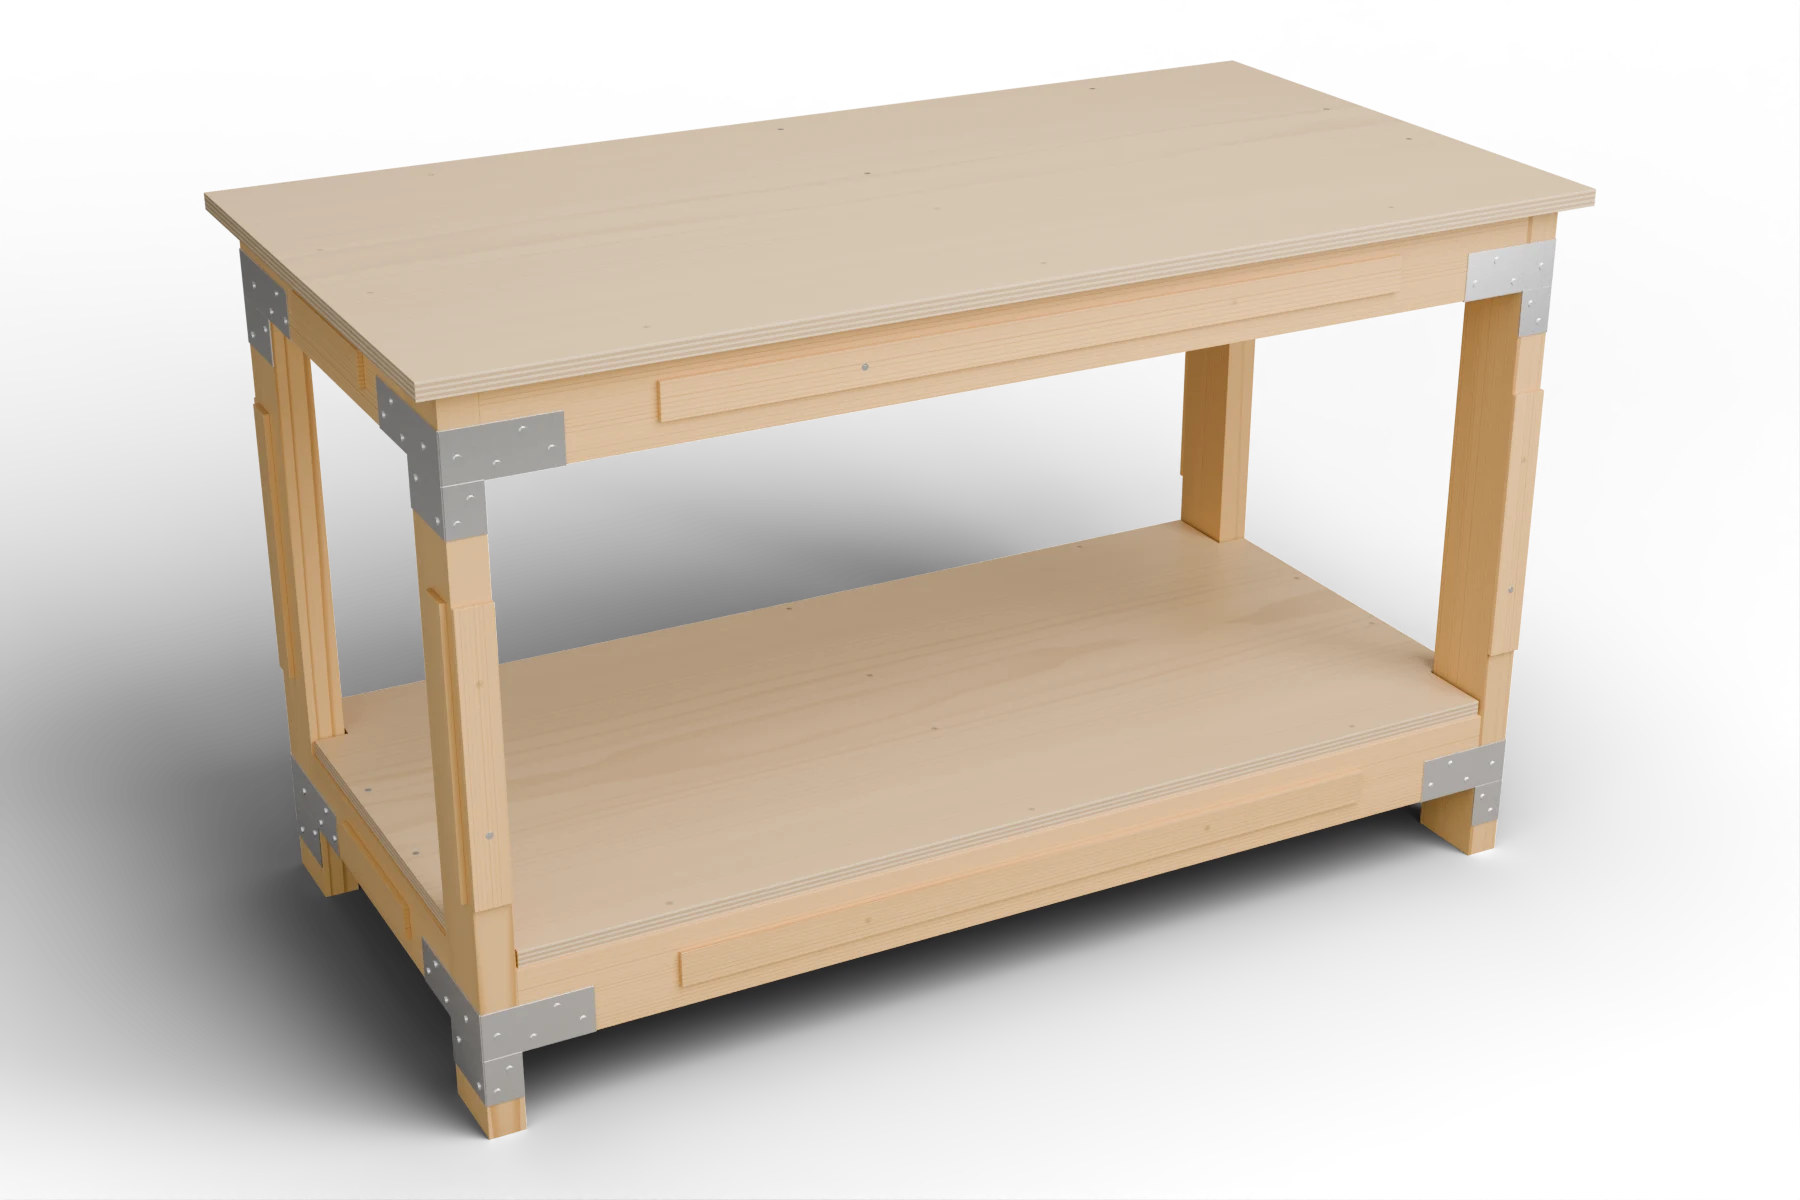
The lower shelf rests on the rails and center support.

Build the lower frame
The lower shelf rests on the rails and center support.
Parts LF, LB, LL, LR, LC
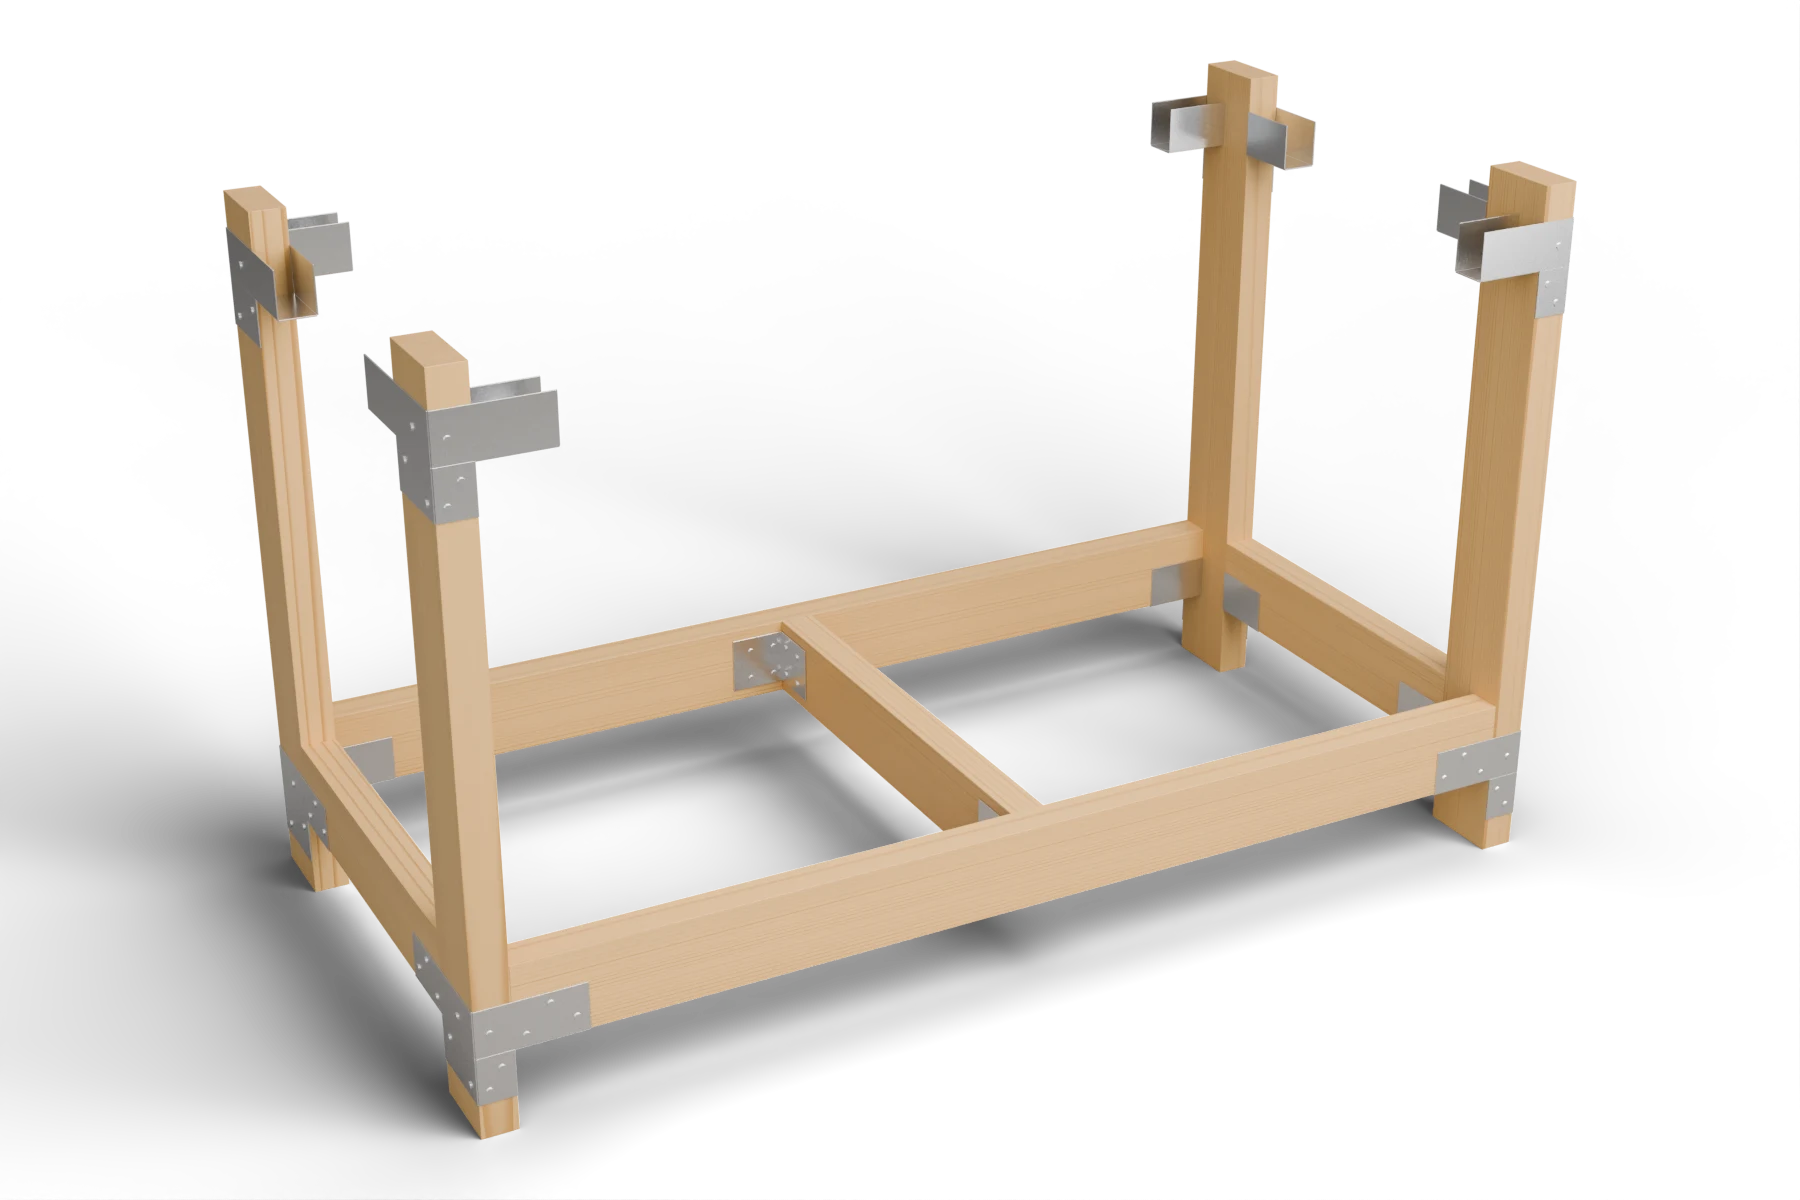
  1. Join the posts with the two 45″ long rails at front and back and the two 17″ end rails at the sides. Stand the rails on their narrow edges, 3 1⁄2″ (89 mm) tall.
  2. Seat each rail fully. Clamp the frame square and use all three screws in each rail end: six rail screws per corner connector, 24 total at this level.
  3. Center one 21″ support between the front and back rails. Its centerline is 24″ from either outer side of the frame. Keep its top level with the other lower rails.
  4. Fit one RTA2Z angle at each end of the center support, as illustrated. Use four SD9112 screws into the long rail and four into the center support at each angle. Use the connector’s punched holes and specified screws.
Check before you move on The lower frame measures 48″ × 24″ outside. Both diagonals match, all rails are seated, and the shelf support is level.
6

Step 6 of 15 · Phase B

Complete the upper frame

All upper surfaces must form one flat support plane.

Complete the upper frame
All upper surfaces must form one flat support plane.
Parts UF, UB, UL, UR, UC
  1. Install the remaining long and end rails in the upper connectors. Use all six rail screws per corner connector: 24 screws for this level.
  2. Add the second center support directly above the lower one. Attach it with the remaining two RTA2Z angles and 16 SD9112 screws.
  3. Check the outside dimensions, compare both top diagonals, and check each face for square. Lay a straightedge across the posts, rails and center support. Correct any proud or low member before covering the frame.
Check before you move on The frame does not rock, all upper bearing surfaces are flush, and no joint relies on an ordinary cabinet screw.
7

Step 7 of 15 · Phase B

Add the cabinet spacers

These thin strips keep the plywood clear of the metal connectors.

Add the cabinet spacers
These thin strips keep the plywood clear of the metal connectors.
  1. Use the labeled 1⁄4″ × 1 1⁄2″ (6 × 38 mm) solid pine strips. Position the vertical strips from 10″ to 22″ (254 to 559 mm) above the floor.
  2. Center the horizontal strips on the lower and upper rails, following the spacer drawing. Keep every strip on clear wood between connectors. Do not put a spacer over a metal plate or screw head.
  3. Fasten each strip with two #6 × 1″ flat-head wood screws. Drill 9⁄64″ clearance holes through the strip, then 3⁄32″ pilot holes 7⁄8″ deep into the frame. Countersink only enough to leave the heads flush.
  4. Hold a straightedge across the strips. Confirm that the plywood will clear all metal. Correct a proud screw or poorly seated connector before proceeding.
Check before you move on All 16 strips are secured with 32 screws. No covering panel will be pulled onto protruding metal.
8

Step 8 of 15 · Phase B

Attach the shelf and the top

Keep the top fully supported and free of raised screw heads.

Attach the shelf and the top
Keep the top fully supported and free of raised screw heads.
Parts SH, TOP
  1. Lower the notched shelf onto the lower rails. Check the 1⁄8″ (3 mm) gaps around the posts and outer frame. Do not force it into place.
  2. Center the tabletop with a 1″ (25 mm) overhang beyond the bare frame on all four sides. Clamp it securely.
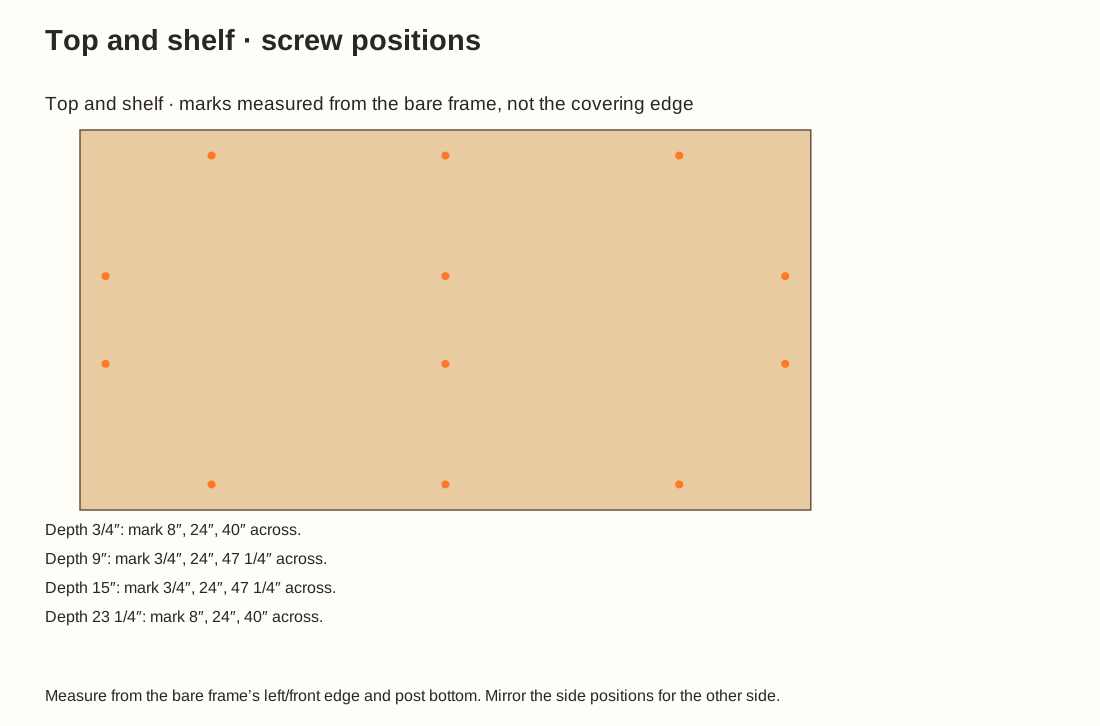
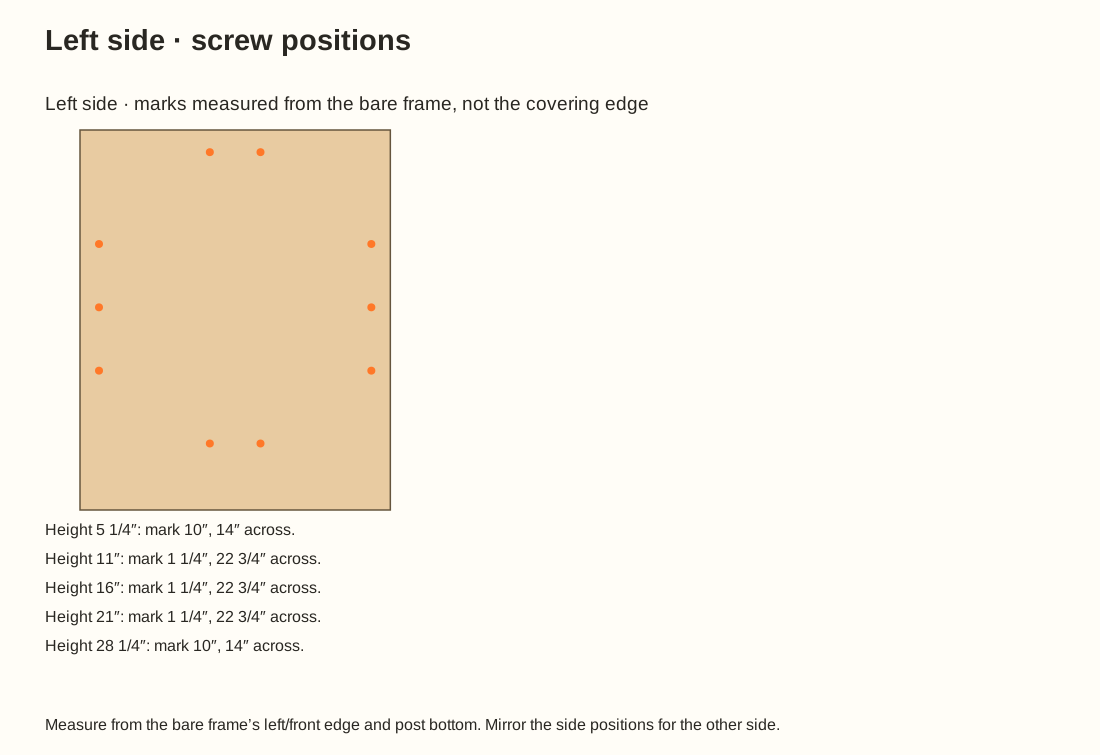
  3. Use the drawing’s 12 screw positions for each panel. Drill an 11⁄64″ clearance hole through the plywood, then a 7⁄64″ pilot hole 1 3⁄8″ into the rail. Fasten with #8 × 2″ flat-head screws and leave each head flush.
  4. Run a straightedge across the finished top. A proud head, rocking panel or open bearing gap must be corrected before an enclosure goes on it.
Check before you move on The shelf and top each have 12 screws, and the top bears evenly on the posts, rails and center support.
screws top
Use the marked positions and cut labels.
9

Step 9 of 15 · Phase B

Cover the cabinet frame

The back and side panels also keep the cabinet square.

Cover the cabinet frame
The back and side panels also keep the cabinet square.
Parts SL, SR, BK, FL, FR, FLR, FUR
  1. Keep the frame square while fitting both side panels and the full back. Place their lower edges level with the post bottoms. The back overlaps the ends of the side panels.
  2. Fit the two front upright strips and the front rail covers. Their inside edges follow the bare frame opening; trim a small outside overhang flush with the side panels if the received plywood thickness requires it.
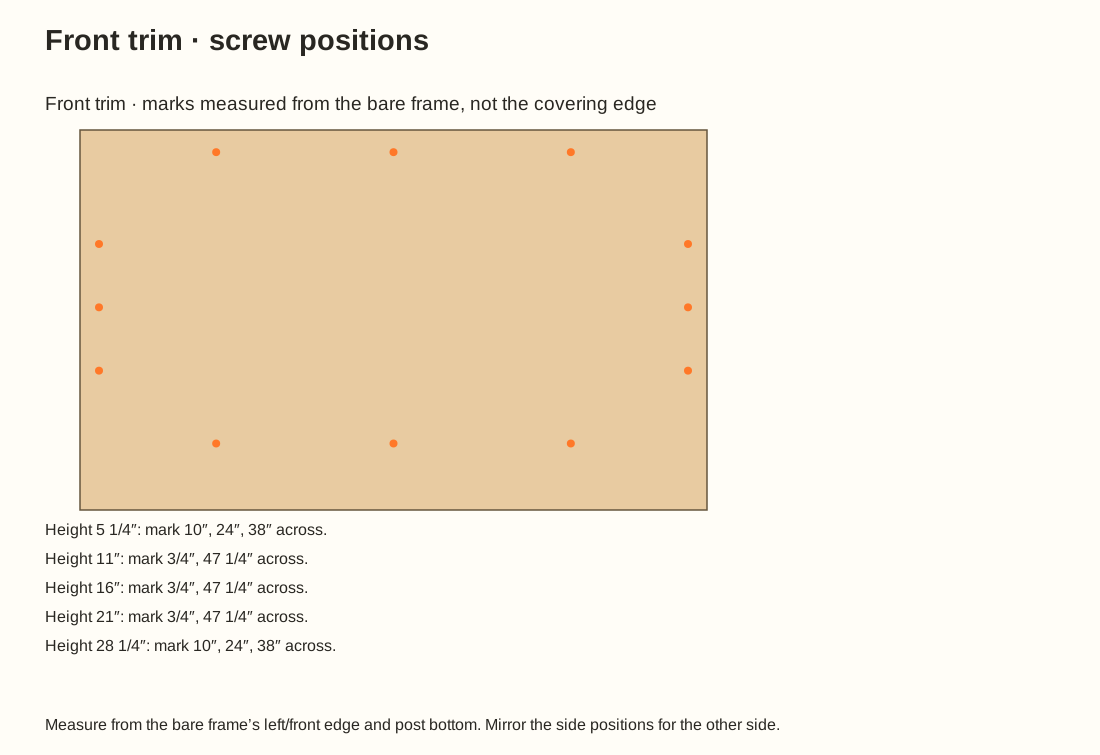
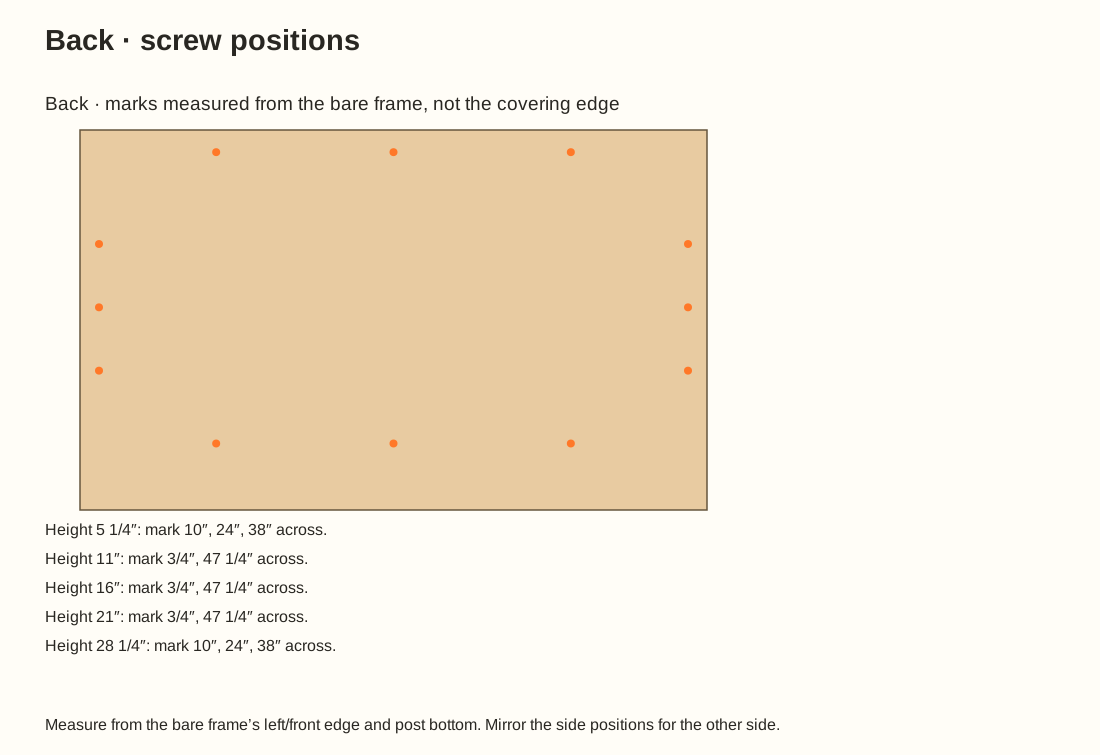
  3. Use the panel screw drawing to mark fasteners over solid spacers. Drill 11⁄64″ clearance through the covering and spacer, then 7⁄64″ pilots 1 3⁄8″ into the frame. Install #8 × 2″ flat-head screws with flush heads.
  4. Check the diagonals once more before tightening the last screws. Keep the full back and both sides in place; they are part of this design, not optional decoration.
Check before you move on The cabinet remains square and every panel screw reaches solid framing.
screws sl
Use the marked positions and cut labels.
screws front
Use the marked positions and cut labels.
screws bk
Use the marked positions and cut labels.
10

Step 10 of 15 · Phase B

Sand and finish the wood

Finish the loose doors on both faces before hanging them.

Wait: 7 days minimum full cure; longer outside label conditions

Sand and finish the wood
Finish the loose doors on both faces before hanging them.
  1. Remove dust and gently ease exposed edges. Keep the top flat. Sand the doors equally on both faces and support them flat while finishing.
  2. Apply Varathane Triple Thick satin with a synthetic brush, in one uniform coat along the grain. Follow the label’s preparation and application conditions; seal the exposed edges as well. Keep hinge cups and hardware seating surfaces clear of pooled finish.
  3. Allow at least 7 days for full cure at the label’s reference conditions of about 70°F (21°C) and 50% relative humidity; cooler or more humid conditions need longer. Do not load the top or shelf before full cure.
Check before you move on The finish is fully cured, the panels remain flat, and no hardware seating surface has pooled finish.
Phase C

Fit the doors and place the stand

11

Step 11 of 15 · Phase C

Drill the door cups and attach the hinges

Use the tested jig from step 2.

Drill the door cups and attach the hinges
Use the tested jig from step 2.
Parts D1, D2
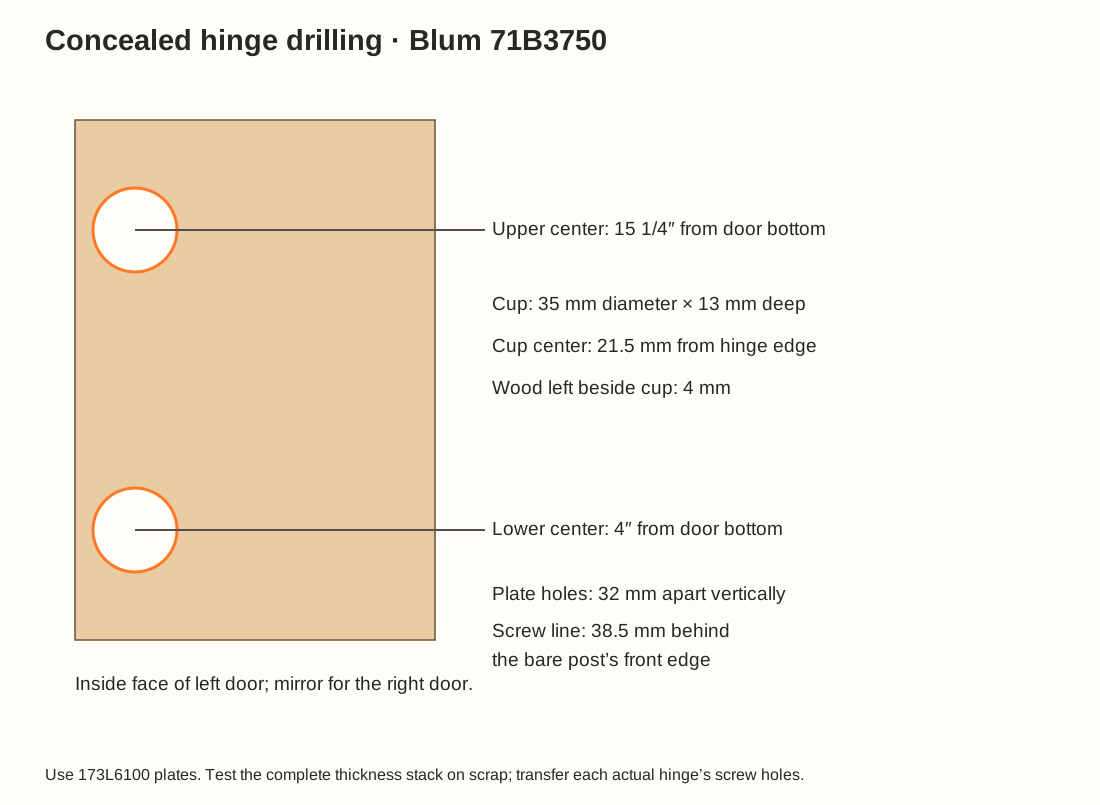
  1. Each door is 22 5⁄16″ × 19 1⁄4″ (567 × 489 mm). Mark its inside face and hinge edge before drilling. Measure the hinge centerlines 4″ and 15 1⁄4″ (102 and 387 mm) up from the bottom.
  2. At each centerline, drill a 35 mm cup with a depth stop set to 13 mm. Leave 4 mm of wood between the cup edge and the door edge; the cup center is 21.5 mm from the edge. These metric sizes match the hinge and the 35 mm bit.
  3. Clamp a backing board and keep the drill square. Practice the depth on scrap again before touching a finished door. Do not drill through the front face.
  4. Seat each hinge, transfer its two factory mounting holes, and drill 3⁄32″ pilots 9⁄16″ deep into the door. Use two Blum 606N #6 × 5⁄8″ flat-head deep-thread wood screws per cup. Seat them in the factory screw recesses; do not countersink the metal.
Check before you move on Both cups sit flat on each door, with no break-through, stripped holes or screw points.
12

Step 12 of 15 · Phase C

Hang and adjust the cabinet doors

Both hinges and mounting plates stay inside.

Hang and adjust the cabinet doors
Both hinges and mounting plates stay inside.
Parts D1, D2
  1. Use 1⁄8″ (3 mm) spacers below and beside the doors, including the gap between them. Have a helper support each door.
  2. Mount the 0 mm Blum 173L6100 plates on the inside faces of the front posts. Align their centers with the two door hinge centers. Use the settings from the trial fit; the plate screw holes are 32 mm apart vertically.
  3. For the reference stock in this guide, the screw-hole line is 38.5 mm behind the bare post’s front edge. If your covering, spacers or door thickness differ, transfer the working line from your scrap test instead of blindly using that reference.
  4. Drill 3⁄32″ pilots 9⁄16″ deep and use two Blum 606N #6 × 5⁄8″ flat-head deep-thread wood screws per plate. Clip each hinge onto its plate. Use the hinge adjustments to make the fronts flush and the gaps even.
  5. Slowly open both doors through their full travel. Check the edges, shelf, trim and knobs before using the soft-close action.
Check before you move on Both doors open freely, close evenly and remain clipped to all four plates.
13

Step 13 of 15 · Phase C

Fit the two knobs

A simple pull opens each door without a key.

Fit the two knobs
A simple pull opens each door without a key.
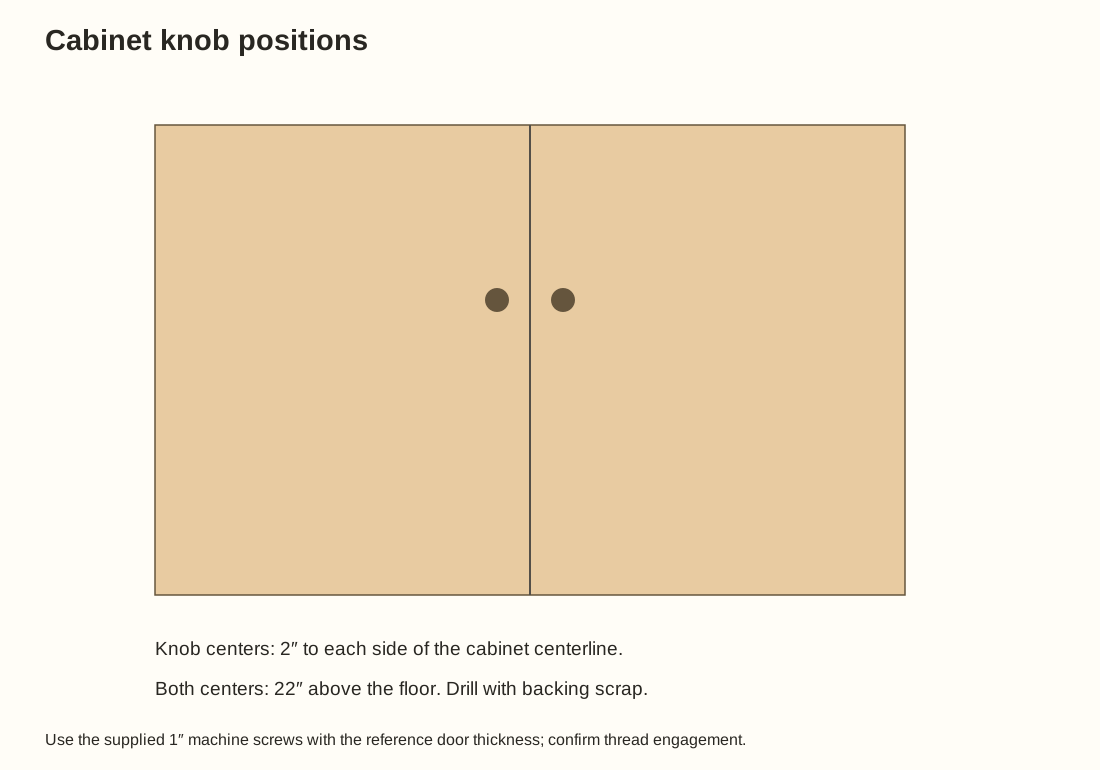
  1. Mark each knob 2″ (51 mm) from the cabinet centerline, at 22″ (559 mm) above the floor. Check the mirrored positions before drilling.
  2. Clamp a backing scrap to prevent splintering and drill a 3⁄16″ (5 mm) through-hole for the 8-32 machine screw. Fit the included 1″ screw from the inside and hand-tighten the knob.
  3. Check that the screw engages the knob without bottoming out. Use the manufacturer’s appropriate screw length if your actual door thickness requires a different length.
Check before you move on The knobs are secure and both doors operate without rubbing.
14

Step 14 of 15 · Phase C

Level and anchor the empty stand

Anchor it before loading or leaving the doors unattended.

Level and anchor the empty stand
Anchor it before loading or leaving the doors unattended.
Caution Do not attach the restraints only to drywall or only to the thin back panel.
  1. Place the empty stand in its final position. Use non-compressible shims under the full foot of a post if necessary; support all four posts and check for rocking. Do not support only the cabinet skins.
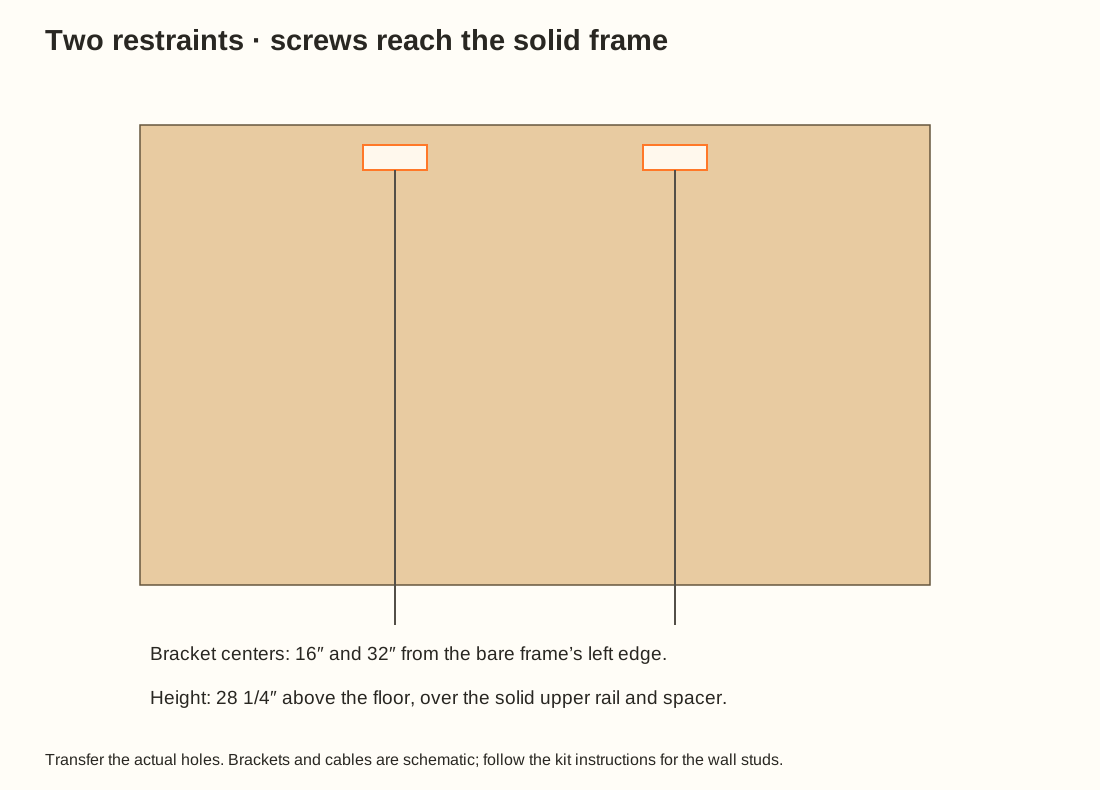
  2. Fit two furniture-restraint brackets on the back, over the upper rail and its solid spacer. The drawing marks the bracket centers. Transfer the actual bracket holes within the marked solid backing area.
  3. Use two #8 × 2″ pan-head screws per cabinet bracket. Drill clearance through the plywood and spacer, and 7⁄64″ pilots 1 3⁄8″ into the solid upper rail. Both screws must enter the rail, not just the plywood.
  4. Locate sound wood wall studs and follow the restraint kit’s wall-bracket and pilot-hole instructions. This installation assumes up to 1⁄2″ drywall over wood studs. Connect and secure both cables, with little slack but without lifting the stand off the floor.
  5. Check both locking pins and both wall connections by hand. Leave enough space behind the stand that the cables do not bend sharply over the tabletop edge.
Check before you move on All four feet bear on the floor, both restraints are connected to studs, and the empty stand stays stable with either door open.
15

Step 15 of 15 · Phase C

Place the enclosure and make the final checks

Load gradually and keep the weight spread across the flat base.

Place the enclosure and make the final checks
Load gradually and keep the weight spread across the flat base.
  1. Recheck the enclosure-and-contents weight against the planning scope before lifting. With enough helpers for the actual weight, place the empty enclosure centrally on the stand.
  2. Confirm that its entire required base is supported, the tabletop remains flat and all four feet still bear firmly. Add furnishings and substrate gradually, spread across the floor.
  3. Open and close the cabinet doors after loading. Stop and unload if the top sags, joints move, doors begin rubbing, a post lifts, or the stand rocks. Do not fix movement by merely tightening a door adjustment.
  4. Check screws, connections, surface condition and restraints regularly and after moving the setup. Remove the enclosure before moving the stand.
Check before you move on The loaded stand is stable, the doors work normally, and the enclosure’s own support, restraint and equipment checks are complete.

After the build

Taking a door off and putting it back

Support the door before releasing either hinge.

  1. Open the door and have a helper hold its weight.
  2. Release the clip at the rear of each hinge arm, following Blum’s drawing. Keep fingers clear of the hinge mechanism.
  3. To reinstall, seat the front of each hinge on its plate and press the rear until it clicks. Pull gently to confirm both clips have latched.

Final checks and regular inspection

Cleaning and care

Reference

Stock and fit

The plywood reference thicknesses are 0.703″ and 0.453″, from Georgia-Pacific. They are material specifications, not extra saw-cut instructions. Measure the received sheets and repeat the hinge trial if the stack differs.

Use the original hardware’s factory holes. Connector and hinge shapes in the model explain assembly; they are not drilling templates or manufacturer CAD.

What the load review covers

The planning ceiling assumes a centered, flat enclosure base with evenly distributed weight, dry No. 2 Southern Pine, Group 1 plywood, every specified connector screw, full cabinet sides/back and installed wall restraints.

The review checks the upper rails, plywood and connector reactions. It does not certify the finished stand, workmanship, floor or wall attachment. No aquarium or stacking approval is implied.

Product and design sources

  1. S1 Simpson WBSK assembly instructions
    https://pdf.lowes.com/productdocuments/7de4de82-425e-47a2-bdba-5ff2ba3dbf6c/44031053.pdf
  2. S2 Simpson 2026 connector catalog, page 337
    https://ssttoolbox.widen.net/content/orplhjaqw1/original/C-C-2026.pdf?download=true
  3. S3 Blum concealed hinges: inset 71B3750, plates and screws
    https://d2.blum.com/services/BEC003/concealedhinges_ep_dok_bus_%24sen-us_%24aof_%24v18.pdf
  4. S4 Georgia-Pacific sanded plywood sizes and grade
    https://pdf.lowes.com/productdocuments/3b9cb5c2-b472-4758-ac83-43e721d27340/04777514.pdf
  5. S5 APA Q225F panel load tables, tables 3–5
    https://files.engineering.com/files/53faf256-c597-4ff7-9c93-ec5a0eb04861/Q225_plywood_span_tables.pdf
  6. S6 Southern Pine design values
    https://www.southernpine.com/wp-content/uploads/2023/09/D_Design-Value-Comparisons-by-Species_0601131.pdf
  7. S7 Varathane Triple Thick application, coverage and cure
    https://www.rustoleum.com/-/media/DigitalEncyclopedia/Documents/RustoleumUSA/TDS/English/CBG/Varathane/VAR-35_Varathane_Triple_Thick_Polyurethane_TDS.ashx
  8. S8 Amerock Edona knob dimensions and included screws
    https://www.amerock.com/edona-cabinet-knob-bp53005g10
  9. S9 Furniture restraint kit and installation scope
    https://www.picturehangsolutions.com/products/furniture-anti-tip-kit